These easy plans for building a wood greenhouse will enable you to build a decorative and functional outbuilding that will not only allow you to grow food and flowers in the off-season, but will also add value to your property.
A DIY wood greenhouse can be built as a permanent structure, temporary structure, or something in-between to meet your gardening needs.
Check out our round up of these 12 wood greenhouse plans that you can build easily to find the DIY structure that is right for your gardening needs.
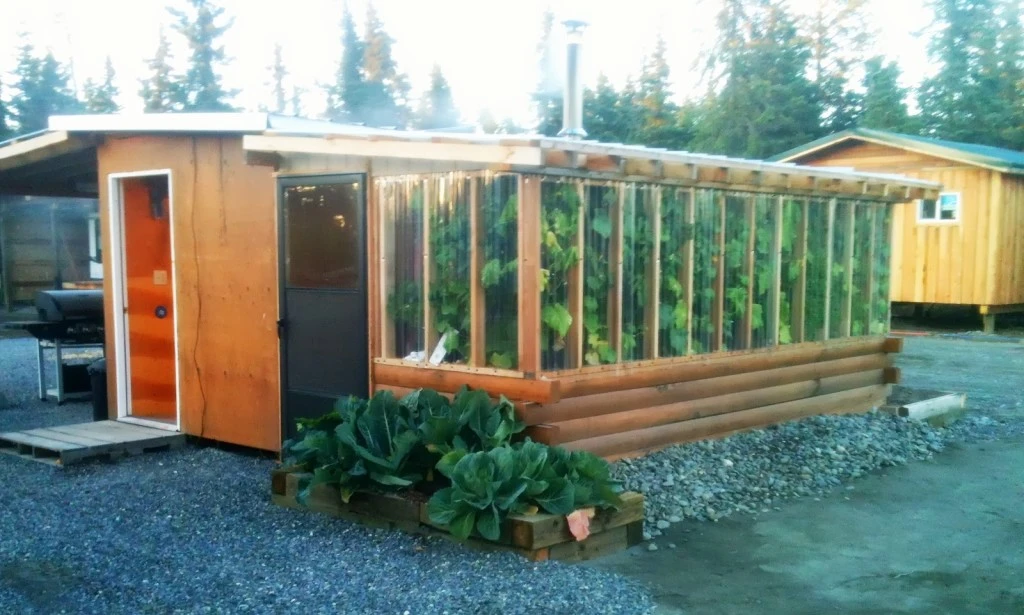
Here we have a DIY structure by blackanddecker that can be created in any size needed and can be semi-permanent or permanent. The plastic sheeting that covers the wood frame will last 3-5 years and can easily be replaced or the structure taken apart, depending on your future needs.
Wood Frame Greenhouse Plan, we love this design as its simple and costs a little, Image via: blackanddecker
3- Extend Growing Season
Use these step by step plans to build a large wood frame greenhouse by theelliotthomestead that will enable you to extend your food growing season. Harvest fresh greenhouse vegetables almost year around when using a large greenhouse like these plans will enable you to build. Get crops started earlier in the spring with the growing space this homemade greenhouse will provide.
This size is perfect for most home gardeners and will enable you to have fresh produce and/or flowers almost 12 months out of each year without taking up the entire backyard.
* Select a location that is in full sun.
* Decide on size and buy lumber, door and polyethylene foil (according to detailed list included with free plans)
* Create this functional and decorative greenhouse with top vents.
This DIY greenhouse by uk-gardening is for the serious gardener who depends upon their homegrown vegetables as part of a sustainable lifestyle or for income production. Great for growing plants on shelves and in grow boxes. You may also like to see hoop house plans.
* Pick a sunny, level location and install 6 wooden support posts.
* Lay insulation board on the ground and cover with at least 18 inches of soil (this will be the raised bed).
* Build and install the top frame for roof.
* Cover structure with plastic to hold heat inside. Remove plastic in spring.
Get the instructions for this raised bed greenhouse
Raised Bed Wood Greenhouse Plans, Image via: wayneofthewoods
7- Cheap Greenhouse
Small wood greenhouse by runnerduck that can be built against another outbuilding. The small size and use of exterior wall space from another structure make this an inexpensive DIY build. Great for seed starting in spring so you can get a head start on the garden growing season.
This easy to build greenhouse by ideadonnafarm has a plywood floor and plywood half-walls, topped with a wood frame covered with plastic. This simple and functional design will last for years and can easily be transformed into a different type of outdoor structure (work shop, playhouse, tool shed, etc.) if the time comes when it’s no longer needed for a greenhouse. You may also like to see pvc greenhouse plans.
Classic style that is easy to build and efficient to use. Simple wood frame with one door and three air vents, all covered with plastic provides plenty of space for seed starting and plant growing. Get the detail for this wood frame greenhouse by construct101.
Conclusion
Greenhouses help you to extend the growing season and get vegetables year round. Now you have ample resources from the list we have shared with you to decide to make one for yourself that suits your style and budget. Hope our article has helped you!
Utilizing your DIY skills alongside these greenhouse plans can significantly boost your ability to cultivate fresh produce throughout the year. When I first explored the idea of building a greenhouse, I was motivated by the prospect of extending the growing season and maximizing my yield. It seemed like a practical solution to ensure a steady supply of homegrown fruits, vegetables, and herbs.
A greenhouse offers the advantage of starting plant seeds earlier and prolonging the production of crops well into the fall season. This capability intrigued me, as it meant I could enjoy a wider variety of fresh produce for a longer period. Additionally, the prospect of having a space to overwinter potted plants appealed to me, as it would allow me to nurture my greenery year-round.
With a plethora of 57 DIY greenhouse plans available, I was spoiled for choice when it came to selecting the right design for my needs and skill level. Browsing through these plans, I felt inspired and eager to embark on the project. Each plan offered unique features and construction methods, providing me with valuable insights and ideas to incorporate into my own greenhouse design.
Exploring these easy-to-follow greenhouse plans on various internet platforms, I felt empowered to kickstart the construction process and begin growing my own produce. The accessibility of these plans meant that anyone, regardless of their building experience, could embark on this rewarding DIY project. Armed with enthusiasm and determination, I looked forward to creating a thriving greenhouse that would serve as a hub for my gardening adventures
57 DIY greenhouse plans with tutorials:
1- Greenhouse from an Old Carport
I recommend this greenhouse plan to those with a small budget and for beginners. It is a mini looking cute DIY greenhouse by Instructables made from a portable old carport. The idea is great and one of the best greenhouse plans. Many people have those old carports that are no longer in usage and through this easy plan, they can be turned into ideal greenhouses.
The DIYer also efficiently used metal pipe clamps to hold the wood so there was no need to drill into carport pipes. This ensures that if in future you want to take down the greenhouse, it is still usable.
The whole frame is connected with crossing guy wires which make it very stable. The shade cloth on top is also moveable when not needed.
A pretty simple and efficient plan.
Greenhouse from an Old Carport, Image via: Instructables
2- Glass Jar Greenhouse
Exploring DIY projects has always been a source of inspiration for me, and stumbling upon the DIY greenhouse plan by Instructables by interesting engineering was nothing short of a revelation. What immediately captured my attention was the sheer creativity behind the design. The use of glass jars as the primary building material for the greenhouse seemed both ingenious and eco-friendly, offering a unique twist on traditional greenhouse construction methods.
What I personally admire most about this DIY greenhouse plan is its resourcefulness. The idea of repurposing glass jars, something that many of us have lying around or can easily acquire from thrift shops, into a functional greenhouse is both inventive and sustainable. The wooden structures holding the jars together add a rustic charm to the design while ensuring structural integrity.
The versatility of this greenhouse design is another aspect that appeals to me. Not only does it provide ample indoor space for nurturing plants, but the inclusion of jars as mini greenhouses for seedling starters adds an extra layer of functionality. The thought of transforming ordinary glass jars into miniature ecosystems for growing plants is both fascinating and inspiring, showcasing the endless possibilities of DIY creativity.
Furthermore, the attention to detail in the design, such as using jar lids for flooring and incorporating rainwater-catching discs, demonstrates a thoughtful approach to maximizing functionality while minimizing waste. The plan even offers solutions for sourcing the necessary jars, making it accessible to anyone eager to embark on this creative endeavor.
Overall, my personal experience with the DIY greenhouse plan by Instructables by interesting engineering fills me with excitement and curiosity. It represents a perfect blend of innovation, sustainability, and practicality, inviting me to explore the boundaries of my creativity while nurturing a thriving garden sanctuary. I can’t wait to dive into this crazy DIY plan and witness firsthand the magic of turning ordinary glass jars into a spectacular greenhouse masterpiece.
The next plan I am showing you is a recycle idea but it needs creativity.This DIY greenhouse plan by Instructables is so unique that you’ll be blown away by creativity. The whole greenhouse is made using glass jars and lots of glass jars. Wooden structures are holding them together. The jars are not filled and the open mouths are inwards. Not only do you have the indoor space but you can also put plants inside jars (mini greenhouses) which make great seedling starters.
And you know what they used for flooring? The jar lids. YUP! crazy right. Some jar’s mouths are outside and are connected with discs that catch rain water. As if you are wondering where you might find this many jars, one is thrift shops and other solutions on finding them are listed in the plan.
You just need to see this crazy DIY plan for yourself.
If you want to build a small greenhouse, this wooden barn greenhouse plan by ana-white would work best for you. Get started by working on the plan given below: Cut the wall framing from the boards (wood) you have available or you can purchase it for a few dollars easily. Use roofing tin for the side paneling, it would provide strength to the house as well. Use metal flashing to trim the corners of the panels. Cover the entire greenhouse with corrugated roofing.
Build a Small Barn Greenhouse, Image via: ana-white
4- DIY Hoop House
This plan unlike the ones I have showed you earlier is a large size greenhouse. A hoop house is a simple structure made with a few wood boards and PVC pipe. A hoop house can be built to any size and these DIY greenhouse plans on youtube give you the instructions to build a 40 feet structure for large gardening endeavors.
5- DIY Pyramid Shape Greenhouse
Here we have a pyramid shape greenhouse plan with youtube video tutorial. You can also make a diy greenhouse like on this youtube, a stylish one by doing: Take two doors and attach them from the hinges. Place them on the ground in such a way that it looks like an inverted “V” – you can simply keep your plants under this – enjoy gardening!
6- Dome Shaped Green house Plans
If you love assembling the broken triangles, you must construct this kind of a diy greenhouse by northernhomestead– it’s beautiful. You would not see this normally everywhere because it requires time to get completed. You can simply lay the foundations by fixing it in the ground with stakes.
The tough part comes in when you have to get the wood cut in equal length and width – moreover, assembling takes time. You need to have proper measurement and a diagram to get a perfect shape. However, it is fun – you can cover the entire structure with a special kind of greenhouse sheet so get the perfect desired look.
Use 2x6s wood for laying out the basic foundation or frame of greenhouse – measurements solely depend upon the area you want to cover.
Cut 10’ rebar to make a total of four 30” rabar for making the hoop stand. Take the open ended PVC pipes and fix them on the hoop stands. For the better grip, you can simply use screws to tight the PVC pipe and the stand.
Insert strong PVC pipe at the top in order to provide strength to the circular frame.
Cover the entire naked greenhouse with plastic sheet and attach it with the lathe.
Lastly, add the door and the basic wood frame which has plastic covering all around; and you are done.
Build the side frames at first also you must cut the ends of the studs keeping 8 inch difference.
Drill pilot holes in the frames and fix them with the screws.
Make the front and the back of the woodgreenhouse likewise.
Anchor the wooden studs to the top and bottom plats and in the similar manner, fix them with screws.
Lastly, make the door with basic wooden frame and place it on the front side – in order to provide the perfect professional touch, you can coat the entire joint area with the paint of your choice.
Don’t get thrown off by the name. The material used in this greenhouse plan on youtube is easily accessible and cheap. These are plastic, not glass and will withstand accidents. Also, if a panel breaks, it won’t shatter and you can glue or tape it off.
The planner has more than 3 million followers, works readily and knows his way around tools.
The final greenhouse is neat and looks so awesome. Great job done. Here is the video on Youtube where you can learn how to build this greenhouse.
10- Scrap Window Homemade Greenhouse
This kind of homemade greenhouse project like in this youtube video just requires you to make the most of the old and unwanted window frames that are lying in your junkyard. Simply make the basic wooden structure (foundation) and with the help of screws adjust and assemble the windows on it. Add tin roofing and add glass to the windows which have broken ones. Simply add flowers to it so that beauty can be enhanced.
11- Double Decker Greenhouse
By definition it is a greenhouse at Instructables but not much of a greenhouse look. The design is still great using a Recycle, an old swing set into a greenhouse. A shelf is put across the middle to add garden space in between and you can also place pots beneath too.
It makes a great garden in a small space for a short season. It will surely add a couple of weeks of growing time on each end of the season and a nice plant starter.
Make your own greenhouse free from salvaged goodies.
What I like about this greenhouse, its solared powered and have a space to live off grid life. This wooden greenhouseidea by motherearthnews is so well built and attractive, it can double as a guest house. The solar powered wood structure cost under $4,000, and it’s multi-function usage makes it invaluable on a homestead. The covered front porch is the perfect spot for relaxing after a day of garden chores.
Build your own greenhouse by buildeazy with these greenhouse plans that feature a staggered roof for optimum light reception. The sturdy wood frame is covered with clear plastic and the large interior space will enable you to grow plenty of greenhouse vegetables and flowers.
This is a simple structure to build by sowanddipity and can be taken down and stored year after year when it’s no longer needed. Called a tomato fort because it is ideal for sheltering tomatoes from late or early frost and non-stop rain. An hour and less than $50 is all you need to build this greenhouse. You may also like to see diy tomato cage.
Top it off with any type of roofing material you have on hand, since the interior will receive all the sun light needed through the four walls of glass windows.
Greenhouse From Old Windows, Image via: Instructables
You must be having some old doors in your storeroom – it is the perfect time to take them out and make most of them. Follow this simplest green house plan by motherearthnews and instead of side paneling, simply use the old doors – add tin roofing or plastic sheets to make a gorgeous and effective greenhouse for your west garden.
You can make a smart 8ft in height homemade greenhouse like the one at howtospecialist with a beautiful garden – all you need is a lumber frame for the foundation, big window frames for ventilation, and a door of course. You can nail the frame and fix it in the garden with stakes.
I am not sure whether you would be able to collect a 1000 bottle – it is very interesting though! Within the simplest greenhouse structure made from wood by goodshomedesign, you can insert the collected plastic bottles to get the desired kind of greenhouse. I think this idea can work best for small space; you would need to add fewer bottles and get the task done easily.
You will only have to build three sides and a roof for this lean-to stylegreenhouse by runnerduck. Perfect style for building against the backside of a shed or garage that has a southern exposure. Plenty of interior room for growing a wide array of plants and the exterior fits well into the landscape design.
DIY Lean-To Greenhouse (8 x 2), Image via: runnerduck
22- 8×8 Greenhouse Plans
Standard design and size, these building plans by construct101 stick with a tried and true design that maximizes interior space without sacrificing a lot of landscape space. Detailed greenhouse plans make the DIY build go smoothly and the sturdy design will last for years.
If your kids have outgrown their outdoor trampoline and you have wondered what to do with it, here’s the answer. Use the frame to create a diy greenhouse like this one at howdoesshe.
Below are simple step to build this diy greenhouse plan:
Remove trampoline tarp and springs
Take the frame apart in two equal sections to create two half circles
Place half of frame on end with rounded side facing up and legs facing inward on one end of garden.
Repeat with other frame half on the opposite end of garden.
Use bamboo poles for building aDIY greenhouse by premeditatedleftovers for the ultimate in sustainability. Bamboo is a renewable resource that is strong and easy to build with, lasting for several years before it needs to be replaced.
This ingenious design creates a cover made from PVC pipe and plastic that is raised and lowered as needed over garden beds. This style of DIY PVC Greenhouse by apartmenttherapy can be built to fit existing raised bed gardens. Hinges hold the covered diy pvc greenhouse top to the wood frame bottom and the lightweight material makes it easy to raise and lower as needed.
Greenhouse cover made from PVC pipe and plastic, Image via: apartmenttherapy
28- Tabletop Greenhouse Plan
A small space can house a lot of growing plants when the design is right. This easy to buildtabletop greenhouse by dremel is portable, so it can placed in the best location for sun reception any time of the year. The mobile design allows for year around plant growth and food production.
This is a pre-fab type of structure that includes all the building materials and DIY greenhouse plans at dremel. The frame is designed in a chalet style and the see-through walls allow you to look inside the greenhouse from any place in the backyard. Grow tropical plants inside this DIY greenhouse regardless of the climate you live in so you can enjoy a tropical view even when snow is on the ground.
The style of this budget-friendlyDIY greenhouse by theelliotthomestead will remind you of an old-world European-style farmhouse and will compliment any backyard. Learn how to build a greenhouse that is both beautiful and functional so you can grow plants year-around. The building material is budget-friendly and durable so this DIY greenhouse will last for many years.
Do you have old windows stored up from a previous window upgrade? Do you know where you can find some old windows? If you can answer ‘yes’ to either question then you can build this adorable and functional old window greenhouse by gardentherapy almost no money.
Use these plans and learn how to make a greenhouse from old windows, some leftover lumber and old windows. The greenhouse size is ideal for small backyards and the design will make it an attractive addition to the landscape.
Old World Style Greenhouse, Image via: gardentherapy
32- Back Door DIY Greenhouse (10 x 6.5)
It can be challenging to find the space in a small backyard for a greenhouse, but these greenhouse plans will show you a space-saving idea. These wood greenhouse plans will show you how to build a greenhouse right outside your back door. ThisDIY greenhouse by tomsgardens becomes a walk-through structure that takes you from inside your home to the outside. You won’t even get cold during the winter months when you visit the plants.
Build this DIY greenhouse by blackanddecker on a budget with a little lumber covered with plastic sheeting. The plastic sheeting is light-weight, durable, and holds the heat in while keeping the cold out. Ideal for a low-budget build and small back yard. The DIY structure is large enough to grow food-producing plants from seeds through maturity.
A lean-to greenhouse like this one is great for building on a budget. Learn how to transform old windows and leftover lumber into a small but functional greenhouse. By learning how to make a greenhouse at fabulesslyfrugal that leans up against another structure you can reduce the number of walls you need to build, so you save both time and money.
Old wood pallets can be recycled and used to build almost anything, including a DIY greenhouse. Get some wood pallets and follow these free greenhouse plans by thegreenlever so you can build your own attractive and productive greenhouse. The recycled pallet wood creates the frame of the structure, and recycled windows are used to build the rest of the structure. This budget-friendly DIY project is almost free to build and will last for years.
These free PVC greenhouse plans by web.archive.org will show you how to transform inexpensive PVC pipes and plastic sheeting into a functional greenhouse. Start garden plants and flowers from seeds and keep them growing all year inside this PVC hoop house.
The sturdy plastic sheeting can withstand most winter weather and is easy and cheap to replace every few years. The PVC is made from durable plastic and will last for many years in most climates.
Follow the greenhouse plans on this YouTube video and build a budget-friendly structure for growing plants year-round. This detailed YouTube video walks you through the easy building process so you can complete this DIY project in just one weekend.
38- Mobile Home Conversion
A vacant mobile home can easily and cheaply be converted into a portable greenhouse like this one at motherearthnews. These detailed greenhouse plans will take you through the conversion process so you can convert any size mobile home into a structure that will grow an abundance on plants year-around.
This is a great idea for off-grid homesteaders who need a secure place for growing food. Wildlife would have a difficult time destroying crops and food can be grown year-round.
These budget-friendly greenhouse plans by backwoodshome will show you how to transform existing garden beds into a grow house for year-around plant production. Ideal for homesteaders who need a steady supply of fresh food or for home gardeners that just want to extend the growing season a few extra weeks without spending much money.
Use these free detailed instructions to build a dome greenhouse out of recycled wood pallets and plastic. The shape of the structure in unconventional but it allows full sun exposure to all plants growing inside and protects the plant from the elements. Use these greenhouse plans by instructables to create this functional dome shape grow house for your plants.
This homemade greenhouse idea by instructables is great for small gardens or when a small number of young plants need early or late-season protection. This modular shape is cheap and easy to build, plus it’s light-weight and portable. Move it as needed to protect garden plants from frost. A little left-over lumber and plastic sheeting are all that’s needed for this easy DIY project.
This is a great idea for a raised garden bed by wayneofthewoods and will allow you to start seeds much earlier in the spring and continue growing plants until early winter. Plastic can be removed and replaced as the weather changes to provide insulating warmth to growing plants. Help plants produce longer and more abundantly with this budget-friendly DIY greenhouse.
This DIY greenhouse by instructables is perfect for cold climates that receive heavy snowfall during the winter. The structure is sturdy enough to withstand the weight of snow and holds the interior heat during the frigid winter temperatures so plants can thrive. This DIY project is also easy on the budget and can be built for under $50.
Here is a great idea for those who like to dabble with electronics and gardening – a DIYautomated greenhouse by instructables. Its a small design but great for starting seeds and propagating plants. It’s small design will also fit perfectly onto a patio or balcony.
Automated Greenhouse For patio or balcony, Image via: instructables
45- Adorable DIY Greenhouse
This greenhouse design is small, adorable, and very efficient, perfect for a small backyard. A few old windows, leftover lumber, and leftover paint can be transformed into this adorable DIY greenhouse by montanawildlifegardener. The space can be used for all gardening needs since it contains a sink and can double as a She-Shed for those moments when you need a little quiet time.
Learn how you can make an A frame DIY greenhouse on youtube. There are lots of tips and tricks in this youtube video. The greenhouse was very efficiently designed and there were hardly any scraps leftover. The planner knows that plastic panels are expensive so the cuttings were minimal.
There is a built-in vent on the back for proper aeration. A closed greenhouse will burn your plants. It only took the DIYer 3 hours to just get the whole thing framed up.
Audio/video, editing, descriptions, purpose, efficiencies, and script, everything is at its best. Nailed it. Easily build your own greenhouse by watching this plan.
47- Greenhouse from Vintage Windows
This greenhouse by hometalk is so pretty and well-made that it looks like straight out of a fairytale. It was made using vintage windows. We all have some vintage (good for nothing windows) laying around but, in this case, they are purposefully reused. Even if you don’t have them, you can easily find them in Restores or on online classified sites. They make into great greenhouses.
Another great thing is that some of the windows open, acting as vents so that your plants don’t burn out by excessive heat. The end product is lovely and sturdy. Perfect for growing vegetables in winters.
Greenhouse from Vintage Windows, Image via: hometalk
48- DIY Lean-to Greenhouse
Another versatile idea. This is a lean-to greenhouse plan by empressofdirt. It is attached to the side of the house and you can operate from the insides. If you happen to have an available exterior wall in a sunny location but not much space, this plan was definitely carved out for you. It has plant shelves at waist-height for easy reach. To increase the plant space, you can add more wire shelves. A thermometer with humidity readings and the possibility of installing automatic air vents and misting systems make this plan great.
All the tools and steps are clearly listed in the comprehensive read.
The aluminum withstands harsh weather and is resilient and sturdy. It is strong yet lightweight while the polycarbonate is virtually unbreakable.
Each and everything are listed and told in the extensive read. All the info is under so many bold headings. They covered up everything. There is video too if you believe in seeing rather than reading. This greenhouse will extend your growing season and is perfectly sealed which ensures that no insect pest from outside can scurry their way in it.
Aluminum and Polycarbonate DIY Greenhouse, Image via: handymanmagazine
50- Cheapest DIY Greenhouse Ever
Get instructions on how to build this super cheap functional greenhouse in this youtube video in only 20 dollars. It has fold up walls made of plastic. This whole plan was very clear and quick. Exactly what you’ll be looking for if you are plain on tools and want a portable one; no fancy measurements, no fancy carpenter language, simple.
51- Full Greenhouse Build Plan
One of the best greenhouse plans on youtube as compared to other ones we have shared with you. There are some serious skills involved in this Youtube video tutorial, so much precision. This is a mega project, 4 months of work shown in only 4 minutes. From start to finish and if you know your way around a saw, a pressure hammer and measurements, you can easily make this big greenhouse. It looks so sturdy and well-structured that it is bound to last for decades. The whole family helps and works on it and they make it happen.
Impressive, a lot of great ideas and design features involved.
52- DIY Greenhouse for Just £60
No matter how small your budget, this DIY greenhouse plan by idealhome truly proves that it doesn’t matter. And the look of this, oh my gosh. This doesn’t look that fancy looking this big of a greenhouse was made for just £60. Other than this being cheap, another best thing is that it can be easily dismantled when needed.
Hanging seasoned branches and ambient fairy lights adds a rustic touch of personality. This creativity is of a true DIYer.
It is so neat and efficient, how did the DIYer manage to pull that off? Well, you have to find out for yourself.
This whole plan is a rebuild from scratch. This DIY Greenhouse by instructables is made using recycled hardwood windows, all double glazing. The double glazing provides insulation in winters and traps the heat and keeps the cold outside, protecting crops from harsh weather.
These windows require no painting or carpentry and will last at least 30 + years without anyone even taking care of them. There are also Google Sketchup drawings for you to get an idea. Not 1 but 4 designs.
Article is pretty comprehensive with everything clear and well explained with tips here and there.
DIY Greenhouse with 100 % Recycled Materials, Image via: instructables
54- Hydroponic Food Factory
Versatility is good and this plan here is an example. Most of you know how to make a simple DIY hydroponic like this one by instructables using PVC pipes but when winter comes, it stops working. This idea here is infused with a portable, mini slender greenhouse DIYed using PVC pipes and a baby crib which can keep your Hydroponic system working even in winters. It is more like a cold frame.
It houses your hydroponic structure or you can switch out and grow other plants. You can grow potatoes, strawberries, lettuce and celery and many other greens in this.
I suggest this mini greenhouse to those who have limited space and growing plants in pots. A true definition of mini. This cute looking DIY Greenhouse by instructables can house your couple of plant pots that you always wanted to be protected from harsh winter cold. You can easily move it around and it takes very little space.
The DIY plan consists of only 4 steps with 3 supplies, this simple.
If one is not enough for you, you can make many mini ones reusing the same design.
Mini Greenhouse from a Pallet, Image via: instructables
Sometimes a polytunnel is also included in greenhouse plans like this one on youtube. Who knows a polytunnel plan might be the answer to your greenhouse requirement? You’ll definitely like the design and maybe want to build this one.
It is a two-person job. Maybe invite your friend over for a cup of tea and have at it. You will make it in no mean time. All the materials are listed in the description alongside the time they were used in the video.
They also have a playlist for individual construction videos on Youtube and reply to your queries in comments.
Wraping UP
Extending the growing season or taking a jump start to spring is easy when you have many types of greenhouse options to consider. You can go from small to large, wood to glass, hoop style to lean greenhouse, from just 20$ to expensive one depending upon your scale to grow and budget on hand.
Hope we have helped you in your decision to make a greenhouse! If you like the post or have any more ideas please don’t forget to share and give your feedback in the comment section.
Here we have prepared a questionnaire to answer some common questions.
FAQ’s
What is the best greenhouse design for hot climates?
We recommend a greenhouse that has plenty of ventilation for use in a hot climate. One with easy to open sides so that the structure will have good air flow. You may want to consider a greenhouse that has open sides that are covered with insect netting if you live in a hot climate.
How can I heat my greenhouse cheaply?
Using solar panels to harvest the energy of the sun will be the cheapest way to heat your greenhouse. The number of solar panels needed will depend on the size of your greenhouse.
Another cheap method for heating a greenhouse is to place black plastic bottles filled with water inside the structure. The black plastic will absorb heat and warm the water inside of the bottle and raise the temperature of the greenhouse.
What material is used for greenhouses?
The greenhouse frame can be built from wood or metal. The covering should be clear or semi-clear plastic or glass. The plastic can be sheeting or rigid acrylic panels. The goal of the covering material is to allow as much sunlight as possible to enter the greenhouse.
Which vegetables are easy to grow in a greenhouse?
For beginners, we recommend easy care plants like carrots, onions, kale, zucchini, turnips, and eggplants. Herbs are typically easy to grow in a greenhouse too. An experienced gardener may want to try growing tomatoes and cucumbers.
References:
National Geographic, “The Greenhouse Effect and our Planet”, https://education.nationalgeographic.org/resource/greenhouse-effect-our-planet/
Education, Royal Society Of Chemistry, “Climate Change: The greenhouse effect and global warming”, https://edu.rsc.org/resources/the-greenhouse-effect-and-global-warming/767.article
Chelsea Green Publishing, Farming & Homesteading, “Not Level? No Problem. How to Build a Greenhouse on a Slope”, https://www.chelseagreen.com/2023/how-to-build-greenhouse-on-slope/
Free landscape design software will help you design the outdoor space of your dreams. When using software to create your design, you won’t have to fabricate models of outdoor elements by hand. All the outdoor elements, like building, vegetation, people and vehicles are already at your fingertips with garden design software.
Not only will free landscape design software allow you to create your dream space, but will also allow you to create walk-throughs and flyovers that will virtually glide you and/or potential clients through your creation.
Browse through our round up of these amazing free garden design software options to see what is available and which one will be right to met your personal or business needs.
Garden and Landscape Design Software
1– Realtime Landscaping Pro
The first one in our list is a professional landscaping program by realtime-landscaping.en.softonic.com that comes to you as a free download and it offers you a good piece of backyard design software as well. Since it uses 3D design your designs will look as if they are real pictures of existing gardens. As a result, you could plan and landscape your garden in a professional manner with it.
Pros.
This is a powerful design software that will allow you to use a wide array of visual tools to create the perfect landscape design. Create a deck, pool area, flower garden, and much more just like the professionals do using this software.
Cons
The only con is that it does not provide an aerial view of your landscape design.
Irrespective of whether you are a novice to garden planning or an experienced one, this landscape design software by SmartDraw allows you to create your own garden designs with elegant ease that’s I like about this software. In addition to gardens, you also could design patios and decks with it.
It is able to add barbecues and grills, foot paths, umbrellas, picnic tables, fountains and a number of other fixtures into your garden as well. Though it is not an online landscape design software, once downloaded it will allow you to do many things related to garden design.
Pros:
This software has built in templates, plants, and grass so you can drag and drop landscape items until you find a satisfying design for your landscape.
You can create a shopping list with this app once you have settled on the design.
It’s user friendly and lets you visualize how the finished landscape will look.
Cons:
The one con is that you can’t upload photos of your landscape.
‘Plan-a-Garden’ is a beautiful free landscape design software by bhg which is also easy to use. There are buildings and shrubs as well as trees that could be dragged and dropped into the picture in order to plan your dream home garden.
It could design any small garden the same way you do a large one with it. You could make many plans and save them in order to show them to your family members. Later you could edit them in case you want to do so.
Pros:
Create any size garden using your home computer or laptop. Whether you want a roof top garden, a container garden for your patio, or a lavish landscape with a pool and outdoor kitchen, this software will help you design it.
You can use urban, suburban, or rural settings along with many different types of plants when playing around with the design.
This is an award winning app that is straightforward to use.
Cons:
The con is that all plants, structures, and other outdoor objects are virtual.
This free landscape design program by marshalls will allow you to put all your garden design ideas on a beautiful 3D design and visualize it in order to help you edit it and achieve the best suited plan for your garden. Being able to add your home also within the design is a special feature you will find in this beautiful free landscape design software.
Pros:
Visualize your garden ideas in 3D with this software. Design a landscape that will suit the needs of your family with this easy to use app.
Easy to use edit feature allows you to add, move, and remove outdoor elements until you are satisfied with your design.
This is an online landscape design software by smallblueprinter which could be used without downloading the software. However, if you want to save your plans it is necessary for you to download the free software. Once you download it, using it will be similar to using any other free design software used for garden design.
Pros:
Download the Garden Planner and have access to a multitude of ideas for your landscape design. Everything from large trees to small annual flowers are on this software so you can see how the landscape design will look when it’s first planted and what it will look like 10 years into the future.
Cons:
The software must be downloaded to save your plans.
Use photos of your actual landscape with this software. Incorporate images of plants and objects that you would like to have in your outdoor space and the software will help you determine if the object and plants would be the best fit for your climate, sun exposure, and soil.
The software is free.
Cons:
Not as user friendly as most landscaping software.
6– Showoff Virtual Designer
In case you want to use a diy landscape design software like this one by saga.co.uk, Showoff Virtual Designer is the tool you must select. It allows you to upload a digital photograph of your own garden and add the necessary plants, pots, foot paths and walls onto it in order to design your dream garden out of it.
You could change your design until you find the best suited one. This free garden design software not only allows you to plan your garden but also it lets you save it and even share it with others.
Pros:
Use photos of your actual landscape with this software. Incorporate images of plants and objects that you would like to have in your outdoor space and the software will help you determine if the object and plants would be the best fit for your climate, sun exposure, and soil.
The software is free.
Con:
Not as user friendly as most landscaping software.
‘My gardena’ is a professional free landscape design software by gardena that allows you add your deck, patio, fence water and so many features. You could design your garden easily with this 3d tool. At the same time you have the option to see example gardens using real time walk though in 3d technology. Once you do the planning the shopping list of yours also could be printed using the same software.
Pros:
Ideal design software to use when planning a landscape with a built in irrigation system.
A garden will need water to grow and if you don’t want the chore of watering plants regularly, then this software is a must. Use it to design the perfect outdoor space that will be easy to maintain with an automatic irrigation system.
Free software helps you be creative so you can plan a beautiful garden.
Cons:
Only good if you’re planning to install irrigation.
professional free landscape design software, Image source: gardena
8– Realtime Landscaping Architect
Though it is necessary to purchase this landscape design software by ideaspectrum that enables you to design your landscape unlike the software we discussed before, but you also will be able to use their trial version free. It is a good piece of software that could be used to design your garden. There is no need to have any previous knowledge on CAD either to use it.
Pros:
This landscape design is not free but will provide you with a free trial before you buy it.
You can test it out before you buy it.
The price includes support, tutorials, and more.
Cons:
The con is that you have to pay for this software.
Here we have a free SketchUpsoftware to design and build upwards. Not all gardens are built on a flat surface and this software will enable you to build up, down and over any type of terrain within your landscape.
Create small backyard gardens, terrace gardens or design a large outdoor park with this free landscape design software. Just a click of a button will allow you to bring in the exact image of the terrain you will be working with so you can adjust the garden design to specifics variations within the outdoor space.
Pros:
Here is powerful software that can bring your garden plans to life. From the smallest container garden to the largest park on uneven terrain, this software can help you design the landscape of your dreams.
The con is the software is not free. Prices vary according to the plans you purchase.
10– Software For Landscape Design and Urban Planning
This landscaping software free designs by lands-design will enable you to design water features along with land and garden designs. Create stunning renders in vivid colors that will show you exactly how an outdoor space will look before the first shovel full of dirt gets moved.
Use Lands free landscape design software to create large outdoor spaces that contain stairs, fences, walls, water features and other design elements. Add a variety of vegetation from over 1,500 virtual plants to choose from. Design and re-design until you get the space just right for yourself or a client.
The best landscape design software allows you to create it your way, with all the elements you want within the outdoor space that you have. Lands software can handle everything from terrain modeling, to urban planning, to a backyard garden. Above ground water features and below ground irrigation system planning are also easy with this free software that is quick to download.
Pros:
Full color and the ability to add water features to your landscape design are the biggest pros of this software.
Over 1,500 plants are also included so you can play around with the design and see how the landscape will look in all four seasons.
Cons:
Designed for use in large landscapes, not good for a small backyard.
This free garden design app by iscapeit lets you visualize what your yard can look like before you spend any money. Use the free app from iScape to envision and plan what you want to do in your yard. Add all the elements you would like to the space using the app, then collaborate with landscape designers and industry partners to see if your design is the best it can be for the space.
Free advice and knowledge from landscape professionals are included with this free garden design app. At any stage of the design process you will be able to share it with a spouse, friends or landscape professional of your choice to get their valued input on the outdoor garden space you’re creating.
You can streamline your garden project by purchasing products directly through the iScapes app.
Pros:
See what your landscape will look like before you do any work or spend any money.
Get free advice from landscape professionals with this software. If your design is not the best for your climate, the professionals will help you make better plant choices.
The app can be downloaded for free.
Cons:
You will only have limited access with the free feature.
Use this free landscape design software by dreamplan-home-design-software to design your home inside and outside. DreamPlan Home Design Software allows users to create detailed architectural and garden plans in 3D so everything can be visualized before money is spent.
Design an indoor living space that flows seamlessly with a customized outdoor living space with this free downloadable software. The built-in wizards enable a novice designer to create a spectacular design that will work with your exact terrain and budget.
Design an outdoor kitchen, firepit, seating and eating areas. A fragrant flower garden and productive vegetable garden may also be a part of your plans.
Create and view your design in 3D in only minutes with this easy to use free downloadable software. Create a unique floor plan or select from existing ones, and select from the many varieties of trees and shrubs offered so you can put together a space designed to meet your personal needs.
Pros:
Design the inside and outside of your home with this free software.
Visualize your dream home in 3D.
Design your home and your landscape with one easy to use software download.
This backyard design software by homeoutside is for people who like to live outside. Download this free software from HomeOutside and start planning your ideal outdoor living space in minutes.
You can start with their partial outdoor designs and create a customized space from there, or use their full property designs for your space. Ask an expert for help at any stage of the design process so you can get the most from your outdoor space.
You can get an online workbook that will allow you to submit property information, goals, ideas and preferences for your outdoor living space. Based on the provided information, you will receive a unique design that has been customized to meet your needs. You can accept it, tweak it or start all over again, the ultimate garden design will be your creation.
Pros:
Perfect for people who want to create an outdoor living space. This software will help you create a space you will spend a lot of time in.
You can ask an expert for advice at any stage of the design process.
Landscape design is made easy with the free landscape designsoftware by edrawsoft. Take all the guess work out of the design and incorporate all the elements you want with the easy to use home plans.
EDraw provides a bright, user friendly interface that is easy to understand and operate. Simply drag and drop into place the landscape elements you want in your garden space. Choose from ponds, buildings, walkways, tree and flowers. You can also see what your landscape will look like in different seasons.
Use this free landscape design software to design a small garden, large garden, rooftop garden or entire landscape with pond, fences, trees and vegetable garden. No limits on the outdoor space you can customize with this easy to use, free loadable software.
Available versions for Windows, Mac and Linux, the vast array of templates and examples makes garden design on your home computer a snap.
Pros:
User friendly landscape design software that is free.
Design water features, walkways, and a she-shed or other outbuildings.
Add flowers, trees, and shrubs then see how they will look in all four seasons with this software.
Cons:
Reviews of the software are edited and not published in real time so it’s difficult to get an honest consumer review.
Everything needed to design your own unique garden is at your fingertips with this free landscape design software. Home Design 3D not only allows you to create a new space, but re-model the space you currently have too. You can have professional results with your design project by using this free software with 3D planning.
Arrange and re-arrange each element until it suites you and the space. Adjust heights, thickness, design and decorate all indoor and outdoor spaces. Select from 100‘s of textures and over 1,500 pieces of furniture. See what your space will look like in daytime or nighttime with the visualization and visit featured provided by this free software.
Ideal for use on a Smartphone, Tablet or PC or Mac. There’s no limit on what you can create right from your SmartPhone using this free downloadable app.
Pros:
Perfect software for remodeling the spaces you already have. This software will enable you to remodel the inside and outside of your home. Rearrange and re-design all of your living spaces with this one software download.
It’s 3D and can be used on a smartphone or home computer.
Cons:
The software is primarily used for home remodeling, not landscape designing.
The American Dream Home used to be a front yard with a white picket fence….now it’s so much more than that. Curb appeal, water features, shrubs, flowers and outdoor kitchens are all factored into most people’s dream home nowadays, and this free landscape design software on download.cnet by NCH Software can help you design your idea of a dream home.
In minutes you can design the interior and exterior of your home to meet your exact specifications. See what your uneven landscape would like if it as raised or lowered, or with that patio you’ve always wanted or maybe even a pool with outdoor kitchen.
Download the free software and start dreaming today. You can also include the white picket fence in your design is that’s a desired element.
Pros:
Design the interior and exterior of your dream home with this free software.
See what your home and yard will look like from the curb and overhead.
See what your home will look like after a remodel and how your landscape will look with a pool or outdoor kitchen.
Easy to use software puts the power of landscape design into everyone’s hand. You don’t have to hire a professional landscaper to design your garden, nor do you have to be a professional landscaper in order to use this software.
It’s so easy to use, even a novice computer user will be able to navigate the page and design a professional looking garden. Landscapes should not be expensive and only attainable to the wealthy, an outdoor space should be comfortable, enjoyable and increase property value. You can do all of this and more with this free landscape design software by 3D Landscape For Everyone.
See your ideas come to life in 3D. Add elements and re-arrange them until the outdoor space suits you exact specifications. The download is free and will only takes a few minutes to ready for use. Nothing to sign up for and nothing to purchase. Get started designing an award winning outdoor space with this free garden design software today.
Pros:
Ideal software for the first time home owner and novice gardener. This software is user friendly and will take you through each phase of design step by step.
Plan the simplest or most elaborate landscape using this one free software product.
Since there are seventeen different free landscaping design software in our list, you have ample opportunity to choose the one you prefer and design your garden to add a better environment to your home.
Based upon some frequently asked questions we’ve prepared a questionnaire.
FAQs
What is 3D Landscape Design Software?
3D will allow you to see how plants stack, layer, bloom, and their mature height. Multiple angles of the 3D design will show an aerial view, side views, and front views so you can see how the home and landscape will look from all angles.
What’s The Difference Between 2D and 3D Landscape Design Software?
A 2D design gives you a direct view of the landscape design, usually in full color, so you have a better visual experience of what your finished home and landscape will look like.
A 3D design does the same thing however, it is much more detailed and allows you to see all angles of the landscape from the front, sides, and top.
How Can I Improve My Landscape Design?
By downloading one of these 17 software products and create a landscape that works for you. Many will provide free advice from a design expert so you will be able to choose the right plants and plant them in the right places in your landscape.
Experts will also be available to offer advice for other hardscape features in your landscape.
How Can Landscape Design Software Help You?
Landscape design software can help take your dream home and make it a reality. When you know what you want your landscape to look like but don’t know where to start, using software for the design will be the needed first step to get you started.
How To Pick The Right Landscape Design Software For You
First decide some of the things that you might want in your landscape, like a pond, seating area, or outdoor kitchen. Next, search for a software product that offers designs for the things you want most in your landscape and check them out.
How Much Does Landscape Design Software Cost?
Many of these 17 landscape design software products are free to download. Some will you have to pay for and the cost will vary.
Check out the free design software first and if you don’t like what they have to offer start looking into the ones that will cost the lowest and work your way up in price.
Greenhouses can be a great way to help gardeners gain some extra time at the beginning or end of the growing season. DIY PVC greenhouse design plans can range from very complex to extremely simple. My goal is to give the average gardener the ability to create a greenhouse design that is both inexpensive and easy to build on their own.
Simple greenhouse PVC frame designsthat feature PVC pipe construction are lightweight, easy to assemble, and the supplies are easily found at any hardware store or big box store. There are many DIY PVC greenhouse plans that can be recreated by any gardeners. Cutting the PVC pipe can be done with a hand saw or a squeeze-type pipe cutter for fast and simple construction.
Here we have collected 11 DIY greenhouse plans featuring PVC pipe and plastic sheeting construction.
1- DIY Moveable PVC Greenhouse
Looking for a way to extend the growing season for your garden crops or starting the season early? Building a PVC greenhouse by Instructables that resembles a high tunnel like we have in this plan can be the solution you need to extend the life of your green house plants. This tutorial and video shows how to build a DIY PVC greenhouse.
This five foot by five foot DIY PVC greenhouse can be built for under $25. Using PVC plumbing parts and plastic sheeting, this greenhouse can be built in less than one day. This tutorial has a list of required supplies. PVC connections are secured using PVC primer and cement.
The small size of this moveable indoor greenhouse creates the ability to use it on the lawn, on the patio, to cover containers from nightly frost, etc. The plastic sheeting is inexpensive and easily purchased, making replacement if damaged a simple fix. Give this DIY PVC greenhouse a try and you will not be disappointed in the results.
This twelve foot by thirty foot DIY PVC greenhouse by Ladylees Home would be a great option for many gardens. Everyone who owns a greenhouse will tell you that they should have made it bigger. This tutorial’s design was created for a farm but can be used in a yard as well.
The materials needed to construct this DIY walk-in PVC greenhouse come out to approximately $360. Prices can be reduced if you are using or recycling some of the supplies from other uses such as scrap wood and extra plumbing supplies. The base of the greenhouse is made of wood screwed together like a raised bed.
The PVC pipes are connected to rebar staked into the ground around the wood foundation frame. This tutorial tells an unfortunate detail about using PVC pipe and plastic sheeting in snowy weather. The weight of the snow can collapse the plastic sheeting. Plan to remedy this if it remains in use year-round.
DIY Large Walk-in PVC Greenhouse, Image via: Ladylees Home
3- DIY Raised Bed PVC Greenhouse
A raised bed greenhouse is a great option to use in place of a cold frame. Having a raised bed means that the ground may not freeze. The plastic on the frame can also heat the soil as well as provide a humid environment for water retention.
Here we have a video tutorial that goes through the benefits of using a PVC raised bed frame as a greenhouse by GNH Lumber. The best thing we like about this DIY PVC greenhouse frame is that you can make the plastic removable so that you can control the heat and avoid rain or snow destroying the plastic on the frame.
Building this DIY PVC greenhouse, the frame is built out of two foot sections that are connected. In the tutorial, it is explained that the sections are not glued together so that it can be easily deconstructed and stored when not in use.
DIY Raised Bed PVC Greenhouse, Image via: GNH Lumber
4- DIY PVC Propagation Greenhouse
Constzucting a smaller, walk-in greenhouse with more permanent front and back panels is a good option. In this tutorial you will see additional resources including PVC greenhouse plans in pdf that they found while in the planning stage. This greenhouse tutorial by web.archive is aimed at helping gardeners start seeds earlier in the season for earlier harvests.
The low budget and smaller size of greenhouse is great for many DIY gardeners with room to grow. The supplies are readily available. In the tutorial they offer many considerations for the size of the plants, the weather (rain/snow), and the budget. This tutorial is very well thought out for other DIYers to follow.
The best thing we like about this DIY PVC greenhouse is that it also utilizes crossbars that go across the PVC hoops. The addition of crossbars helps distribute the weight of water or snow and makes damage less of an issue. This tutorial also implements a system of ceiling braces to support the top of the greenhouse from collapsing in on itself.
This pvc greenhouse on youtube is constructed to cover garden beds as long as fifty feet in this in-depth walkthrough video tutorial. This tutorial explains why they went with a different PVC pipe material. The grey electrical PVC pipe is apparently more resistant to UV damage by the sun.
The hoops are made of 2.5-inch diameter PVC pipe. There are two sections of ten foot lengths connected at the top of the greenhouse to make twenty foot hoops. The larger hoops greenhouse allow for a taller design. This tutorial is loaded with a lot of good knowledge and information for the DIY gardener.
The standard plastic sheeting is supposed to last up to four years of use. One thing this tutorial shares is that the PVC can react to the plastic sheeting. There are many remedies to fix this issue, including painting and covering the PVC with duct tape where it touches the plastic sheeting.
6- DIY PVC Arch Greenhouse
This Youtube video tutorial is a quick guide to constructing a PVC greenhouse that is simple yet effective. The four minute tutorial shows all of the supplies needed and how to put them together to create a simple design. The tutorial comes as a kit but the design is easy to follow and the supplies can be found at any local hardware store.
The structure of the DIY PVC greenhouse on Youtube is built entirely with PVC pipe and PVC fittings making for a seamless and simple design. No worry about using wood on the ground or securing the hoops to stakes in the ground for added support. The tutorial is easy to follow and also comes with door frames built into the structure for added benefits.
The plastic sheeting can be secured to the PVC frame using snap clamps. This design is also light enough to be moved around and can be moved over garden beds. For securing the greenhouse so the wind is not able to move it, you can use rope tiedowns with stakes.
7- DIY PVC Greenhouse with Printed Plans
If you want a greenhouse design that is simple and provides easy written assembly instructions, we found this tutorial an awesome for you. This project features DIY PVC greenhouse plans by Pvc Plans in printable pdf format. Simply print the pdf version of the plans and take the supply list to the hardware store.
Different from other tutorials, this version uses smaller one and one-fourth inch diameter PVC pipe for construction. The smaller diameter pipe allows for more bendability in the construction. This printable pdf design features a door frame for access and reducing heat and humidity buildup in the sun.
PVC Greenhouse with Printed Plans, Image via: Pvc Plans
8- DIY Low Cost PVC Greenhouse
Creating a low cost greenhouse designthat provides the effectiveness you need is what this tutorial provides DIY gardeners. The design of this greenhouse can withstand high winds and rain. This tutorial is designed to be used in many different parts of the world to enhance gardening and food crop growth.
The larger base foundation helps this DIY PVC greenhouse frame by Den Garden be sturdy and stand up to weather conditions. Cutting the PVC pipe material just needs a hack saw available at any local hardware store. The greenhouse tutorial instructs DIYers to secure the joints of PVC and use snap clamps.
The total cost of materials for this project will be about $250 which creates a fourteen by twenty foot greenhouse. This tutorial also uses electrical conduit PVC pipe for the low cost. This tutorial features a cost and estimated costs list for easy shopping and budgeting.
DIY Low Cost PVC Greenhouse, Image via: Den Garden
9- DIY Gable Greenhouse Design Plans
This tutorial differs from other greenhouse plans as it features more of a house design. A pitched roof makes rain and snow less likely to be able to collect on top of the plastic. Featuring the construction of a six foot by nine foot DIY PVC greenhouse design by Little Green House, there are many clear instructions to this design.
This written tutorial uses one-inch PVC pipe for construction of the gable design. The gable design also features a door. The website for this greenhouse design features several other greenhouse designs and kits with free printable plans for easy construction.
10- DIY Collapsible and Portable PVC Greenhouse Frame
Rejecting the notion of spending a lot of money on greenhouse kits, this tutorial aims to create an inexpensive option for the average gardener. This tutorial aims at getting to the basics of being a good option at the lowest cost possible. Going green should not mean adding more money to the budget.
The greenhouse plan design by Homemade Hints will only cost $35 to recreate on your own. It is best to use this design over the top of a raised bed, especially in colder climates. This greenhouse design attaches the PVC pipes with zip ties.
The greenhouse will also deter pests from infiltrating your garden plants. It holds up to weather well with its pitched roof design. It can be taken down simply by detaching the connections just like camping tent poles. Try this tutorial out for a simple and easy solution.
This DIY PVC greenhouse on youtube features a five foot by five foot frame with five foot high walls and an even taller roof. The frame design features one inch PVC pipe construction. The plastic sheeting used is sold at the store as drop cloth for painting purposes.
Modifications to the PVC construction are simple and easy with a hand saw and additional joint connector pieces. The design is small and easy enough to pull apart and store away for winter months. Total cost of supplies for this greenhouse design is around $25.
With lumber prices being so high following the pandemic and home-building supplies at limited quantities, using PVC pipe from plumbing or electrical supplies is a great solution.
DIY PVC greenhouse designs are an inexpensive option for many gardeners to fix weather conditions that cut growing season short. The lightweight and low cost construction of PVC greenhouses can make these DIY greenhouses a simple and easy solution for any gardener.
Summary
Pvc greenhouses are light, easy to make and a low budget option for small gardeners. By building one of the above pvc greenhouse you can extend your growing season and start earlier before spring. We hope the above pvc greenhouses we have shared with you can help you in making your own custom design pvc greenhouse.
A DIY mini greenhouse is the ideal solution for plant growing and seed starting in small spaces. Not everyone has a large outdoor space to accommodate a full size green house, but even apartment dwellers can enjoy the benefits of a DIY small greenhouse.
Tiny greenhouses have a variety of uses, like nursing sick plants back to health, growing fresh herbs and vegetables, propagating plants, starting plants from seeds and over-wintering plants.
Check out our list of these 12 DIY mini greenhouse ideas to find the right one to meet your plant growing needs.
Recycled Windows
These smallgreenhouse plans by balconygardenweb show you how to recycle five old windows and a wooden pallet into a functional greenhouse. All you need to build this diy mini greenhouse are:
Four equal sized windows and one smaller window.
One wooden pallet.
Clean window glass.
Join the four same size windows with screws to form a box.
Place smaller window on top of box and mark where it ends.
Remove small window and use wood slats from pallet to fill in the gap on top. Attach slats with screws.
Place window back on top and attach to wood slats with two hinges for easy opening.
This design uses five windows to create a diy small greenhouse by blackanddecker that is portable and functional. Three windows are the same size and are used to create two opposite sides and top lid, and two smaller windows are used to create the front and back. No extra wood is needed, the wood framed windows are screwed to each other. Easy to move as-is, easy to take apart when no longer needed. You may also like to check out wooden greenhouses.
A wood frame and a few storm windows makes a nice homemade greenhouse
Measure storm windows and use 2x4s to create a box which the storm windows will be attached to.
Three storm windows are used for this design – one for the front and two for the sides. A back and top are not needed since this. small greenhouse sits on a covered porch with the back against the exterior of the house.
Attach the two side windows to the frame with screws.
Attach the front window with hinges so it can be opened.
Fold Up DIY Mini Greenhouse
This mini greenhouse design by rockler is tall enough to stand upright inside of and built to be folded and put away when not in use. This design is great for gardeners who want to start plants from seeds in the late winter and extend their growing season in late fall. Easy to fold and store when not in use. You may also like to check out homemade greenhouses.
Adorable and functional, this greenhouse desigcraftsalamoden by easily becomes a part of the outdoor landscape decor while providing an interior that promotes plant growth. Six windows create the four sides design with a pitched roof.
This mini greenhouse is easy to build and fits nicely on a table top. Use these free plans to create a safe, warm environment for ailing houseplants or for showcasing houseplants outdoors. This mini green house by wonderwood.no is inexpensive and easy to build and is created from large photo frames.
Convert your raised bed garden into asmallgreenhouse like this one by doityourself to extend your growing season. Create a hoop structure over the raised bed with PVC pipes and cover with white plastic sheeting. Perfect for starting garden seeds in the raised beds and for growing crops all the way into early winter. Plastic is removed and replaced as needed while PVC pipe hoop frame is left in place. You may also like to see 12 ideas to build a hoop house.
Recycling and ingenuity at its finest. Old, clear plastic CD cases can be transformed into a functional diy mini greenhouse with this idea by megacrafty. Use clear glue to attach CD cases to each other and create the size and shape you want. Apply painter’s tape to hold the cases together until the glue dries. No need to build a frame for this sturdy design. You may also like to check out cold frame plans.
This is the simplest diy mini greenhousedesign by alittlebitwonderful of all – a clear umbrella opened and placed over a large container of seed or plants. Perfect for an herb garden and/or for someone who lacks DIY skills. Fill a large, round container with potting soil, plant herb seeds and stick the pole of a clear, opened umbrella in the center of the soil. Allow 1-2 inches of space between the bottom of the umbrella and the container for air flow.
Low light indoor trees are ideal plants to grow inside spaces that receive very little natural light. Live greenery indoors adds a touch of warmth and beauty to an indoor room, plus the green leaves help to purify the air in the room.
Large, empty corners of a room are great spaces to fill with a live tree. Look over our round up of these 15 best low light indoor trees we have found, you can grow easily and pick out one that best suits your living space and lifestyle.
Here are 15 best low light indoor trees:
Madagascar Dragon Tree
Chinese Evergreen
Alii Ficus
Kentia Palm
Parlor Palm
Bird of Paradise
Norfolk Island Pine
Fishtail Palm
Corn Plant
Umbrella Tree
Yucca Indoor Plant
Indoor Fiddle Leaf Fig Plant
African Candelabra Tree
Tree Fern Indoor Plant
Rubber Indoor Tree
1- Kentia Palm
The first one we have in our list is Kentia Palm (Howea forsterana) that produces deep green, palm fronds that can grow up to 8 feet long. The tree is very slow growing and will probably only reach a mature height of 5-6 feet, but it does have the capability to reach almost 50 feet in height when grown in a shaded, outdoor location. Direct sunlight will burn this tree, whether its grown outdoors or indoors.
Caring Tips: This Australian tree like low light and slightly dry soil. Only water when top inch of soil dries out. Mist palm fronds monthly to remove dust and increase humidity. Feed once a month during the growing season. Do not re-pot unless absolutely needed. The fragile roots of the Kentia Palm are easy to break and will not re-produce.
Kentia Palm (Howea forsterana), Low Light Indoor Trees, we love its pattern of leaves
2- Madagascar Dragon Tree
The second one we are going to discuss is Madagascar Dragon Tree (Dracaena Marginata) that is famous for oozing what appears to be red blood when it’s cut. The live greenery, combined with the red blood, make this low light house tree a unique conversation piece when guest come over to your home.
The stems of this low light indoor tree are stiff and sturdy, so it will require no additional support as it grows into a mature height of around 6 feet. The long, slender leaves appear near the top of the tree only, not along the trunk.
Caring Tips:
Place the Madagascar Dragon tree near a north facing window where it will receive low light during the day. Direct sun will scorch the leaves, so never place it in a east or west facing window.
Keep soil moist, but never soggy. Mist leaves once a week to increase the humidity level for the tree. This indoor tree does not like hot or cold temperatures and will grow best in a room that remains between 60-75 degrees consistently.
Madagascar Dragon Tree, a Low Light Indoor Tree
3- Chinese Evergreen
This is the best indoor tree for low light that was originated in the tropical rain forests of Asia, we love this tree. The Chinese Evergreen(Aglaonema Commutatum) will reach a mature height of 3 feetand will be equally as wide.
This large indoor plant has large, flat leaves that are typically variegated in colors like silver and light green. Occasionally the low light plant will produce a bloom that resembles the bloom of a Peace Lily.
This tropical plant does not require much light to grow, but it does need to be kept warm. Consistent indoor temperatures between 68-75 are ideal for optimum growth.
Caring Tips: Water only when the top inch of soil is dry.
Chinese Evergreen (Aglaonema Commutatum), low light indoor tree
4- Alii Ficus
This tree hails from India and Asia, and is one of our the best plants to grow indoors. The leaves of this species of ficus tree are narrow and can reach up to 10 inches in length. The tree can reach up to ten feet tall when mature. The tree is slow growing, but can bePrune as needed to keep the tree looking neat and at the desired size.
Caring Tips: Water only when the top inch of soil dries out. Feed only during the spring and summer months, withhold food during fall and winter. Only use fertilizer that does not contain boron. Alii Ficus is boron sensitive and will drop its leaves if fed with fertilizer that contains boron.
Precausion: All parts of this indoor tree are poisonous and should be kept away from children and pets.
Alii Ficus low light indoor tree, reach up to ten feet tall when mature
5- Parlor Palm
The Parlor Palm (Chamaedorea elegans) is named after the room it grows best in–the parlor, which is the name given to an interior sitting room of the home. This low light indoor tree is easy to care and ideal for any room of your home or office. It’s a slow growing tree with rich green, slightly arched leaves. Parlor Palms are popular and hardy, often being handed down from one generation to the next.
This low light indoor tree rarely needs re-potting and will grow to a mature height of 8-10 feet. The dark green palm fronds can grow up 6 feet long, so it will need space to grow tall and wide.
Parlor Palm low light indoor tree, we love it as its easy to care tree
6- Bird of Paradise
The Bird of Paradise tree(Strelitzia reginae) is more of a tall houseplant than a tree. This is one of the best indoor trees that is unique because it blooms, we love it! That’s why we love it the most than other trees in our list. The fiery red-orange blooms are long lasting, appearing in mid-summer and lasting for weeks. The unique blooms resemble a bird in flight.
This low light indoor tree will reach around 10 feet tall when mature and have a 6 foot spread.
Caring Tips: Native to Texas, Bird of Paradise thrives under dry conditions. Only water when top inch of soil is dry. Fertilize every other week when tree is actively growing.
Bird of Paradise, tall houseplant than a tree.
7- Norfolk Island Pine
This evergreen tree resembles a traditional Christmas tree and is often decorated as one during the Holiday season. Norfolk Island Pines (Araucaria heterophylla) are not true pine trees and are not cold hardy. They will die if exposed to temperatures below 35 degrees.
These are slow growing trees as compared to other trees we are discussing about, which will eventually reach a mature height of 6 feet.They can be placed outside during the summer in a shady location. However, the Norfolk Island Pine helps to purify indoor air, so it’s good to keep them indoors year around.
Caring Tips: Norfolk Island Pines enjoy high humidity and indirect light. Only water when the top inch of soil is dry and feed with a balanced, water soluble fertilizer spring through summer. You may also like to see my other related article low light houseplants.
Norfolk Island Pine, low light indoor tree reach a mature height of 6 feet
8- Fishtail Palm
This low light indoor tree gets its name from the shape of the fronds it produces. The jagged edged thin leaves hang down and resemble a fishtail.
Caring Tips:
Fishtail Palms (Caryota) are tropical plants and grow best in rooms where the temperatures are 70-80 during the day, and 60 at night during the active growing months. When weather cools and the Fishtail Palm’s growth slows down, air temperature of around 50 degrees during the winter months encourages the tree to rest and store energy for the next growing season.
This slow growing tree also loves humidity and should be misted every other day or kept in a room with a humidifier.
Fishtail Palm tree
9- Corn Plant
Despite its name, the Corn Plant (Dracaena fragrans) is not edible, but it is a nice looking indoor plant for low light that grows quite large. The indoor tree will also help keep the air clean.
The thick trunk curves in interesting shapes and the long, strappy leaves are striped lime green and cream and resemble the leaves of corn stalk. Older trees may produce a strongly scented flower, but it’s rare.
Caring Tips:
The Corn Plant may drop some its leaves when you first bring it home due to the shock of being moved. It will quickly recover and produce new leaves. If the plant is over-fed or over-watered, leaves will turn yellow and drop off.
Place Corn Plant in a bright location, but not in direct sunlight. Also, keep it away from drafts. Water and feed sparingly. This low light indoor tree will grow slowly to eventually reach a mature height of around 6 feet. It can be pruned to keep at a desired height. You may also like to see my other related article low light outdoor plants.
Corn Plant low light indoor tree
10- Umbrella Tree
This low maintenance, low light indoor tree is covered with large, bright green glossy leaves that draw the eye towards it. The size of an Umbrella tree (Schefflera amata) grown indoors is determined by the size of the container it’s planted in. One planted outdoors can reach a mature height of 50 feet, but a container grown one can be kept at a more manageable 5 feet or less. The Umbrella Tree is fast growing and will need regular pruning to keep it at a desired height and width.
Caring Tips:
Place Umbrella tree near a north facing window and keep room temperature between 55-75degrees. Water thoroughly, then allow soil to dry out before watering again. Over-watering this indoor tree will cause root rot and powdery mildew. It’s a tropical tree and does like a light misting twice a week.
Fertilize once a month during the growing season and wipe the dust off of leaves monthly with a soft, damp cloth.
Umbrella tree (Schefflera amata) a low light tree
11- Yucca Indoor Plant
Large, woody stems produce sword shaped leaves on the Yucca tree(Yucca elephantipes). This low light indoor tree helps purify the room air and needs very little care. Native to the Caribbean, the sword shaped leaves will grow between 1-2 feet in length. Dust the leaves monthly.
Caring Tips: Yuccas will reach a mature height of around 10 feet and are drought tolerant. Ideal indoor plant for people who are frequent travelers, it can even tolerate large temperature changes. This tree can be moved outdoors in a shady location during the summer, but must be brought back indoor before the first frost.
Yucca Indoor Plant, we love sword shaped leaves it produces
12- Indoor Fiddle Leaf Fig Plant
The Fiddle Leaf Fig (Ficus lyrata) is an ornamental tree that makes statement in any room of the home. The tall growing tree (up to 10 feet) produces large, flat leaves all the way up the trunk.
Caring Tips:
This is one of our best houseplants for low light areas. The Fiddle Leaf Fig will tolerate indirect sunlight, but it will drop its leaves if placed in a drafty location. Keep away from exterior doors and air vents.
The tree will also develop brown leaves that fall off if it’s over-watered. Dust leaves with a soft cloth once a month to prevent dust buildup, and give the entire Fiddle Leaf Fig tree a shower once a year in the spring.
Allow soil to dry out completely between watering. Feed every two weeks during active growth using a balanced fertilizer. You may also like to see my other related article fruit bearing trees.
Fiddle Leaf Fig (Ficus lyrata) low light house plant
13- African Candelabra Tree
The African Candelabra tree(Euphorbia ammak) is a cactus look-alike. These trees are native to Southern Africa, but will grow well indoors in any part of the world.
Caring Tips:
These are succulents and need very little water in spring and summer, and should only watered once a month during the winter months. Old, mature African Candelbras will reach 6 feet tall when mature, but that will take a few years since they are slow growing.
Also known as Milk Tree, this low light indoor tree produces a milky sap that can irritate skin and eyes. The milky sap is toxic if ingested and this tree should not be grown around children or pets. You may also like to see my other related article dwarf fruit trees.
African Candelabra tree (Euphorbia ammak)
14- Tree Fern Indoor Plant
Native to Australia, the Tree Fern (Dicksonia) has fronds like a fern and a thick trunk covered with fur. The feathery fronds can unfurl to reach mature lengths of 4 feet, with the tree height reaching 6-10 feet when mature.
Caring Tips:
Tree Ferns love moisture, so keep the soil moist at all times and mist tree weekly. Place tree in a bright room, but not in direct sunlight. Prune off lower fronds as they die back and turn brown.
Mature Tree Ferns are heavy feeders and will need to be fed with water soluble plant food every two week from spring through fall.
Tree Fern (Dicksonia) low light house plant
15- Rubber Indoor Tree
Very attractive plant with glossy leaves, the Rubber Tree(Ficus elastica)is popular for indoor growing because of its easy care nature. The tree will reach a mature height of between 3-6 feet and will need to be re-potted every year in well draining potting soil until it reach the height you desire. The larger the container, the larger the tree will grow.
Caring Tips:
Rubber Trees are heavy feeders and drinkers. Feed weekly during the growing season with a weak solution of water soluble fertilizer to quench the tree’s thirst and hunger.
Wipe leaves off once a month to remove dust and keep them glossy.
Rubber Tree (Ficus elastica)
Factors To Consider When Buying An Indoor Tree
A low light plant is ideal for growing in a room that receives very little natural light. This type of houseplant will thrive on just a couple of hours of indirect sunlight each day. But there are other factors, besides light level, to consider when selecting the right tree for an indoor environment.
Consider the average room temperature year-round. People who live in large homes often close off some of the unused rooms of the house to save on energy usage. This is good for reducing the utility expense but not good for plants.
If the room is closed off without access to fresh air, the room temperature will be far too hot in the summer and far too cold in the winter for the plant to survive. Most plants that are commonly grown indoors thrive when the room temperature is 65-75 F during the day and 55-65 F during the night.
There are some exceptions, like the Parlor Palm, which thrives when daytime room temperature is 80 degrees F and will survive temperatures that dip to 50 F.
2- Amount Of Sunlight
Even low light plants need to be exposed to sunlight every day but usually not direct sunlight. Houseplants like Bird of Paradise and Alii Ficus need to be near bright light to produce growth. A few hours each day of bright indirect sunlight is needed for most low light plants to thrive.
Observe the room throughout the day to determine how the light enters the room and where the direct sunlight spots are located. Direct sunlight will cause many plants, like low light indoor trees, to be sunburned. A sunburned tree or plant will develop blistered leaves that turn yellow or brown and fall. If too many leaves are lost to sunburn the plant will die.
Turn the plants a quarter turn once a week to give all sides of the plant equal exposure to light so it will grow evenly.
Grow lights can be used in indoor spaces that do not provide the plant with enough light. Use LED grow lights that do not produce heat to supplement the natural light for plants.
3- North, South, East, or West
The amount of sunlight the room receives will be related to which side of the house the window is facing. A northern exposure will provide the room with the least amount of sunlight each day. It will provide the right amount of low light these types of plants need anywhere in the room, even in front of the window.
Rooms with southern exposure will be very bright most of the day and low light plants in that room will need to be placed far away from the window. East-facing rooms will receive morning sunlight which will make this a good room for most low light plants.
If the room faces west it will receive the intense afternoon sunlight. Place low light plants in this room far away from the window.
South or west-facing windows can be covered with room darkening curtains or blinds that can be closed during the times of day when the sunlight is most intense. If there is a skylight in these rooms it will be difficult to protect plants from the intense sunlight and it will be best to relocate the plants.
4- Growing Requirements
The growing requirements for each low light plant will vary but all will share in their need for low light growing environments.
Be sure to read the exact specifications for each plant before purchasing so you will know if you can provide the right growing environment that will allow the plant to thrive.
5- Soil
The soil needs of a low light plant will be slightly different than other houseplants because they tend to grow very slowly. A good quality potting mix formulated for indoor plants will be needed. This type of potting soil mix is composed of peat moss, vermiculite, perlite, and contains no fertilizer. Soil-less mixes like this will absorb moisture very well, resist compaction, and allows you to tailor the feeding schedule to the plant.
6- Watering
A low light indoor tree will require more water than a small succulent that is grown in the same room. The type and size of the plant will determine how much water will be needed.
The Kentia palm is an indoor tree for light low environments and it thrives in soil that is always a little on the dry side. The Norfork Island pine and Fishtail palm are indoor trees for low light area. Both of these trees like dry soil and high humidity, so they will need to be misted regularly to keep them well hydrated and thriving.
Ending note
Bringing nature to your indoor space is more demanding than ever before but the problem is which plants thrive well especially houses that receive not much of the sunlight. These plants are able to survive well in low to middle indirect sunlight. You can choose any of these from our list you like the most!
Not everyone has a sunny backyard, and that’s an ideal location for low light outdoor plants. A shaded area can be transformed into a lush, green growing oasis if the right plants are selected.
If you have ever walked through a garden center, you know that it can be difficult to find plants that do well in partial to full shade conditions. A general rule is that with larger leaves, plants can tolerate less sunlight. Below are our list of 20 outdoor plants that need little light to thrive.
These low light plants for outdoors will grow beautifully in a shady backyard.
1- Begonias
The first one we have is a Colorful begonias(semperflorens-cultorum) that are a shade garden staple and one of the best plants to grow in a shady backyard. This annual plant has broad leaves that can be glossy green, bronze or red with clusters of flowers in red, pink or white. Begonias will reach a mature height of about 12 inches and about half as wide. Plants are heat tolerant and like moist soil. Can be grown in containers.
Begonias (semperflorens-cultorum), plant has broad leaves
Bleeding heart(Lamprocapnos spectabilis) is an early blooming perennial that is an ideal shade garden plant. This is one of our most favorite plants to grow in a shady garden. The plant will produce long, arching stems which will have pink or red blooms hanging from them. The blooms are heart-shaped and have an elongated bottom that looks like a tiny drop of blood. Great plant for hanging baskets.
Bleeding heart will bloom from spring until mid-summer. When temperature rise, the plant will die back even when it’s planted in full shade. Plant will reach a mature height and width of two feet.
Bleeding heart (Lamprocapnos spectabilis), early blooming perennial, height and width of 2 feed, blooom in early spring to mid summer.
3- Hostas
We can call Hostas as a true low light outdoor plants that can survive in full shade. Most varieties of hostasby BHGcan grow well with small amounts of sun. When plants have variegated leaves, more sunlight will help the colors, but limited sunlight is best.
If leaves look brown or burned, they may be getting too much sun. Hostas do best in well-drained soil. Hostas love water and there is no such thing as too much water for hostas. Hostas are not fussy about temperature or humidity and can grow in a wide range of climates.
Growing requirement: Often the best and easiest way to feed hostas is by adding a healthy layer of compost to the soil in the spring. Hostas will do well with a magnesium-rich fertilizer meant for vegetables. Hostas grow best in growing zones 3 to 9.
Hostas with variegated leave, growing zones 3 to 9.
4- Heuchera (Coral Bells)
One of the easiest perennials to grow, heuchera (on wikipedia) are an easy to care for outdoor plant. Heuchera are tolerant of a wide range of light conditions, poor soil, heat, cold, humidity and drought. Foliage comes in nearly every color imaginable, from silver to nearly black.
Heuchera flowers occur in hues of coral, red, white, or pink and are attractive to butterflies and hummingbirds and are long-lasting in cut arrangements. Plant coral bells in spring or fall. Space plants 1-2 feet apart. Heuchera foliage color are best when plants receive about four hours of sunlight.
Heuchera does best in rich well-draining soil but is tolerant of clay or rocky soils. Heuchera is somewhat drought-tolerant once established. In spring, spread a thin layer of compost or apply a balanced slow-release granular fertilizer. Best grown in growing zones 4 to 9.
Heuchera flowers, drought-tolerant, growing zones 3 to 9.
5- Coleus
Small plants with big impacts in shady areas, coleus (Plectranthus scutellarioides) have brightly colored foliage that range in color from shades of pale green to deep Burgundy.
Growing requirement: Plants are annuals and come in a wide range of mature sizes and leaf size. Coleus are adaptable to most soil conditions and are easy to incorporate into any shade garden theme. Ideal for border plants or filler plants, coleus can also be grown in containers. Keep top pinched off plant so it will produce lateral branches. Coleus will retain their leaf color throughout the summer.
Coleus (Plectranthus scutellarioides), color shade of pale green to deep Burgundy.
Fall foliage is crimson red, and clusters of small red berries will remain on the tree after leaf drop. The berries attract a birds and squirrels. Slow growing Dogwood trees will reach a mature size of 20 feet tall and 10 feet wide.
Dogwood trees (Cornus nuttallii), white, pink or red blooms in spring, 20 feet tall and 10 feet wide.
The vine is a fast growing perennial that will reach a mature length of 30 feet. After flowers fade, the vine will produce long seed pods that turn grayish brown in fall. This shade loving vine is a favorite source of nectar for butterflies and is often grown to cover a pergola.
Dutchman’s Pipe (Aristolochia tomentosa), foliage and showy 2 inch long yellowish-green trumpet shaped blooms, length of 30 feet when mature
8- Flowering Quince
This is a hardy flowering shrub that will grow to reach a mature size of around 10 feet tall and wide, but can be pruned to desired size. It’s a drought tolerant shrub (by plants.ces.ncsu.edu) that will adapt to most soil types.
Growing season and color range: Flowering quince (Chaenomeles speciosa) is a deciduous shrub that produces showy flowers in the late winter and early spring when little else is blooming. Bloom colors include red, pink and white, and blooms are followed by fragrant yellow fruit. The quince fruit is edible and typically used to make jam.
Flowering quince (Chaenomeles speciosa), color range from red, pink and white, and blooms are followed by fragrant yellow fruit
9- Foam Flower
Characteristics of low light plants: Spikes of two feet tall white blooms emerge from attractive three-pronged foliage and give the appearance of the plant being covered with foam. Foam flower (Tiarella cordifolia) is a hardy perennial that will thrive in a shady backyard, producing both floral beauty and fragrance during the spring.
Growing size and conditions: The plant will reach a mature height of around 6 inches and is often used as a ground cover for shady areas. It’s fast growing and will quickly fill in bare spots in a shade garden if the soil remains moist.
Foam Flower (Tiarella), mature height of around 6 inches
10- Hydrangeas
Plant identification: Hydrangeas (Saxifragaceae) grow into large shrubs that produce huge blooms that are the size of diner plate. The large, round blooms are made up of many small blooms and are ideal for use as cut flowers and dried flowers. Blooms appear in mid-summer and colors range from pink, blue, purple, and white. Shrub can be prune to desired size and will grow to around 8 feet tall and wide if left unpruned.
Growing requirements: Hydrangeas enjoy semi-shaded areas where the soil remains moist. The shrub grows best in acidic soil and bloom color will vary depending on the pH level of the soil. This shade loving plant also produces large, attractive leaves and comes in evergreen or deciduous varieties.
Hydrangeas (Saxifragaceae), colors range from pink, blue, purple, and white, 8 feet tall and wide without pruning
11- Impatiens
Also known as Jewelweed, Impatiens (Impatiens walleriana) is one of the best plants for shade, we love it. Hardy in most growing areas and adaptable to most soil conditions, impatiens are low growing plants that will create mounds of colorful flowers during the later winter and early spring.
These plants will provide bright color in shady areas and require no maintenance. Ideal for borders or baskets.
Jewelweed, Impatiens (Impatiens walleriana)
12- Lady Fern
Characteristics: Low growing plant that has light green foliage and fiddle-heads in shade of red. One of the most prized low light plants, Lady ferns (Athyrium filix-femina) are often found growing in-between taller shrubs and trees in shady woodland areas.
Growing needs: Lady fern will quickly reach its mature size of 2 feet tall and equally as wide. This shade lover enjoys loamy soil and moisture. Easy to grow in containers or hanging baskets. Some fern fronds will grow straight up, and others will grow sideways and spill over the side of a container.
Lady ferns (Athyrium filix-femina), 2×2 feet tall,
13- Brunnera
Brunnera is an outdoor plant that does not need sunlight to grow. Plants have leaves that are glossy green or variegated. Brunnera can be grown in partial shade to even full shade. If you have a full shade location, brunnera is a great option.
Growing requirements: Brunnera blooms in early to mid-spring with blue flowers and does best in well-drained soil that can be kept consistently and lightly moist. If opting for containers, make sure that brunnera cannot dry out. Plant care for brunnera will include watering to maintain soil moisture and providing good drainage to assure that roots of brunnera plants do not sit in soggy soil.
Growing brunnera reaches 1.5 feet in height and 2 feet wide, growing in a small mound. Brunnera is best grown in growing zones 3 to 8.
brunnera-macrophylla, start blooming from early to mid of the summer
14- Caladiums
Caladiums are another great option for low light outdoor plants. Caladiums are best to bring color to full shade locations. Caladium do not do well in full sun, which burns the leaves. When potting, start them in a damp peat mix soil.
Caladiums like a slightly acid soil pH. Once they start coming out of the ground, move into their shaded areas. When growing Caladiums as houseplants, water whenever the soil feels dry.
Begin watering less in autumn, as plants naturally go dormant and stop growing. If grown outdoors in a cold climate, they can either be considered annuals or you will need to dig and store the tubers over winter.
Caladiums plants, color shades are green, white, pink, rose or red.
15- Astilbe
Astilbes are easy-to-grow plants, but they also need plenty of water. Astilbe like consistently moist soils, and they will suffer without it. Make sure to grow astilbe in soil that is well-drained and has a lot of organic matter or compost.
Amending the soil with compost and peat moss can help the soil retain water and keep astilbe plants happy. When it comes to light, astilbe is versatile. Astilbes can take anything from full sun to almost full shade.
More sun exposure brings dry soil and possibly burnt leaves. Planting astilbe in a location that only gets some morning light will ensure their livelihood. Astilbe do best when grown in growing zones 3 to 8.
Astilbe Plants, grown in growing zones 3 to 8.
16- Lily of the Valley
Plant lily of the valley (at almanac) in partial sun to full shade. Lily of the valley needs protection from the hot afternoon sun. For warmer growing zones, full shade is optimal for lily of the valley. With aromatic, white bell flowers, this is a beautiful cut flower for arrangements.
Growing needs: Lily of the valley prefers soil with good drainage. The plants can grow in a range of soil types, including clay soil. It likes an acidic to neutral soil pH but can tolerate slightly alkaline soil, too. This plant prefers consistently moist but not soggy soil.
Growing needs: Lily of the valley prefers mild conditions with average humidity. Temperatures between 60 to 70 degrees Fahrenheit are best. The plant doesn’t do well in dry, hot climates. In the right growing conditions, lily of the valley can grow quite quickly. The plant roots grow as rhizomes and can multiply each year. Lily of the valley do best in growing zones 3 to 8.
Lily of the Valley, best in growing zones 3 to 8
17- Japanese Painted Fern
While Japanese painted fern is listed as being a plant for partial shade or full shade. The plant achieves its best color if grown in partial shade. It is important to keep the Japanese painted fern from the hot afternoon sunlight in any growing zone.
An essential requirement in growing Japanese painted fern is a soil with adequate drainage. Planting in more clay soils can lead to root rot and fungal disease. Keep the soil evenly moist.
Caring Tips: Heat from the sun and more hot, humid days in the middle of summer can cause the delicate leaves to brown and burn. With a good organic soil, fertilizing should not be needed. Japanese painted ferns thrive in growing zones 3 to 8.
Japanese Painted Fern
18- Trillium
Found in forests under thick tree growth, trillium do best in partial to full shade. Direct sunlight can burn the foliage, so these are great outdoor plants that need little light. Trillium plants prefer a neutral soil pH.
Typically, Trillium in forests blooms white but colors can also be red. Trillium need a soil that is rich in organic matter and holds moisture, similar to what they find in forests. Maintain lightly moist soil, sitting in soggy soil for too long can result in root rot and other diseases.
During hot, dry conditions, trillium will likely need more water than normal, or they will wilt. Humidity typically is not an issue if their water needs are being met. Fertilizer usually is not necessary but organic compost is beneficial as it mirrors the forest soil. Trillium can do best in growing zones 4 to 7.
Trillium Flowers, growing zones 4 to 7
19- Foxglove
Foxglove (on costafarms) can grow in full sun, partial sun, or partial shade. Mature plants tolerate shade but not full shade. Foxgloves will do best when exposed to partial sun. Foxgloves like rich, well-draining soil that’s acidic, with a pH under 6.0.
Keep the soil moist, but not soaked as foxgloves can get crown rot. Foxgloves do better in cooler temperatures and may wilt in temperatures over 90 degrees Fahrenheit. Foxgloves do not need any special conditions for humidity.
For growing these biennial plants in colder zones, apply mulch for winter protection. Apply a 1-inch layer of compost around the plant in early spring to encourage growth. Fertilizer is not necessary and excess nitrogen can harm the growth. Foxglove thrives best in growing zones 4 to 10.
Foxglove Flowers, zones 4 to 10
20- Japanese Maples
Japanese maples can be grown in sun and shade depending on the variety. Japanese maples in nature typically grow under the canopy of other trees. Green leaved varieties are better suited for shade conditions.
Caring Tips: Caring for Japanese maples in summer is mainly a matter of providing enough water to prevent stress. Apply the water to the root zone slowly so that the soil can absorb as much water as possible. Cut back on the amount of water in late summer to intensify the fall color.
If using mulch for moisture, keep a few inches from the trunk to prevent rot. Pruning should be done in late winter when the tree is dormant. Japanese maples do best in growing zones 6 to 8but can be potted and brought indoors or covered for winter protection.
Japanese Maples, growing zones 6 to 8
Summary
Low light outdoor plants can survive in low to moderate indirect sunlight. These plants are hardy and often with long leaves. Each of them have different growing requirements and characteristics. You can select any of the above low light outdoor plants that you like the most. Hope we have guided you well through our list in the selection of right low light outdoor plants for your garden.
Here we have prepared a questionnaire to answer some of the common questions.
FAQ’s
What is indirect sunlight?
When the rays of The Sun don’t hit directly to the plants and filter through some object before your plants gets the Sunlight. A shaded outdoor structure, large trees are in the way of sunlight, or if the plants are north facing side of your house.
Does low light help plants grow?
Plants need sunlight to grow well and to produce seeds and fruits. All plants require photosynthesis to convert oxygen, water and adequate light into carbohydrates. It works as a form of energy for healthy growth of plants otherwise they can produce carbohydrates and can die.
How many hours does a plant need sunlight?
Usually plants need 6 to 8 hours of sunlight, however there are some plants that can live with the least amount of indirect light from 2 to 4 hours. You can supplement your plants with artificial light.
In a previous article we discussed the numerous benefits of cold frame gardening and how to extend your growing season by weeks, and in some cases months. Having your own diy greenhouse is a wonderful asset to any home gardener, but cold frames are the next best thing. They are inexpensive, versatile, and easy to build. Here are some diy cold frame plans we gathered from the internet that will help get you started.
1. PVC DIY Cold Frame
PVC is lightweight, portable, and very durable. Frames constructed out of PVC piping, and a strong sheet of plastic for the cover, are light enough to be moved from one part of the garden to another. After using for seed starting and hardening off, place the pvc cold frame by pvcplans over tender lettuce plants in the fall and harvest in early winter.
Here is a planfor a very attractive DIY cold frame by thisoldhouse using a recycled window for the top. This one has been placed on a foundation of bricks and is more permanent in nature than the lightweight PVC model above.
Here are brief steps to build a diy cold frame
Measure the length of log side of window to get the length of one front and two back piece.
Cut the pieces to the length.
Mark and cut the angle.
Mark and cut the tall and short Battens. Then glue and screw the Battens
Cut and position the back pattern. After that glue and screw the back Battens.
Glue the four side together and attach hinges.
Install the pavers, lid and handle.
Cut the vent rod and position the frame.
This Old House Cold Frame Plans, Image via: thisoldhouse
3. The Instructable Plan
Again, this is a diy Cold frame by instructables that incorporates the use of recycled windows. You will notice that this diy cold frame is a bit deeper than most which is great for taller growing plants. As with all plans using old windows, take the time really clean them up, re-caulking if necessary, and paint the box itself with whatever color you like. This will help with durability.
The Instructable cold frame Plan, Image via: instructables
4. The Seed Library Cold Frame Plan
For those of us with little time to spare, here is a cold frame plan by hudsonvalleyseed that is easy to implement and pretty inexpensive. It uses a product called Suntuf, a poly-carbonate material for the frame itself, but this isn’t really necessary. Any scrap wood will do the trick and save you some money along the way. Once again, take a little time to prep the wood and it will last for years. You may also like to read Vegetables To Grow In A Greenhouse.
A good cold frame by sacgardens will heat up during the day, almost as much and sometimes more than a homemade greenhouse. This one is simple yet very attractive and uses basement window well covers for the top. The plans call for pressure treated lumber and the frame can be placed on a brick or cement block foundation. Pressure treated is heavy so don’t plan on moving this cold frame around without a little help.
The Sacgardens Cold Frame Plan, Image via: sacgardens
6. DIY Cold Frame From PPG
This is a plan for a very simple 5’ x 5’ cold frame by pondplantgirl that will cost less than $30. It won’t look as natural as some of the wooden frames discussed above and the plastic covers won’t last as long as the recycled windows, but it will get the job done. You may also like to read DIY Wood Greenhouses.
The Vegetable Gardener diy cold frame by finegardening focuses on a lightweight top for ease of opening and propping up on warm days. In this case the top is made of a clear 8-mil thick sheet of vinyl stapled to the edge of the lumber framed top. Obviously, the vinyl is very lightweight, but over time it will deteriorate and crack, usually within a couple of years and you will have to replace it.
This isn’t a big job…just cut a new piece to the right size and re-staple. As you can see the cold frame itself is very well made and even incorporates a Uni-vent system for automatically raising and lowering the top based on the interior temperature.
Here are brief instructions to build this diy cold frame:
Cut SUNTUF panel in half in a way so that you have four panel that are 26″ wide by 48″ tall.
Make the Frame for the lid.
Finishing the lid. Using the drill bit make hole in every other valley of each panel’s ribbing along the top and bottom edges.
Make the frame for cold frame.
Attache the lid on the frame by using hinges and short screws.
The cold frame is ready.
The Vegetable Gardener Cold Frame Design, Image via: finegardening
8. The Grit DIY Cold Frame
If you really want to build an elaborate diy cold frame by grit consider the FarmTek model. This could almost be called a “hoop house” and can be constructed on a pretty large scale. This one is 12 feet long and uses a very heavy plastic to cover the four foot high hoops. You can certainly fit a lot of plants, even the tall ones, in this spacious frame.
Here is a plan by hgtv that incorporates a little extra feature…insulation. While the finished diy cold frame looks like many of the others we discussed here, this one has insulated sides. The insulation is simple to install and will definitely help with heat retention. Be careful however even young plants don’t tolerate heat very well, so make sure you let some of that insulated heat escape when the outside temperature creeps up near 50 degrees. You may also like to read DIY Mini Greenhouses.
The DIY Network’s Cold Frame Plans, Image via: hgtv
10. DIY Cold Frame Plan By SFC.Small Farmcentral
This diy cold frame by sfc.smallfarmcentral is made by using old window, scrap wood and hinges with screw. Remember few important things while making this type of cold frame such as keep the back tall than front side and boxes to short as compared to window for rain to run off.
Recycle Window DIY Cold Frame Idea By SFC.Small Farmcentral, Image via: sfc.smallfarmcentral
Wraping Up
Cold frames are nothing more than miniature greenhouses. If you build a couple right now, you’ll be off to a roaring start next spring and you’ll end the season well after the snow arrives. If you love to garden, get into cold frame gardening. You’ll be glad you did!
Decorating your pergola, trellis and arches can be a tough decision to make, as there are a thousand varieties of flowering vines in the market each with their own characteristic and beauty. You can do so much with these beautiful garden accents which are the main beauty to your garden. You can always come with innovative and inspiring ideas to cover up the sides of property that is less than beautiful by growing colorful flowering vines.
If you want to make the entrance of your garden really attractive you can use the flower vines with the characteristic of having multi-color flowers and dark green heavy leaves that will also attract butterflies to your garden. You can also make your garden a secluded spot by planting the flowering vines that can hide unappealing space of your garden covering the whole arbors, pergolas and arches.
Here are our list of best flowering vines for trellis, arches, pergola, and arbors :
1- Zephirine Drouhin Rose
The first one in out list is vining flowers that are among the best climbers with inimitable roses on it. The canes of this rose is thorn less and have the beautiful burgundy color which will make your garden look alluring.
These vines having flexible canes are widely used to decor the garden as they are easy to wrap around the pergolas or the arches that you have in your garden and can grow up to 15 feet. This unique flowering vine doesn’t require much of sunlight and blossoms very well in shadows as well, so if your garden doesn’t get the direct sunlight this Zephirine Drouhin Rose is just suitable for your garden. Related Article: Best Indoor vine plants.
2- Bougainvillea
If you are looking for something bright, colorful and floriferous in your garden then bougainvillea vining flowers must be your choice. These vining plants grow very well on bushes, hedges and fences from 3 to 40 ft. and are considered the best climbing plants for shade. If your bougainvillea plant is looked after well then this plant will prove to be the best in your garden. It is mostly liked for its disease resistant and pest free qualities which makes it popular among the garden lovers.
Whether you plant it in a small pot or leave it to climb on a garden trellis or fence, it will spread with full elegance overflowing the trellis and your arches. The bougainvillea grows in an equatorial climate such as in Keyna, Singapore or Brazil. They don’t grow in extreme cold weather or during excess rainfall. The ideal season for North America is spring and fall.
3- Blue Moon Wisteria
This Blue Moon Wisteria flowering vine grows in purple, red, blue and white color blooming vigorously in spring. It can spread up to 4 to 8 ft. and reaches up to 15 to 25 ft. This flowering vine produces flowers by the 3rd year of its plantation and it needs full sun, so make sure to plant it in the part of your garden where it will get the most sunlight.
The soil in which it has to be planted should be somewhat acidic, temperately fertile and well-drain. Usage of superphosphate during the onset of spring has proved stimulating growth for the flowers. To grow properly it needs space and support so if you are using this vine plant on a pergola you will have to support it properly at first. Blue Moon Wisteria requires a lot of maintenance and is the best plants to grow on a pergola.
4- Sweet Peas
This vining plant offer fragrant blooms in multiple colors depending upon their species, from summer to fall. Growing up to a height of 8 feet, this annual needs full sun, well-drained soil to grow, fertilizers every after 2 to 4 weeks and are suitable for northern regions. They require a lot of attention as the Sweet Peas is prone to bugs and pests. Related Article: vertical garden plants.
5- Morning Glory
This saucer shaped flowers bloom early in the morning and thus represents their name ‘Morning Glory’. They are the best decorating vine flowers for a garden because of their beauty. They have heart-shaped leaves which are mostly 4-5 inches long. They appear in blue, red, purple and yellow colors and the flowering vines reach up to 10 ft. long. Morning Glory grows in temperate and subtropical regions. Growing a morning glory is not much of a hassle, and can grow in dry soil as well but needs plenty of direct sunlight.
6- Campsis Radicans (Trumpet Vine)
This flowering vine Campsis Radican has trumpet shaped flowers and is also known as the Trumpet Vine. The flowers turn their color from orange to red and are yellow from its throat. Their distinct colors attract hummingbird to the garden. The Trumpet vine is perfect to grow on arches, pergola and trellis, as they are the best climbing plants and reach up to the height of 25 to 40 ft. The vine flowers need sunlight but the leaves can grow well in shade too.
7- Clematis
If you want the Clematis for your trellis or arbor you will have to go with the taller variety of clematis. The blooming season begins during the early spring and only after one season the whole structure will be covered in Clematis. These vine plants are easy to grow, require less maintenance and at the end of the year your garden will be filled with intriguing and colorful flowers.
8- Emerald Falls Dichondra Ground Cover Seeds
This gorgeous silver foliage with its heavy and constant growth is perfect for windows or on the ground. It is easy to grow as it requires only sun and well-drained soil to thrive properly. It reaches about 2-4 inches of height and the leaves are 1 inch in width. Its dark green color gives a fresh and a radiant look to the garden and you can grow them on the hanging baskets of your garden.
9- Henryi Clematis
The Henryi Clematis provides the best sight in summer as they have beautiful daisy shaped flowers with dark green foliage, its vine flowers look wonderful falling over a fence or an arbor. The flowers grow best when are given direct sunlight. The Henryi Clematis starts blooming in the start of summer and is seen throughout summer. This plant reaches till 6 ft. and the width of the flower is 24 inches to 3 ft. This flower is absolutely stunning with creamy color that is dark in the center and favorite among gardeners.
10- Jewel of Africa Nasturtium Seeds
These vining flowers are available in highly appealing colors such as yellow, orange, maroon, red, salmon and an apricot shade. With green leaves and colorful flowers this vine plant looks like a beautiful painting. They are grown in yards, walls, fences, trellis and as garden covers too. They require full sunlight to flourish and bloom from June to September. They are very easy to grow and flourish well if maintained with care.
11- Cape Honeysuckle (Tecomaria capensis)
This flowering vine is a native of Africa and is well able to withstand life in a harsh climate. Salty air, high winds, and sandy soil will not harm this hardy vine that produces reddish-orange trumpet-shaped, fragrant blooms throughout the summer. In warm, tropical climates the vine will produce blooms throughout the winter months.
Cape Honeysuckle is an evergreen that will reach a mature length of 40-feet and be covered with dark green glossy leaves year-round. This hardy flowering vine can be pruned to the desired length and can be pruned into a bush in any size and shape desired.
12- Carolina Jessamine (Gelsemium sempervirens)
Carolina jessamine is a fast growing vine that thrives in warm climates. The vine is semi-evergreen and is covered with attractive emerald green leaves most of the year and an abundance of fragrant yellow flowers from late winter until spring.
Carolina jessamine grows best in full sun and needs consistent moisture. It will reach a mature length of 20-feet and is sometimes used as a ground cover on slopes to prevent soil erosion. Related Article: diy tomato cages.
13- Climbing Roses (Rosa)
Creating a covered arbor with climbing roses will add vertical beauty and fragrance to any outdoor space. An archway or arbor leading into the backyard garden is covered with a climbing rose like ‘William Baffan’ or ‘Pretty In Pink’,which are fast growing vining plants that produce an abundance of colorful scented blooms during the summer.
The stunning appearance and perfumed fragrance of a climbing rose covering an arbor or archway will create a welcoming focal point to the landscape and increase the curb appeal of your home.
Climbing roses grow best in full sun, well draining soil. Fertilize climbing roses every month during their active growing season. Mature climbing roses will reach 20-25 feet when mature.
14- Chocolate Vine (Akebia quinata)
This intriguing climbing flower vine is one of the best climbing plants that you can use because it bears both flowers and edible fruits.
This perennial vine with flowers and fruit is a native of Asia and has delicate green leaves, deep purple pendulant blooms, and deep purple oblong fruits. The name of the vine comes from the bloom color and fragrance – they look and smell like chocolate.
The flowering vine plant is covered with glossy dark green oval leaves that grow in clusters of five. The pendulant flowers show up in early spring and last until early summer and the edible fruit will show up on the vine in late summer. Most people say the fruit looks like an eggplant but doesn’t taste quite as good.
This hardy flowering vine grows best in full sun and well draining soil. It will grow fast and reach a mature length of 20-feet.
15- Grapes (Vitis vinifera)
Any type of grape is ideal for planting to cover a trellis, arch, pergola, or arbor. Plant your favorite eating or wine making grape and enjoy early spring blooms and late summer fruits.
Grape vines will need to be pruned yearly and the grapes will only grow on last year’s woody branches.
Plant grape vines in full sun and slightly sandy soil for best results, Feed the vines twice a year once in early spring and again in mid-summer. The spring blooms will attract pollinators so you can enjoy watching the bees, birds, and butterflies while smelling the sweet aroma of grape blooms. In the fall, you can enjoy the shade of the grape vines while feasting on the sweet grapes.
16- English Ivy (Hedera helix)
This is an often overlooked flowering vine and thought of as only a perennial evergreen vine. English Ivy produces flowers that are greenish-white or greenish-yellow, and appear on the adult ivy plant in fall. The small blooms appear in clusters and are shaped like an umbrella. English ivy does not produce many blooms but are a welcomed burst of floral color during the fall when other plants have ceased flowering.
Since English ivy is one of the few fall-blooming plants, this flowering vine has less competition for the pollinators in the area. This flowering vine grows best in partial shade and moist soil. It’s a slow growing, non-invasive plant that will reach around 9-feet in length when mature.
17- Bower Vine (Tecoma jasminoides)
This flowering vine is a native of Australia and thrives in a sub-tropical climate. It’s a fast growing climbing flower that will produce an abundance of white trumpet shaped blooms that have dark pink throats.
The vine does not produce dense growth but the vines intertwine and will rapidly cover a trellis or pergola. Bower vine is drought tolerant and grows well in full or partial sun. This vining flower will reach 30-feet when mature but can be kept pruned to a short length.
18- Moonflower (Ipomoea alba)
This is a fast growing vine that produces fragrant white flowers that open at night. If you enjoy sitting outdoors under the stars, a moonflower vine is a must-have in your garden. The large white or purple blooms are almost iridescent in the nighttime and will fill the night air with a sweet fragrance. The large green leaves are heart shaped so the vine provides unique garden beauty during the daytime when the flowers are not open.
Moonflower is a sub-tropical plant and will act like a perennial in a tropical climate. In colder climates, this flowering vine will act like an annual. The vine is easy to grow from seeds and will reach a mature length of 30-feet.
19- Passion Flower (Passiflora)
This flowering vine is a native of all tropical regions, including Asia and Australia. There are many different species of passion flower, most of which are flowering vines, but all vary in their usage.
Some species are used for their healing properties, some are strictly ornamental, while others are grown for the edible Maypop fruit they produce. Whichever passion flower species you choose to grow, it won’t disappoint in floral production and fast growing vines.
The large flowers range in color from blue, purple, white, red, yellow, and orange, and all having different colored centers. The blooms will measure up to 5-inches across.
Passion flower vine is not picky about the soil its’ planted in but it prefers dappled sunlight instead of full sun. The vine will be 40-feet long when mature.
20- Pink Jasmin (Jasminium polyanthum)
A native of China, pink jasmine produces pink flower buds and white star shaped blooms on an attractive vine. The flowering vine will have pink buds and open white flowers on it simultaneously giving it a unique bi-color effect.
This is an ideal climbing vine for arches, arbors, and pergolas. The vine will quickly cover the support system to provide fragrant shade. The vine can also be grown as a ground cover to help prevent soil erosion on rocky slopes.
Pink jasmine is an evergreen vine and in a tropical climate, it will produce fragrant blooms year-round. In colder climates, the vine will not bloom during winter but the glossy green leaves will remain green.
Plant in full to partial sun, in well draining soil. Keep soil moist, especially during the first year after planting. The vine will reach 25-feet in length when mature.
There is a great difference between the crops grown as starter plants and the greenhouse vegetables. Masses tend to grow vegetables and fruits in their greenhouse where they’ve control environment to control temperature, providing heat, extend the growing season and to protect them from frosting.
However, if you are new to gardening and planting fruits and vegetables, then you must be having good ideas what to grow in a greenhouse. God has bestowed countless variety upon us, so how can you select which are the best vegetables to grow in the greenhouse? Simply start with easy vegetables to grow so that within a year you get hands on them, so the next season you can continue to grow even the complicated ones.
1. Spinach:
It is one of the most grown best greenhouse plants – if you want to enjoy the freshest and tastiest spinach, cut it from the garden and cook it immediately. It is so healthy that you can increase your intake of vitamins and minerals instantly. Most importantly, you would never face trouble with growing and maintaining this greenhouse vegetable.
2: Leafy greens:
You must start with something that belongs to “salad family” – almost every other leafy vegetable grows in the same manner, especially when considering the bedding green house plants. Other than the basic knowledge, there is some aesthetic knowledge needed as well when growing leafy vegetables. They have varying tastes and colors – they make the perfect starters and sidelines. These can be a great source of income as you can sell them to various grocery stores and even wholesalers.
3: Micro greens:
In simpler words, you can grow the lovely looking and with a mouthwatering taste Tatsoi, Beet, Peas, Choi and radish etc. they are extremely loved as sidelines and with as snacks. Once you have good knowledge, you can mix the varieties and make second-generation micro greens at your own. You may also like to see shade loving vegetables.
You must have been grown up eating cucumber salads or even the raw pieces with salt. They taste simply wonderful – however, growing them is not that simple. You need to shrink wrap them so that their freshness can be retained after harvesting.
5. Tomatoes:
Most of the greenhouses have tomatoes in various colors and shapes – they are easy to handle specially the beefsteak varieties.
6. Peppers:
Peppers are loved all over the world – they simply make the dishes tastier. To your surprise, there is a great variety of peppers that you can easily grow in your greenhouse. They have light to intense taste and colors are mind-blowing. You may also like to see vegetables garden planners.
7: Herbs:
You might be interested in growing greenhouse vegetables indoor – herbs are the perfect in roots and without it as well. You can enhance the tastes of your meal with basil, cilantro and watercress etc.
8:Squash and Swiss chard:
They can be enjoyed planting and eating because they come in massive variety – they can even help you earn money by selling it to end users.
9: Citrus fruits:
You can grow a number of winter fruits in your greenhouse – these include sweet and sour, delicious looking melons, oranges and lemons. They have the ability to sustain even the coldest weather, so enjoy your winter evenings with juicy fruits.
10: Grapes:
Many do not know that the grapes can even be grown in the greenhouse – many free greenhouse plans can highlight details for you. You have to protect them from pests and take special care of the varieties like “black ham burgh” and “Buckland Sweetwater”.
11: Strawberries:
Fill your greenhouse with tasty strawberries this season – you can grow whatever type you want. Just make sure you provide them with sufficient space and ventilation.
12: Peaches:
It is very important for a newbie to select the right kind of greenhouse fruits and veggies. For example, peaches are extremely good to grow in the greenhouses or small gardens. They are nourishing and simple to handle too.
13: Coriander:
You cannot miss out the refreshing leafy greenhouse vegetable, which is perfect topping for salads and soups. You simply need to pay attention while the plant is growing, as it requires proper aeration and water. You may also like to see fast growing vegetables.
14: Chilies:
You can even keep a corner of the greenhouse to plant chilies – it can include green chilies and red ones too. It solely depends upon the kind of flavor you would like to have.
15:Raspberries:
You can actually do a very good business by growing raspberries – supply them to cake bakers and enjoy the money. In addition, they are so tasty that you can add as many in your delicious fruit salads and please the guests too. They are also ideal to blend with milk and have it in the form to shakes.
Therefore, now you must be clear enough how to start and what can you grow in a greenhouse. Greenhouse vegetable gardening is not only rewarding but also fun activity too.


 Plants")
")

")

")
")
")