Category Archives: Home Projects

33 Homemade Forge Plans To Meet All Your Blacksmithing Needs

Having your own homemade forge will enable you to transform steel and glass into practical and beautiful items. Create useful items for your home, campsite, off-grid homestead or gift-giving in a homemade forge.

Decorative and useful items forged from steel commands a hefty price in the market place, so a DIY forge will also enable you to make some blacksmith projects to supplement your income or to start up your own business. It only takes three things to get started creating unique pieces from steel; a hammer, anvil and a forge. The hammer and anvil are easy to find, and we believe with our 33 homemade forge plans, the forge will be easy to build.

Warning: Propane forge can be very dangerous if handled not carefully. Please don’t attempt these projects if you are not well aware how to use propane forge. I take no responsibility for any misshaping that is caused from the use of information in this publication.

1- Lawnmower Deck Homemade Forge

Discovering the DIY blacksmithing forge on Imgur was like stumbling upon a hidden gem in the vast expanse of the internet. As someone deeply passionate about craftsmanship and the art of blacksmithing, I was immediately drawn to the ingenuity and resourcefulness of this project.

What struck me the most about this DIY forge was its commitment to recycling and repurposing. The idea of transforming old, seemingly useless items like a lawn mower deck and a BBQ grill into a functional blacksmithing forge was nothing short of brilliant. It resonated with my own values of sustainability and environmental consciousness, reminding me that with a bit of creativity, we can breathe new life into items that would otherwise end up in a landfill.

The process of repurposing these items seemed almost poetic to me. The lawn mower and grill, once destined for the scrap heap, were given a new lease on life as essential components of a forge. It was a testament to the power of creativity and innovation, showing that with a keen eye and a bit of elbow grease, we can transform the ordinary into the extraordinary.

What I particularly liked about this DIY forge was its accessibility. Instead of heading to the hardware store for new parts, the builder looked around their own garage, workshop, and backyard for materials to repurpose. It served as a reminder that sometimes, the best solutions are right in front of us, waiting to be discovered.

Ultimately, what resonated with me most about this DIY blacksmithing forge on Imgur was its embodiment of the principles of sustainability, creativity, and self-sufficiency. It wasn’t just a forge; it was a testament to the power of human ingenuity and the potential for transformation that lies within each of us.

Homemade Forge
Lawnmower Deck Homemade Forge, Image via: imgur

2- Homemade Propane Forge

Building a homemade forge by imgur from an expired propane tank is easy with some ingenuity and this free plan that I am sharing with you. All you need to do is, Remove the collar top and fill tank with water. Measure and cut appropriate sized hole on top (which will become the front side). Paint with heat resistant paint. Allow to dry and attach burner nozzle and all remaining hardware with the detailed instructions found in these building plans.

Homemade Propane Forge
DIY Propane Forge Project, Image via: imgur

3- Simple Homemade Forge

Learn how to build a simple forge in this youtube video that will get you started blacksmithing.

I recomend this forge to beginners, so before investing a lot of time and money into building a homemade forge, just start with a simple forge like this one to see if you are going to enjoy the art of blacksmithing. Rocks are used to help increase the heat and hold it long enough to increase the temperature needed to work the metal. The design is simple and the building components are easy to find and inexpensive.

4- Mini DIY Forge

Dreaming of making homemade jewelry and/or knives from metal? Then this is the DIY forge by thegeekpub for you. To Build this homemade forge, all you need is just a few fire bricks, a propane torch, aluminum angle, nuts, bolts and a few washers so you can hammer out some one-of-a-kind jewelry pieces or unique knives.

Mini Forge
Mini Forge, Image via: thegeekpub

5- Waste Oil Homemade Forge

Discovering the DIY forge by Instructables was a revelation for me as someone deeply passionate about metalworking and blacksmithing. What immediately caught my attention and sparked my excitement was the ingenious use of waste oil as fuel. As someone who has access to used restaurant fryer oil and other types of waste oil, the idea that I could repurpose these materials to power my forge was incredibly appealing. It not only offered a cost-effective solution but also aligned perfectly with my commitment to sustainability and reducing waste.

What I personally liked most about this DIY forge was its simplicity and accessibility. The materials required to build it were basic and inexpensive – just bricks, concrete blocks, and a metal pipe. This meant that I didn’t have to invest a significant amount of money to create a functional forge in my backyard. The step-by-step instructions provided by Instructables made the building process clear and manageable, even for someone with limited experience in metalworking. It felt empowering to know that with a few simple components and a bit of effort, I could have a forge ready to use in no time.

The prospect of building my own homemade forge over the weekend filled me with excitement and anticipation. Not only would it provide me with a practical tool for pursuing my passion for metalworking, but it also represented a creative and fulfilling DIY project. The thought of being able to create metalwork in my own backyard, using fuel that would otherwise go to waste, was incredibly satisfying. It was a reminder of the boundless possibilities that come with resourcefulness and ingenuity, and it ignited a newfound sense of enthusiasm for exploring the world of DIY craftsmanship.

Waste Oil Homemade Forge
Waste Oil Homemade Forge, Image via: instructables

6- Air Tank Homemade Forge

The shell of a homemade forge can be created by recycling something you may have on hand, like this design that uses an old air tank for the shell.

Build this homemade forge:

  • Cut the material being used for the shell to the desired length.
  • Determine how many burners the DIY gas forge will have and how far apart they will be (if more than 1). Then create the appropriate sized holes.
  • Attach burner nozzles, pipes and choke assembly.
  • Plumb in the gas jets and hook up the gas valves and hoses using the step by step instructions given in these free plans.
Homemade Forge
Air Tank Homemade Forge

7- Homemade Coal Forge

If you have welding skills then you can build this homemade coal forge with metal pipes and metal plates. A 3-inch metal pipe makes up the body of the DIY forge and the coal bin is constructed using metal plates. You use diy spot welder to make joints of metal where needed.

These detailed pictorial instructions will show you how to build this small and mighty coal forge by imgur. Great for forging small metal items in your home workshop. Learn to make your coal and save money every time you fire up the forge.

Homemade Coal Forge
Homemade Coal Forge, Image via: imgur

8- Recycled Propane Grill

Use these homemade forge plans by feltmagnet to recycle that old propane grill that never gets used anymore into a useful blacksmith’s forge. Since the grill is already built to withstand heat, removing the wood and plastic items from the grill and doing a little tweaking to the design is all you’ll need to do. A charcoal grill can also be transformed into a usable gas forge.

Recycled Propane Grill
Recycled Propane Grill, Image via: feltmagnet

9- Propane Blacksmith Forge

These detailed plans will not only show you how to build a DIY gas forge, but also tell you the right questions to ask yourself prior to the DIY build. By asking yourself the right questions, you’ll be able to build the DIY forge by wikihow that best suits your needs in terms of size, heat output and how to best use the forge.

Propane Blacksmith DIY Forge
Propane Blacksmith DIY Forge, Image via: wikihow

10- YouTube Video

If following a video of a DIY building project is the best way for you to create, then watch this one before undertaking a forge building endeavor. This YouTube video will walk you through the entire process of propane forge plans on Youtube and answer all your questions.

11- Homemade Propane Forge

Another instructional video that will walk you through the forge building process with ease. To Build this homemade forge all you need is Airtank or freon tank, Kaowool Piece of 1/8″ x 3/4″ steel flat stock Piece of 1″ steel square tubing, 2″ x 10-32 bolts,,mini-grinder with thin kerf cutting disc, Files, Drill,10-32 tap, putty knife. This DIY propane forge design by instructables gets extremely hot and is great for the more advanced black smithers that has income potential on their mind. Forge glass items as well as metal in this homemade forge so you can create both practical and decorative items.

DIY propane forge
Homemade Propane Forge, Image via: instructables

12- Coffee Can Forge

No rule says a forge has to be big, it just has to work, and this one that I have Included in this list does. Any large metal can, like coffee, soup or paint cans can be transformed into a workable, mini propane forge by makezine. The refractory lining used inside these mini forges allows the heat to build up inside these small spaces to high enough temperatures to soften metal. Use this plan to make a quick and inexpensive forge. You may consider building these propane forges and selling if you can score a steady supply of large metal cans from a local restaurant.

Coffee Can diy Forge
Coffee Can diy Forge, Image via: makezine

13- Customized Build

Here is a YouTube documentary of a DIY propane forge on youtube. Build your own customized homemade forge with this detailed, informative and easy to follow YouTube video.

14- Metal Bucket Homemade Forge

So simple and inexpensive to build, you won’t even need power tools to build this DIY gas forge. A metal bucket can be transformed into the forge body with some simple hand tools. Legs for the forge can be created from any metal you have on hand and a burner holder made from standard black pipe and conduit rings. A couple of layers of Durablanket and fire bricks will enable an ordinary metal bucket to heat up hot enough to be used to forge steel.

Metal Bucket Homemade Forge

15- Propane Forge Build

Small and mighty, this homemade forge by imgur is crafted from a recycled propane tank and will help homemade propane forgemeet all of your blacksmithing needs.

Step by step pictorial instructions will show you every detail of this DIY project so you can build with ease. The small size of this forge makes it ideal to build for use in a small space or to forge small metal work.

Create this homemade forge and use it to earn extra income by crafting one of a kind knives.

Propane Forge Build
Propane Forge Build, Image via: imgur

16- Portable Blacksmith Forge

What I like in this forge, its compact, portable DIY forge and small enough to store on the shelf until it’s needed, yet powerful enough to get the forging job done when needed.

Learn how to create this homemade coal forge in this Youtube video that uses a rechargeable battery. A bag of charcoal and a fully charged battery will provide enough heating power to forge several knives.

And since it’s portable, this forge can go wherever you need it. Take it along with you to the job site so you can forge replacement parts for various metal items like fences, gates, and other unique items.

17- Disc Brake DIY Forge

Watch this YouTube video to learn how to transform a disc brake into a functional blacksmith forge.

An old disc brake can be obtained from a local auto repair shop for free, so the money invested in this homemade forge will be minimal. Removable legs make this DIY forge easy to store, easy to take with you, and easy to assemble and disassemble as needed.

Build this cheap, portable, and functional forge with this detailed instructional YouTube video for your home workshop.

18- Mini Electric Forge

A couple of old space heaters and fire bricks can be put together to create a mini DIY electric forge by ibuildit when you follow these free plans.

Everyone has an old space heater that no longer heats as it should and it can be given a second life with this great recycling idea. The fan and plug-in cord of the heater are valuable components of a homemade forge.

This mini DIY electric forge will generate a little over 1,500 degrees F of heat and is ideal for a small home workshop.

Mini Electric Forge
DIY Mini Electric Forge Idea, Image via: ibuildit

19- Charcoal Forge

Here is a great way to recycle an old oval wash tub and transform it into a portable charcoal forge by bladeforums.

Oval wash tubs were very popular for use as flower planters and beverage holders a few years ago but are outdated now and need to be upgraded. Use an old oval wash tub and follow these detailed instructions to build yourself an inexpensive charcoal forge.

Steel forging is a great way to create heirloom pieces and earn extra income, and this easy to build blacksmith forge can help you get started forging steel.

portable charcoal forge
Charcoal Forge, Image via: bladeforums

20- Homemade Electric Forge

Use this electric forge by brilliantdiy to melt recycled aluminum at home so you can save money and keep aluminum out of the landfill.

An old paint bucket is the main component of the DIY project and this YouTube video will show you how to build it. Aluminum cans can be saved and taken to the local recycle center and sold for a few dollars, but it takes a lot of aluminum cans to make it worthwhile. Melting the aluminum compacts it so it will take up much less space while you are saving it.

Also, aluminum is a good metal to use for other projects around the house and it’s good to have some on hand. This homemade blacksmithing forge is cheap to build and will help you develop DIY skills that will enable you to earn extra income.

Homemade Electric Forge
Homemade Electric Forge, Image via: brilliantdiy

21- Homemade Gas Forge

Learn how to build a DIY gas forge in this YouTube video for your blacksmithing needs. The forge can generate plenty of heat for metal working and creating unique knives and other small metal objects. The size of this DIY gas forge is small enough to fit in most home workshops.

This detailed YouTube video will show you everything you need to know so you can build a gas forge of your own.

22- Propane Fueled Forge

Firebricks and propane can be used to create a propane fueled forge by instructables that generates plenty of heat for all your blacksmithing needs.

A forge has to generate enough heat to change the physical state of steel or metal so that it can be pounded and manipulated into the desired shape. This propane forge has the ability to generate all the heat needed and it’s safe to use. The small size of the forge won’t take up much space inside your home garage or workshop either.

Propane Fueled Forge
Small Propane Fueled Forge Plan, Image via: instructables

23- Recycled Grill

Transform an old gas or charcoal grill into a new homemade forge by imgur with this idea. After a grill is no longer usable to cook food on, it can be recycled into something else useful like a blacksmithing forge.

Get yourself an old grill and follow these pictorial directions to create a useful homemade forge. This idea helps keep useful items out of the landfill and shows you how to build a forge for very little money.

homemade forge
Recycled Grill Forge, Image via: imgur

24- Old Welding Tank

An old welding tank can be recycled and re-used to create a DIY forge like in this YouTube video for your workshop. Blacksmithing is an art that can be satisfying as a hobby or as a money making endeavor. However you choose to use blacksmithing skills, you have to start with a forge that will generate enough heat to make steel and metal malleable so it can be shaped. This welding tank forge is a great place to get started.

This YouTube video tutorial makes the forge building process easy and answers many of the questions you may have. Get started today with a new hobby or business by building this welding tank forge.

25- Box and Burner

Simple, inexpensive and efficient. These forge plans show by popsci you how to build a box that can retain the heat from a burner so the metal can be heated enough to be hammered into the desired shape. Professional looking results and easy of moving would make this design a good choice for taking to craft fairs or similar venues for on-site metal forging or glass blowing.

homemade forge plans
Box and Burner forge plans, Image via: popsci

26- Blacksmith’s Coal Forge

Hot coals in a bucket is the basic principle of this blacksmith’s coal forge at instructables. A hair dryer is used as a blower to help control the heat and galvanized buckets are used to contain the charcoal.

This YouTube video will talk you through the simple build that will create a functional and effective diy coal forge for you to use at home.

Blacksmithing is a lucrative business that commands top dollar prices on well made and unique metal items. Hand forged steel pieces are heirloom items that can be handed down through the generations and increase in value every year.

Get your start in this lucrative business today with this easy to build coal forge.

Blacksmith’s Coal Forge

27- Fire Brick Homemade Forge

This is a small homemade forge by manmadediy that is highly efficient and perfect for the hobbyist. It only requires nine standard sized fire bricks to create the exterior, and a blow torch to produce the heat for forging metal, so this DIY build is great for beginners.

Fire Brick Homemade Forge
Fire Brick Homemade Forge, Image via: manmadediy

28- Simple Backyard Forge

If you are interested in becoming a blacksmith for fun or profit, one thing that you must have is a forge. The forge can be elaborate and expensive, or it can be simple and still meet all of your blacksmithing needs.

You can use materials that you have on hand, like leftover lumber to build a frame and rocks that are sourced from your property, to save money building a forge. Just go through this easy to follow homemade forge plans on youtube so you can build one for yourself.

The forge is simple to build and small enough to fit in the backyard. It can be used to craft tools to use around the homestead and knives for hunting. A DIY forge will also enable you to generate an income through blacksmithing.

You can learn how to make hunting knives, farm tools, and many other useful and decorative items on your own simple backyard forge.

29- Get Hammering

Here are some detailed plans for making a homemade forge by popularmechanics so you can get hammering on metal very quickly.

You can use these blacksmith forge plans and start building it in the morning and hammering metal by that evening. It is a quick and easy DIY project that will help you meet all your blacksmithing needs.

Blacksmithing was once the way to have something fashioned from metal but it lost popularity as the world become modernized. In recent years, the art of blacksmithing has returned and is growing in popularity.

People who have chosen to live an off-grid lifestyle are the ones who are bringing back the lost art of blacksmithing. A DIY forge like this one will enable you to create nails, hinges, handles, and many other metal items that are needed for use on an off-grid homestead.

Knowing how to create things from metal will also help you barter for other goods and services. Blacksmithing is a profitable craft and it also makes a good hobby.

homemade forge
Blacksmith forge plans, Image via: popularmechanics

30- Brake Drum Forge

This is a great way to recycle an old brake drum from a vehicle. A brake drum is a perfect size for a homemade forge and the heavy-duty steel can withstand the high temperature generated by the fire. Recycling is good for the planet because you are keeping usable items out of the already over-filled landfills.

An inexpensive hair dryer creates the air flow to keep the fire burning hot so the metal can be heated to just the right temperature. The hair dryer keeps the air flow constant so the forge temperature will remain constant.

Use these free plans to build a homemade charcoal forge by instructables or you can burn coal in the brake drum forge. A used brake drum can be found at most junk yards and it does not need to be modified to use as a forge. Add a few steel pipes and a hair dryer and you will be ready to start forging metal. The ash falls to the bottom of the pipe and is easily emptied as needed.

A homemade forge will enable you to work with metal to create all types of useful and ornamental items. Hand crafted forged knives are in high demand and sell for top dollar and learning how to forge blades is a way to increase your income.
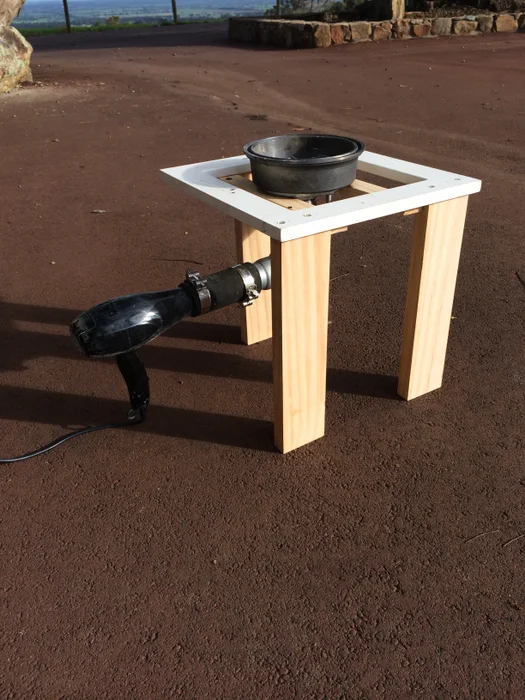
Brake Drum Forge
Brake Drum Forge, Image via: instructables

31- Portable Forge

Here is a great DIY forge plan for a traveling blacksmith. This portable forge can go where you go. It is small enough to not take up much space yet large enough to generate enough heat to make metal pliable.

This compact portable DIY forge by brilliantdiy will allow you to take it along with you as travel. Take it with you to forging events, knife shows, renaissance fairs, or anywhere else a forge may be useful. When this homemade portable forge is not in use, store it on a shelf in the garage or other out of the way location.

These forge plans will show you how to build this compact model that has a 12 volt rechargeable battery that will last for hours. The forge uses charcoal and the free plans include written instructions as well as a YouTube video.

Take your blacksmithing skills on the road with this small but powerful DIY portable forge. You want to consider setting up a road side blacksmith shop near your home to hone your craft and generate income. At the end of the workday, this portable forge will be easy to pack up and take back home.

Portable Forge
Portable Forge, Image via: brilliantdiy

32- Kitchen Sink Forge

When the stainless-steel sink has finished its usefulness in the kitchen, take it outside and use it to build a homemade forge.

These free forge plans by jackdawschoice will show you how to transform a kitchen sink, brake drum, and a hair dryer into a functional and efficient forge. The stainless-steel sink is lined with firebricks and a brake drum is set in the center to be used as the fire pot. The hair dryer blows the needed air to keep the fire burning hot and consistent.

A heavy-duty wood stand can be built from pieces of leftover lumber you may have on hand to keep the cost of this DIY project very low. The stand for the forge can be built to a customized height so it will be comfortable for you while you are enjoying metal forging.

The fundamentals of blacksmithing have been unchanged for over 200 years. You need extreme heat that remains consistent, an anvil, and a hammer. This kitchen sink forge may look a little unconventional but it will provide the consistent high heat that is needed for transforming raw metal into a desirable object.

The demand for hand forged metal work has increased over the past couple of decades and being able to sell products online has opened up a new selling venue for blacksmiths. You will be able to keep the production costs low with this homemade forge that is built from recycled items. And when production costs are low, the profit margin is increased.

Kitchen Sink Forge
Kitchen Sink Forge, Image via: jackdawschoice

33- Air Tank Forge

You can build an amazing homemade gas forge like in this YouTube video out of an old air tank with these instructions.

Living off grid often means thinking outside the traditional box to create things that are needed without using electricity. Off grid living also means becoming more self-reliant and using whatever you have on hand to create things. These free plans will show you how to transform an old air tank that was once used to fill tires with air into a homemade forge.

The forge is efficient and powerful enough to handle all of your blacksmithing needs. Create metal and iron items that are useful for hunting, farming, fishing, building, or just to add a touch of decorative beauty to your homestead.

Conclusion:

There are blacksmith guilds all over the world so it is easy to connect with fellow blacksmiths and learn from them. Developing your skills as a blacksmith will be fun and rewarding. A self-employed blacksmith can set their own working hours and prices per item. It’s a good way to make a living better if you enjoy working with your hands to create a unique and useful item.

Hope our list of homemade forge plans has helped you a lot to decide how to build your own forge.

Here we have prepared a questionnaire to answer some common questions.

FAQ’s

Can you forge with wood?

Yes. Any kind of dry wood can be used for forging and it’s a great way to use up old scrap lumber. Scrap wood from pallets, dry tree limbs, and old boards make ideal fuel for a forge. As long as the wood has not been treated with chemicals it can be used in a forge.

Which material cannot be forged?

Most metals can be forged but there is one material that cannot be forged and that is cast iron. Cast iron is brittle and has a low melting point. If cast iron is heated in a forge, it will break apart or melt.

We suggest using stainless steel, titanium, carbon steel, and other metal alloys in your forge. Forging is a good way to recycle old metal objects and create something new.

Is forged iron stronger than steel?

Steel is stronger even if the iron has been forged. Forged steel is stronger steel that has been cast or plated, making it one of the strongest materials on earth. Steel is made stronger when it’s forged since it has been manipulated to conform to the desired shape.

Can I use charcoal to forge?

We don’t recommend it even though it is an easy combustible material to obtain. It’s difficult to get the charcoal to burn hot enough to soften steel or iron so it can be forged. You would have to use a great deal of charcoal and have the airflow perfect in order to be able to forge with charcoal.

References:

Slide Share, Jul 10, 2019, “What is forging”, https://www.slideshare.net/EmilyClarke42/what-is-forging-154677737

SCRIBD, by rabikm, “Metal Forging Is A Metal Forming Process That Involves Applying Compressive Forces To A Work Piece To Deform It”, https://www.scribd.com/document/458237156/Metal-forging-is-a-metal-forming-process-that-involves-applying-compressive-forces-to-a-work-piece-to-deform-it

MDPI, 30 November 2020, by Prof. Dr. Andrzej Gontarz, “Forging Processes of Materials”,https://www.mdpi.com/journal/materials/special_issues/forging_processes

20 DIY Barn Doors To Add A Rustic Touch Your Home Needs

A DIY barn door is a perfect solution to many of your homes privacy needs. DIY sliding barn doors can be used as window treatments, interior doors and exterior doors. This stylish and practical solution adds a rustic touch to any space while using less floor space. All floor space around the door can be used since none has to be allotted for an opening and closing swing that traditional doors need.

Using some of these barn door plans to create window treatments will also improve the health of anyone suffering from dust allergies since it will limit the amount of fabric curtains needed. Whether for health or decorative reasons, a DIY barn door will add that rustic touch your home needs.

  1. Window Treatments

Add character and privacy to any room with sliding barn doors by homedepot over the windows. Use these plans to create the right size for your window. Paint to match any home decor.

diy barn door
Image via: homedepot
  1. Laundry Room Door

Laundry rooms are needed in every home, but are not desired daily views. Conceal all the machinery, laundry products and the dirty laundry behind a stylish and functional DIY barn door like this one by blog.jennasuedesign. These tutorial videos and pictorial instructions  make building a barn door a cinch for both novice and seasoned DIY’er.

Laundry Room Barn Door
Image via: blog.jennasuedesign
  1. Barn Sliding Door with Glass

Interior separation between rooms is sometimes needed, yet total separation is not desirable, like between a kitchen and dining room, family room and office. A DIY barn sliding door like this one by diynetwork with a glass insert is the perfect solution. The see-through glass top barn door allows two interior rooms to be separated, yet not completely closed off from each other.

Barn Sliding Door with Glass
Image via: diynetwork
  1. Sliding Barn Door With Chevron Pattern

These detailed plans will enable you to create an attractive sliding barn door like this one by thisoldhouse with a chevron pattern wood inlay. Great for use as a focal point in any room of the home. Easy to follow video and these plans even include a material shopping list so you won’t forget to buy anything.

Sliding Barn Door With Chevron Pattern
Image via: thisoldhouse
  1. Modern Look

Barn doors don’t have to look old to add a rustic touch, just look at this modern rustic style door. These detailed plans on how to build a barn door by diypete are easy to follow. Start by measuring the door, cutting plywood to size and add steel around the edges. Measure and cut cedar wood, then attach cedar to plywood with glue and nails. Sand and leave cedar wood natural or stain desired color. Install DIY barn door with a hardware kit and you’re done.

detailed plans on how to build a barn door
Image via: diypete
  1. Herringbone Barn Door

So elegant, yet so simple to build, wood strips applied in a herringbone pattern. Measure door and cut plywood to fit. Frame out the door edges with 1×6‘s. Cut 2×2‘a into 4 inch long strips to create a herringbone pattern. These plans only cover the bottom half of the barn door like this one by bowerpowerblog but the process can be repeated to cover the entire door if desired.

Herringbone Barn Door
Image via: bowerpowerblog
  1. Modern Barn Doors

Building barn doors like this one by abeautifulmess could not be easier. These free plans show you how to build these sleek, modern barn doors that fit in perfectly with a modern, minimalistic look.

Modern Barn Doors
Image via: abeautifulmess
  1. Traditional Barn Door

Making a barn door like this one by lowes to fit an interior door is simple with these detailed plans. Attractive, functional and in the traditional style, this door look is classic and fits in with any decor.

Making a barn door
Image via: lowes
  1. Recycle Skate Board Wheels

Use these plans to create a functional sliding barn door like this one by instructables with skateboard wheels. Perfect design for an outbuilding that needs a large opening for equipment to pass through. Using skateboard wheels instead of a barn door kits can save you a couple hundred dollars.

Recycle Skate Board Wheels
Image via: instructables
  1. Increase Home Value

An attractive barn door like this one by zillow can increase the value of your home and cause it to sell faster when placed on the market. But even if you don’t want to sell your home, this design and paint color choice adds a WOW factor to an otherwise ordinary bedroom.

sliding barn door
Image via: zillow
  1. 36“ Sliding Door

Small door openings can still be covered with an attractive sliding barn door like this one by southernrevivals. Use these free plans to create your own attractive 36“ sliding door.

36“ Sliding Door
Image via: southernrevivals
  1. 1 Pallet Door

Here’s another way to recycle old wooden pallets – transform them into an attractive barn door like this one by ana-white. Stack and stain the wood, then add some black metal hardware for a look that fits in with any decor.

1 Pallet Door
Image via: ana-white
  1. Bypass Door

Follow these detailed instructions for building an elegant bypass door like this one by themagicbrushinc. Painted black here, but can be painted any color.

Bypass Door
Image via: themagicbrushinc
  1. Kitchen Door

Add a pop of color to an all-white kitchen with a colorful sliding barn door like this one by finditmakeitloveit. The pictured door separates the kitchen and laundry room and is painted yellow to compliment the decor.

Kitchen Door
Image via: finditmakeitloveit
  1. Cheap Barn Door

Cheap to build doesn’t mean cheap to look at. These plans show you how to build a DIY barn door like this one by epbot on the cheap.

Cheap Barn Door
Image via: epbot
  1. British Brace

Attractive British brace detailing adds a touch of classic elegance to a rustic barn door. The contrast in styles will fit in with any style of home or decor. Get the full tutorial for this barn door at remingtonavenue.com

rustic barn door
Image via: remingtonavenue.com
  1. Great Look, Low Price

These barn door plans by remodelaholic show you how to give a DIY barn door a great look with inexpensive hardware. A high-end look for a low price.

barn door plans
Image via: remodelaholic
  1. Door and Track

Discover how to build a barn door like this one by akadesign.ca and track for a very low cost. Attractive wood design works in any room and can be stained or painted to blend with room decor.

how to build a barn door
Image via: akadesign.ca
  1. Barn Door Tutorial

Step by step tutorial shows you how to build an attractive barn door like this one by houseseven.blogspot for minimal cost. This detailed tutorial takes all the guess work out of the DIY build and makes it easy for you.

how to build an attractive barn door
Image via: houseseven.blogspot
  1. Lightweight Sliding Screen

When you want the look of a barn door like this one by vintagerevivals without the heavy weight of wood. consider this DIY sliding screen.

Lightweight Sliding Screen
Image via: vintagerevivals

23 Homemade Power Hammer For Forging

A homemade power hammer can transform your blacksmithing passion or business into a more efficient and enjoyable endeavor. When I first started exploring the idea of building my own power hammer, I was drawn to the prospect of reducing the physical strain of hammering steel by hand. It seemed like a practical solution to streamline the forging process while achieving precise and beautiful results.

Unlike manual hammering, a DIY power hammer can automate much of the labor-intensive work, allowing for greater consistency and efficiency in forging. As someone who values the craftsmanship of blacksmithing, the idea of incorporating a power hammer into my workflow was both intriguing and promising. I envisioned it as a tool that could enhance my creative expression while minimizing the physical exertion required.

While building a homemade power hammer may entail some upfront costs, the opportunity to customize it to my exact specifications was appealing. This customization aspect allowed me to tailor the power hammer to suit my specific forging needs and preferences. Exploring the collection of 23 homemade power hammers provided me with a wealth of inspiration and ideas to guide my DIY project.

Ultimately, the prospect of building my own power hammer was not just about convenience or efficiency; it was about embracing a deeper connection to the craft of blacksmithing. It represented a journey of exploration and self-discovery, as well as a commitment to continuous improvement and innovation in my craft. With determination and enthusiasm, I embarked on the endeavor, eager to unleash the full potential of my homemade power hammer in the forge.

23 Homemade Power Hammer For Blacksmithing

1- A-Frame Power Hammer

Delving into the world of metal forging has been a passion of mine for quite some time, and the prospect of enhancing my craft with a homemade power hammer by interesting engineering was incredibly enticing. What immediately drew me to this DIY project was the promise of making metal forging significantly easier and more efficient. Instead of relying on manual labor to pound heated metal with a handheld hammer, the idea of using an A-frame power hammer seemed like a game-changer.

One aspect that I truly appreciate about the homemade power hammer by interesting engineering is its accessibility. The fact that it’s relatively easy to build and doesn’t require a hefty investment, especially if you have some pieces of scrap metal and angle iron lying around, makes it an attractive option for DIY enthusiasts like myself. The availability of free plans, complete with a video demonstration and written instructions, ensures that even those new to metalworking can embark on this project with confidence.

The versatility of the power hammer is another aspect that I find appealing. With this tool at my disposal, I’ll be able to forge a wide range of metal objects, from knives and door handles to candle holders and beyond. The potential for creativity and craftsmanship is virtually limitless, opening up a world of possibilities for both practical and artistic endeavors.

Furthermore, the realization that the art of blacksmithing can not only be a fulfilling hobby but also a potentially lucrative one is incredibly motivating. By equipping myself with a homemade power hammer, I’ll be better positioned to hone my skills, take on more ambitious projects, and even turn my passion for metalworking into a profitable venture.

Overall, my personal experience with the homemade power hammer by interesting engineering fills me with excitement and anticipation. It represents an opportunity to elevate my craft, expand my capabilities, and embark on a journey of exploration and creativity in the world of metal forging. With this invaluable tool by my side, I look forward to unlocking new possibilities and pushing the boundaries of my metalworking endeavors.

Homemade Power Hammer
A-Frame Power Hammer, Image via: interesting engineering

2- Cheap Power Hammer

Learn how to Build a homemade power hammer in this YouTube video for very little money. Start a forging business or improve your forging skills with this well-made, inexpensive DIY power hammer.

There is no need to spend money on equipment if you can build it yourself and save money. The money saved can be invested in the raw materials needed to forge hand-made knives and other unique metal items.

Turn your hobby or dream into a profitable business with this cheap power hammer that can be custom built for your needs.

3- Forging Power Hammer

Follow these power hammer plans on YouTube and build your own forging power hammer for very little money. The cost is low but the power of this blacksmithing hammer is high compared to the other ones we have in our roundup. Forge all the raw metal you want with ease after building this power hammer that will do all the hard hitting for you.

There is a great satisfaction that comes from taking a raw piece of metal and transforming it into a functional item through the art of blacksmithing. And one thing a blacksmith must have to create works of metal art is a forging hammer.

4- Mechanical Homemade Power Hammer

These detailed plans will show you how to design and build a mechanical power hammer that will be easy to maintain and have a long life expectancy. Not exactly for the hobbyist forger, but if you foresee forging as a way of life in your future, this top of the line homemade power hammer by Anvilfire will meet your needs.

Mechanical Homemade Power Hammer
How to design and build a mechanical power hammer, Image via: Anvilfire

5- Bucket List Blacksmith DIY Power Hammer

If one of the things on your bucket list is to build your own power hammer and become a blacksmith, then here we have this easy to build design for you. Learn how to transform some basic items into a blacksmiths power hammer in this YouTube video. Only a few items are needed for this DIY power hammer build such as steel rods, brass pole, anvil, and a 25 pound hammer created from a railroad tie. Assemble and weld together using homemade welder as shown in this video, then get busy forging and check it off your bucket list.

6- Crank Shaft Motion Homemade Power Hammer

These power hammer plans on youtube show you how crank shaft motion can be used to make working with steel much easier. Informative YouTube video provides step by step plans for building this inexpensive and tough power hammer that will make forging easier and quicker. The two handed control literally puts the striking force into your hands, but uses much of your energy to exert the forceful blows.

7- Anvil Mounted Power Hammer

These power hammer plans by Christ Centered Ironworks are unique in that they show you how to build an anvil mounted power hammer. This DIY build features a variable speed motor, electric clutch control, portable and can deliver 50 to 350 blows per minute. Weighing only 82 pound, this anvil mounted power forging hammer can be scaled to accomodate large or small anvils, allowing you to customize it to meet your personal forging needs.

Anvil Mounted Homemade Power Hammer
Anvil Mounted Homemade Power Hammer, Image via: Christ Centered Ironworks

8- Treadle Homemade Power Hammer

This tutorial provides you with power hammer plans in this YouTube video that run the finished product without power. The treadle design allows you to physically control the power with your foot. The unique design using a spring allows the hammer to be less rigid for more controlled strikes. Dies are easily removed for quick interchanging when forging your own unique pieces.

9- Portable Homemade Power Hammer

Learn how to build a power hammer in this YouTube video that is small, easy to handle, lightweight, and portable. This homemade power hammer can go wherever you go and forge raw material into useful and beautiful metal items.

This homemade power hammer hits hard and accurate so you can forge with speed and precision. If you are a blacksmith by trade or want to learn forging and become a blacksmith, you will need a good, dependable blacksmith’s power hammer.

Ideal for ironwork around the homestead or for re-shoeing horses. A lightweight, portable DIY portable power hammer can help you make money as a traveling farrier that goes to where the horses are for a re-shedding job.

10- Scrap Built Power Hammer

Learn how to Build a power hammer in this YouTube video for practically nothing by following the instructions in the video. Watch the video for inspiration, then prowl through your own metal scrap pile to discover items that can easily be transformed in a DIY power hammer.

11- Power Hammer Video Tutorials

Learn how to construct the arms to hold the DIY power hammer in this instructional YouTube video
, the slider it fits into, and a little secret for keeping the noise and vibration down to a minimum.

This is a very detailed video that will take you through the DIY project step by step so the build will be easy. Start your own blacksmithing business and make a good living from home after building this DIY power hammer.

12- DIY Power Hammer

Learn how to take the best design ideas of different power hammers and mesh them together to create one amazing DIY power hammer in this YouTube video
. Make forging easier without spending a lot of money when you create a unique power hammer that will meet your forging needs.

Combine the best design ideas into one useful blacksmithing tools so you can get the most out of your forging time. Metalworking projects can be completed faster and easier when you have a DIY power hammer that is designed for your exact needs.

13- Treadle Hammer

This DIY power hammer gets its’ power from your foot and will beat hot metal into the desired shape with ease. Learn how to build a treadle power hammer in this YouTube video for your home blacksmithing shop.

This design is simple and effective, allowing you to forge raw material with very little effort. Let your feet do the work instead of your arms with this unique treadle design DIY power hammer.

14- Steel Forging Machine

Learn how to build a DIY steel forging machine in this YouTube video with the free plans. This DIY project is easy to build and the power hammer will handle all type of steel forging you want to do.

It’s inexpensive to build and will effectively transform raw steel into functional pieces that can be used on the homestead or sold for profit. This DIY steel forging machine is easy to operate and maintain, and it will save you a lot of work when creating metal items.

15- Di Vinci Drill Power Hammer

Stop using your muscle power to beat steel into shape and let drill power do the hard work for you. Discover how to use a Di Vinci drill and some lumber to create a DIY power hammer in this YouTube video that will make blacksmithing easy.

Create a heavy duty frame from lumber for the drill and add a blacksmith hammer and anvil, then let the drill be the power behind the hammer. This design makes the work easy and quick

16- Home Built Power Hammer

This home built power hammer can be customized to the desired size so it can fit into your work space. The cost of building this DIY power hammer by I forge Iron is very low also, with the main expense being the cost of the lumber.

If you have some 6 x 6 posts on hand then that will cut the building expense in half. This study DIY power hammer will make a great piece of equipment for your blacksmith shop and will be effective for beating all types of metal.

Home Built Power Hammer
Home Built Power Hammer Image via: I forge Iron

17- Tire Power Hammer

Here is a unique design that uses the small spare tire of a vehicle to create a blacksmith power hammer by Farm Show. If you are serious about your blacksmithing hobby to the next level, then this tire power hammer may be just right for you.

Read the story behind the idea and get detailed instructions for building a tire hammer for your home workshop here.

It’s simple to build and will make forging metal a much easier and faster task. Once you build a homemade power hammer, you will be able to create many more forged items in less time than hand forging.

blacksmith-power-hammer1
Tire Power Hammer, Image via: Farm Show

18- Pneumatic Power Hammer

This DIY power hammer does most of the forging work for you. Be creative and become proficient in the art of blacksmithing with a forge that does the hard work for you.

You will be able to make more items in less time and with less muscle fatigue when you have a homemade power hammer like this one. Get detailed instructions so you will be able to build a pneumatic power hammer like this one on youtube.

Blacksmithing was becoming a lost art but interest in recent years has made it popular again. Forged metal is currently in high demand as more people return to the look and durability of metal and iron for use in their homesteads. Hinges, handles, outdoor cooking items, knives, etc., that have been forged from steel, iron, or metal gives an old world look to new homesteads. The forged materials will last for decades too.

Build this DIY power hammer and craft one of kind items for your homestead, then make more items to sell.

19- Davinci Cam Power Hammer

Learn how to build a Davinci cam power hammer in this YouTube video that will be ideal for your blacksmith workshop.

Forge steel, iron, or metal with this efficient, hard working small power hammer. It will help you be creative with much less effort than hand forging. This power hammer is just the right size for a home workshop yet it’s powerful enough to tackle almost any forging task.

Blacksmithing and homesteading go together, and this DIY project will be a great asset to any workshop. Blacksmithing is increasing in popularity and it’s a good work from home job that will bring in additional income.

20- Treadmill Motor Power Hammer

People have good intentions when they buy a treadmill but they rarely follow through with those intentions. The treadmills end up in a corner collecting dust and dirty clothes.

Put that treadmill to good use (at least the motor) by using parts of it to build a homemade power hammer like in this YouTube video. The treadmill motor has the right amount of horsepower for a DIY power hammer so you can practice your blacksmithing skills with ease.

Watch this YouTube video for all the building details of this DIY power hammer. Since you are recycling a motor and other pieces of scrap metal, building this power hammer won’t cost you much. Any type of metal work you can imagine, you can build with the help of this inexpensive power hammer.

You can make items for your personal use or to sell for additional income. Blacksmithing is a great hobby that can be used for both fun and profit.

21- Small Power Hammer

If you would like to have a power hammer for your blacksmith shop but have limited space, this small power hammer might be just right for you.

It’s a budget friendly DIY project and is ideal for beginning builders to undertake. It’s a simple build and this YouTube will show you exactly how to build a small power hammer.

The power hammer in this YouTube video is powerful, efficient, and will take up very little space in your work shop.

You can start your own hand-forged knife business with a small power hammer like this one. Hand-forged knives sell for a premium price so you could make a good income by working from home in your own business. No more commuting, traffic jams, or difficult bosses, work for yourself at home making decorative and useful items from steel, iron, and metal with the aid of this homemade power hammer.

22- Rusty Dusty Homemade Power Hammer

The name was given by the inventor of this amazing mechanical hammer by Instructables and he also gives his phone number along with the building plans. The pictorial plans will walk you through the DIY build, but if you need further assistance, call the number provided with the plans. You are encouraged to call with any issue or problem you encounter while embarking on this DIY build and the inventor will talk you through the process over the phone.

Rusty Dusty Power Homemade Hammer
Rusty Dusty Power Homemade Hammer, Image via: Instructables

23- Tire Homemade Power Hammer Plans

Invented by Ray Clontz, from Charlotte, NC,  the tire hammer is truly unique and easy to build. The operating mechanism runs smoothly and is easy to get a feel for so you can be forging like a pro from the beginning. The operating mechanism is simply a steel wheel on the motor shaft that rubs an inflated rubber tire. Detailed pictorial instructions show you how to assemble the tire hammer at home with just the following tools:

* Cutting torch

* Stick welder

* Drill press

* Bandsaw

* Grinder

These common tools are found in most home workshops and they will enable you to build this highly functional, unique DIY power hammer by Anvilfire.

Tire Homemade Power Hammer Plans
Tire Homemade Power Hammer Plans, Image via: Anvilfire

Summing Up!

Hamer is the basic need for turning your metal artwork into something usable such as forge knives, door handles​ and​ candle holders. The final product you make from your skill helps you in driving income for your needs. When you have an automated or machine base hammer you can speed up your work and make things in a short time. Although these homemade power hammers are difficult to build,​ but​ once built will help you in reducing your handwork.

You can choose the one from our list that you find comfortable to build and exactly the one that suits your needs. Hope you like the post!

Please don’t forget to share your thoughts in the comment section.

References:

Slide Share, pub: Apr 24, 2018, “Power hammer project”, https://www.slideshare.net/achalpatel1/power-hammer-project

SCRIBD, by Raja Mane, “Motorised Hammer Project Report”, https://www.scribd.com/document/512636471/Motorised-Hammer-Project-Report

Yumpu, International Specialised Skils Institue Inc, PUb: 2010, “Power Hammer Techniques and Applications for Creating compound Curves In Sheet Metal”, https://www.yumpu.com/en/document/read/33838267/power-hammer-techniques-and-applications-for-creating-

University of Colorado at Boulder, Margaret Eisenhart School of Education, “HAMMERS AND SAWS FOR THE IMPROVEMENT
OF EDUCATIONAL RESEARCH”, https://www.colorado.edu/education/sites/default/files/attached-files/Eisenhart_Hammer_Saws.pdf

27 DIY Spot Welder That Are Cheap And Easy To Make

Researching DIY spot welder designs online was an essential step in my journey towards building my own. The internet offered a wealth of resources, from detailed tutorials and step-by-step guides to forums where fellow DIY enthusiasts shared their experiences and recommendations. Exploring these various options not only broadened my understanding of spot welding principles but also gave me insight into the different approaches and designs available.

A DIY spot welder can be a game-changer, especially for someone like me who loves tackling household repairs and projects without breaking the bank. I remember when I decided to build my own spot welder, driven by the need to mend various electronic items and appliances around the house without shelling out hefty sums for professional services. It was a project born out of necessity and a desire for self-sufficiency.

Assembling the DIY spot welder was an educational experience in itself, involving gathering the necessary materials, understanding the principles behind spot welding, and tinkering with circuits and connections. There was a sense of satisfaction in knowing that I was not only saving money but also gaining new skills and knowledge along the way. It truly felt like I was empowering myself to take control of my home maintenance needs in a practical and cost-effective manner.

Once the DIY spot welder was up and running, its utility became apparent almost immediately. From repairing microwave oven doors to fixing broken kitchen appliances and even patching up vacuum cleaner components, the versatility of the spot welder proved invaluable. The precision it offered in creating defined welds without excessive heat made it ideal for working in tight spaces, allowing me to address repairs with confidence and efficiency. It was a tool that not only saved me money but also provided a sense of accomplishment every time I successfully tackled a repair job on my own.

1. Cheap DIY Spot Welder

I remember stumbling upon the detailed instructions for building a DIY spot welder by mods-n-hacks.gadgethacks during my online research, and it instantly resonated with me. Incorporating those instructions into my own project not only guided me through the build process but also added a personal touch, knowing that I was following in the footsteps of others who had shared their expertise online.

Recycling useful items helps to keep trash out of the landfill and more money in your pocket. All DIY projects are meant to save you money and/or recycle useful objects and an arduino spot welder is no exception.

Cheap DIY Spot Welder
Cheap Spot Welder Image By mods-n-hacks.gadgethacks

2. DIY Spot Welder Plans

Watch this detailed video to learn how to build a cheap spot welder by Made in Poland on youtube. If you want to create this spot welder you can download the plans to go along with the YouTube video.

This creative design we have makes this one of the best set of free online plans for a homemade spot welder. DIY projects can be fun, fast, and affordable when you watch instructional YouTube like this one.

3. Spot Welding Machine

A DIY spot welding machine by mistrymaketool is so handy in the workshop, and once you get used to it you will wonder how you have got by without one.

At third one we have a small, easy to build diy spot welder that uses a little pressure and a lot of heat to fuse two metal pieces together. The welded union will be strong and will enable you to repair and create many more items in your home work shop.

A homemade spot welder is useful for many applications, including automotive, metal furniture, crafting, artwork, remodeling, and home construction. Think of all the creations you could build and repairs that you could do if you had a spot welding machine like this one.

As we all know spot welding is one of the oldest welding methods that joins two or more metal components without the use of any type of filler material. You can build this small but powerful welding machine quickly and inexpensively.

DIY spot welder
Small and Powerful Spot Welder, Image By mistrymaketool

4. Microwave DIY Spot Welder

Not only can a spot welder help you repair a non-functioning microwave, but parts of an old microwave can be used to build a spot welder instructables. Salvaged parts from an old microwave can be recycled into a handy resistance spot welder with these easy to follow instructions.

Microwave DIY Spot Welder
Microwave DIY Spot Welder, Image By instructables

5. DIY Spot Welder For Electronics

Finding the guide on hackaday for making a DIY spot welder was really exciting for me. I love fixing electronics, so learning how to build a welder and a controller to make precise welds in tricky spots was like discovering a new superpower. It’s not just about fixing stuff; it’s about getting better at what I love to do and exploring new ways to make things work again.

DIY Spot Welder For Electronics
Homemade Spot Welder For Electronics, Image By hackaday

6. Small Homemade Spot Welder

Here we have another useful idea for recycling components from an old microwave into a small DIY spot welder. The homemade welder by makezine may be small in size but it has the power to permanently weld sheet metal and to perform quick brazing jobs.

Use the transformer from a non-functioning microwave and a few other components in addition to welding table to create this powerful small spot welder.

Small Homemade Spot Welder
Small Homemade Spot Welder, Image By makezine

7. Microwave Transformer DIY Spot Welder

This is a large diy spot welder by hackaday that has more power than the homemade welders we have discussed before.

This DIY project takes three videos to cover all the details of the build but it’s well worth watching. The finished welder is powerful enough to handle any household project and the finished product looks very professional.

Microwave Transformer DIY Spot Welder
Microwave Transformer DIY Spot Welding machine, Image via: hackaday

8. DIY Battery Spot Welder

Why pay over $100 for an arduino spot welder when you can just make one of these for a fraction of the cost? Save money and get the battery spot welder like this by darkkevind one youtube by following these free plans.

This detailed YouTube video will take you through the building process so you can build a DIY battery spot welder very cheaply. The video is very informative and helpful for first-time welder builders.

9. DIY Battery Spot Welder

When I stumbled upon the DIY spot welder tutorial by WeAreTheWatt on YouTube, I got really excited. I love working with recycled parts, so the idea of building something useful from stuff I already had lying around felt like a perfect fit for me.

But if building from scratch isn’t your thing, there’s always the option of getting a spot welder kit. I found one online that comes with everything you need, and there’s even a YouTube video to guide you through the process. It’s super easy to put together, and once it’s done, you’ll have a handy tool to tackle all those welding repairs on your list.

10. Arduino Battery Spot Welder

This is an ideal DIY battery spot welder by instructables and is easy to build by following these instructions. The video takes you through the build step by step, plus there are pictures and written instructions to show you how to use this diy arduino battery spot welder after you finish building it.

Think of all the projects you can complete around the house with a new spot welder, then get busy building the welder with these detailed instructions.

DIY Arduino Battery Spot Welder
DIY Arduino Battery Spot Welder, Image via: instructables

11. Homemade Spot Welder

A light-duty homemade spot welder by instructables is easy to build from recycled parts and these detailed instructions. An old transformer from a microwave and a few other recycled components can be put together to create a new homemade spot welder that can handle small welding jobs.

To make this diy spot welder you will need cutting blade (hacksaw blade),three MOTs (Microwave Oven Transformers), hammer, wood, copper tube. Repair those broken electronics and create something new with this useful welder.

Homemade Spot Welder
DIY Spot Welder to Handle Small Welding Jobs, Image via: instructables

12. Tab DIY Spot Welder

Simple construction and accurate electrode force adjustment are part of this DIY tab spot welder by avdweb.nl. The double pulse this DIY spot welder generates better clamping ability and the current can be adjusted to suit the welding task.

Pictorial instructions along with written instructions provide all the details and precautions for this DIY project.

Tab DIY Spot Welder
Tab Spot Welder For Welding Task, Image via: avdweb.nl

13. Battery Pack DIY Spot Welder

When I stumbled upon the idea of building a spot welder with either an Arduino-controlled timer or a spot weld controller, I was intrigued. Having the option to choose how to control the weld felt empowering, like I could customize the project to fit my own preferences and needs based on my experience.

The simplicity of the build and the small size of the project made it seem very doable, even for someone like me who’s not an expert in DIY projects. I’d suggest giving it a try, especially if you’re looking for a satisfying way to spend an afternoon. Plus, considering how affordable the materials are, it’s a budget-friendly project that can yield a really useful tool in the end. I can imagine using the finished DIY spot welder from rcgroups to tackle those stubborn spots that are often tricky to reach, making repairs around the house much easier.

Battery Pack DIY Spot Welder
Battery Pack Homemade Spot Welder, Image via: rcgroups

14. DIY Spot Welder For Batteries

A DIY spot welder by hackaday for batteries is easy to build with these free instructions. Written instructions and pictorial diagrams make this building plan easy to follow. Some of the components for this DIY project can be purchased from the Dollar Tree store, making this a very inexpensive project.

DIY Spot Welder For Batteries
Homemade Spot Welder For Batteries, Image via: hackaday

15. Recycled Microwave Oven

A deconstructed microwave oven was used to build this DIY spot welder by instructables and you can build one just like it with these free plans.

Plans are also included to build a stationary metal frame so the spot welder will remain in one location. It’s too large and heavy to be portable but it’s ideal for the home work shop.

These free plans for building a DIY spot welding machine include written instructions, pictorial instruction, and a video. The building process is easy to understand and since it recycles an old microwave oven, you will be keeping a useful item out of the landfill.

If you have been wanting a spot welder for your home DIY projects, this one is for you. it can get the welding tasks done and it won’t cost you too much to build. You may also like to go through homemade forge to do your blacksmith tasks.

Recycled Microwave Oven
Recycled Microwave Oven, Image : By instructables

16. Battery Spot Welder

This DIY battery spot welder by instructables is easy to create and is ideal for a one-time welding job.

Sometimes you just have one DIY project that you need a spot welder for and then it probably will never be used again. This battery spot welder is perfect for that one-time job.

If you have a project that you are wanting to tackle but don’t want to invest a lot of money in spot welder, check out this DIY battery spot welder. it is fast and easy to build, it does not cost much to build, and it will enable you to build that special project.

A battery, car solenoid, and some copper nails are most of the items that you will need to build this battery spot welder. You can build it and have it ready to use in about one hour.

Battery Spot Welder
Battery Spot Welding Project To Do One-Time Welding Job, Image By instructables

17. Simple Spot Welder

This DIY spot welder by Maciej Nowak Projects on Youtube is simple to build and simple to use. It is not a complicated or elaborate machine, but it is efficient.

This YouTube video will show you how to build this simple spot welder with detailed steps. The video instructions are clear, precise, and easy to follow so you won’t be confused during the building process.

When the spot welder build is complete, it will be an efficient machine that will be welcomed in any home work shop. It is very useful when welding sheet metal, wire mesh, or other metal components. Spot welding is one of the most efficient welding processes and has a wide range of uses for building and repairing items around the house.

18. Mini Spot Welder

Watching the YouTube video by Creative Etc on creating a mini DIY spot welder was a real eye-opener for me. I was amazed at how simple yet effective the process was, using recycled parts from a microwave oven along with some basic materials like copper wiring and a battery.

If you’re looking to amp up your DIY game and start fusing metals together, I highly recommend starting with this mini spot welder. It’s a fantastic way to dip your toes into spot welding and discover its usefulness for various projects around the house. Once you’ve experienced the convenience of having a spot welder in your workshop, you might even feel inspired to tackle larger projects by exploring plans for building bigger DIY spot welders.

19. Microwave Oven Transformer

When you upgrade your home microwave, save the old one to create a DIY spot welder by boccelliengineering for your work shop.

Microwave ovens have transformers that can be used to create a spot welder. These free plans will show you how to build one for yourself. And the great thing about using the transformers from an old microwave oven is that it will keep a useful objects out of the landfill. If you don’t have an old microwave at home, one can be purchased from a thrift store or flea market for a very cheap price.

Spot welding uses electricity to fuse metal components together. The fused joint is strong and will last. The spot welder fuses the metal in one spot and it does it very quickly so the metal does not heat up.

When you have small welding projects that need to get done, a DIY spot welder can help you get them done efficiently and cheaply.

DIY spot welder
Microwave Oven Transformer, Via: boccelliengineering

20. Spot Welder With Automatic Circuit

Spot welding is safer and more efficient than other types of welding and an automatic circuit will keep the welding going on for longer periods of time. These free building plans by electroniclinic will show all the steps for building a homemade spot welder.

Spot welding is typically used when a single layer of wire mesh needs to be joined to itself, like in gaskets, mesh screens, or overlapping metal seams. There are many uses for a DIY spot welder in a home work shop.

The thing that makes spot welding so desirable to home hobbyists and crafters is that a large amount of energy can be delivered to one spot in a very short time. Spot welding is quick, efficient, and ensures a strong, fused joint.

Building a DIY spot welder will also save you a lot of money. One of the least expensive ones that you can buy will cost $50, and that is a mini spot welder. You can build one that is larger and cost less. Check out these free plans and build one for your work shop.

Spot Welder With Automatic Circuit
Spot Welder With Automatic Circuit, Image via: electroniclinic

21. Portable Spot Welder

Sometimes the welder needs to go to the DIY project and this portable spot welder will go wherever you need it to go.

These free plans will show you how to build a high capacity spot welder by elektormagazine that has a super capacitor that can generate between 200A to 400A current. This one also has a dual pulse which is powerful enough to create a solid union of two or more metal components.

Take this portable spot welder outside to the car you’re restoring or to the metal patio furniture you are repairing. it will go with you to get the welding job done.

This portable model will be able to handle a lot of welds before it gets hot. Just wait for a few minutes so it can cool down and then you can resume welding. This is a handy little DIY battery spot welder to have for use around the house. It’s small and lightweight but powerful enough to get the welding job done.

Portable Spot Welder
Portable Spot Welder, Image Via: elektormagazine

22. Homemade Spot Welder

If you enjoy crafting with metal and creating unique objects, a homemade spot welder like this one by Sorin – DIY Electrical Nerd on Youtube will be a great asset to you.

Watch this YouTube video for detailed instructions on how to make a spot welder that is cheap and easy to make. This DIY spot welder is powerful and portable, so it’s able to handle all your metal crafting both at home and on the go.

You don’t need special skills to be able to use a spot welder and the welds will be strong. Think about all the things you could do if you only had a welder, then build this cheap and easy DIY spot welder and get busy.

You will be able to create new metal objects or repair broken metal items with this spot welder.

23. Battery Spot Welder

A spot welder is a fantastic addition to any home workshop, and the best part is, you can craft one yourself without breaking the bank. I still recall the sense of achievement I felt when I put together my own battery spot welder using the guidance from instructables. This DIY creation packs quite a punch, effortlessly producing sturdy welds in half the time it takes for a conventional welder, revolutionizing the pace of my DIY endeavors.

One thing I love about this homemade battery welder is its versatility. Since it doesn’t require electricity to function, it’s perfect for workshops that are off-grid or for taking on-the-go. With this spot welder, I’ve been able to weld various materials like iron, steel, and stainless steel sheets with ease, making repairs and projects around the homestead a breeze.

Imagine the possibilities once you have a spot welder in your toolkit. From joining thin metal components to tackling all sorts of projects around your homestead, this DIY spot welder opens up a world of opportunities. Plus, the detailed plans are free, so you can build one yourself and enjoy its usefulness for years to come.

Battery Spot Welder
Battery Spot Welder, Image via: instructables

24. DIY Spot Welder 

Here is a spot welder that you can build without a microcontroller. By not having to include a microcontroller you will save money and time.

This DIY spot welder by hackster without a microcontroller will work just as well as other spot welders to create a strong union between two pieces of metal. It is quick, easy and cheap to build and will last for years. The homemade welder is small and portable so it can be used in your home workshop or outside. Wherever a welding task is needed to be done, this spot welder can get the job done.

These free plans provide detailed instructions along with pictures so you will be able to easily build a DIY spot welder for yourself.

DIY Spot Welder
Homemade spot welder you can build without a microcontroller, By hackster

25. High-Voltage Capacitor

This DIY spot welder by Maciej Nowak Projects on youtube is powered by 220 volts of electricity and will create strong, long lasting welds. Create sturdy unions between metal, iron, or steel so you can fabricate something new.

Consider all the things you could fabricate if you had a high voltage capacitor spot welder like this one. You could build useful things around the homestead and/or create metal items to sell and generate a source of income.

Welding is also a high paying job and if you have a spot welder, you could go where welding services are needed and generate income. It is always great when you have a tool and skills that will enable you to earn money. This DIY spot welder is easy and cheap to make so your investment will be small but the earning potential is big.

These free plans include both a video and written instructions so you will be able to build this spot welder without any problems.

Spot welding is an easy skill to learn even if you have never welded before. It is one of the  oldest forms of welding and is used in the automotive industry and the home work shop and everywhere in between.

26. Lithium Ion Battery Spot Welder

No electricity is needed to use this homemade spot welder by extremediy. This powerful little welder is powered by a lithium ion battery and can go wherever spot welding is needed.

Ideal for an off grid homestead or work shop. It is also great to outdoors where metal fabricating or repairs are needed. The uses for this homemade battery welder are limitless and it is a must-have for any homesteader.

A battery from a car or lawn mower will generate plenty of power for this DIY spot welder. Joining two pieces of metal together with a spot weld is quick and efficient. The union will create a strong bond between the metals that will last indefinitely.

Spot welding does not create an open flame and it does not require any type of special skills to do. These free plans will show you how to build a DIY battery spot welder that is easy and cheap to make and easy to use.

Lithium Ion Battery Spot Welder
Lithium Ion Battery Spot Welder, Image via: extremediy

27. Recycled Microwave Oven Transformer

Discovering the free plans on instructables for building a homemade spot welder using recycled parts was a real game-changer for me. I’ve always been drawn to projects that repurpose old items into something useful, and turning an old microwave oven into a spot welder felt like a perfect fit. With these plans, I was able to breathe new life into something that would have otherwise been discarded.

It’s amazing how many microwave ovens end up in the trash simply because of broken glass components, like the door fronts and turntables. But with these free plans, I learned how to salvage the still-good parts, particularly the transformer, and repurpose them into a DIY spot welder. It’s a great way to minimize waste and make the most out of what you already have lying around the house.

If you’re someone who loves working with metal or has a few broken metal items waiting to be fixed, a spot welder is an indispensable tool to have. While store-bought spot welders can be quite pricey, building your own with these free plans is not only affordable but also surprisingly easy. Plus, with both written and video instructions included, it’s a straightforward DIY project that anyone can tackle.

homemade spot welder
homemade spot welder, Image Via: instructables

Summary

Do all your household repairs such as microwave, metal stool, furniture and small kitchen appliances without hard and costly welding working with these easy to make diy spot welders that we have gathered for you. You can save a large sum of money without the need to call a professional and do little repairs when you can do it yourself. Hope these ideas we shared with you have given you some thoughts on how to make your own spot welders.

To answer some common questions that come to your mind I have prepared a questionnaire.  

FAQ’s

What voltage and current is required for spot welding?

For welding of thin material you need to set the voltage at least 12V with a current supply of 1000A. Thick materials are welded with a high voltage above 12V. However you must be aware that working with high current can be dangerous and all precautions should be taken to ensure safety.

Difference Between Spot Welding and Soldering?

A spot welding is used to join two pieces of metal by making a solid and strong bond while the soldier joins two pieces of electronic components with a lighter bond.

Does spot welder use AC or DC?

Spot welding is done using Ac power that provides low voltage with a high volume of current. A transformer is used to set a voltage of 5V to 22V with a current of 1000 to 10000A.

What metals can not be spot welded?

Generally all the metals can be spot welded except copper, silver, lead, zinc and Manganese.

References:

Science direct, Spot welding ,”Proceedings of the 1st International Joint Symposium on Joining and Welding, 2013″, https://www.sciencedirect.com/topics/engineering/spot-welding

UK Essays, Subject: Engineering, Published: 6th Sep 2021, “The Three Stage Process of Spot Welding” https://www.ukessays.com/essays/engineering/spot-welding-involves-three-stages-engineering-essay.php

Universal Technical Institute, Pub, Feb 20, 2023, “Spot Welding & How It Works”, https://www.uti.edu/blog/welding/spot-welding

23 DIY Charging Stations To Hide Cords and Wires While You’re Charging

If you own a variety of devices, you’re going to need a DIY charging station to keep them organized. With the constant release of smartphones, tablets and music players, there comes a time when your family owns five or six devices that use different chargers. The devices start creating an unsightly mess of tangled cords and wires, and this is when you’re not trying to locate a missing charger or device.

The best way to avoid the frustration of owning several devices is to build your own DIY charging station. Sure you can find a device charging station in stores, but building your own allows you to create a station that works for you.

Use the following ideas to build a DIY charging station that hides your cords and wires.

1- Use Tool Box As Charging Station

A tool box makes an amazing multi device charging station like this one by fstoppers because it has multiple compartments and drawers. You’re going to need to do a little upgrading to protect your gear and feed your cords. Start by turning the inside of the lid into a space for your chargers. Use the top drawer to hide your power strip, and feed the cord through a hole in the back of the box to an outlet. Store your devices on the top surface of the box.

DIY Charging Station
Image via: fstoppers

2- Turn Suitcase Into A Charging Station

A suitcase charging station like this one by designsponge is a unique but effective way to charge your devices. It’s best to use a vintage suitcase because it usually includes an acrylic tray. The power strip is hidden inside the suitcase, with the cord feeding through the hole on the side. A pegboard sits on top of the tray for your devices and plug extender. The vintage style looks great with your sleek, modern devices.

DIY Charging Station
Image via: designsponge

3- Convert Shoe Box Into A x

Turning a shoe box into a charging station like this one by instructables is a great way to repurpose an old box. The cords are fed through holes on the side of the box, with the devices resting in front of the box itself. Use decorative items to create a charging station that fits your style, or keep it simple by sticking with the original design.

Shoe Box Charging Station
Image via: instructables

4- Build DIY Charging Station With Wooden Pieces

If you’re looking for a hands-on project for your DIY charging station like this one by,  build your own charging dock with wooden pieces. The power strip is going to be placed inside the box, with the cord feeding through the hole on the side of your dock. Plug your chargers into the power strip, and feed the cords through the holes at the top, with your devices resting on top of the box.

DIY Charging Station

5- Kitchen Charging Station

You spend a lot of time in the kitchen, so it’s the perfect place to charge your devices overnight or while cooking. This phone charging station by learn.kregtool is made of wood and mounted over the outlet above your counter. Pull the knob on the front to open the station and reveal your hidden cords. Your phones are placed in the grooves on top of the charging station.

phone charging station
Image via: learn.kregtool

6- Wood Scrap Charging Station

Give your wooden scraps a new life by using them to build your own cell phone charging station like this one by homemadebycarmona. Your phone is going to sit in a thick slot on top of the station, with the charger’s head sticking out of the bottom of the slot. The cord of the charger is hidden inside the charging station, and it is also fed through a hole at the bottom, so it can be plugged into the wall. Use circular pads to raise the station and create room for the cord. You can use a sander and stain to give your charging station a sleek or textured look.

Wood Scrap Charging Station
Image via: homemadebycarmona

7- Photo Box Charging Station

If a shoe box doesn’t suit your needs, you may enjoy building your DIY charging station like this one by yellowblissroad with a photo storage box. The power strip is hidden inside the box, and the cord is fed through a hole on the side. You’re going to drill several holes in the front of the box, which can be framed with spacers or grommets for decorative purposes. Place the lid on the box, and let your devices rest on the top of the lid as they charge. The best thing about using a box is you can decorate it as you see fit.

Photo Box Charging Station
Image via: yellowblissroad

8- Bread Box Charging Station

If you’re looking to disguise your device charging station, consider a bread box charging station like this one by thekimsixfix.Your power strip is hidden inside the box and mounted to the back for security. The cord of the power strip is fed through a hole in the back of the box, so you can plug it into the outlet over your counter. Unlike other charging stations where the devices sit on top or in front of the box, your devices are hidden inside the bread box. You can even decorate and label it as a bread box to disguise what is really a charging station.

Bread Box Charging Station
Image via: thekimsixfix

9- Grass Charging Station

A DIY charging station like this one by instructables gives you the chance to think outside the box, and you’re sure to feel creative with this grass USB charging station. Start by choosing a container that works for you, which may already have a hole in the bottom, or you may need to drill the hole yourself. Feed the USB cord through the hole in the container, and place synthetic grass over and around the cord’s head. When you plug in your device, it looks like it’s charging in a patch of grass.

Grass Charging Station
Image via: instructables

10- Make A Charging Station Out OfShadowbox

You can also create your own shadowbox charging station like this one by lookiewhatidid.blogspot The power strip is attached to the back interior of your shadowbox, and of course, the cord is fed through a hole in the back. Your chargers should be plugged into the power strip before you replace the back with a wooden piece, complete with the appropriate holes. This way, your cords and wires are hidden inside a solid box. Decorate the box as you see fit, and place the devices on top of your shadowbox as they charge.

11- Countertop Charging Station

The kitchen is known as the heart of the house, so it makes sense to place your charging station like this one by tidbits-cami on the counter. A charging station made of wood and mounted over the outlet above your counter is always a good choice. The cords are hidden inside the station, which can be opened by the knob on the front, and the devices are resting in the slots on the top. A wooden charging station looks great with any interior, and you can also build one for your bedroom or home office.

Countertop Charging Station
Image via: tidbits-cami

12- Envelope Charging Station

Another unique idea is a DIY charging station by lemonthistle that resembles an envelope. All you need to do is mount a metal wall envelope to the wall close to an outlet. You can slip your devices inside the envelope when it’s time to charge them. Depending on the size of the envelope, it may be able to hold two or three devices at once. The great thing about the envelope is the silver color that is already stylish enough for your charging station.

Envelope Charging Station
Image via: lemonthistle

13- Drawer Charging Station

Building a multi device charging station like this one by repurposeandupcycle in a drawer is going to require a bit of work, but the drawer gives you an effective way to hide and charge your devices. You can even use a small, store-bought charging station to organize the devices and cords inside your drawer. Most people would build this charging station in the kitchen, but it can work in any room that has a cabinet in front of an outlet or power strip.

Drawer Charging Station
Image via: repurposeandupcycle

14- Wooden Charging Station

Once again, you may be looking for a DIY charging station project like this one by letsdiyitall that is more hands-on than other projects. With this project, you’re going to build a charging station with multiple compartments out of wood. The compartments should be big enough for your phones and tablets, and you’re welcome to decorate it if you want a specific style. A 4-port USB charger over your outlet allows you to charge multiple devices at once.

Wooden Charging Station
Image via: letsdiyitall

15- Hanging Charging Station

Why not create a hanging charging station like this one by hometalk with a hook, screws, flatware caddy and wire basket with a handle? You can hang the charging station under an outlet on the wall, such as your kitchen island. Use vinyl stickers to decorate the interior of the basket, or place a potted plant on either side. The stickers and plants are optional, but they do create a functional but stylish place to charge your devices.

Hanging Charging Station
Image via: hometalk

16- Cubed Charging Station

You can create this phone charging station like this one by aninvitinghome with a wooden cubed wall shelf. All you have to do is drill a hole into several of the cubes for feeding the chargers. On top of the shelf is a basket with your power strip, which is plugged into the wall. Place your devices inside the cubes with the chargers, which are fed behind the shelf and up to the basket. The cubes without holes can be used as a place to store your devices when you’re not using them.

Cubed Charging Station
Image via: aninvitinghome

17- Magazine Rack Charging Station

Another way to get creative is to turn your wooden magazine rack into a charging station like this one by 100things2do The holes are drilled into the back for feeding the cords, and you can place the charging station on a desk, table or counter near an outlet or power strip. Since each space is big enough for several magazines, the rack works for devices of different sizes.

Magazine Rack Charging Station
Image via: 100things2do

18- Picture Frame Charging Station

A picture frame charging station like this one by thediymommy is perfect if you’re looking for something that sits at an angle. Your devices sit against a cardboard insert, on ledges made of trim, which are all painted with chalk paint. The cord is fed through a hole in the cardboard and under the frame. A picture frame charging station works on your desk, kitchen counter or any table near an outlet.

Picture Frame Charging Station
Image via: thediymommy

19- Planter Box Charging Station

A planter box charging station like this one by homedit is always a great idea because it doesn’t require you to drill any additional holes. It already has spaces that are wide enough to feed the cords. You can place your devices in front of a planter full of flowers or inside the planter on synthetic grass. Place the planter box on a table or counter and feed the cords to an outlet or power strip.

Planter Box Charging Station
Image via: homedit

20- Book Safe Charging Station

A book safe charging station like this one by caughtonawhim is a stylish way to hide your cords and wires. You’re going to cut a hole in the pages of a journal, which should be big enough for your phone. Don’t forget to cut a notch in one side, on several of the top pages, for your cord. The hole and notch should be deep enough to close the book without the inside cover touching your screen or cord.

Book Safe Charging Station
Image via: caughtonawhim

21- Wall Mounted Charging Station

You can create a wall mounted charging station like this one by instructables by building a shelf out of wooden pieces. The shelf is actually a box with a door on it for hiding your power strip. The cord to the power strip is fed through a hole at the bottom of the box, and the charger cord is fed through a semi-circle at the top. Your device is going to rest on top of the box as it’s charging.

Wall Mounted Charging Station
Image via: instructables

22- Lamp and USB Charging Station

For this project, you’re building a lamp and USB charging station like this one by removeandreplace that is perfect for your work or hobby area. The outlets are attached to the charging station to keep your cords organized, and you can switch on the lamp when you need more light. Use an attractive lamp shade to add a bit of style to this functional charging station.

Lamp and USB Charging Station
Image via: removeandreplace

Whether you’re looking for a something for your phone or multi device charging station, the sky is the limit when you’re building your own DIY charging station.

23- Family Charging Station

The whole family has a place to charge their devices with this USB charging station by drivenbydecor. There are several holes on the bottom of the wooden mail sorter, and circular pads are attached to the bottom to create enough space for the cords to go underneath. Your devices are organized inside the compartments of your charging station.

Family Charging Station
Image via: drivenbydecor

27 DIY Lemonade Stands For Your Kids To Have A Fun Summer

A DIY lemonade stand is a great way to teach your child a little about responsibility. It gives them a sense of accomplishment to know they earned their own money. The best part is learning how to make a lemonade stand, which gives you quality time with your child.

When building a DIY lemonade stand, you want to look through different lemonade stand ideas to find one that works for your family. You can build a lemonade stand using materials ranging from cardboard to a nightstand. Use the following ideas to learn how to build a lemonade stand.

DIY Lemonade Stand Ideas For Kids

1. Wooden Crate Lemonade Stand

The wooden crate lemonade stand by thenerdswife is easy to build because it doesn’t require any tools. You’re going to use four wooden crates, two wooden stakes, twelve zip ties and a hot glue gun to build this stand. If you want to add a splash of color, consider white spray paint and yellow acrylic paint, or you can go with another color scheme.

 Wooden Crate Lemonade Stand
Image via: thenerdswife

2. Chalkboard Lemonade Stand

You can build your chalkboard lemonade stand like this one by lollyjane out of an old lemonade stand or a small wooden cart with wheels. Paint the front with chalkboard paint, which you can decorate with yellow vinyl letters. Your awning is made with pieces of fabric, a curtain rod and translucent Velcro. If your child wants to add more pizzazz, consider a colorful bunting made of patterned fabric. You may also like to see other relevant ideas for fun activities such diy play houses.

Chalkboard Lemonade Stand
Image via: lollyjane

3. Cardboard Lemonade Stand

If you’re looking for an easy kids lemonade stand idea like this one by ohhappyday, you can never go wrong with a cardboard lemonade stand. A refrigerator box is a great option, and you can easily cut a window and door into the stand. Use extra strips of sturdy cardboard to make a shelf that displays your inventory. One idea is to create a slope for the paper awning by cutting off the top of the box. Finally, decorate the lemonade stand with a little paint.

Cardboard Lemonade Stand
Image via: ohhappyday

4. DIY Lemonade Stand

Are you looking for lemonade stand ideas that allow you to work more with your hands? You’re sure to enjoy building this DIY lemonade stand by lowes. The materials include lumber, boards, plywood, deck screws, sandpaper and a jigsaw. Like any DIY project, you’re going to start by building the frame, and then you can add the rest. When you’re finished, your child can help you decorate with paint and fabrics.

DIY Lemonade Stand
Image via: lowes

5. Shipping Pallet Lemonade Stand

When learning how to make a lemonade stand like this one by diynetwork, you may want to build it out of shipping pallets. This is a great way to upcycle wooden pallets and crates. You’re also going to use scraps of plywood, and you can even add decorative or functional wheels. Let your children paint the entire shipping pallet lemonade stand, or just paint the sign and leave the rest unpainted for a natural look. You may also like to see other relevant ideas for fun activities such diy tree houses.

Shipping Pallet Lemonade Stand
Image via: diynetwork

6. Display Table Lemonade Stand

Another great choice for a kids lemonade stand like this one by thisoldhouse, this stand uses slots and notches instead of screws and nails. It’s similar to a display table used for science fairs. While you’re sawing the slots and notches, your children can sand and paint the table. When they’re not using the table to sell lemonade, it can easily be disassembled and packed inside your house.

Display Table Lemonade Stand
Image via: thisoldhouse

7. Beverage Cart Lemonade Stand

Whether your child is selling lemonade on your front yard or in front of a grocery store, a lemonade stand with wheels like this one by hertoolbelt is a good way to transport everything. The stand is built using pieces of wood such as boards and plywood, as well as nails, screws, wood glue and sandpaper. Use a handle and wheels to create a design similar to a beverage cart. Once again, you want to take care of the actual construction, and let your child decorate the stand with paint and fabric. You may also like to see other relevant ideas for fun activities such diy swing sets for kids playing.

Beverage Cart Lemonade Stand
Image via: hertoolbelt

8. Wood Pallet Lemonade Stand

As you can see, a wood pallet lemonade stand like this one by dolendiaries is an easy way to build a stand for your child. You can find the wood pallets and scrap wood in lumber yards, home improvement stores or your own garage. Use the scrap wood as a counter, and add hinges so you can fold up the stand later. Finish it off with a paint job by your children, and add an umbrella for shade.

Wood Pallet Lemonade Stand
Image via: dolendiaries

9. Charming Lemonade Stand

Whether you’re upcycling or hitting the flea market, a nightstand makes a charming lemonade stand like this one by designdazzle. You’re going to make a topper and sign using plywood and two pieces of 1×2 boards that stand at 5 feet tall. Once everything is assembled, paint it in a fun color scheme, such as green and yellow. Position the stand so the drawers are facing your child, as they can use them for money jars and extra supplies.

Charming Lemonade Stand
Image via: designdazzle

10. Picket Fence Lemonade Stand

Have you ever thought of building a picket fence lemonade stand like this one by ana-white? Okay, it’s not going to be an actual picket fence, but you’re going to use the pickets to build it. You’ll be cutting and stapling the wood pickets to reduce the amount of scrap leftover. Use 1×3 boards and a piece of cedar picket to create your topper and sign. Your children are sure to love painting their stand in fun colors, such as yellow and white.

Picket Fence Lemonade Stand
Image via: ana-white

11. Wooden Lemonade Stand

You’re going to build a wooden lemonade stand like this one by skiptomylou out of plywood, PVC pipe and Masonite board. The plywood and PVC pipe are for the stand itself. The Masonite board is for the sign, which is going to be designed by your children. You can even attach hinges to fold it up for easy storage. Use paint, chalkboard paint and printed graphics to decorate the lemonade stand.

Wooden Lemonade Stand
Image via: skiptomylou

12. Simple Lemonade Stand

Build a simple DIY lemonade stand like this one by rainonatinroof using two large wood crates, plywood project panel and boards. You do need to use a drill, circular saw and wood screws for the actual construction. Use Velvet Finishes Bold and Baroque to paint the stand and sign in a vibrant color scheme. When you’re finished, you have a lemonade stand that’s just right for your little one.

Simple Lemonade Stand
Image via: rainonatinroof

13. Wooden DIY Lemonade Stand

If you’re looking for more lemonade stand ideas that use wood, you can build this wooden lemonade stand by thegirlcreative with wooden crates and scraps of wood. Start by stacking four wooden crates, two-by-two, on top of a plywood base. Then, place more plywood on top as a counter. Use nails and a nail gun to attach the pieces together. When it’s time to paint, you can use painter’s tape to create a fun design.

Wooden DIY Lemonade Stand
Image via: thegirlcreative

14. Gourmet Lemonade Stand

In addition to lemonade, you may want to serve tasty snacks, so consider a gourmet lemonade stand like this one by nobiggie. You’re going to use a three tier cart, which you can find in a fun color or paint yourself. Use the top tier for lemonade, the second tier for cookies and brownies and the bottom tier for candy, extra lemons and supplies. Label the tiers with laminated scrapbook paper and mailbox stickers. If you need to move your stand, the wheels on the cart makes it easy to transport everything.

Gourmet Lemonade Stand
Image via: nobiggie

15. Carnival Booth Lemonade Stand

How would you like to build a carnival booth lemonade stand like this one by mrmcgroovys? It resembles a ticket booth, which is a cute design for your child. You can build is out of a refrigerator, wardrobe or washer/dryer box, as well as a rivet project kit. You’re going to create a large front window with a shelf for selling the lemonade, and you can create side windows as well. Your child is sure to have a blast decorating the box with paint.

Carnival Booth Lemonade Stand
Image via: mrmcgroovys

16. Bright Wooden Lemonade Stand

When learning how to build a lemonade stand like this one by fantabulosity, you may be looking for plans that use wooden crates. As you can see, wooden crates are affordable, durable and easy-to-use materials. For this plan, you’re going to spray paint four wooden crates in a bright color, such as aqua, pink or yellow. Then, stack them two-by-two and nail them together. You can even turn a top and bottom crate around to create a charming display for customers. Paint and attach two wooden rods for the banner, which you can make out of paper or wooden pendents and pretty ribbon.

Bright Wooden Lemonade Stand
Image via: fantabulosity

17. Rolling Lemonade Stand

These are actually plans for a rolling slushie stand, but it works for a rolling lemonade stand by livingwellspendingless as well. You’re going to build it with a rolling cooler, large cardboard boxes, zip ties and wrapping paper rolls. Decorate it with regular or chalkboard paint, a foam brush and scraps of fabric. It’s easier to put together than it may sound, and your children can help paint the stand and create the sign.

Rolling Lemonade Stand
Image via: livingwellspendingless

18. Changeable Lemonade Stand

You’re not just learning how to make a lemonade stand like this one by ana-white with these plans, but you’re building a changeable play stand your child is sure to love. You’re going to build the stand out of wooden pieces, and be sure to include shelves for supplies. There should be a slot at the top for three foam board signs, with the lemonade sign in front to hide the other signs. When your child isn’t selling lemonade, you can switch out the signs to create a pretend market, post office or puppet theater. You may also like to see other relevant ideas for fun activities such diy climbing wall.

Changeable Lemonade Stand
Image via: ana-white

19. Easy-To-Build Lemonade Stand

The plans for this easy-to-build lemonade stand like this one by mysimpleobsession include a board, side posts, wooden drawer crates and miscellaneous decor. You also need screws, natural wood filler, clamps, a drill and a jigsaw. When you’re finished, you’ll have a wooden lemonade stand with a sign in the front and drawers in the back. Use wooden letters, vintage signs, a chalkboard or whatever decor catches your eye to dress up your stand.

Easy-To-Build Lemonade Stand
Image via: mysimpleobsession

20. Fancy Lemonade Stand

A fancy lemonade stand like this one by scatteredthoughtsofacraftymom is sure to grab your customers’ attention. Start with a patio coffee table, which you can reuse or buy from a thrift store. It’s small enough for your child to sit at comfortably. Use duct tape, hot glue and long wooden dowels to create posts and attach your pennant banner. A lace tablecloth or ruffled table skirt is perfect for your fancy stand.

Fancy Lemonade Stand
Image via: scatteredthoughtsofacraftymom

21. DIY Rolling Lemonade Stand

If you love DIY rolling lemonade stand ideas like this one by satsumadesigns, here’s another set of plans for you. The plans require several boards, wide trim boards and plywood, along with screws, casters and washers. You can create a pennant banner out of scraps of pretty fabric, as well as cut-out letters for your sign. The inside of the stand should face your child, as it holds the cooler and supplies. It’ll be a breeze moving their stand thanks to the attached wheels.

DIY rolling lemonade stand ideas
Image via: satsumadesigns

22. DIY Wooden Crate Lemonade Stand

You know by now that a DIY lemonade stand like this one by divinelifestyle made with wooden crates is a popular choice among families. The materials for this idea include wooden crates for the stand, a board for the counter and two square dowels for the burlap banner. One idea is to not label the banner, and place a small lemonade sign on the counter. Leave the wooden crates alone for a natural look or cover them in paint. Decorate the counter by covering it in wrapping paper.

DIY Wooden Crate Lemonade Stand
Image via: divinelifestyle

23. PVC Lemonade Stand

You don’t always need to use wood or cardboard to build a kids lemonade stand like this one by formufit. Why not build a PVC lemonade stand? The entire frame is built with PVC pipes and fittings, but the counter is made of pine board for a flat, durable surface. You can create the front, sides and awning with a patterned fabric. Imagine yellow and white striped fabric for your lemonade stand.

PVC Lemonade Stand
Image via:

24. Adorable Lemonade Stand

You’re sure to attract customers with this adorable lemonade stand like this one by dearlillieblog. It’s made of one piece of 4′ by 4′ wood and two pieces of 1′ by 4′ wood. The signs are made of cardboard and long skinny boards for a simple but effective look. Use fabric to create curtains for their lemonade stand. Bonus: You can easily switch out the signs by using sawtooth hangers.

Adorable Lemonade Stand
Image via: dearlillieblog

25. Wishing Well Lemonade Stand

A wishing well lemonade stand like this one by instructables is a charming idea, as the top resembles the roof over a wishing well. The actual wishing well is the table of your child’s stand. You’re going to build the lemonade stand out of cedar or pressure treated lumber because they’re durable enough for the outdoors. If you’re placing the lemonade stand inside, such as your garage or a flea market, pine wood is a good choice. You may also like to see other relevant ideas for fun activities such diy cornhole boards and diy gaming tables.

Wishing Well Lemonade Stand
Image via: instructables

26. Plywood Lemonade Stand

Another idea is to build a plywood lemonade stand like this one by instructables, as this is an affordable and durable option. Once your lemonade stand is assembled, which you can do with hinges, you can prime and paint it. Keep it simple but effective with yellow, or create a multicolored lemonade stand with yellow, orange and green. A yellow sign is attached to white posts to match the rest of your stand.

Plywood Lemonade Stand
Image via: instructables

27. Wooden and Chalkboard Lemonade Stand

A wooden and chalkboard lemonade stand like this one by diy.dunnlumber is never a bad idea for your little one. The stand is made of cedar, plywood, cedar fencing and tight knot cedar. When you paint the top area with chalkboard paint, you’re making it easy to create and erase your sign. Let your little one write out the sign to add a child-like quality to their stand.

Wooden and Chalkboard Lemonade Stand
Image via: diy.dunnlumber

Conclusion

Learning how to build a lemonade stand is a great experience for you and your child. You can take care of the construction, and they can take care of the decorating. It’s the perfect project for the whole family!

When you take your time to research the plans, you’re sure to find a DIY lemonade stand that catches your eye.

13 DIY Climbing Walls To Do Healthy Exercise At Your Home

If you’re looking for a fun way to exercise, consider a DIY climbing wall. You may have seen families climb on them at indoor playgrounds, but a climbing wall is not limited to occasional use. There are may people who have a climbing wall right in their own home.

You can build a DIY climbing wall in areas such as the playroom, garage or backyard. Now, it’s important to take the precautions to keep everyone safe while using the wall. This includes a sturdy hangboard and climbing holds, as well as thick padding at the bottom. There should also be enough room to fall without hitting any other parts of the wall.

Are you looking for an exciting way to stay active without a gym or club membership? Check out the following ideas for building a climbing wall at home.

1. Budget-Friendly DIY Climbing Wall

If you’re looking to build a DIY rock climbing wall like this one by growingslower on a budget, then these are the plans for you. You’re going to build your wall with materials such as wooden panels, T-nuts and climbing holds. Plywood and lumber are great choices because they’re affordable and durable. Remember, when you’re shopping for supplies, reach out to your local manufacturers to see if they offer any discounts. When building, the walls should be at an angle to offer a bit of a challenge and different movements. For padding, you want to use several thick mattresses to create a safe landing.

Budget-Friendly DIY Climbing Wall
DIY climbing wall Image via: growingslower.com

2. DIY Climbing Wall With Storage

When building a home climbing wall like this one by awesomeinventions for your family, you want to be sure the storage area is easy for everyone to access. One idea is to install cubbies, hooks and lower shelves for their shoes and climbing gear. This way, their gear is already in the same room when they’re ready to climb. On the other side of the room is your climbing wall, which includes a mixture of angled walls and one vertical wall. If you can find seat materials from old cars, they’d make great padding for the floor. Whatever you use for padding, cover it with carpet for an extra layer of protection.

DIY Climbing Wall With Storage
Image via: awesomeinventions

3. DIY Climbing Wall With Loft Bed

A climbing wall with a loft bed is a great option for building a kids climbing wall like this one by instructables in their bedroom. This way, they always have a reason to use their climbing wall. You’re going to build the wall out of thick plywood and wood pieces, with the loft bed behind the top section of the wall. Placing the loft bed behind the top section keeps it hidden if they’re entertaining guests, but it also keeps them secure in bed as they sleep. It never hurts to build or invest in a ladder or small staircase for the nights when your child doesn’t feel like climbing up and down the wall. A diy climbing wall with a loft bed is sure to be a hit with your child and their friends! You may also like to see my other kids fun projects such as diy tree houses.

DIY Climbing Wall With Loft Bed
Image via: instructables

4. DIY Climbing Wall For Less Than $100

That’s right, these plans allow you to build your own climbing wall for less than $100. This DIY climbing wall by garagegymreviews is made of birch plywood, spare plywood, climbing holds and T-nuts. Of course, you have the option to buy additional materials if needed. Wood glue, a power drill and clamps are the only other supplies you may need. Remember to install the T-nuts in every hole you create in the wall, as this allows you to change up the layout of your holds whenever you want. You can place a small climbing area above a lengthy door way, or you can designate an entire room to angled and vertical climbing walls.

DIY Climbing Wall For Less Than $100
DIY climbing wall Image via: garagegymreviews.com

5. Freestanding Indoor Rock Climbing Wall

A freestanding climbing wall works like this one by instructables if you have limited space, live in a rental or want a portable wall. You want to use plywood for the wall and a strip of plywood for the top area, as well as climbing holds, T-nuts, connectors and other supplies. The sides are going to hold the climbing wall at an angle while making it easier to move it, so you don’t have to worry about a permanent location or damaging the walls. The hangbar is going to be secured on the top part of the wall. Don’t forget to place some padding under the wall, as you’re still going to need a soft landing.

Freestanding Indoor Rock Climbing Wall
Image via: instructables

6. Cave-Design DIY Climbing Wall

If you’re looking to build a DIY rock wall outside like this one by chockstone, but you’re worried about the weather, then consider a cave-design climbing wall. It’s built inside a structure of vertical and angled posts, horizontal slats and marine board walls. The marine board and corrugated roofing iron offer weather protection. The final step is to install the climbing holds in a layout of your choice. You can give yourself a challenge, but make sure you can see the course inside the climbing area. You may also like to see my other kids fun projects such as diy playhouses.

Cave-Design DIY Climbing Wall
Image via: chockstone

7. Backyard Climbing Wall

You can build a DIY backyard climbing wall like this one by impatientlycrafty on the back of your home. It’s going to be made of pressure treated plywood, pressure treated wood, wood screws and Philips head screws, all for exterior use. If you want to create a fun design for your children, such as a forest or city, you can use spray paint for your design. Once the paint dries, attach your screw-on climbing holds to the board. Since your climbing wall is in the backyard, you can use rubber mulch as your padding, just as you may find on the playground.

Backyard Climbing Wall
Image via: impatientlycrafty

8. Outdoor Climbing Wall

Here is another DIY climbing wall by makezine to consider for your backyard. If you have children, you may decide to build a small playground on the back of the wall. The materials include, but are not limited to, posts, plywood sheets, wooden pieces and T-nuts, as well as primer and exterior paint. As for the climbing wall itself, you want to include vertical and angled walls to keep your layouts interesting, as well as a slide, monkey bars and ladders for your little ones. Your whole family can enjoy playing and exercising in the backyard.

DIY climbing wall
Image via: makezine

9. Outdoor Climbing and Training Wall

Another backyard climbing wall idea by instructables, this plan allows you to design a wall that gives you everything you need to train. If you’re looking for a fun challenge, you can build a structure with a wall that is angled at 36.6 degrees, which isn’t too steep or vertical. In addition to your climbing holds, you’re also going to install campus rungs on one side of the wall as another source of climbing. The wall is semi-permanent, so while it may be difficult, it can be moved by at least two people.

Outdoor Climbing and Training Wall
Image via: instructables

10. Garage DIY Climbing Wall

With this DIY climbing wall plan by instructables, you’re going to build your own climbing wall right in your garage. This way, you have easy access to the wall without making any major changes to your home. If you’re looking to create a fitness plan, you want to include a 90 degree overhang with a 25 degree lead out, 45 degree overhang, Jacobs ladder and pull-up bar. You can also add a vertical wall, angled portion, bulge and top anchors just for leisure activities. The climbing wall is made of pine plywood, pine boards and climbing holds with the usual tools and supplies. You may also like to see my other kids fun projects such as diy swing sets.

Garage DIY Climbing Wall
Image via: instructables,

11. Home Climbing Wall

A home climbing wall by rei.com can be built in areas such as a storage room, basement or garage, as long as you consider your lighting, ventilation and access. Remember to use angles and features that are not going to get boring quickly. One idea is to built flat, overhanging walls between 20 degrees and 45 degrees, as this keeps the layout interesting and full of moves. If you’re building walls steeper than 20 degrees to 30 degrees, be sure to include a small, vertical kicker panel at the bottom of the area. Build a climbing course that is a challenge, but not impossible to complete.

home climbing wall
Image via: rei.com

12. DIY Kids Climbing Wall

If you’re an active parent, this kids climbing wall by thecreatedhome allows your children to be active right along with you. You can build this climbing wall in the playroom, their bedroom or even the living room. You’re going to cut and attach smaller pieces of plywood boards with climbing holds onto the wall, which forms different sections to work with the room and create age-appropriate courses. Use thick mats to double as padding when climbing and a wall cover when there’s no adult supervision.

Kids Climbing Wall
DIY climbing Wall Image via: thecreatedhome.com

13. Portable Kids Climbing Wall

When building this portable DIY climbing wall for kids like this one by sim.plified, consider building it at an angle that points upward, rather than an overhanging wall, but remember to adjust it according to their age and skill level. You should also cover the wall with indoor/outdoor carpeting to avoid splinters, plus it serves as weather protection if you want to move the wall outside. Remember to invest in padding to give your children a soft landing.

Portable Kids Climbing Wall
Image via: sim.plified

Summary

The layout you use not only depends on your space and budget, but it also depends on what you want to get out of your climbing wall. You may be active in climbing competitions, or maybe you’re looking for a way to change up your exercise routine. It’s also a great way for children to release their energy.

Whether you’re building for yourself, your children or the whole family, you’re sure to build a DIY climbing wall that keeps everyone active.

10 DIY Telescope You Can Build On The Cheap

A DIY telescope is a fun thing to have around for family members of all ages to use. Get a closer look at the stars in the nighttime sky and learn about the constellations or look for shooting stars. A homemade telescope is also a must-have for an up-and-coming spy, and they’re cheap to create.

A DIY telescope will provide hours of fun and information, regardless of what you use it for. Building one can also be a family project, providing fun and bonding time for you and your children.

Check out these plans for 10 DIY telescopes we found around the internet you can build on the cheap and get started with your viewing fun this weekend

1 -Wrapping Paper Tube DIY Telescope

Recycle a long cardboard tube from wrapping paper into a homemade telescope with these plans by savvyhomemade we are sharing with you. Cut down the cardboard tube to the desired size, have the needed lens installed in each end, then embellished as desired.

Cheap, easy and quick to create, plus you probably already have the wrapping paper tube on hand.

DIY telescope
Wrapping Paper Tube DIY telescope, Image via: Savvyhomemade

2. DIY Dobsonian Telescope

Unlike the one we discussed before this is a large size diy telescope. Just follow these detailed instructions that will show you how to build a telescope by Instructables that will allow you to see far up into the sky and get a closer look at the solar system. Starry constellations, comets, planets and meteors will appear almost close enough to touch with this large and powerful DIY telescope.

Build this telescope and leave it set up in your backyard so viewing the solar system will be as easy as walking out your back door.

DIY Telescope
DIY Dobsonian Telescope, Image via: Instructables

3. Galilean DIY Telescope

This is an ideal homemade telescope by Space to create with your children for a beginner’s telescope or one for a school science project. Easy and cheap to build, most of the components can be purchased at your local office supply store.

The range of view is limited with this model, but it can inspire a young astronomer to build a telescope in the future that has a far reaching view or build other projects for science. This cheap DIY telescope will provide a view of the solar system that is grand enough to capture their imagination and fans the flames of their natural curiosity. Inspire a future astronomer and DIY builder with just a small investment of time and money on this DIY project.

Galilean DIY Telescope
Galilean DIY Telescope, Image via: Space

4. Backyard  Dobsonian

We like this diy telescope as it’s unique in its design, portable and easy to build, these detailed instructions will show you how to build a telescope that will provide a bird’s eye view of the stars from your own backyard. Use these easy to follow plans to build a telescope that will enable you to see the world from your own backyard.

Large, but lightweight, this DIY telescope design by Makezine can be built cheaply and provide hours of viewing pleasure for young and old alike. The written and pictorial instructions will walk you through each step of the building process so the end result will provide a clear view of whatever you are trying to view.

DIY telescope design
Backyard  Dobsonian Telescope , Image via: Makezine

5. Under $200

Use these free plans to build a powerful Newtonian-Dobsonian style DIY telescope by manmadediy that will give you the viewing power to see solar flares, the auroras, stars and planets. Use these free plans to build this telescope and enjoy hours of observing and discovering all the wonders our universe has to offer.

All the components for this build can be found at your local building supply store for under $200. You may have some of the building materials already on hand that will bring the price well under $200 for powerful homemade telescope.

DIY telescope
Under $200 DIY telescope, Image via: Manmadediy

6. DIY Astronomy Project

As long as there are kid’s science projects, there will be a need for a cheap, easy to build DIY telescope. This is Dobsonian design that will meet the criteria for being cheap and easy to create.

These easy to follow instructions will create a homemade telescope by Popular Mechanics that will help a child win the science fair or enable a budding young astronomer get a better look at the solar system.

Great project for the family and will provide inspiration and information for all ages. These free plans will show you how to transform a cardboard tube into a functional Dobsonian style telescope that will provide a clear image of the solar system. The total build cost will be under $25, even less if you have some of the materials on hand.

DIY Astronomy Project
DIY Astronomy Project, Image via: Popular Mechanics

7. Digital Telescope

This high range diy telescope can easily and cheaply be built with PVC pipe, recycled lens and a webcam. These pictorial instructions show you how to make a telescope by Instructables that sets on a tripod and records what you have it pointed towards.

Inexpensive to build and great for research projects. View the recorded footage over and over again to discover new and exciting things about our solar system that the naked eye can’t see. The recorded footage provides easy to access documentation that can be viewed over and over again and shared with friends and family. Great science project that will be sure to win the blue ribbon.

Digital Telescope
Digital Telescope, Image via: Instructables

8. Beginners Telescope

This beginners telescope by Instructables can be built for under $20 and provide hours of viewing pleasure. Great for the want-to-be astronomer, this design is powerful enough to provide a sharp, clear view of Jupiter, Saturn and Venus. The image will also be clear enough so you can see the craters on the moon.

This Kepler design is a tried and true design that will provide a clear image with a simple, stream-lined build. Lightweight and portable, take this homemade telescope along with you on hiking trips and vacations so you can get a good view of the solar systems from different angles.

Inspire your beginning astronomer and open up a lifetime of discovery by following this easy to read instructions and creating this cheap DIY telescope.

Beginners Telescope
Beginners Telescope built for under $20, Image via: Instructables

9. DIY Replica of Galileo’s Telescope

To buy a telescope like the one used by Galileo could cost a small fortune. However, building one will be very cheap. A few pieces of PVC pipe will be the biggest expense for this DIY project.

Create the DIY telescope such as the one by popsci and explore the solar system and perhaps make new discoveries just as Galileo did centuries ago.

Build this diy telescope with PVC pipe and two lenses. It’s portable and easy to carry along with you wherever your explorations may take you. A tripod can be built with PVC pipe and then spray painted gold to give this DIY project a high end finish. No one will suspect the telescope is made from PVC pipe after it has been painted.

DIY Replica of Galileo’s Telescope
DIY Replica of Galileo’s Telescope, Image via: popsci

10. Kids Telescope

Fuel your kid’s natural curiosity and provide them hours of fun with this easy to build DIY telescope by Gift Of Curiosity. Inspire them to search for land and buried treasure just like the pirates of old once did by using a telescope. Encourage them to look up into the dark nighttime sky and discover the bright starts that shine in our solar system with this easy to build kids telescope.

This homemade telescope is assembled from an inexpensive kit that uses recycled materials. Easy for kids to build with just a little parental help, plus the kit keeps usable items out of the landfill. Ideal way to teach kids two lessons- recycling and discovery of new things.

Kids Telescope
Kids Telescope, Image via: Gift Of Curiosity

Wraping Up!

Building a diy telescope does’not need a lot of scientific knowledge or know how. You can build at your own or with your kids to enhance their learning skills. The ones we have shown you above can help you to build a similar type of telescope. 

References:

NASA, APR 24, 2020, “What Is the Hubble Space Telescope? (Grades K-4)”, https://www.nasa.gov/learning-resources/for-kids-and-students/what-is-the-hubble-space-telescope-grades-k-4/

Harvard Library, “WorldWide Telescope in Research and Education”, https://dash.harvard.edu/bitstream/handle/1/11688788/goodman-worldwide-telescope.pdf?sequence=1&isAllowed=y

16 Free Ramp Plans-Learn How To Build Various Ramps

Making a ramp tops is one of the best DIY projects you can execute and there are various types of ramp plans you can create to improve functionality within your home, we have compiled 16 free easy to build DIY ramps plans to make your home more attractive and accessible. There are steps to guide you on how to build a ramp to enable you to get underneath your car quickly, a wheelchair ramp or shed ramp for more accessibility to and a skateboard ramps to provide a fun-filled skateboarding experience right in your home.

Here are the standard supplies and tools used in these projects.

Basic supplies required

  • Pressure treated wood boards – you can find these in hardware stores.
  • Plywood
  • Beam joist
  • Metal sheet – you can get this from home depots, or search the internet for steel fabricators.
  • Screws – from home improvement stores.
  • Metal handles – from home improvement stores.
  • Roofing nails
  • Shims
  • Pines
  • Adhesive

Basic tools

If you have the budget, you can buy most of these tools, as you would be using them for other diy projects. Otherwise, lookout for where you can borrow some of these.

  • Miter saw
  • Level and framing nailer
  • Power drill
  • Measurement tape
  • Triangular ruler
  • Philip-head
  • Belt sander
  • Masonry Bit
  • Hand file.
  • Pencil for marking.

Wheelchair Ramp Plans

1. Build a Wheelchair Ramp

Building a wheelchair ramp like this one by familyhandyman would be a fantastic project to carry out. This ramp can go a long way in helping someone with mobility challenges live independently and can be made of wood or all aluminum.

You can get already formed ramp material (wooden or Prefabricated aluminum), and then assemble it yourself.

When making this ramp, you need first to create a sketch of your ramp considering the measure of the width, landing size and location. Measure the distance between the thresholds to the ground and adjust the length and slope of the ramp to fit your yard. Then start building

Build a Wheelchair Ramp
How to Build a Wheelchair Ramp, Image via: familyhandyman

2. Build a Portable Wheelchair Ramp

Moving a wheelchair into homes, vehicles and shops could be hectic as the entrance might be steep. A portable wheelchair ramp like this one by instructables by becomes the ideal solution to ease movement in and out of these places.

Custom made aluminum ramp are good, but are quite expensive and most of them may not work correctly for all kinds of wheelchairs, as they are mainly made for lighter wheelchairs, and are not very strong.

When building these wheelchair ramp plans, always bear in mind the measurements of the available space. You can attach handles to the ramp for comfortable carriage.

Build a Portable Wheelchair Ramp
Moveable wheelchair ramp plans,, Image via: instructables

3. Make a Handicap Ramp and Landing

Make your home easily accessible to people with movement challenges with this classic DIY project. Handicap ramps like this one by hgtv are easy to create and a great DIY project to embark on. First, you have to measure your space and then sketch your ramp design.  “The Americans-with Disabilities-Act requires that ramps such as this should be at least 5fts by 5fts, so someone in a wheelchair can quickly turn around without getting stuck).

Assemble each piece of wood using a framing nailer.

Check to ensure the frame is sturdy, then add a few pressure treated wood shims in areas where needed, before attaching the structure to the building with nails.

Create support for the diy ramp, by cutting woods that measure from the top of the landing to the concrete base and nailing them to the side of the ramp.

Make a Handicap Ramp and Landing
Make a Handicap Ramp and Landing, Image via: hgtv

4. Wheelchair Ramp Plan 

Another wheelchair ramp idea, to improve home accessibility for people who can’t use the stairs. This wheelchair ramp plan by lowes provides a gentler and less stressful way of entering or leaving their home for them.

This is amongst the most straightforward DIY projects you can start right away. However, you might want to ensure building a wheelchair ramp complies with local building requirements and its created to meet the specific needs of the occupant. The diy wheelchair ramp should be formed according to the measurement of the entrance point of the home.

To make it safe and sturdy, hardwood is used and its coated with stain to ensure durability.

Build a Wheelchair Ramp
building a wheelchair ramp,, Image via: lowes

Car Ramp Plans

5. Make a Car Ramp For Your Vehicle

It’s always fun doing things the DIY way, Instead of using hydraulic jacks, build a DIY car ramps like this one by corvetteforum to access underneath your vehicle. The design of this diy ramp is very straightforward.

First, cut the wood to the required dimension and get the fillets done and edge sloped. Get the plank smoothened (using a hand planer); you can take it to a carpenter to do this.

Next, attach the planks to each other by applying the adhesive at the base of each plank and then stacking them one above the other.

Mark the points to drill and drill at that point ensuring the planks don’t move. After that, you can then use a Philip-head to screw it together.

Check that the end of the screw doesn’t jut out at the bottom. Use a hand file to file out any jutting screw.

Make a Car Ramp For Your Vehicle
Make a Car Ramp For Your Vehicle, Image via: corvetteforum

6. Build A Diy Car Ramp To View Underneath Your Vehicle

We have all had that moment when we want to get the car up in the air and access or fix something under it. Well, these easy to build ramp plans by team-bhp give you an inexpensive and easy way to achieve that.

First, create a framework of the ramp using the planks, the length of the ramp can either be 2”x10” or 2”x12”. Screw the planks to each other with screws to create the frame.

Then cut each plywood to a width of 3 strips 16”, and then screw to attach to the various sides of the ramp. The ramps take a sheet each. There you have it.

Build A Diy Car Ramp To View Underneath Your Vehicle
Build A Diy Car Ramp To View Underneath Your Vehicle, Image via: bhp

7. Have A Low Profile Car? – Build A Car Ramp To Fit Your Vehicle

Low car ramps cost as much as $200, but with this Diy hack, you could build very sturdy DIY car ramp like this one by golfmkv for a quarter of that.

Sketch the slope; this would make it easier to build.

Using the saw, cut the wood according to the measurement, this should depend on the length of your car. A 90” size was used here.

Then assemble the wood one after the other with a screw, You can then attach caster wheels to simplify moving the ramp and sand the edges to provide extra refinement.

Have A Low Profile Car? – Build A Car Ramp To Fit Your Vehicle
Build A Car Ramp To Fit Your Vehicle, Image via: golfmkv

8. Create A Customized Low DIY Car Ramp 

Another diy ramp plan by instructables for those with low cars. You might end up having an issue if the cowling under your car’s bumper touches the ramp. Make this customized low day diy car ramp to keep your vehicle in good shape.  A little innovation was introduced in this project and its aimed to help indicate to you when to stop moving when climbing the ramp. So, a small switch connected to a bulb was attached to the close to the end of one of the ramp, in a way that when climbed on, the build start lightening and you would know to stop.

Create A Low Customized Low Car Ramp
Create A Customized Low DIY Car Ramp , Image via: instructables

Skateboard Ramp Plans

9. Build A Skateboard Quarter Pipe Ramp

If you love skateboarding, then quarter pipe skateboard ramps such as this one by liveabout is a must have. You can also use it for bikes, and it isn’t hard to build. Having a skating ramp at home is excellent as it provides you with an alternative when it’s raining or when you want to skate alone.

Building a 3 inches quarter pipe ramp is not so difficult or time-consuming, and it cost less than a 100 bucks. That’s less pay compared to the fun it would provide.

It’s going to require some of the necessary materials for this project, In addition to those listed at the top; you would need a metal pipe (you can quickly get one from a home improvement shop).

Build A Skateboard Quarter Pipe Ramp
Build A Skateboard Quarter Pipe Ramp, Image via: liveabout

10. Make A Skateboard Mini Ramp

Another skateboarding DIY project for enthusiasts. Whether you are an experienced skateboarder, just starting out or have got kids who love skating, this DIY mini ramp plan by wikihow is the ideal project to provide fun and satisfying experience. Have the time and space to practice till you become a good skateboarder.

Before embarking on this project, check the possibility of storage, whether you have enough space for it in your home would help you determine the size.

To start, get your ideas on paper and create a blueprint for your design. Then organise the needed supplies and then begin to build.

Make A Skateboard Ramp
Make A Skateboard Mini Ramp, Image via: m.wikihow.com

11. Build A Micro Quarter Pipe Ramp

Skating never gets old; if you still haven’t found the ideal skating DIY project, these micro quarter mini ramp plans by howtheyplay would be suitable for you. Size and mobility are crucial factors to consider when building your diy ramp; this particular project would fit any home due to its variance in size.

You can also create the micro-ramp indoors, to protect the elements. However, When built outside, you can use pressure treated woods and paint to ensure longevity.

Apart from the primary materials, you can get others from home improvement stores. First, gather your tools, design your ramp and start building.

Build A Micro Quarter Pipe Ramp
Build A Micro Quarter Pipe Ramp, Image via: howtheyplay

Shed Ramp Plans

12. Build a Shed Ramp For Your Home

A shed ramp like this one by thesawguy adds so much functionality to your home; it eases the movement of things in and out through the door. You might have challenges moving the wheelbarrow, mower or the dolly in or out of the house, but building a shed ramp within a few hours can make life far more comfortable for you.

A shed ramp is a basic necessity in all home, while some sheds are permanently attached, shed ramp plans like this are made to be detachable, so you only get to put it in place when you need to use it.

It’s important that you measure the height from the ground to the base of your door and build the shed accordingly.

You may also like to see diy pallet shed and garden shed plan.

Build a Shed Ramp For Your Home
Build a Shed Ramp For Your Home, Image via: thesawguy

13. Make A Garage Shed Ramp

Want a ramp to enable you quickly walk into your garage, or move equipment like the lawn mower or even ride the motorcycle out? Then this is the ideal DIY ramp by instructables for you.

Building a shed ramp yourself gives you the opportunity to make it very sturdy.

Firstly measure the height from the garage floor to the ground, in this case, it was 14”, so the front side of the diy ramp was built to be 14” high.

As usual, its best you start with a sketch of the ramp, then source for materials before you begin building,

Make A Garage Shed Ramp

14. Make A Backyard Shed Ramp

A shed ramp can come very handy in the yard if you use a cart, or want to access specific areas, and in this DIY wood project, you would be learning how to build a shed ramp like this one by howtospecialist very quickly, no matter your experience .

The good thing about this DIY project is that you would create the ramp, how you want it and suit your need.

From the design to the length and width, everything should be about the space you have out there.

First, you would have to source materials, in addition to those listed at the top, you can also get a wood stain and paint optionally.

Make A Backyard Shed Ramp
Shed ramp plans image credit: howtospecialist.com

Deck and Launch Ramp Plans

15. Build a Deck Access Ramp

Make your deck more accessible by building and installing a deck ramp like this one by bhg. You can design it to be either an angle deck or flat stairs all according to the space you have. You can also have a building inspector look over your plan before you start constructing.

Get the necessary materials and create the deck ramp according to instructions, then place it in a way that’s convenient and offers unrestricted access to the deck.

Build a Deck Access Ramp
Build a Deck Access Ramp, Image via: bhg

16. Make a Launch Ramp

There is so much fun from a launch ramp to pass up.

If you aren’t conversant with using a launch ramp, it’s quite easy to learn. Find out how to build a ramp of any size you want.

These are mainly some of the best ramp ideas out there, go through the list and choose those that fit your need and that of your home and start working on it.

Make a Launch Ramp
Make a Launch Ramp

15 DIY Plantation Shutters-How To Install Window Shutters

DIY plantation shutters are a stylish way to create unique treatments for your windows. Wooden window shutters are also healthier than fabric curtains since the don’t hold onto dust particles and other allergy causing pollutants.Window coverings will also help reduce the cost of heating and cooling your home, plus they are eco-friendly since they reduce the amount of natural resource needed to keep your home’s interior air temperature comfortable. Check out these 15 DIY plantation shutters ideas and installation advice so you can enjoy the money saving beauty of window shutters in your home.

Related: DIY window box

DIY Plantation Shutters For Window Covering

  1. Wooden Window Shutters

Install a set a classic white wooden window shutters like this one by diynetwork with these easy to follow pictorial instructions. All you need to do is;

  • Measure the window.
  • Measure the shutters.
  • Attach filter strips.
  • Mount shutters in place using a drill to install screws.
  • Check alignment and make any needed adjustments.

wooden window shutters
Image via: diynetwork

  1. Design Custom Size DIY Plantation Shutters

Every home has at least one odd sized window that store bought window treatments like this one by thegeekpub just will not fit. Create your own perfectly sized diy window shutter for that odd window with these detailed plans. Affordable, easy to build and it will solve your privacy needs.

Custom Size DIY Plantation Shutters
Image via: thegeekpub

  1. Build Movable Wood Shutters Using Rockler’s Kit

You don’t have to go it totally alone when constructing DIY shutters like this one by homeconstructionimprovement. there are kits that will help you with the building process from start to finish. Here are simple steps you need to follow to build this wooden shutter from kit.

  • Measure window.
  • Purchase the shutter kit with the louvers as close to the window size as
  • Cut louvers and frame to correct size with a table saw.
  •  Drill all needed holes for pins.
  • Glue and secure joints.
  • Install shutter control arm.
  • Paint and hang shutters.

Build Movable Wood Shutters Using Rockler’s Kit
Image via: homeconstructionimprovement

  1. Make Plantation Shutter From Leftover Wood

These detailed instructions show you how to transform leftover wood from other building projects into fashionable and functional diy window treatments like this one by ibuildit. The window shutter cost is minimal since wood you already have on hand is being used.

Make Plantation Shutter From Leftover Wood
Image via: ibuildit

  1. Measure For And Install Plantation Shutters

Make ordering and installing ready made diy plantation shutters like this one by justagirlandherblog easy with these step by step instructions. Get inspired for installing exterior window shutters when you see the home transformation in these pictures.

Measure For And Install Plantation Shutters
Image via: justagirlandherblog

  1. Install Plantation Shutter With This Easy To Follow Guide

Take all the complicated guess work out of installing attractive diy wooden shutters like this one by foxhollowcottage with these instructions. It doesn’t get any easier than this and these instructions are perfect for someone who is just beginning DIY home projects.

Install Plantation Instructions With This Easy To Follow Guide
Image via: foxhollowcottage

  1. Build And Install Exterior Shutters

Increase the curb appeal and value of your home by adding diy exterior shutters like this one by petitelefant that you can easily build and install yourself. Here are step by step instructions to build this exterior plantation shutter.

  • Purchase wooden fence slabs.
  • Measure and cut six wooden fence slabs in the desired length for each window. Three pieces of wood will go on each side of the window.
  • Measure and cut narrow pieces of fence slabs to be the cross support for each shutter. Two pieces will be needed for each set of three long boards.
  • Secure short, narrow board on top of long boards.
  • Paint or stain as desired. Secure to house exterior with screws.

Build And Install Exterior Shutters
Image via: petitelefant

  1. Get Privacy And Beauty With This DIY Plantation Shutter

DIY plantation shutters like this one by providenthomedesign offer both privacy and beauty to any room of the home. Check out these design ideas for wooden window treatments in the bathroom, kitchen and living rooms, then get busy building your own unique wooden window treatments.

Get Privacy And Beauty With This DIY Plantation Shutter
Image via: providenthomedesign

  1. Simple DIY Build

These instructions break down the building process into simple steps to allow even the novice DIYer to be able to build custom wooden window shutters like this one by wikihow. Tackle your first DIY build with confidence and build beautiful shutters with detailed instructions like these.

DIY wooden window shutters
Image via: wikihow.com

  1. Affordable DIY Window Shutters

Having window treatments like this one by iseekblinds custom built and installed by an outside builder can cost you thousands of dollars, doing it yourself can keep most of that money in your pocket. Follow these plans to create your own attractive and affordable window shutters.

Affordable Window Shutters
Image via: iseekblinds

  1. Board and Batten DIY Plantation Shutters

Board and batten shutters create a timeless look on the exterior of any home. Increase the curb appeal and provide safety for your home with these functional and attractive DIY plantation shutters by divaofdiy.

Board and Batten Shutters
Plantation shutters Image via: divaofdiy.com

  1. Build Plantation Style Shutters

Wide slats, also called louvers, are shutter styles that are perfect for many rooms and can be easily built. Follow this YouTube video for easy building and installation instructions.

  1. YouTube Instructions

If following an instructional video makes building easier for you, then here is one that will easily take you through the process of building custom plantation shutters like this one on youtube.

  1. Custom Blinds DIY Shutters

Learn how to create custom wooden window treatments instructional YouTube video. Easy to follow instructions with beautiful results.

  1. DIY Plantation Shutters By New Yankee

Visit show rooms and other venues that have wooden shutters like this one on youtube over the windows to get inspirational ideas for creating your own DIY window treatments. It’s a good starting point for any custom build and will inspire you go home and custom build home furnishings to personalize your  living space.

Plantation Shutters By New Yankee
Image via: