September 14, 2023
DIY, Woodworking Skills
A DIY garden room is a new trend for creating more space in your existing home. The high costs of relocating to a larger home and the major investment of time and money to do a home renovation have people looking for other options. One ideal option to create more …
Read More »
June 19, 2023
Woodworking Skills
Riding bicycles can be a fantastic way to commute without a motor vehicle, get plenty of exercise, and travel through many tourist destinations. Storing bicycles can seem cumbersome or take up a lot of space but there are many excellent outdoor bike storage ideas that can make storage simple without …
Read More »
June 6, 2023
DIY, Home Projects, Woodworking Skills
Having a homemade sawmill opens up a world of possibilities for cutting logs into lumber easily and affordably. When I first learned about the concept of building my own sawmill, I was intrigued by the idea of being able to transform felled trees into usable lumber for my woodworking projects. …
Read More »
June 5, 2023
DIY, Woodworking Skills
Thinking about the excessive cost of commercial saw mills to tackle the job of cutting down trees to make lumber is a daunting thought. Fortunately, there are many DIY projects that can help guide the process of creating a DIY chainsaw mill that can be portable and reusable with any …
Read More »
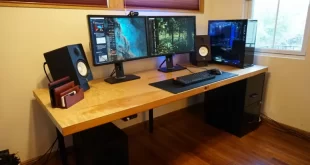
June 5, 2023
DIY, Woodworking Skills
Creating your own computer desk is a great way to have a workspace that suits you perfectly. When I decided to make my own desk at home, it was exciting to think about having a space that was exactly what I wanted for work and gaming. Plus, making it myself …
Read More »
April 19, 2023
Woodworking Skills
A DIY router table will help you complete building projects faster than with just a router alone. It’s so easy to cut your own moldings and shape narrow pieces of wood when you have a homemade router table to hold the router in place. If you work with larger bits …
Read More »
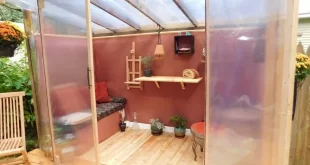
March 23, 2023
DIY, Woodworking Skills
A DIY sunroom can improve the quality of your home life and increase the value of your home. Building a sunroom onto your home will allow you to bask in the warmth of the sun year-round and have an ideal place for growing plants. if you’re a garden enthusiast and …
Read More »
March 12, 2023
DIY, Woodworking Skills
Are you tired of spending long hours sitting in front of your computer? Do you want to improve your posture and overall health while working? If this is what you want, then a diy standing desk might be the perfect solution for you. In recent years, the popularity of standing …
Read More »
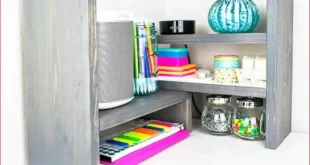
February 20, 2023
Woodworking Skills
Finding ways to incorporate leftover wooden boards or plywood to create useful DIY projects is a wonderful idea. Small woodworking projects that can be constructed in an hour or half a day can help bring use and utility to spaces around the house and yard. Many woodworking projects can be …
Read More »
January 19, 2023
DIY, Garden Projects Plans, Woodworking Skills
If you want a place where you never have to clean up someone else’s mess, then you need to check out these 12 she shed plans from our list. Be inspired to build your own space that’s comfy, cozy, reflects your taste in decor, and the rest of your family …
Read More »
 The Self-Sufficient Living Is about simple living,growing your own food,raising livestock,Do It By Yourself,off grid living,gardening,homemade products