Bluebird house plans are great to have on hand for that rainy day DIY project to enjoy with your children. It is a great afternoon project that will build the family bond, provide a home for bluebirds and give hours of entertainment for years to come as you watch the birds raise their families.
Bluebird house plans are simple to follow and the construction is easy. The houses can be painted, decorated or left plain. Attach the finished houses to trees in the yard, fence posts along the driveway or any other outdoor structures. It’s simply a matter of building them and the birds will come.
Check out these 11 cool free bluebird house plans we have gathered in our list and get busy building some with your kids this weekend.
Use One Board To Build A Bluebird House
All you need is one board and these free plans to build a bluebird house by Thediydreamer. This simple design we have is irresistible to bluebirds. Bluebirds start nesting in February and March, and will continue to lay eggs as each brood leaves the nest. So now is the right time of year to get out the one board and create some attractive houses.
Eliminate Garden Pests By Building A Bluebird House
Building a birdhouse like this one bybirdsandblooms is a way of doing something good for the bluebirds. You’ll be charmed by the beauty of the birds and their cheerful singing. Since their diet consists primarily of insects and grubs, your garden may benefit, too. Bluebirds prefer to nest in open areas that has minimal ground cover and structures. Placing a birdhouse near the garden or open field is ideal.
Eliminate Garden Pests By Building A Bluebird House, Image via: birdsandblooms
Give Bluebird House A Superior Look By Painting It
In this idea we will learn how to build an ordinary bird box like this one by HGTV, then transform into an extraordinary house with just a little paint. Bright paint and few flowers painted in a contrasting color on the box provide landscape art even when the birds have flown south for the winter. You may also like to check out DIY bird bath.
Give Your Bluebird House Superior Look By Painting It, Image via: HGTV
How to Build a Bluebird House
Take all the guess-work out of the DIY bluebird house project like this one byWikihowby using these detail plans we are discussing with you. Download these free plans that will show you exactly what type and how much building material needed to create this functional birdhouse.
Bluebirds are cavity nesters, typically making their nests in abandoned woodpecker holes and in the natural cavities of old trees. Build this slant front style birdhouse byFeltmagnetthat will mimic their desired cavity natural nesting location so they will be attracted to it and stay around to raise more than one brood.
You can kill two proverbial birds with one stone with these bluebird house plans byFriendsschoolplantsale. This functional birdhouse has a surprise on the roof – a tiny garden that supplies food for the bluebirds.
Attractive in the garden as a living work of art, create a birdhouse with tiny garden on top that is filled will insect-attracting plants. These insects will help keep a family of bluebirds fed during their stay in your DIY birdhouse. You may also like to check out diy bird feeder.
Here we have a beautiful idea that will show how to build a flat roof on a bird house, these free plans byDIY Garden Plans show you how to build a pitched roof design. A little paint creates on the pitched roof and box create a cozy home for traveling bluebirds.
The heat of summer puts bluebirds and their eggs under a lot of stress. Minimize that stress with these free birdhouse plans by Bird Watching -blissthat show you how to prevent heat stress for your feathers guests. A simple addition of a heat riser tube helps to keep the inside of the bird box a comfortable temperature. You may also like to check out plants to attract hummingbirds.
Building nest boxes like this one by Birdwatching-Bliss and mounting them in the proper locations is a great way to help conserve and increase the bluebird numbers in your area. These free plans for easy to build nest boxes is one way you can help maintain bluebird population. You may also like to check out homemade hummingbird feeder.
Bluebirds are constantly raising a new brood of birds, often building new nests for the next clutch of eggs before the previous brood have left the old nest. To help prevent parasites and diseases in the birds, the bird box like this one by My Backyard Plans need to be cleaned. These free plans show you how to construct an easy to clean birdhouse so you can help keep the birds healthy.
All of us like the appearance and presence of birds in our backyard that remind and bring us just close to nature. These bluebirds houses we have shared with you will help you to decide to make any one of these or your own custom design. We hope you like our post!
With so many chuck box plans and designs available, it can be very difficult to choose the right one that best suits your needs. That is why we have compiled a list of 10 of the best chuck box plans and designs for camping to help you make an informed decision.
Whether you are a beginner or an experienced DIYer, these plans will guide you in building your own portable camp kitchen. From simple and budget-friendly designs to more advanced and customizable options, there is a plan that suits each one of you. You do not need to struggle with cooking on your camping trips anymore. Choose one of these chuck box plans from our round up and start building your own portable camp kitchen today!
10 Chuck Box Plans And Designs For Camping
Building your own chuck box can be a fun rewarding DIY project. It will not only save you the hassle of hauling all your cooking gear and utensils to your campsite every time, but it will also give you a sense of pride and satisfaction knowing that you built it yourself.
Are you ready to take your camping experience to the next level by building your own chuck box? Here are 10 different chuck box plans and designs that you can choose from:
Camp Kitchen Chuck Box Plan
The first one we have in out list is a chuck box design by reithat is easy to build. It is made from a single sheet of plywood, and it can be built for only around $50. We found this chuck box plan with compact and simple design that makes perfect for those who are new to DIY projects and don’t have a lot of experience with woodworking.
You can make this chuck box from a single sheet of plywood, and it requires basic woodworking tools. These tools include a saw, drill, and screwdriver. This camping kitchen box is assembled using a combination of screws and wood glue, and the lid is attached using hinges.
This chuck box design is meant to be sturdy and durable, with a solid wood frame and aluminum siding. This chuck can be built for around $100, and it has a lot of storage space. We recommend this camping kitchen box by scoutlifeto larger groups, those who have longer camping trips, or looking for a more heavy-duty option.
Make this chuck box with a solid wood frame and aluminum siding. The frame is constructed using basic woodworking tools such as a saw, drill, and screwdriver. The aluminum siding is attached using screws, and the lid is attached using hinges. There are also handles on the sides to make portability easier.
This chuck box by filson is built with a focus on portability, and it has a lightweight aluminum design. This box can be made for around $150, and it has a more modern and sleek design compared to other chuck box plans we are going to discuss in this article. We suggest this chuck box to be perfect for those who prioritize portability and are a fan of sleek designs.
You can build this chuck box with a lightweight aluminum and it requires only basic metalworking tools such as a saw, drill, and screwdriver. The box is assembled using a combination of screws and adhesive. The lid, in this plan, is attached using hinges.
This chuck box is made from a single sheet of plywood. It can be built for around $50, and it has a very similar design to the first chuck box plan we discussed earlier.
Building this chuck box by reddit requires basic woodworking tools such as a saw, drill, and screwdriver. While it is assembled using a combination of screws and wood glue, the lid is attached using hinges.
This chuck box is built with a focus on versatility and has multiple compartments and shelves for organization. You can build it for around $100. This chuck box generally has a more complex design compared to other chuck box plans we have discussed until now, and we suggest this design to be perfect for those who want a lot of organizational options.
You can construct this chuck box plan by instructables using basic woodworking tools such as a saw, drill, and screwdriver and assemble it using a combination of screws and wood glue. The lid of this box is attached using hinges.
Portable Storage Container For Camping, we love this chuck box plan as it has multiple compartments, suitable to those who are regular on camping, Image via instructables
Ultimate DIY Camp Kitchen
If your concerns are more related to portability, this camp kitchen box on youtube is perfect for you. Its compact lightweight design makes it perfect for long trips with multiple destinations and traveling journeys.
To construct this chuck box design, you only need to use basic woodworking tools such as saws, drills, and screwdrivers. Then you can assemble it with a combination of screws and wood glue.
Portable Camp Kitchen
If you are looking for a camp kitchen box plan that is more advanced, here is a box that will look as if you moved your existing kitchen with you. Its lightweight simple aluminum design makes it perfect for long-tripping journeys. You can build this box for around $100, and it has a modern sleek design.
This chuck box design on by youtubehas multiple compartments and shelves to provide you with more options for organization and keep your food and supplies safe. You can build this camping kitchen box for around $150 with very basic materials. You only need a 1/2 & 1/8 baltic birch ply, daddo’s, brad nails, and wood glue to hold it together.
Camping Kitchen Chuck Box Plans
If you are looking for a cheap practical organization-focused chuck box design to go for, then this portable camp kitchen design by Tom Builds Stuff is the perfect one for you. This design focuses more on portability, and it can be built for only around $50.
The materials you will need to build this chuck box include one 4×8 Sheet of 1/2 MDO Plywood, one box Kreg 1in SPS-C1-100 Screws, one 1-1/2 x 48 Brass Continuous Hinge, chest handles, Primer and Exterior. Paint
This is just another cheap practical chuck box plan by Instructables that can be built for around $100. This chuck box design is a bit more complicated compared to other designs. If you always prefer having more space to hold all the essentials with enough weight to handle, you may want to go for this plan.
Chuck box help you to sort out the problem of storing your kitchen equipment and a proper place to cook food or prepare your meal while you are on a camping trip. You can choose any of these chuck boxes we have collected that you think can meet your requirements of having a portable kitchen on a camping trip.
Based upon some of the most common questions asked I have prepared a questionnaire.
FAQ’s
What materials do I need to build a chuck box?
Most chuck boxes can be made from a single sheet of plywood. If you have some leftover pieces of plywood, they can be used for the DIY as well. You will also need some hardware, like screws and hinges.
How much does it cost to build a chuck box?
The cost will depend on how basic, or how fancy, you want to build the chuck box. A chuck box can be as simple as a plastic tote with a wooden board across the top or as fancy as a free-standing kitchen that has everything a home kitchen has.
A simple one can be built for just a few dollars. A more elaborate one may cost around $150.
How do you stock a chuck box?
A chuck box needs to hold all the essential items for meal preparation and eating. Stock it with plates, eating utensils, cups, pots, pans, a stove, water, fuel, spices, non-perishable food items, and a cleaning product.
If there is room left after the essentials are stocked, Add a few of your favorite non-essentials.
What is the standard chuck size?
You make the chuck box the right size to suit your needs. Most chuck box range in size from 25-35 inches wide, 15-25 inches high, and 13-20 inches deep.
References:
Scout Life, hobbies-projects, by hobbies-projects “Build a Chuck Box for Camp Cooking”, https://scoutlife.org/hobbies-projects/projects/31755/build-a-chuck-box/
Texasmonthly, the-culture Out, “of the Box”, https://www.texasmonthly.com/the-culture/out-of-the-box/
Blog.scoutingmagazine, By Bryan Wendell, March 25, 2014, “Tuesday Talkback: In search of a better patrol box”, https://blog.scoutingmagazine.org/2014/03/25/tuesday-talkback-in-search-of-a-better-patrol-box/
Having your own homemade forge will enable you to transform steel and glass into practical and beautiful items. Create useful items for your home, campsite, off-grid homestead or gift-giving in a homemade forge.
Warning:Propane forge can be very dangerous if handled not carefully. Please don’t attempt these projects if you are not well aware how to use propane forge. I take no responsibility for any misshaping that is caused from the use of information in this publication.
1- Lawnmower Deck Homemade Forge
Discovering the DIY blacksmithing forge on Imgur was like stumbling upon a hidden gem in the vast expanse of the internet. As someone deeply passionate about craftsmanship and the art of blacksmithing, I was immediately drawn to the ingenuity and resourcefulness of this project.
What struck me the most about this DIY forge was its commitment to recycling and repurposing. The idea of transforming old, seemingly useless items like a lawn mower deck and a BBQ grill into a functional blacksmithing forge was nothing short of brilliant. It resonated with my own values of sustainability and environmental consciousness, reminding me that with a bit of creativity, we can breathe new life into items that would otherwise end up in a landfill.
The process of repurposing these items seemed almost poetic to me. The lawn mower and grill, once destined for the scrap heap, were given a new lease on life as essential components of a forge. It was a testament to the power of creativity and innovation, showing that with a keen eye and a bit of elbow grease, we can transform the ordinary into the extraordinary.
What I particularly liked about this DIY forge was its accessibility. Instead of heading to the hardware store for new parts, the builder looked around their own garage, workshop, and backyard for materials to repurpose. It served as a reminder that sometimes, the best solutions are right in front of us, waiting to be discovered.
Ultimately, what resonated with me most about this DIY blacksmithing forge on Imgur was its embodiment of the principles of sustainability, creativity, and self-sufficiency. It wasn’t just a forge; it was a testament to the power of human ingenuity and the potential for transformation that lies within each of us.
Building a homemade forge by imgur from an expired propane tank is easy with some ingenuity and this free plan that I am sharing with you. All you need to do is, Remove the collar top and fill tank with water. Measure and cut appropriate sized hole on top (which will become the front side). Paint with heat resistant paint. Allow to dry and attach burner nozzle and all remaining hardware with the detailed instructions found in these building plans.
I recomend this forge to beginners, so before investing a lot of time and money into building a homemade forge, just start with a simple forge like this one to see if you are going to enjoy the art of blacksmithing. Rocks are used to help increase the heat and hold it long enough to increase the temperature needed to work the metal. The design is simple and the building components are easy to find and inexpensive.
4- Mini DIY Forge
Dreaming of making homemade jewelry and/or knives from metal? Then this is the DIY forge by thegeekpub for you. To Build this homemade forge, all you need is just a few fire bricks, a propane torch, aluminum angle, nuts, bolts and a few washers so you can hammer out some one-of-a-kind jewelry pieces or unique knives.
Discovering the DIY forge by Instructables was a revelation for me as someone deeply passionate about metalworking and blacksmithing. What immediately caught my attention and sparked my excitement was the ingenious use of waste oil as fuel. As someone who has access to used restaurant fryer oil and other types of waste oil, the idea that I could repurpose these materials to power my forge was incredibly appealing. It not only offered a cost-effective solution but also aligned perfectly with my commitment to sustainability and reducing waste.
What I personally liked most about this DIY forge was its simplicity and accessibility. The materials required to build it were basic and inexpensive – just bricks, concrete blocks, and a metal pipe. This meant that I didn’t have to invest a significant amount of money to create a functional forge in my backyard. The step-by-step instructions provided by Instructables made the building process clear and manageable, even for someone with limited experience in metalworking. It felt empowering to know that with a few simple components and a bit of effort, I could have a forge ready to use in no time.
The prospect of building my own homemade forge over the weekend filled me with excitement and anticipation. Not only would it provide me with a practical tool for pursuing my passion for metalworking, but it also represented a creative and fulfilling DIY project. The thought of being able to create metalwork in my own backyard, using fuel that would otherwise go to waste, was incredibly satisfying. It was a reminder of the boundless possibilities that come with resourcefulness and ingenuity, and it ignited a newfound sense of enthusiasm for exploring the world of DIY craftsmanship.
The shell of a homemade forge can be created by recycling something you may have on hand, like this design that uses an old air tank for the shell.
Build this homemade forge:
Cut the material being used for the shell to the desired length.
Determine how many burners the DIY gas forge will have and how far apart they will be (if more than 1). Then create the appropriate sized holes.
Attach burner nozzles, pipes and choke assembly.
Plumb in the gas jets and hook up the gas valves and hoses using the step by step instructions given in these free plans.
Air Tank Homemade Forge
7- Homemade Coal Forge
If you have welding skills then you can build this homemade coal forge with metal pipes and metal plates. A 3-inch metal pipe makes up the body of the DIY forge and the coal bin is constructed using metal plates. You use diy spot welder to make joints of metal where needed.
These detailed pictorial instructions will show you how to build this small and mighty coal forge by imgur. Great for forging small metal items in your home workshop. Learn to make your coal and save money every time you fire up the forge.
Use these homemade forge plans by feltmagnetto recycle that old propane grill that never gets used anymore into a useful blacksmith’s forge. Since the grill is already built to withstand heat, removing the wood and plastic items from the grill and doing a little tweaking to the design is all you’ll need to do. A charcoal grill can also be transformed into a usable gas forge.
These detailed plans will not only show you how to build a DIY gas forge, but also tell you the right questions to ask yourself prior to the DIY build. By asking yourself the right questions, you’ll be able to build the DIY forge by wikihow that best suits your needs in terms of size, heat output and how to best use the forge.
If following a video of a DIY building project is the best way for you to create, then watch this one before undertaking a forge building endeavor. This YouTube video will walk you through the entire process ofpropane forge plans on Youtubeand answer all your questions.
11- Homemade Propane Forge
Another instructional video that will walk you through the forge building process with ease. To Build this homemade forge all you need is Airtank or freon tank, Kaowool Piece of 1/8″ x 3/4″ steel flat stock Piece of 1″ steel square tubing, 2″ x 10-32 bolts,,mini-grinder with thin kerf cutting disc, Files, Drill,10-32 tap, putty knife. This DIY propane forge design by instructables gets extremely hot and is great for the more advanced black smithers that has income potential on their mind. Forge glass items as well as metal in this homemade forge so you can create both practical and decorative items.
No rule says a forge has to be big, it just has to work, and this one that I have Included in this list does. Any large metal can, like coffee, soup or paint cans can be transformed into a workable, mini propane forge by makezine. The refractory lining used inside these mini forges allows the heat to build up inside these small spaces to high enough temperatures to soften metal. Use this plan to make a quick and inexpensive forge. You may consider building these propane forges and selling if you can score a steady supply of large metal cans from a local restaurant.
Here is a YouTube documentary of a DIY propane forge on youtube. Build your own customized homemade forge with this detailed, informative and easy to follow YouTube video.
14- Metal Bucket Homemade Forge
So simple and inexpensive to build, you won’t even need power tools to build this DIY gas forge. A metal bucket can be transformed into the forge body with some simple hand tools. Legs for the forge can be created from any metal you have on hand and a burner holder made from standard black pipe and conduit rings. A couple of layers of Durablanket and fire bricks will enable an ordinary metal bucket to heat up hot enough to be used to forge steel.
Metal Bucket Homemade Forge
15- Propane Forge Build
Small and mighty, this homemade forge by imgur is crafted from a recycled propane tank and will help homemade propane forgemeet all of your blacksmithing needs.
Step by step pictorial instructions will show you every detail of this DIY project so you can build with ease. The small size of this forge makes it ideal to build for use in a small space or to forge small metal work.
Create this homemade forge and use it to earn extra income by crafting one of a kind knives.
What I like in this forge, its compact, portable DIY forge and small enough to store on the shelf until it’s needed, yet powerful enough to get the forging job done when needed.
And since it’s portable, this forge can go wherever you need it. Take it along with you to the job site so you can forge replacement parts for various metal items like fences, gates, and other unique items.
17- Disc Brake DIY Forge
Watch this YouTube video to learn how to transform a disc brake into a functional blacksmith forge.
An old disc brake can be obtained from a local auto repair shop for free, so the money invested in this homemade forge will be minimal. Removable legs make this DIY forge easy to store, easy to take with you, and easy to assemble and disassemble as needed.
A couple of old space heaters and fire bricks can be put together to create a mini DIY electric forge by ibuildit when you follow these free plans.
Everyone has an old space heater that no longer heats as it should and it can be given a second life with this great recycling idea. The fan and plug-in cord of the heater are valuable components of a homemade forge.
This mini DIY electric forge will generate a little over 1,500 degrees F of heat and is ideal for a small home workshop.
Oval wash tubs were very popular for use as flower planters and beverage holders a few years ago but are outdated now and need to be upgraded. Use an old oval wash tub and follow these detailed instructions to build yourself an inexpensive charcoal forge.
Steel forging is a great way to create heirloom pieces and earn extra income, and this easy to build blacksmith forge can help you get started forging steel.
Use this electric forge by brilliantdiy to melt recycled aluminum at home so you can save money and keep aluminum out of the landfill.
An old paint bucket is the main component of the DIY project and this YouTube video will show you how to build it. Aluminum cans can be saved and taken to the local recycle center and sold for a few dollars, but it takes a lot of aluminum cans to make it worthwhile. Melting the aluminum compacts it so it will take up much less space while you are saving it.
Also, aluminum is a good metal to use for other projects around the house and it’s good to have some on hand. This homemade blacksmithing forge is cheap to build and will help you develop DIY skills that will enable you to earn extra income.
Learn how to build a DIY gas forge in this YouTube video for your blacksmithing needs. The forge can generate plenty of heat for metal working and creating unique knives and other small metal objects. The size of this DIY gas forge is small enough to fit in most home workshops.
This detailed YouTube video will show you everything you need to know so you can build a gas forge of your own.
22- Propane Fueled Forge
Firebricks and propane can be used to create a propane fueled forge by instructables that generates plenty of heat for all your blacksmithing needs.
A forge has to generate enough heat to change the physical state of steel or metal so that it can be pounded and manipulated into the desired shape. This propane forge has the ability to generate all the heat needed and it’s safe to use. The small size of the forge won’t take up much space inside your home garage or workshop either.
Small Propane Fueled Forge Plan, Image via: instructables
23- Recycled Grill
Transform an old gas or charcoal grill into a new homemade forge by imgur with this idea. After a grill is no longer usable to cook food on, it can be recycled into something else useful like a blacksmithing forge.
Get yourself an old grill and follow these pictorial directions to create a useful homemade forge. This idea helps keep useful items out of the landfill and shows you how to build a forge for very little money.
An old welding tank can be recycled and re-used to create a DIY forge like in this YouTube video for your workshop. Blacksmithing is an art that can be satisfying as a hobby or as a money making endeavor. However you choose to use blacksmithing skills, you have to start with a forge that will generate enough heat to make steel and metal malleable so it can be shaped. This welding tank forge is a great place to get started.
This YouTube video tutorial makes the forge building process easy and answers many of the questions you may have. Get started today with a new hobby or business by building this welding tank forge.
25- Box and Burner
Simple, inexpensive and efficient. These forge plans show by popsci you how to build a box that can retain the heat from a burner so the metal can be heated enough to be hammered into the desired shape. Professional looking results and easy of moving would make this design a good choice for taking to craft fairs or similar venues for on-site metal forging or glass blowing.
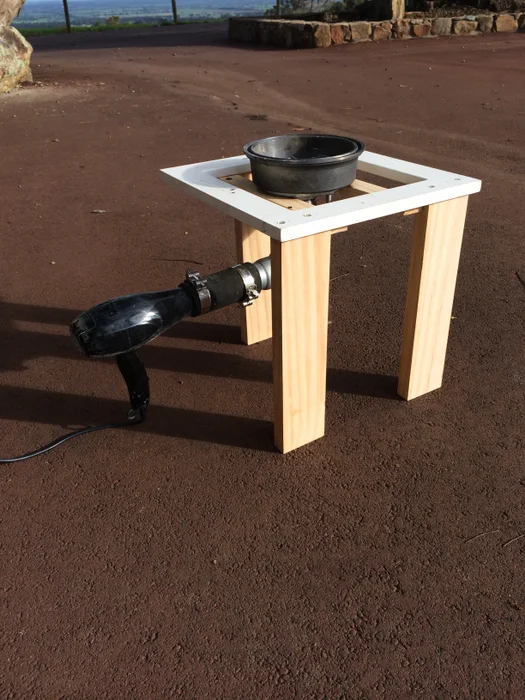
Hot coals in a bucket is the basic principle of this blacksmith’s coal forge at instructables. A hair dryer is used as a blower to help control the heat and galvanized buckets are used to contain the charcoal.
This YouTube video will talk you through the simple build that will create a functional and effective diy coal forge for you to use at home.
Blacksmithing is a lucrative business that commands top dollar prices on well made and unique metal items. Hand forged steel pieces are heirloom items that can be handed down through the generations and increase in value every year.
Get your start in this lucrative business today with this easy to build coal forge.
27- Fire Brick Homemade Forge
This is a small homemade forge by manmadediy that is highly efficient and perfect for the hobbyist. It only requires nine standard sized fire bricks to create the exterior, and a blow torch to produce the heat for forging metal, so this DIY build is great for beginners.
If you are interested in becoming a blacksmith for fun or profit, one thing that you must have is a forge. The forge can be elaborate and expensive, or it can be simple and still meet all of your blacksmithing needs.
You can use materials that you have on hand, like leftover lumber to build a frame and rocks that are sourced from your property, to save money building a forge. Just go through this easy to follow homemade forge plans on youtube so you can build one for yourself.
The forge is simple to build and small enough to fit in the backyard. It can be used to craft tools to use around the homestead and knives for hunting. A DIY forge will also enable you to generate an income through blacksmithing.
You can learn how to make hunting knives, farm tools, and many other useful and decorative items on your own simple backyard forge.
You can use these blacksmith forge plans and start building it in the morning and hammering metal by that evening. It is a quick and easy DIY project that will help you meet all your blacksmithing needs.
Blacksmithing was once the way to have something fashioned from metal but it lost popularity as the world become modernized. In recent years, the art of blacksmithing has returned and is growing in popularity.
People who have chosen to live an off-grid lifestyle are the ones who are bringing back the lost art of blacksmithing. A DIY forge like this one will enable you to create nails, hinges, handles, and many other metal items that are needed for use on an off-grid homestead.
Knowing how to create things from metal will also help you barter for other goods and services. Blacksmithing is a profitable craft and it also makes a good hobby.
This is a great way to recycle an old brake drum from a vehicle. A brake drum is a perfect size for a homemade forge and the heavy-duty steel can withstand the high temperature generated by the fire. Recycling is good for the planet because you are keeping usable items out of the already over-filled landfills.
An inexpensive hair dryer creates the air flow to keep the fire burning hot so the metal can be heated to just the right temperature. The hair dryer keeps the air flow constant so the forge temperature will remain constant.
Use these free plans to build a homemade charcoal forge by instructables or you can burn coal in the brake drum forge. A used brake drum can be found at most junk yards and it does not need to be modified to use as a forge. Add a few steel pipes and a hair dryer and you will be ready to start forging metal. The ash falls to the bottom of the pipe and is easily emptied as needed.
A homemade forge will enable you to work with metal to create all types of useful and ornamental items. Hand crafted forged knives are in high demand and sell for top dollar and learning how to forge blades is a way to increase your income.
Here is a great DIY forge plan for a traveling blacksmith. This portable forge can go where you go. It is small enough to not take up much space yet large enough to generate enough heat to make metal pliable.
This compact portable DIY forge by brilliantdiy will allow you to take it along with you as travel. Take it with you to forging events, knife shows, renaissance fairs, or anywhere else a forge may be useful. When this homemade portable forge is not in use, store it on a shelf in the garage or other out of the way location.
These forge plans will show you how to build this compact model that has a 12 volt rechargeable battery that will last for hours. The forge uses charcoal and the free plans include written instructions as well as a YouTube video.
Take your blacksmithing skills on the road with this small but powerful DIY portable forge. You want to consider setting up a road side blacksmith shop near your home to hone your craft and generate income. At the end of the workday, this portable forge will be easy to pack up and take back home.
When the stainless-steel sink has finished its usefulness in the kitchen, take it outside and use it to build a homemade forge.
These free forge plans by jackdawschoice will show you how to transform a kitchen sink, brake drum, and a hair dryer into a functional and efficient forge. The stainless-steel sink is lined with firebricks and a brake drum is set in the center to be used as the fire pot. The hair dryer blows the needed air to keep the fire burning hot and consistent.
A heavy-duty wood stand can be built from pieces of leftover lumber you may have on hand to keep the cost of this DIY project very low. The stand for the forge can be built to a customized height so it will be comfortable for you while you are enjoying metal forging.
The fundamentals of blacksmithing have been unchanged for over 200 years. You need extreme heat that remains consistent, an anvil, and a hammer. This kitchen sink forge may look a little unconventional but it will provide the consistent high heat that is needed for transforming raw metal into a desirable object.
The demand for hand forged metal work has increased over the past couple of decades and being able to sell products online has opened up a new selling venue for blacksmiths. You will be able to keep the production costs low with this homemade forge that is built from recycled items. And when production costs are low, the profit margin is increased.
Living off grid often means thinking outside the traditional box to create things that are needed without using electricity. Off grid living also means becoming more self-reliant and using whatever you have on hand to create things. These free plans will show you how to transform an old air tank that was once used to fill tires with air into a homemade forge.
The forge is efficient and powerful enough to handle all of your blacksmithing needs. Create metal and iron items that are useful for hunting, farming, fishing, building, or just to add a touch of decorative beauty to your homestead.
Conclusion:
There are blacksmith guilds all over the world so it is easy to connect with fellow blacksmiths and learn from them. Developing your skills as a blacksmith will be fun and rewarding. A self-employed blacksmith can set their own working hours and prices per item. It’s a good way to make a living better if you enjoy working with your hands to create a unique and useful item.
Hope our list of homemade forge plans has helped you a lot to decide how to build your own forge.
Here we have prepared a questionnaire to answer some common questions.
FAQ’s
Can you forge with wood?
Yes. Any kind of dry wood can be used for forging and it’s a great way to use up old scrap lumber. Scrap wood from pallets, dry tree limbs, and old boards make ideal fuel for a forge. As long as the wood has not been treated with chemicals it can be used in a forge.
Which material cannot be forged?
Most metals can be forged but there is one material that cannot be forged and that is cast iron. Cast iron is brittle and has a low melting point. If cast iron is heated in a forge, it will break apart or melt.
We suggest using stainless steel, titanium, carbon steel, and other metal alloys in your forge. Forging is a good way to recycle old metal objects and create something new.
Is forged iron stronger than steel?
Steel is stronger even if the iron has been forged. Forged steel is stronger steel that has been cast or plated, making it one of the strongest materials on earth. Steel is made stronger when it’s forged since it has been manipulated to conform to the desired shape.
Can I use charcoal to forge?
We don’t recommend it even though it is an easy combustible material to obtain. It’s difficult to get the charcoal to burn hot enough to soften steel or iron so it can be forged. You would have to use a great deal of charcoal and have the airflow perfect in order to be able to forge with charcoal.
References:
Slide Share, Jul 10, 2019, “What is forging”, https://www.slideshare.net/EmilyClarke42/what-is-forging-154677737
SCRIBD, by rabikm, “Metal Forging Is A Metal Forming Process That Involves Applying Compressive Forces To A Work Piece To Deform It”, https://www.scribd.com/document/458237156/Metal-forging-is-a-metal-forming-process-that-involves-applying-compressive-forces-to-a-work-piece-to-deform-it
MDPI, 30 November 2020, by Prof. Dr. Andrzej Gontarz, “Forging Processes of Materials”,https://www.mdpi.com/journal/materials/special_issues/forging_processes
You can build your own DIY log cabin and return to living a rustic lifestyle like that of our forefathers and mothers. It was a lifestyle of less stress, less expense and more enjoyment. A practical, sustainable lifestyle can be centered around a beautiful and affordable log cabin when you use one of these 23 ideas for building your own diy log cabin in the woods.
1- Hardy Log Cabin
The picture most people have in mind when thinking of a log cabin, this Hardy log Cabin design by motherearthnews, is the ideal design. Beautiful, functional, energy efficient and inexpensive to build and maintain.
Log cabin surrounded by the forest at Duck Mountain Provincial Park in Saskatchewan, Canada, Image via: motherearthnews
2- DIY Log Home
The best thing about a DIY log cabin is being able to build it with your own two hands. There are log cabin plans for projects of all sizes. In fact, you can build a log cabin that’s big enough for a weekend getaway. Imagine spending the weekend or holiday at a cabin you don’t have to rent. One idea is to look into log building kits to find everything you need. With or without a kit, most sources ensure the instructions are easy to follow.
DIY Log Home
3- DIY Log Cabin
Here’s another set of plans for building a small DIY log cabin like this one by instructableswhich isn’t hard if you follow the instructions. You’re going to start by choosing and preparing the area for your cabin, and then you’re going to start the actual construction with the base. The next steps are the walls and rafters, and then you’re going to finish it off with the roof. It may be a small log cabin, but it’s perfect for relaxing while surrounded by nature.
Built to last, these DIY log cabin plans by outlands.tripod will provide log home living for generations. A solid rock foundation supports hewn logs to createa handsome and sturdy cabin, complete with a covered front and potential basement.
If you want to go cheap, these DIY cabin plans are for you. Build a comfy log cabin for $100 using the Norwegian stabbur design motherearthnewsBuilt on rock pillars with a wide roof overhang, small door and windows, this log house plan is cheap to build, energy efficient and easy to maintain.
The A-frame is a basic cabin design that stands up to the elements well and is cheap to build. For under $6,000, these DIY log cabin plans by goodshomedesignwill enable you to build a rustic A-frame cabin complete with covered front porch and plenty of interior loft space for sleeping or storage space.
10- Cedar Log Homes
Use this information provided by three different families who have already built their own log homes to help you decide what is right for your own DIY log cabin such as this one by lhba. Wood choices, such as cedar, cabin size and usage are all things to consider prior to building.
You don’t have to start from scratch to have a rustic, log cabin lifestyle. Recycle an old homestead by re-claiming logs like this one by popularmechanicsand fireplace bricks with these plans. Abandoned log cabins that have endured the elements for decades may not be livable as-is or in the location you want it to be, but those are just minor details which can be overcome. The logs and other materials can be re-claimed, dismantled, moved and reassembled and given new life as your new reclaimed log home.
You can find a variety of small cabin plans like this one by instructables, and this includes plans for a small cottage cabin. Imagine your own small cabin with details such as a double-slanted roof, windows and porch.
You can even build a small wooden bench to place on your porch for enjoying the outdoors. Inside your cabin is a single living space for relaxing in a tiny, nature-inspired home. You can add a small couch for reading or picnic table for entertaining guests. You may also like to see my other article homemade wood burning stoves and heaters.
When building a cabin, it’s best to keep the purpose of your space in mind. Are you building a small cabin for occasional use, or are you building a place to escape for several days?
You can build a DIY cabin like this one by inhabitatretreat that features several windows and elevated tree decks, which are perfect for enjoying the view. Your cabin may also include an open-air outdoor shower, a wood-fired hot tub and an outhouse, as well as room for several pieces of furniture.
Are you looking to build something special for your child? You can find plans for a DIY log cabin playhouse like this one by instructables. It’s going to be the size of most playhouses found in stores, but you can always adjust the size if necessary.
When you’re finished building and staining the playhouse, you can paint it in a fun color, although painting is optional. One idea is to paint the door, shutters and porch railing, while leaving the rest of the cabin in its natural tone. Your little one is sure to enjoy playing in their own log cabin.
If you’re looking to build your own shelter from scratch, take a look at these log cabin plans by thekidshouldseethis. The plans show you how to build a log cabin without any power tools. All you need are the materials, hand tools and a strong work ethic to put these plans into action.
When you’re finished, you have a log cabin that’s comfortable enough to relax and sleep in. You can even dress up the exterior with outdoor equipment such as a small ax or kayak paddles, which also provides easy access to these pieces.
If you’re more drawn to plans for small log cabins, consider building this DIY small cabin on youtube. It features a double-slanted roof, small chimney, windows and a porch. Inside is a cast-iron stove for cooking food and heating the cabin, as well as a stovepipe, thermometer and space for several pieces of furniture. Regardless of the season, your small cabin is a great getaway when you need a break from your normal routine.
17- Traditional Log Cabin
When building a log cabin, you may be looking to build a traditional DIY log cabin like this one on Youtube. You’re going to use huge logs to create a cabin that’s stylish and spacious. It features a porch, small kitchen, living space and wooden stairs that lead to a loft area.
You can also add details such as a glass door, windows, shelving space and coat hooks. One idea is to place an outhouse and shower room near your cabin to have everything you need. Whether you’re converting to a tiny home or looking for a getaway, building a traditional log cabin is a great project.
18- Log Chicken House
With these log cabin plans on youtube, you’re going to build an old-fashioned log chicken house. Rather than a tiny home or getaway, these plans are for building a place to raise your chickens. It’s like a small cabin for chickens, complete with a ramp, roosts and nesting boxes. There’s also enough space for your chickens to rest and move around comfortably. While the structure is made with logs, you still want to use chicken wire to protect your chickens from predators.
19- Simple Log Cabin
If you have never built a DIY log cabin before like this one on youtube, you can use these log cabin plans to build a simple log cabin. It’s a great option if you’re a beginner or looking for an easy design. When you’re finished, you’ll have a beautiful cabin with a spacious porch for enjoying your surroundings. It doesn’t include any electricity, but you can use the natural light by day and oil lamps by night. A wood stove is great for cooking meals and heating up the cabin.
20- Off-Grid Log Cabin
You can build an off-grid log cabin like this one on youtubefor creating a shelter in the woods or getting away for a few days. Imagine waking up to the birds chirping after spending the night in your cabin. It also gives you a place to stay if harsh weather hits while you’re in the woods. There’s enough space inside the cabin to go off the grid for a few days. Your cabin may not include a porch, but it does include one or two windows to give you a glimpse of nature.
21- Big and Beautiful Log Cabin
This diy log cabin can house a large family comfortably while blending in with the natural surroundings. These step-by-step log cabin plans on youtube will have you living stress-free with plenty of room to grow.
Ending Note!
From a simple design or relaxing retreat to a playhouse or chicken cabin, you can find a variety of DIY log cabin plans.
Plastic PVC pipe can be used to create a variety of interesting and useful things in the garden and landscape. PVC pipe is lightweight, inexpensive, versatile and sturdy. Try some of these DIY PVC pipe projects in your garden this weekend.
Forget about those flimsy wire tomato cages sold at garden supply center to support your tomato plants. They can’t do the job very well and must be replaced every couple of years. Use this PVC pipe idea by instructables to build a tomato cage that will last for years and support all your tomato plants.
Use short lengths of PVC pipe like this one by lowes to elevate your short flowers to new heights. Place a length of pipe in the ground, fill with soil and plant a flower. Easy and attractive way to use leftover pieces of PVC pipe.
Combine this project by simplifiedbuilding with number 1 for 2 PVC projects that will keep your backyard chickens happy, safe and well-fed. Some PVC pipe and nylon of wore mesh can be fashioned into a safe and movable pen for chickens or turkeys.
This is a must-do for all gardeners. A simple, yet very effective fold down greenhouse that utilizes a lean-to style. This DIY PVC pipe project by bonnieplants uses plastic pipe and sheeting to create a fold down greenhouse that will protect tender garden plants from the elements.
If you grow tomatoes for market (or are planning too) this unique Pvc shelter idea by pvcplans will enable you to grow bigger and more tomatoes. Sheltered from the harsh elements, this shelter allows just the right amount of sun light and rain to come through to the tomato plants. You may like to see popular varieties of tomatoes.
This PVC pipe project by birdsandblooms will make you the envy of the neighborhood. Quick and easy to make, these DIY bird feeders will keep your feathered friends well-fed and add a touch of whimsy to your landscape. Make several of these so you’ll have plenty to share with friends.
This is one of those DIY pvc projects by pvcworkshop you’ll wish you had discovered sooner. This easy-to-make PVC hose caddy lets you rolls the garden hose around your landscape without having to lift and pull on it.
Here’s one for the kids (or the kid at heart). A simple to make water gun will provide hours of fun for very little cost. A great way to cool off in the hot summer. Find the details at Instructables. You may be interested to see diy projects for water pump.
If you thought a greenhouse was to expensive for you to own, think again. Use these greenhouse plans by pvcplans to build your own large and productive greenhouse in your own backyard. PVC pipe, plastic sheeting and some shelving is all that’s needed for this functional and attractive greenhouse.
Stop bending and stooping when planting your corn and beans with this unique planter by sensiblesurvival.blogspot. Easy to make and it will save a lot of wear and tear on the knees and back.
Several garden vegetable and tall growing flowers need to be staked to keep them off the ground. Cut just the right lengths of PVC for the job, sharpen one end and drive it into the ground for stability. Get the details at Instructables.
Building a reloading bench can be a valuable project for anyone who enjoys shooting. When I decided to build one myself, I found it to be an easy DIY project with the help of reloading bench plans I discovered online. These plans provided clear instructions for creating a sturdy workbench with ample space for loading and reloading ammunition.
Having a reloading bench not only gives you a designated area for working on your guns but also provides storage space for gun parts, ammunition, and other shooting accessories. It was convenient to have everything organized in one place, making my shooting hobby more enjoyable and efficient. Even if you’re not into guns, a homemade reloading table can serve as a versatile workspace in your garage or crafting room.
The reloading bench plans I used allowed me to customize the bench to fit my specific needs and available space. Whether you have a small corner or a larger area to work with, there are various designs and sizes to choose from. It was satisfying to find the perfect plan that suited my requirements and then bring it to life with some DIY effort.
If you’re considering building a reloading bench, I recommend checking out different plans to find the one that best suits your needs. With a bit of time and effort, you can create a functional and personalized workspace that enhances your shooting or crafting activities.
1- Attractive Reloading Bench
Build this attractive reloading bench on Youtube for placement inside your home. Using these reloading bench plans will enable you to build an attractive and functional piece of furniture that can be used as the focal piece of any room in your home.
No one will know this is a gun reloading bench unless you tell them. All the storage compartments are concealed and the finish on the exterior of the wood makes the DIY reloading bench look like a high end piece of designer furniture.
When space is limited and you don’t have a dedicated space to keep all of your guns and ammo, these reloading bench plans are just what you need to build a quality piece of furniture. You may also like to check out shooting bench plans for hunting.
2- Storage Cubbies
Use these free reloading bench plans on youtube to build a sturdy reloading table that has plenty of storage cubbies right at your fingertips. Building this bench is simple and quick.
Along the length of this diyreloading table are several storage cubbies that will hold all of your ammo, tools, and spare parts. The work surface is large and flat so it will provide plenty of room for working on your gun while all the built-in cubbies keep everything you need at your fingertips.
No more wasting time gathering parts or searching for just the right screw after you build this reloading bench. Everything will be at your fingertips so you can reload your gun and get back to hunting or target practice.
3- Thrifty Table
Save money by building this reloading table by cheaperthandirt. Start making this for your work shop this weekend. Part of the reason gun enthusiasts reload shells and work on their guns is to save money. Hunters are also looking to save money and feed their family quality meat, so why not build a thrifty table with these reloading bench plans?
This diy reloading table can be customized to the perfect height, depth, and width so it will be a perfect fit for you and your work space. The double 2×4 frame will create a solid, sturdy frame to top with plywood and provide you with a heavy duty work surface that will last for years.
Use these reloading bench plans to create a work space that will allow you to quickly change out presses for different types of ammo. Reload ammo for pistols, shot guns, and rifles at the same table in minutes when you have the ability to quickly change out the presses.
This reloading bench is strong and can handle any size press you may want to use. Build this thrifty table quickly and inexpensively by following these free loading bench plans. You may also like to check out garage workbench plans to efficiently do your projects.
Build this reloading bench by rifleshootermag around an exterior window to allow the natural light to shine in on the work surface. Follow these detailed building plans and get started on this DIY project this weekend.
Use these reloading bench blueprints to custom build a work area that will fit perfectly into your space. Don’t block off a window but rather build around the window so you can have a view outside and natural light while you reload ammo.
The steel pipe legs and oak or birch wood will make this reloading bench sturdy so it can be used with any size press. These reloading bench plans also create storage below and above the work surface so you can store all the needed gun and ammo parts. Overhead lighting is also installed so if the sun is not shining brightly through the window, you will still have a well lighted work space.
Here we have a portable reloading bench by bulletin.accurateshooter that is small in size so it’s easy to carry.Take this reloading table along with you the next time you travel to a hunting destination. Just follow these simple instructions and build a portable reloading table like this one.
Take this portable reloading table with you to your favorite hunting locations for duck, wild boar, rabbit, fox, etc., and never worry about running out of ammo.
You can travel, hunt, and enjoy the outdoors without worries when you know you have all the tools and supplies needed to reload ammo and make any needed gun repairs while on an out of town hunt.
You will be able to go where the wild game is and hunt with this portable reloading table. It is small enough to take with you but still large enough to provide a solid work surface for reloading ammo.
The building materials are cheap and the portable bench can be built for around $60. The bench folds easily and can be set up in minutes when you reach your hunting destination. It folds small and will fit into the back of a truck or camper.
Follow these free reloading bench plans to build a customized wooden bench that will meet all your ammo needs. Get ready to save money by reloading your own ammo.
This sturdy wooden reloading bench by howtospecialist can easily be customized to fit your space and height requirements such as reloading bench design by cheaperthandirt we discussed at number third. Being comfortable while working on your guns and ammo will make hunting and shooting hobbies more enjoyable. Reloading ammo will also save you a lot of money. Most reloaders claim that a box of ammo can be reloaded for about half the cost of what a new box of ammo would cost at the store.
What we like about this wooden reloading bench plan is its in detail and can be printed out for easy reference. All the measurements are provided for a basic DIY reloading table but they can be changed as needed to meet your needs. You may also like to check out potting bench plans that help to make your gardening project easy.
Build this compact reloading bench for small spaces or infrequent usage. Get ready to save space and money on relaoding your own ammo. The compact size will still provide the same stability as a large reloading table, just in a smaller size.
Not everyone has a large workshop or plenty of space to follow reloading bench plans for a large table. Plus, some hunters and shooters only pursue their hobby occasionally and don’t really need a reloading table on a weekly basis. This compact table may just be perfect for your space or your occasional hobby pursuit.
Follow these reloading bench plans by outdoorlife and purchase a pre-made heavy duty steel work mate bench frame. This will fold out and in so not only will the reloading bench be compact, it will also be portable. The steel frame is strong and will be topped with 3/4 inch plywood to give the bench a strong, stable work surface. The work mate steel frame won’t tip over and built in storage on the bottom can be created if desired.
This compact reloading bench is ideal for working on pistols and hand guns. It also provides plenty of space for reloading any size of ammo. Save money and save space by following these plans and building a compact DIY reloading bench.
Reloading bench is a necessity for hunters and survivalists. These reloading bench plans will help you to store ammo, guns and in reloading of hunting guns. We hope this article has guided you in your decision to build any of these tables to meet your hunting needs.
Based upon some of the most common questions asked I have prepared a questionnaire.
FAQ’s
What is the standard size of a reloading bench?
Most reloading enthusiasts recommend the top of the reloading bench measure between 28″-36″ deep and 48″-96″ wide. This size will provide plenty of space to accommodate ammunition presses, clamps, and other needed tools and provide plenty of space to work.
A DIY reloading bench can be made to any size specification to meet your needs.
What is needed for a reloading bench?
The bench must be sturdy and have plenty of storage space to hold all the reloading components. Drawers, shelves, pegboards, etc., are essential so all components can be at your fingertips. Space for a reloading press is also essential.
If you can make the reloading bench adjustable and portable, that is a big plus for comfortable working.
Is a reloading bench expensive?
The purchase price of a reloading bench will start at around $100 and go up. Building a DIY one will vary in price according to how much material you recycle for the building project and what type of material used for the DIY project.
What makes a good reloading bench?
Sturdiness, space, and storage are the top three must-haves for a good reloading bench. Start with those three must-haves in mind and add your desires to the building project so you can create the perfect reloading bench for yourself.
References:
Bartleby Research, “Getting Started With Reloading Research Paper”, https://www.bartleby.com/essay/Getting-Started-With-Reloading-Research-Paper-FCSQSZDJ3CB
Quora, “How can I build a portable reloading, https://www.quora.com/How-can-I-build-a-portable-reloading-bench
Gun Digest, by Philip Massaro, February 3, 2017, https://gundigest.com/gear-ammo/reloading/outfitting-ultimate-reloading-bench
A DIY water fountain is inexpensive to make and will provide you with a wealth of benefits. Not only is a water fountain an attractive addition to a garden or other outdoor area, but it’s also a stress reducer. Water fountains are easier to care for than ponds and waterfalls too.
The sound of running water calms the nerves and listening to the soothing sound of a DIY water fountain after a long, stressful workday will relax you. A homemade fountain can improve your quality of life, improve your health, make your garden more attractive and add value to your home. That’s a lot of return for a small investment of your time and money.
Check out these 27 DIY water fountain and features to discover the one you want to make this weekend.
1- Concrete Water Fountain
This modern design is easy to create and fits in perfectly with a clean-line design scheme. It provides beauty to look at and the sounds of both splashing and running water.
This free-standing fountain doesn’t require maintenance and can be placed anywhere you would like to enjoy the sound of moving water. Concrete can be colored with a special cement color so the DIY water fountain like this one by familyhandyman can be created to match your outdoor decor.
You may decide to add an extra ‘pop’ of outdoor color by coloring the cement a bright blue, red, or orange. One of the great thing about a DIY project is that you can personalize it with your favorite color or other unique design elements. You may also like to see other similar article such as diy rain barrels.
A bowl, ball, pump, pea gravel, and water can be quickly joined together to create a DIY water fountain like this one by todayscreativelife with these easy-to-follow instructions. Five components and five minutes are all you need to create this attractive and soothing tabletop water fountain.
Easy to move, take this water feature anywhere you want so you can enjoy the sight and sound of running water wherever you are sitting.
As an added benefit, you can add a few drops of your favorite essential oil to the water. The fragrance will fill the air and put a smile on your face.
Terra cotta planters can easily be transformed into a large water feature for your garden with these detailed instructions.
The large size makes this fountain an inviting feature to place near your front entryway. The DIY water feature like this one by instructables will also be a welcoming sight and sound for you each time you return home.
The terra cotta material gives the homemade water fountain a natural look so it blends in well with any surrounding landscape. Use the large-sized fountain as the focal point of a flower garden. The inviting water and flowers will attract birds and butterflies to come and take a refreshing drink of water and have a meal of flower pollen. You may also like to see other similar article such as homemade water filters.
This is ideal for a large courtyard entryway or garden seating area. The DIY water fountain like this one by instructables components are all underground and no one will know it’s there – until it’s turned on.
This large disappearing fountain looks like a geyser gushing up from the ground when it’s turned on. There is no pond to maintain with this design. The stones surrounding the base of the water feature keep an underground basin hidden from view. All you will see is water coming up from the ground, splashing back down and disappearing under the decorative stones.
Simple design that is easy to construct with these free DIY building plans.
Take a stroll through a colorful garden, then stop a relax while listening to the sound of running water. A great way to unwind and de-stress after a long day.
This unique design makes the glass tabletop look as though it is rising out of a bed of river rocks with sheets of water running down on each side of the glass. The see-through water feature allows for a wide variety of ways to express your own garden design on each side of the water feature.
Laminar flow delivers a smooth, steady flow of water that doesn’t splash or cause any type of water turbulence. As the water rises from the fountain, it is manipulated into different patterns and creates spell-binding effects.
Laminar flow tubing can be structured to make the water have a sphere-like look, a dancing effect or many other flow patterns. The DIY build is easy, and so is achieving the desired water effect with these instructions.
The large size and lighting make this an ideal planter to use in a central location of a walking garden. Create four pathways through the flower garden, all leading to this centrally located illuminated water fountain planter. Add some seating and small tables and you’ll have a perfect little hideaway right in the middle of your flower garden. A great place to escape with a cup of tea and a good book.
Detailed plans provided written instructions as well as a picture tutorial that will walk you through this easy build process. The basic build is very simple and allows you to add your own personal touches on the outside so the fountain will fit in perfectly with your outdoor decor.
Add ledge to hold some potted plants, side seating, and don’t forget about placing a rubber ducky in the water for a touch of whimsy.
A great tabletop water feature that has an oriental flare with the usage of bamboo. Start this easy DIY build with a large, decorative bowl. Any heavy ceramic bowl will do or you make one from concrete. Paint it any color desired to match your outdoor decor.
The most visible parts of this designs are created with bamboo and give DIY water fountain like this one by safaffect an oriental look. The small size makes it great for use on the balcony of an apartment or condo, and the sound of running water will help to drown out the surrounding noises.
A great asset to a tranquil backyard garden. This buried fountain makes the water appear to rise out of the ground in an upright stream.
All the components are hidden underground and out of sight. The water stream is surrounded by smooth river rocks placed in a circular pattern, but that can be adapted to your own personal style. Create a square or star pattern, use colorful pea gravel or add a couple of large boulders that can double as seating. The decorative possibilities this buried water fountain provide are limitless.
Add a touch of whimsy to your front walkway to a flower garden with this unique DIY water feature by fleamarketgardening created from recycled galvanized components.
An old galvanized washtub, galvanized bucket, watering can and tubing can be stacked together at an angle to create planters and a water feature that takes up a very small space, yet will have a big impact as an outdoor decorative piece.
Grow herbs, flowers or vegetables in the planters as a never-ending supply of water seems to be pouring out of the tops water can and down into the tub below. Great use of space and recycled components. You may also like to see other similar article such as diy water pump.
Transform an unused space in your landscape into a thriving oasis for plants, fish, and people with this idea. A mixture of flat and round stones surround an underground pond liner so nothing is visible but water. A hidden water pump keeps the water flowing for a waterfall effect over the flat stones on one end of the small pond.
Add colorful plants around the perimeter of the pond and colorful Koi fish inside pond for a bounty of color that will complement the relaxing sound of the waterfall.
Recycling antiques, especially if they belonged to an ancestor, is a great way to pay homage to them, preserve history and create something beautiful for you to enjoy. Tea kettles and wine barrels are not items often used in today’s modern homes, but they can become re-used in new and decorative ways that fit in perfectly with modern home and landscape design.
This unique idea and free building plans will show you how to put together old antiques to create one new, nostalgic homemade water fountain that can be enjoyed by the whole family.
Great for small outdoor spaces, this water fountain boasts one unique feature – it sprays water upwards instead of running it downwards. The concealed sprayer creates a gentle spray of water from the top of the planter pot fountain, and the bi-level design catches all the water so there’s no mess.
Some of the water will create an over-spray on surrounding plants, making the space adjacent to the water fountain a perfect place for planting water-loving plants.
Large and stately, this classic design commands attention. Three tiers of trickling water in the DIY water fountain like this one by instructables will make it the show-stopping centerpiece of any garden. The trickling water will also drown out surrounding noise so you can enjoy relief from city noises and neighbors.
Start with this statuesque water fountain, then create your garden sanctuary around it. This ideal garden focal point is an easy DIY project with detailed instructions.
If you would like a smaller scale, three-tiered fountain like this one by jparisdesigns than the previous design. this might be the one for you. Made from three pottery bowls in graduating sizes, this is an easy and inexpensive creation.
Three decorative pottery bowls can be purchased very cheaply at a flea market or salvage store, then put together using these free plans to create a unique water feature. The lovely colors and sound of soothing water will make this a welcomed addition to any backyard garden.
Can be used in the front yard near the entryway too to increase curb appeal and allow you to start unwinding before you even enter your door after work. The sound and sight of running water are so relaxing that just looking at it for a minute before entering your home can improve your mood. You may also like to see other similar article such as diy self watering planters.
One large ceramic pot can equal one lovely DIY water fountain like this one by lowes for your garden. Make this homemade fountain the focal point in your garden by placing it in the center, then planting low growing flowers all around it.
This large ceramic pot has water over-flowing its edges all the time to provide a soothing sight and sound. Place a bench and bird feeder nearby and you may even have the joy of watching birds take a bath in the gently flowing water of this garden fountain.
If you are looking for a small garden fountain like this one by familyhandyman, here is the perfect choice for you. The actual beauty of the fountain lies in its main vessel or structure, which is made from concrete. You can simply get over the entire process in two days. River stones must be used for decoration in this type of design.
All you need is two days to bring out the wonderful diy water fountain. You might face trouble in getting the stones drilled, but you can take professional help for from expert. This is an ideal backyard fountain too.
This is the most decorative kind of fountain by landscaping.about that requires little more effort information. It might cost you around $200 – it is a large garden fountain plan, so work according to your need. There is technicality involved, so you might need help from some professional too.
You need to follow the detailed plan for getting the exact information about the project. However, a quick overview is to make a hole in the pot, install the reservoir, adjust the pumping machine and add the finishing. It is up to you what kind of appeal you want to add.
Follow simple eight steps to get a simple yet stylish kind of a diy water fountain like this one by sunset that can enhance the appeal of your garden. You do not need to spend lots of money over this plan; you need:
A plastic bucket – the shape and size you want your fountain to be
Look for the older flowerpots that you must have thrown in the backyard. It is time to make the most of various flowerpots together and form a diy water fountain. With a little creative approach, you can have five to six in a big garden space. Follow the link and get the knowledge from this video tutorial by landscaping.wonderhowto:
Within your garden space, you can make this kind of stone garden fountain by gardengatemagazine. Use cobblestones for filling the slanted container, as they look gorgeous. You do not need any special material for having executing this plan. Make sure you place this kind of fountain where here is a bunch of bright flowers because it would look really beautiful.
For having a beautiful marble fountain like this one by familyhandyman, you need to understand some technical details. Here is a tip – always use light color marble so that it looks appealing. For your ease, the link on the image will guide you towards coming up with a sexy looking garden fountain.
This kind of diy water fountain by familyhandyman is formed by simply arranging the big and small cobble stones – the technical comes into play when you are supposed to adjust the water pump without destroying the outlook.
Camping in the wilderness can be an amazing experience. Tent camping is not for everyone which is why DIY truck campers are a wonderful way to scale up camping at a DIY price. With the COVID pandemic, mass transit and crowded passenger traveling on planes and trains are not as appealing as earlier years. Creating a DIY truck camper is a wonderful way to travel without leaving some of the comforts of traditional travel accommodations.
With more and more individuals learning how to live in smaller spaces and finding the freedom in traveling more often, DIY truck campers are a fantastic way to take the idea of tiny houses on the road. If looking to convert a truck into sleeping space or finding a unique off grid camping experience, learning how to DIY a truck camper can be a great idea. Let us explore seventeen of the best DIY truck camper projects and tutorials we found on the internet.
1- Skate Away Truck Camper
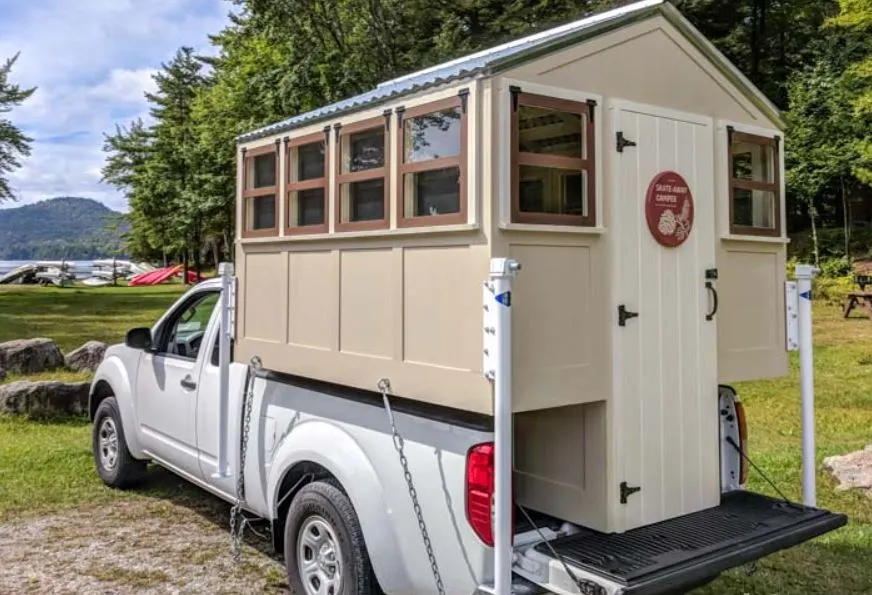
A lightweight DIY truck camper by sawsonskates that looks a lot like a tiny house like this one we have and that is also waterproof is a fantastic way to enjoy wilderness adventures. This DIY truck bed camper can be constructed in a couple weekends. This camper tutorial is incredibly detailed with a lot of easy-to-follow instructions.
Build this homemade truck camper with a saw, drill, and a few hand tools. The goal for this truck bed camper is to be under eight hundred pounds. This build is designed with a lot of windows so that it does not feel cramped and has a large sleeping area.
With a pine lumber construction, the lightweight frame of thisdiy truck camper cab cabin by instructables is paired with a fabric and paint technique to stay lightweight without breaking the budget. This DIY tutorial shows how to build a truck camper with detailed plans. Unlike the one we have shown you earlier you can download this plan with detailed supplies and steps.
The total cost for this DIY truck cap camper materials is 450 dollars, and the camper cab weighs less than two hundred pounds. The modular and modern design allows for a straightforward design that also helps reduce driving hazards of other DIY camper tutorials.
At third number we have a truck bed camper shell by takethetruck with built in storage underneath the sleeping area. Using long drawer slides, with the compact storage, pulling everything out from under the bed provides usable storage for essentials. Oak boards and plywood are the foundation materials for this DIY truck camper.
The detailed instructions use language that any DIYer can understand. The tools needed for this homemade truck camper are, a jig saw, power drill, and a Kreg jig kit. The solo sleeping area provides comfortable height and weight without feeling boxed in. The entire project will take one or two days to complete.
Homemade Solo Truck Camper Image via: takethetruck
4- Off-Road Truck Camper RV
Learn how to fully customize a truck bed into an off-road RV in this Youtube video. The truck cab to RV conversion took two people two and a half months to design and build. While other DIY truck camper projects use a wood frame, this project uses a welded aluminum frame.
The truck bed was removed for adding the aluminum frame which has insulated foam side panels for ultimate weather protection. This project construction went above and beyond with customization that can be altered for the average DIY camper build. The aluminum frame allows for less weight and longer lasting quality.
5- Easy and Removable Truck Bed Camper
Creating an easy and removable homemade truck camper like this one on Youtubewithout a lot of construction knowledge is possible. With a two by four-inch wood frame and support boards, any DIYer has the knowledge and skills to essentially build a box frame for a mattress to rest on as the main goal of this DIY truck camper project. Sliding drawers for storage can go underneath the box frame. Slats on the frame allow it to hold a lot of weight.
6- Recycled Redwood Truck Camper
Getting materials for a DIY truck camper build by doityourselfrv can be as simple as checking out salvage yards or buying old decking on an internet marketplace. This homemade truck camper uses a lot of recycled and salvaged items to save money. The tall frame of the build allows for ample room while camping and traveling around in both warm and colder temperatures.
The miniature RV features a twin bed, stove, sink, refrigerator, cabinet storage, couch, skylight, and wood burning stove. The entire project is under fifteen hundred pounds so a truck can carry it. The tutorial provides photos and descriptions that help with the construction of the truck camper. You may also like to check out diy camping showers.
Turning a truck cab into a functional living space can be a simple and affordable way to enjoy comfortable living while on the road and away from home. At a total cost of under fifteen hundred dollars, this truck cap camper by wildwewander allows for storage area with space for double bed sleeping.
Moveable cushions that can be transformed from lounging to sleeping are a terrific way to create versatile living. Wood storage compartments create secure places for storage of various camping supplies. The truck cap creates an atmosphere of camper living without the excessive cost. Truck cap camper
Turning A Truck Cab Into A Camper Image via: wildwewander
8- Angular Truck Bed Camper
With a fresh angular look, this truck camper by preyonadventureis spacious enough to sleep up to four people while also being easy to remove from a truck bed when not in use. The truck bed camper is light enough to be able to haul a boat as well without overpowering the truck’s ability to travel.
This camper is waterproofed using a DIY fiberglass technique with fabric and paint. With two-by-two-inch framing, this camper frame is lighter than most. An angular design helps combat wind resistance while driving. All the details were thought out for designing and building this truck bed camper.
Building and customizing a pop-up diy camper by imgur that is able to fit in the bed of a truck is a fantastic way to camp out on the open road. Under bed storage creates sliding storage that tucks away and keeps supplies secure. Solid hinged sides are a wonderful way to keep sturdiness but also an insulated interior.
An aluminum construction canopy helps make this hinged pop-up camper lightweight. The interior is decked out in tongue and groove wood flooring. Insulation is key with the aluminum frame to keep the wintry weather at bay. This project can be built with a friend on an affordable budget.
Rather than a slide-in truck camper unit, learn to construct a cab topper camper that sits on the rails of the truck. The classic look of wood makes this DIY truck camper by truckcamperadventure a realistic and exceptional way to enjoy camper-style outdoors living. This wooden truck bed camper is almost like going back to childhood and sleeping in a tree house.
A two by four-inch frame with cedar board covering, the construction is similar to a boat, only upside down. The entire DIY truck bed camper weighs around six hundred pounds so it does not over power the truck.
With an existing truck topper, getting room to sleep two in the back of the truck can be a weekend DIY project. With two by four-inch framing, creating a space for storage and a support for two single beds, this truck topper camper by theparentsflewthenestis easy to build and easy to haul. Without an existing truck topper, consider purchasing a truck topper tent for an inexpensive alternative.
Foldable cushions create an easier and more versatile way to go from sitting around to laying down for rest. Ample storage underneath the two single beds allows for coolers, cooktops, and other supplies needed to make a comfortable camper experience.
Learn How to Convert a truck bed into an RV camper in this Youtube video while also thinking about staying within a budget. A tiny home on the back of a truck, this RV camper is built with a metal frame. This DIY camper project is the ultimate RV experience with fully customized interior and exterior.
With everything that an RV provides, this truck bed RV camper is the ultimate camping experience. With the goal of building this custom camper to the highest potential, this project can be cut down for faster, budget friendly DIYers.
13- Homemade Pickup Truck Camper
Wood framing is made to fit the bed of a pickup truck with added metal sheeting for the exterior shell. This camper is put together similar to a repair person trailer with the added benefit of windows, insulation, and sleeping quarters. This video tutorial is a series of videos designed to show the steps in constructing a truck bed camper that fits construction abilities and budget limits.
The DIY truck topper camper has form and function with easy framing construction that allows many DIYers to complete this project. In this DIY project creator shows detailed instructions on how to build a truck camper in this Youtube video.
14- Truck Bed Topper Canopy Camper
Creating a fold-down space that can be popped up for sleeping quarters off the ground is a fantastic DIY truck cap camper idea by overlandkitted. Eliminating road hazards by designing and building a pop-up and fold-down that does not limit driving views is ingenious. This DIY truck camper project essentially creates a two-story camper that can be folded down into a slim and streamlined design.
Truck Bed Topper Canopy Camper Image via: overlandkitted
15- Camper Van Inspired Truck Bed Camper
Combining a pre-made roof rack that carries a significant amount of weight with a DIY sleeper shell, this project tutorial takes inspiration from VW camper vans. This project details the creation of a camper shell while using a universal truck bed roof rack. A DIY pop-up truck camper by instructables is a wonderful way to feel less claustrophobic without adding more space.
The project tutorial features detailed supplies, high-quality photos, and descriptive instructions.
This camper build can comfortably sleep two adults for on-the-road travel living. The hinged roof is made of waterproof fabric that can be popped up with sides that hinge out.
Following other truck bed camper projects on Youtube, a two by four-inch framing helps this slide-in camper support a dual-purpose sleeping and storage area in the back of a pickup truck. Double bed framing allows for optimum space for sleeping and underneath storage. Wooden slats help evenly support the weight of the sleeping surface.
Drawer pulls or a custom-designed DIY drawer sliding system can be utilized for easily accessing storage areas. Long pullout drawers make storage space expansive for a cooktop, food, and other camping supplies.
17- Slanted Roof Low Profile Camper Module
A wooden framed DIY pop-up truck camper in this Youtube video featuring an expanded roof using piston hinge lifts for a safe and powerful construction. A four-foot-high slanted roof that tapers to a two-foot sleeping quarters, this low-profile pop-up camper is perfect for travelers who do not want to haul a separate camper. The all-wood frame allows for DIYers with a range of construction skills to complete this project.
When the pop-up roof needs to be folded down for driving, the sides fold in for a streamlined design that minimizes wind resistance. Plywood studs make this design a lot lighter than other truck bed designs and can be less expensive to build as well. This camper is light enough to easily slide in and out, so it can be stored away when not being used.
Final Thoughts!
There are many ways to DIY a camperwhen owning a pickup truck. Rather than hauling and storing a large and expensive camper or RV, it can be more affordable to learn how to build a DIY truck camper. There are several budget friendly and lightweight construction projects such as the ones we have shown you above that allow DIYers to build the perfect custom truck bed camper to meet their outdoor living needs.
Based upon some of the most common questions asked I have prepared a questionnaire.
FAQ’s
Can you make your own truck camper?
Yes you can use your existing truck shell for your camper. You will need a hard shell cover to make your own truck camper. You can buy from dealership, auto parts shop and can also buy online. You can build your own home inside shell. The truck troper you buy is usually tall enough to stand up or stand under.
How do truck campers attach?
You can attach your truck camper using “tie-downs”. No matter what types of truck camper you have, you will need to buy four tie-downs. They serve as an anchor point to your camper. You will need two tie-downs for the front and two tie-downs for the rear of your truck bed.
Can I convert a car into a camper?
You can convert your car to a truck camper. You don’t need to do anything to or make any amendments to your car. You just buy a tent box and install it on the roof of your car. You can also remove it anytime you don’t need to.
Is it cheaper to convert a van to a camper?
Converting your existing van to a camper should be cheaper than buying a ready made van camper from the market. By making your own van camper you have options to customize it according to your needs.
References:
Outsideon Line, Published Oct 17, 2022, “How I Built Out the Dream DIY Adventure Truck Camper”, https://www.outsideonline.com/outdoor-gear/cars-trucks/total-composites-truck-camper-diy-build/
Quora, “What are the good and bad things about owning a truck camper?”, https://www.quora.com/What-are-the-good-and-bad-things-about-owning-a-truck-camper
If you want a place where you never have to clean up someone else’s mess, then you need to check out these 12 she shed plans from our list. Be inspired to build your own space that’s comfy, cozy, reflects your taste in decor, and the rest of your family is not allowed to enter.
Men have their man caves, so it’s only fair that women have private space. Rest, relax, do arts and crafts, read a good book, take a nap, or whatever you want to do when you create a she-space with one of these best 12 she shed plans that we have made a round up of.
1- Tiny She Shed
The first one we have a she shed plan that will help you create a tiny home that has plenty of space for crafting and relaxing. This detailed YouTube video takes you through the entire building process.
The barn style interior uses reclaimed wood for window coverings and storage unit doors. Keep everything neat and stored away when not in use with the built-in storage cabinets. Enjoy the natural lighting that comes in through the windows during the day and since the tiny home is wired with electricity, enjoy the she shed like in this youtube video after dark too.
A built-in day bed doubles as a couch and a bed. This attractive tiny home can also double as a place for overnight guests to sleep if needed.
2- She Shed Kit
This YouTube video will show you how to build a she shed from a kit. You will also learn how to level the ground and build a floor for the shed.
Ideal for people who have limited time and/or limited carpentry skills. A pre-fab shed kit like this one has all the measuring and cutting already done for you. Written instructions will be in the shed kit and you can watch it being put together on the YouTube video.
Windows and a shingle roof make this an attractive littleshe shed on youtube to place in the garden so you can enjoy the sight and fragrance of growing plants. You can also observe birds and other pollinators that visit your garden as you gaze out the window of your she shed.
3- Backyard Makeover
Have you been wanting to makeover your backyard? Use these she shed plans to inspire you to build your own and update the backyard too.
Decide on all the things you want in your backyard, like new sod, a BBQ area, fire pit, flower and vegetable garden, etc, then select the ideal spot for your she shed. Place the DIY she shed like this one by hoosierhomemade in a location where you can enjoy all the beauty of your new backyard while being secluded inside of your private oasis.
You may want to consider including a small porch on the front of your new she shed so you can relax and take in the view from the outdoors.
You can enjoy a coastal retreat right in the middle of woodland suburbia with this beachy themed shed.
When a beach vacation is not possible, these she shed plans by findingsilverpennies will help you design a tiny beach house that’s all your own. The soft colors of the beach and white gravel in the front give this she shed a coastal look and feel.
Decorate the interior of the she shed with more beachy colors and items and you can relax in a coastal environment any time.
The overall size of the shed is just 12-feet by 12-feet but that’s plenty big enough to have your own private space. After a stressful day at work, go out to your she shed and sit on the front porch and take in the sights and sounds of nature. There’s no better way to de-stress than just taking a few moments away from everything and everyone to sit down.
You can rest, read a book, or call a friend from the comfort of your private front porch. If you want to do some crafting, step inside the spacious she shed and be creative in privacy.
The French door entrance and overhead skylights allow this she shed to be filled with light. These she shed plans show you how to build the floor, install the French door and skylights to create a bright and airy she shed in your backyard like this one by lowes.
Use the space as a home office, painting studio, crafting space, reading nook, and a place to get away from it all. Open the French doors to let the fresh air and sunshine come in while you work.
Be inspired by the landscaping ideas in these free plans so your she shed will look like a part of your landscape and increase the value of your home.
Create a cozy little backyard getaway with these she shed building plans by icreatables. This video will take you through the entire building process and inspire you to build one like it.
A sloped roof and plenty of windows to allow natural light to come in makes this attractive from both the inside and outside. Perfect size for a she shed retreat, home office, or crafting studio. This backyard getaway will be a DIY project that will add value to your life and your property.
These she shed plans will inspire you to build a smallcottage style shed like this one by flowerpatchfarmhouse that looks like it’s part of a storybook fairy tale. A pitched roof, plenty of windows and flowers all around make this garden cottage and perfect retreat year-round.
Enjoy the beauty of your garden as you look out the windows or sit on the porch of this tiny garden cottage. Add lacey curtains, colorful flowers, and a bird feeder to complete the look of a garden cottage she shed.
These she shed plans will show you how to build a shed on a budget. The shed is large enough for crafting, listening to music, relaxing, or entertaining a couple of friends. The good news is it won’t cost much to build when you use all the money saving ideas these free plans offer.
The construction cost is cheap but the design looks very high end. Arched windows and a gabled roof make this DIY she shed familyhandyman look like it cost a fortune but it’s cheap to build.
Enjoy peace and quiet every day in your backyard she shed. Craft, read, nap, do yoga or whatever else you need to do to unwind and destress at the end of the day. Enjoy morning coffee while you watch the flowers bloom and birds feed in the garden from the comfort of your personal she shed.
Light, bright space that can be used year-round for gardening and hobbies. The plastic covering keeps the building cost way down and allows natural sunlight to shine in from all sides, including the rooftop.
Spending time in the sun each day just like in sunroom helps prevent Seasonal Affective Disorder during winter and this solarium she shed by instructables provides the ideal location. You can be indoors and warm while soaking up the sunshine even on the coldest of winter days.
When you desperately need a place to get away from it all, what can you do? Use these she shed plans on youtube and build yourself a Fortress of Solitude.
Enjoy a private retreat in your backyard when you can go and just be yourself for a few moments each day. Behind the closed door of this she shed you don’t have to be the wife, mother, boss, employee, cook, maid, chauffeur, etc., etc., etc.,…..at least for a few minutes.
Sometimes all we need is a few minutes alone to take a deep breath and collect our thoughts and this adorable she shed will give you the needed space to be alone.
Conclusion
Everyone needs a space that you can call a private one where no one except you is allowed to enter and disturbe you either need a rest, relaxation, do some arts and crafts, read a good book, take a nap, or do some craft work. By having a she shed you can fulfill your needs. You can choose from any of these multiple she shed plans and options.
A DIY barn door is a perfect solution to many of your homes privacy needs. DIY sliding barn doors can be used as window treatments, interior doors and exterior doors. This stylish and practical solution adds a rustic touch to any space while using less floor space. All floor space around the door can be used since none has to be allotted for an opening and closing swing that traditional doors need.
Using some of these barn door plans to create window treatments will also improve the health of anyone suffering from dust allergies since it will limit the amount of fabric curtains needed. Whether for health or decorative reasons, a DIY barn door will add that rustic touch your home needs.
Window Treatments
Add character and privacy to any room with sliding barn doors by homedepot over the windows. Use these plans to create the right size for your window. Paint to match any home decor.
Laundry rooms are needed in every home, but are not desired daily views. Conceal all the machinery, laundry products and the dirty laundry behind a stylish and functional DIY barn door like this one by blog.jennasuedesign. These tutorial videos and pictorial instructions make building a barn door a cinch for both novice and seasoned DIY’er.
Interior separation between rooms is sometimes needed, yet total separation is not desirable, like between a kitchen and dining room, family room and office. A DIYbarn sliding door like this one by diynetwork with a glass insert is the perfect solution. The see-through glass top barn door allows two interior rooms to be separated, yet not completely closed off from each other.
These detailed plans will enable you to create an attractive sliding barn door like this one by thisoldhouse with a chevron pattern wood inlay. Great for use as a focal point in any room of the home. Easy to follow video and these plans even include a material shopping list so you won’t forget to buy anything.
Barn doors don’t have to look old to add a rustic touch, just look at this modern rustic style door. These detailed plans on how to build a barn door by diypete are easy to follow. Start by measuring the door, cutting plywood to size and add steel around the edges. Measure and cut cedar wood, then attach cedar to plywood with glue and nails. Sand and leave cedar wood natural or stain desired color. Install DIY barn door with a hardware kit and you’re done.
So elegant, yet so simple to build, wood strips applied in a herringbone pattern. Measure door and cut plywood to fit. Frame out the door edges with 1×6‘s. Cut 2×2‘a into 4 inch long strips to create a herringbone pattern. These plans only cover the bottom half of the barn door like this one by bowerpowerblog but the process can be repeated to cover the entire door if desired.
Making abarn door like this one by lowes to fit an interior door is simple with these detailed plans. Attractive, functional and in the traditional style, this door look is classic and fits in with any decor.
Use these plans to create a functional sliding barn door like this one by instructables with skateboard wheels. Perfect design for an outbuilding that needs a large opening for equipment to pass through. Using skateboard wheels instead of a barn door kits can save you a couple hundred dollars.
An attractive barn door like this one by zillow can increase the value of your home and cause it to sell faster when placed on the market. But even if you don’t want to sell your home, this design and paint color choice adds a WOW factor to an otherwise ordinary bedroom.
Here’s another way to recycle old wooden pallets – transform them into an attractive barn door like this one by ana-white. Stack and stain the wood, then add some black metal hardware for a look that fits in with any decor.
Add a pop of color to an all-white kitchen with a colorful sliding barn door like this one by finditmakeitloveit. The pictured door separates the kitchen and laundry room and is painted yellow to compliment the decor.
Attractive British brace detailing adds a touch of classic elegance to a rustic barn door. The contrast in styles will fit in with any style of home or decor. Get the full tutorial for this barn door at remingtonavenue.com