Off grid livingpresents some unique challenges that can be made easier with DIY solar panels. Having free electricity from the sun enables you to have all the desired comforts without the entanglement of hooking up to a commercial power source and having a monthly bill to pay.
Enjoy modern electrical conveniences when living off grid by building your own DIY solar panels. It’s an easy and inexpensive DIY project that will save you thousands of dollar in home electrical bills.
1- 63 Watt DIY Solar System
Nowadays, one may want back up power so, it’s great news for the people who want to create something useful for their home. Energy crises affected almost every country so, everyone should arrange some substitutes for energy or power.
Making 63 watt diy solar panels like this one by instructablesis quite easy nowadays. Get trim pieces, flux pen, wood glue, primer and Bus bar etc; these are the most important things in making such systems.
Reduce air pollution, noise pollution and have free energy for life when you build this DIY solar panels. Use DIY solar power like this one by mrmoneymustachefor all of your energy needs and live a pollution free lifestyle. Build this solar system for your current home and it will pay for itself in a few short months.
Consider how much money you will keep in your bank account by not having to pay the utility company for energy each month. No worries about power outages or outrageously high heating and cooling bills, this DIY solar system will provide free energy for life. You may also like to check out DIY solar pool heaters.
3- Install Off-grid Solar System And Save Up To 100$
How to make a diy solar panel like this one by learn.eartheasy is a crucial topic in current era. There are some substitutes that can help you a lot in this regard. This system offers you the electricity for numerous power tools, sound systems and chest refrigerators etc. The process of making a diy solar panel is very simple; you need to arrange almost 4 basic components for it; For instance a charge controller, one solar panel, gold cart batteries and a tiny inverter. So, by using these elements you can get sufficient power sources at your own place.
Take your current home off grid with this tutorial that will show you how to create and install a DIY solar system like this one by waldenlabs. These free plans show you how to create and install a solar system that will provide the amount of electricity for your home needs.
Create a system that will provide a little or a lot of electricity with these written instructions and video tutorial.
Ready made solar panels like this one by the-diy-life are still a little on the pricey side, but you can save most of that money by creating a solar power system using solar cells.
You can create homemade solar panels that will give you the amount of energy you need with inexpensive solar cells. One solar cell can even be split in order to provide a higher amount of voltage at one half the cost.
Customize your off grid power supply by following these free plans and instructions for DIY solar panels.
A little money and time will create a DIY solar energy system like this one by instructablesthat can power all your electrical devices off grid. Charge cell phones, iPads, computers and any other small devices daily without having to pay for the electricity with this inexpensive solar set-up
This is an ideal solar power system to create as a back-up just in case the commercial power supply ever goes out. Stay connected and keep all batteries charged with this homemade solar panel. You may also like to check out DIY solar water heaters.
Follow these easy instructions and learn how to make a solar panel that provide power and heat at the same time.
Solar panels get hot from the heat of the sun, instead of wasting that heat, harness it for use in your home. This is DIY ingenuity at its best – build once, enjoy twice. You don’t have to limit off grid living to warm weather only, and you don’t have to pay those expensive winter heating bills, when you build this hybrid solar panel.
Now, you can make solar panels like this one by instructableswith cheap materials quite easily. No need to invest in market for buying the panels when you can do everything at your own. The diy solar panel consists of 1″x3″ solar cells wired in series with a blocking diode mounted on a board and protected by clear plastic. It will charge two AA rechargeable batteries in a day or two.
9- Make 35 Watt Homemade Solar Panel From Broken Cells
Whenever you buy new solar cells and start making your own homemade solar panel like this one by treehuggersome cells may break or are found broken when reach at your home. In such cases you can use them in making further solar systems. You can adopt this strategy and enjoy numerous free benefits. So, give order of some new cells and some used or broken cells and add them with the ones that you already have. Tutorial : treehugger.com
Getting DIY solar system like this one by instructablesand solar panel cost is in your control now. If you have few conductive copper mesh, sticks, glue gun, multi-meter and a specific conductive pen, you are some steps away from producing cheap electricity. These things are easily available at art stores; you don’t need to waste time in markets to buy such items.
This is a great diy solar panel project by instructablesthat costs around $150 – $200 to build. It is most suitable when you are on camping or road trip. This is so easy to build that even a beginner can build it in an hour. All parts require for this project can be purchased from local hardware store. You may also like to check out DIY solar air heaters.
One can build a solar panel like this one by freeonplatethat is famous for supplemental home heating. Normally a wood where plywood would be of 15mm and the front should be 3mm and a tempered glass. Solar absorber is another important thing that will be included in the list. Using these items to builds your own panel and makes your life easier; solar panel cost is also reasonable.
Are you thinking about alternative energy? Cutting the tab wire and then using solar cells like this one by instructablesis an easy process as wire can be cut into two pieces of 6″ long. This will make the cells more powerful and they can absorb more energy from sun. When energy is more, there will be more electricity. A lot of people recommend this method.
Build your own solar panel like this one by instructablesand instead of using monocrystalline or polycrystalline one can use CIGS cells from Ebay. Such types of panels are ideal for 10 watt but you can arrange the cells in different ways to reduce or increase the electricity supply.
15- Fifteen Watt DIY Solar Panel Made From Plexiglass Covers
Sometimes you need to charge tiny things. If your need is not big, why should you use heavy solar panel? Plexiglass covers are also used in such panels while the cost factor will match your budget too so, it is time to get cheap solar panel like this one by instructables
Are you worried about getting access to a cheap solar panel like this one by instructables? Come and see, it is great blessing now to have a heavy panel to meet the requirements. Once you spend your money in buying solar cells and other related material, you can save money monthly and that will be a big amount after a year. You may also like to check out DIY solar generators.
17- Get Electricity For Remote Property Through Solar Panels
Through diy solar panel like this one by mdpub, now one can turn sunlight into electricity. There are smaller solar cells that perform the actual duty in which all cells are installed on a panel in a specific order. If you want to reduce the total expenses, you can buy second rate cells from EBay. If you buy almost 36 bricks crystalline solar all wired in a sequence, you can easily get 18 volts.
This easy to install DIY solar panel system by learn.eartheasy will provide basic and reliable service for off grid living. Have more than enough electrical power to keep cells phones and laptops charged, plus enough reliable electricity to run a deep freeze and refrigerator full time with this solar system.
Ideal set-up for people moving towards living a sustainable lifestyle. Have the basic creature comforts with minimal investment and no monthly utility bill.
Follow these easy instructions and build your own reliable solar system today.
Harvest the power of the sun with these free DIY solar panel plans by instructables. Reduce, or perhaps even eliminate, your monthly power bill using the sun to heat and cool your home, cook your meal and power all electrical appliances.
The power of the sun is free, and this homemade solar panel can be built for a small investment of money and time. You may also like to check out DIY solar food dehydrator.
Love to camp, but hate to do it in the dark? This ingenious idea will provide you with enough electricity for camper lights, charge your phone, run a fan, and listen to music through a Bluetooth without running your truck battery down.
Cells are ideal when starting small with a plan for a bigger solar system later on. The number of cells are easy to increase to enlarge the system and the cost is minimal.
Turning a file cabinet into a meat smoker is a fun project that won’t break the bank. I remember the excitement of repurposing an old metal filing cabinet into a practical smoker for our backyard. It was surprisingly easy to do and didn’t cost much at all.
Our homemade file cabinet smoker had multiple drawers, which meant we could smoke various types of meat or even vegetables at the same time. I loved the versatility it offered; we could smoke everything from ribs to fish to tofu, all in one go. Plus, it was a great way to experiment with different flavors and recipes.
One of the best parts of using a file cabinet smoker was the convenience. We could start smoking early in the morning and have a delicious meal ready by the evening. It became a weekend tradition for us, gathering friends and family for a backyard barbecue feast.
For us, as homesteaders, this DIY smoker was a game-changer. We raise our own livestock and grow our own vegetables, so having a way to preserve and enhance the flavors of our harvest was invaluable. I’ll never forget the satisfaction of serving up smoked meats and veggies that we had produced ourselves.
As winter approached, we appreciated the ability to smoke and preserve vegetables from our garden. It was a way to enjoy our summer bounty even when the cold weather set in. And knowing that our smoked goods could last for months meant we could enjoy them throughout the year.
Researching and selecting the right plans for our file cabinet smoker was an adventure in itself. We scoured through numerous free plans, looking for one that suited our needs and the materials we had on hand. It was rewarding to find the perfect design and then bring it to life with our own personal touches.
Check out my round up these free plans for 21 file cabinet smokers to discover which one is right for your homestead.
1- Temperature Controlled Meat Smoker
I remember stumbling upon a helpful YouTube video tutorial for creating a temperature-controlled meat smoker on a budget. Following along, I found it perfect for those who only need a small smoker, like for meats or making jerky. With its electric heating element at the bottom and outside-mounted thermostat and controller, it was straightforward to use.
In my experience, a two-drawer file cabinet was used for this design, but I realized a three-drawer could also work, allowing for more meats to be smoked simultaneously. The versatility of the design made it adaptable to different cabinet sizes, which was convenient.
Safety was a big concern for me, especially if using the smoker indoors. The presence of an electric heating element at the bottom eliminated worries about open flames, making it a safer option for indoor use. Plus, it meant I could enjoy smoked meats even during inclement weather.
2- Four-Drawer File Cabinet Smoker
I’ve found that building a smoker using step-by-step instructions from resources like Snapguide is incredibly straightforward and budget-friendly. Using an old metal filing cabinet as the base, drilling holes in strategic places, such as the back and bottom of each drawer, is the first step.
Once set up, placing a disposable aluminum pan filled with charcoal briquets in the bottom drawer and lighting them initiates the smoking process. From there, arranging the meat on racks in the upper drawers and closing them allows for effortless smoking and cooking. It’s a simple yet effective method for creating delicious smoked meats at home.
I’ve seen an interesting idea from Aussie BBQ where they stack two two-drawer file cabinets to create a double-decker DIY smoker. It’s a brilliant concept, allowing for the smoking of a large quantity of meat all at once. Plus, the flexibility to heat it with either charcoal or gas provides options for achieving that perfect slow and low heat for smoking meats.
What caught my attention was the utilization of the top drawer for infusing foods other than meat with a delicate smoky flavor. It opens up possibilities for smoking vegetables, fruits, and even desserts, adding an extra dimension to backyard cooking.
To enhance the aesthetic appeal of the finished smoker, I suggest painting it with heat-resistant paint. This not only adds a touch of style but also helps it blend in seamlessly with its surroundings, making it look more like a professionally made smoker rather than a DIY project.
In my experience, this homemade file cabinet smoker is a game-changer for those of us who enjoy throwing large backyard BBQs for family and friends! With its spacious drawers, it can handle cooking and smoking large quantities of food simultaneously, making party prep a breeze. Following the step-by-step instructions in the free video by AwesomeJelly, you can easily transform an old file cabinet into a smoker that’s capable of feeding a crowd, ensuring everyone leaves your BBQs satisfied and impressed.
Watching this captivating and informative video on Facebook brought back memories of my own experiences with building homemade file cabinet smokers. The fact that it has garnered well over 3 million views speaks volumes about its effectiveness and popularity. It’s fascinating to see how the builder transforms a simple file cabinet into an efficient smoker, and it’s a testament to their skills and ingenuity. I highly recommend checking out this video to gather valuable tips and tricks from a DIY pro, and perhaps even consider documenting your own smoker-building journey with a Facebook video for others to learn from and enjoy.
I found this one to be an ideal companion to the family grill. This meat smoker by instructables is perfect for smoking enough meat to feed the family and a friend or two while using the BBQ grill or stove top for vegetable side dishes. Easy to build with these detailed instructions and the small size makes it easy to use in small backyard spaces and for storing when not in use.
Little File Cabinet Smoker, Image via: instructables
7- Filing Cabinet BBQ
Recycling a four-drawer metal filing cabinet into both a cold smoker and a hot BBQ cooker was a project that resonated with my own DIY spirit. It’s a fantastic way to combine two cooking methods in one, ensuring flavorful results for both meat and vegetables. I’ve found that the deep smoky flavor imparted by this homemade BBQ idea elevates the taste of the food to a whole new level.
In my experience, building the fire in the bottom drawer and arranging the meat and vegetables in the upper drawers allows for efficient and convenient cooking. With minimal effort, you can prepare an entire meal with rich, smoky undertones using this filing cabinet BBQ setup showcased on YouTube.
The closed drawers effectively trap heat and smoke, ensuring that the flavors penetrate deeply into the food, rather than merely coating the exterior. For those interested in trying this project themselves, the detailed building plans provided in the YouTube video offer a valuable resource for recycling an old four-drawer filing cabinet into an affordable and effective home BBQ solution.
8- Side Rack File Cabinet Smoker
In my own experience, I’ve discovered that a recycled file cabinet smoker, like the one showcased by Therecykler, doesn’t have to be basic. Adding side shelves and hooks can greatly enhance the functionality of the smoker, making the entire smoking process more convenient for the chef. What’s more, incorporating these features doesn’t necessarily increase the cost of the DIY project; with a bit of creativity, you can repurpose items like discarded shopping carts and metal store shelves to fulfill these needs, just as the DIY smoker builder did.
One of the advantages of embarking on a DIY build is the freedom to customize the smoker according to your specific requirements. Consider adding features like wheels to make the smoker easily portable, facilitating both cooking and storage. Additionally, exploring other DIY outdoor cooking options, such as DIY pizza ovens, can complement your smoking setup and expand your culinary repertoire.
Side Rack File Cabinet Smoker, Image via: therecykler
9- Old Grey File Cabinet Smoker
An old grey metal filing cabinet by dailymail is functional for paper storage, but it’s the most boring pieces of furniture in the home or office. But all that changes with a simple DIY transformation. An old grey filing cabinet can be turned into the most useful and amazing pieces of hardware in your backyard when you follow these step by step instructions.
Turn that old grey filing cabinet into a BBQ smoker and paint it any color you want (use heat-resistant paint). Boring furniture never looked, or smelled, so good before. Your friends will be asking for your BBQ recipe and to build them a file cabinet smoker.
Old Grey File Cabinet Smoker, Image via: dailymail
10- Filing Cabinet Smoker
These free plans offer a great opportunity to repurpose an old metal filing cabinet into a functional homemade smoker, much like the one depicted. In my experience, older metal filing cabinets, constructed with thicker steel, are particularly well-suited for this purpose, as the thickness of the steel contributes to better heat retention and durability over time.
When selecting the cabinet size, consider your smoking needs and preferences. For smaller gatherings or cookouts, a compact three-drawer filing cabinet may suffice. However, if you intend to smoke meat in larger quantities for long-term storage, opting for a larger six-drawer metal cabinet would be more suitable. Ultimately, the size of the cabinet should align with your smoking goals and the amount of meat you plan to smoke at a given time.
Filing Cabinet Smoker, Image via: instructables
11- Meat Smoker By Mecosmoker
This four-drawer filing cabinet I am showing you makes an ideal meat smoker by mecosmoker especially when you have a lot of fresh meat that needs to be preserved.
This video tutorial will show you how to build a smoker that will handle a large quantity of fresh meat at the same time. A great DIY project for living a sustainable life and hunt and fish for their meat.
As someone who loves hosting gatherings, I’ve learned that nothing satisfies a hungry crowd quite like BBQ meat fresh from a smoker. My own experience has shown me that while large commercial smokers can be pricey, there’s a budget-friendly alternative: building a homemade smoker, such as the one showcased by Patriotcaller, which can be made for just $20. Following the step-by-step instructions in the instructional video not only allows you to save money but also enables you to impress your friends by serving up mouthwatering BBQ dishes that rival those from expensive commercial smokers.
This three-drawer smoker holds wood chips in the bottom drawer and sends a steady supply of smoke up to the two top drawers, thanks to the PID. The proportional-integral-derivative controller is an intelligent temperature controller that enables you to smoke the meat to your exact specifications.
This file cabinet smoker by smokingmeatforums is a smart design with intelligent features typically found in an expensive store-bought smoker. A homemade smoker doesn’t have to be a bare-bones model, it can have all the bells and whistles you want since you are the one building it.
Store-bought smokers can cost hundreds, sometimes thousands, of dollars but building a smoker can cost you less than $100 with these plans.
One hundred dollars may seem a little expensive to some do-it-yourselfers but most of that money is spent on heat-resistant paint. If you already have a four-drawer file cabinet and don’t want to paint it, this DIY smoker by dglobecan be made for almost nothing.
Recycle old grill grates for the bottoms of the top two drawers of the smoker will save money, plus a kitchen raid can probably garner you a couple of old aluminum pans to hold the charcoal, water and wood chips too.
An Iowa teenager successfully built this file cabinet smoker and won the state championship at the county fair with her DIY design, and now she will show you how to build a smoker just like her award-winning one.
File Cabinet Smoker For Under $100, Image via: dglobe
15- DIY Smoker
This detailed video will show you how to turn a file cabinet into a functional smoker by nothinglikebbq, plus provide you with a delicious recipe to get you started. It’s a fun and easy build that will enable you to build a DIY smoker and have guests over for a backyard BBQ on the same day. Your guests may want you to build them a DIY smoker and get you started in a side-hustle business venture that will bring in extra income.
DIY Smoker, Image via: nothinglikebbq
16- Beginner Smoker Build
For beginners in the DIY world, this file cabinet smoker featured on YouTube is an excellent starting point, as I’ve found from my own experience. Requiring minimal skills, tools, and investment, it’s a project that anyone can tackle with ease. If you already have a filing cabinet lying around, the cost of building this smoker will be next to nothing, making it an incredibly budget-friendly option.
The detailed instructions provided in the YouTube video make building this filing cabinet smoker a straightforward task that can be completed in just a few hours, as I’ve observed. Despite its simplicity, the smoker is durable and built to last for years, ensuring that your investment of time and effort pays off in the long run. Whether you opt for a two, three, or four-drawer filing cabinet, these free plans make it easy for even beginners to transform an old filing cabinet into a functional and long-lasting DIY smoker that adds value to your outdoor cooking experience.
17- Redneck File Cabinet Smoker
When something is referred to as ‘redneck’ it just means it’s a DIY item that costs very little to create. Rednecks are folks that know how to build things and save money, like this efficient file cabinet smoker.
Watch this YouTube video for complete instructions on how to build a smoker from a four drawer metal filing cabinet. The large size of this filing cabinet on youtube will allow you to smoke a lot of food at once making it ideal for a farmer or hunter that has a lot of fresh vegetables or harvested meat to preserve.
Make one of these redneck file cabinet smokers for your off grid homestead so you can preserve fresh food without electricity. The cold smoke will dehydrate the food so it keeps without refrigeration. The smoke will penetrate through the food and adds flavor that will be a welcomed addition to any meal.
18- Meat Smoker
If you love to eat jerky but hate to pay the high price for it at the store, start making your own jerky. This DIY file cabinet smoker is one of my most favorite smokers. This meat smoker is the ideal way to make your own jerky for minimal expense.
Jerky is not the only thing that you can make with this DIY file cabinet smoker, you can also smoke meat and vegetables for preservation. The electric heating unit in the bottom of the cabinet allows you to control the temperature so your smoked food will turn out perfect every time.
Even though this DIY smoker on youtube is electric it will not cost much to operate. The low heat keeps the electrical usage and cost way down. You can recycle an old filing cabinet and heating unit from a stove for this DIY project. This will keep the building cost low and keep usable items out of the landfill. The controlled temperature gives you perfect results every time you smoke food.
19- Cheap Filing Cabinet Smoker
If you are tired of spending money on the smokers sold at retail stores, consider building a cheap file cabinet smoker that does that same job.
Learn how to build a DIY smoker in this YouTube video for less than $35. It won’t be any harder to build one than it is to put a store bought one together. The DIY smoker will last just as long and probably smoke meat better than a store bought one.
Growing food, raising meat animals, and harvesting game animals is a way of life on a homestead and you need a way to preserve the food that is safe and sustainable. Dehydrate the food so it can be preserved without electricity so you will never have to worry about a power outage and losing all the food in your freezer. Dehydrated food does not require refrigeration or freezing to remain safe for eating.
This file cabinet smoker can also be used to prepare meals for the family to enjoy at the end of a long workday. It will make a perfect addition to any homestead, plus it is cheap to build.
https://www.youtube.com/watch?v=V6JiiwDlErM
20- Four-Tier File Cabinet Smoker
As someone who loves to host backyard gatherings, I’ve discovered that this ingenious project has the potential to transform ordinary BBQs into unforgettable culinary events, drawing from my own experiences. Repurposing an old four-drawer filing cabinet into a highly efficient DIY smoker requires just a bit of creativity and effort.
The instructional video by Delish simplifies the process of creating and using this smoker, as I’ve learned firsthand. By following the steps outlined in the video, such as placing charcoal in an aluminum pan in the bottom drawer and meat in the top two drawers, you can achieve mouthwatering results like melt-in-your-mouth ribs that will impress your neighbors and guests alike. Additionally, the minimal construction requirements and the durability of the heavy-duty steel cabinet ensure that this homemade smoker will withstand years of use, making it a worthwhile investment for your outdoor cooking adventures.
Learn how to make the file cabinet airtight so all of the smokey flavors are directed into the meat in the file cabinet smoker. This educational video will also show you how to repose damper grates from an old BBQ grill for use on the new file cabinet smoker so the internal heat and smoke can easily be controlled. Learn how to re-purpose other items you may have on hand to create this file cabinet BBQ smoker by watching this YouTube video.
Conclusion
So these are different types of file cabinet smoker I have shared with you, you can recycle them to smoke your favorite meat. Smoking can make your food rich in flavour and also by cold smoking you can store your harvest meat to be used over the time. You can choose any of these filing cabinet smokers to enjoy the flavor of smoked meat.
References:
Michigan State University Extention, by Christine Venema, pub: December 19, 2016, “Smoking as a food cooking method”, https://www.canr.msu.edu/news/smoking_as_a_food_cooking_method
Reaearch Gate, pub: January 2004, author: Julie A. ALBRECHT Ph.D, “NF04-605 Smoking Meat and Poultry”, https://www.researchgate.net/publication/267721939_NF04-605_Smoking_Meat_and_Poultry
ACS Publications, Publication Date:August 7, 2020, “Effects of Smoking Temperature, Smoking Time, and Type of Wood Sawdust on Polycyclic Aromatic Hydrocarbon Accumulation Levels in Directly Smoked Pork Sausages”, https://pubs.acs.org/doi/10.1021/acs.jafc.0c04116
Science Direct: pub: 2016, “Safety by Control of Water Activity: Drying, Smoking, and Salt or Sugar Addition”, https://www.sciencedirect.com/topics/food-science/smoked-meat
Creating a DIY phone projector will provide you with large screen viewing from a small device. Watch movies, videos, YouTube tutorials, and more on a big screen right from your Smartphone. A simple shoebox and magnifying glass can transform a cell phone into a homemade projector.
A DIY phone projector can be created from any cell phone and is a fun DIY to do with your children. Pop some popcorn and get ready to enjoy some family movie time with one of these 13 DIY phone projector ideas we have found for you.
1- Cheap DIY Smartphone Projector
Develop your creativity and learn how optics work by creating this cheap Smartphone projector.
A shoebox and a few other items are all that you will need to create this cheap and functional diy phone projector. Transform the small screen of your cell phone into a large screen the whole family can enjoy viewing with these detailed DIY plans by expertphotography.
The kids will be fascinated with this DIY project by and the finished projector will be good for the whole family.
If you want to create an attractive homemade projector check this one by Thrift Diving. The exterior is made from a small piece of leftover wood and it can be painted and decorated in any way you would like. The projector is inside the wood box and is fully functional to project images from your Smartphone onto a projector screen or wall. All the working components of the projector are housed inside the wood box so it will look nice while it is projecting imaging.
This is a great DIY project to do with your kids. You can do the technical part of the build while they paint and decorate the exterior of the wood box. Ideal for using on family movie night and for using when friends come over to watch streamed programs or videos you made yourself.
If you want your homemade phone projector to be more than a cardboard shoe box, try this project. It will give your projector an expensive look without costing you much money. Many of the components come from the Dollar Tree store and cost just a little over a dollar.
These detailed instructions provide you with both written and pictorial instructions so it will be easy for you to build one just like it at home. These wooden box projectors would also make nice gifts and with Christmas just around the corner, you may want to make a few extra for family and friends.
Learn how to make a diy projector using your cell phone and a few other simple components so you can watch videos on a big screen. This DIY project is for people who have limited skills with electronics since it is such a simple project.
Although it is simple the results are amazing. You can enjoy a family movie night, share videos, or stream your favorite programs on a large wall screen by transforming your cell phone into a DIY projector.
A magnifying glass is used to enlarge the picture and project it onto a screen or wall so you can watch a video without having to squint your eyes. When the images are projected in a larger format, you can sit in a comfortable position and enjoy the video with family and friends.
A new store bought home projector will cost hundreds of dollars and it may not be compatible with your phone. This DIY projector is compatible with any cell phone and is easy to take along with you wherever you go. A store bought projector is large and bulky, not so easy to take with you to a friends house.
This low tech phone projector is cheap and easy to build. You will be able to build one this morning and be watching projected images this afternoon when you follow these simple YouTube instructions. You may also like to check out diy charging station to hide cables, cords and charge your devices at an organized place or station.
4- Shoe Box Projector
This cheap homemade DIY projector by Instructablescan be created in less than 30 minutes and provide you and your family with hours of entertainment.
Use this diy cell phone projector indoors or outdoors and enjoy watching a wide entertainment with your family. Start Holiday traditions this Holiday season with your family using this homemade projector. Enjoy gathering together to watch favorite Christmas movies with your family with this simple shoe box projector idea.
This DIY projector by DIY Photography solves the problem of backward text when watching a smartphone projection. This is one of our most favorite diy phone projector. The upside down design of this homemade projector allows you to watch videos and read all the text without any difficulty. The upside down design makes everything you watch right-side up.
Use these detailed instructions for creating your own cell phone projector today.
Most of us would love to have a home theater room and watch movies on a big screen with family and friends in the comfort of your own home. Unfortunately, that kind of home theater costs a lot of money but this kind of home projector is cheap to make.
Follow theseinstructions for creating a DIY phone projector in this YouTube video then get settled into your favorite chair and enjoy watching a movie on a big screen. An empty wall in a room of your home works perfectly as a large screen to project videos from your cell phone onto.
8- Smartphone Projector
Help prevent the kids from developing eye strain from watching a small phone screen by creating this projector for their Smartphone.
Enlarge your kid’s favorite videos and shows with this projector idea. Easy and cheap to build, this video will show you how to build this DIY phone projector on youtube using just a few common items.
Keep tabs on what your kids are watching on their Smartphones and get in some bonding time with them by watching some of their favorite channels with this DIY projector.
9- Easy Smartphone Projector
Nothing hard or complicated about this DIY project. Get these free plans that will show you how to create the easiest diy Smart phone projector on youtube. Easy, cheap, and quick to build. Gather a few items together for this DIY project and you will be relaxing in front of a big screen projection from your Smartphone in less than 30 minutes.
Unwind at the end of a stressful day by creating a DIY project and watching a good video with the family.
10- Recycle Bin Project
Wondering if there is some way that you can recycle some of the boxes in your recycle bin? How about creating a DIY phone projector with a couple of the boxes?
Make one for the kid’s room, the family room, and one more for using outdoors. Build a fire in the firepit for roasting marshmallows and watching a video after the sun goes down tonight.
This detailed video will show you how to recycle an old shoe box into a new DIY phone projector on youtube. Learn all the building details and also how to focus the cell phone video for best viewing of your favorite videos.
Great project for kids and it will provide hours of family fun after the homemade cell phone projector is built. You will also feel good about finding a new use for an old shoe box.
13- HD Smartphone Projector
Learn how to get a clear HD projected image from your Smartphone with this YouTube video. Image quality and brightness are excellent with this DIY phone projector idea on youtube. The easy to follow video tutorial will show you every step of the building process so you can enjoy watching high quality images projected onto your wall surface.
The LED lighting inside the cardboard box makes a big difference in picture clarity so all projected images come out clear and crisp for easy viewing.
14- DIY Portable Projector
Create a handle on top of the projection box so the device will be easy to take with you to the home of friends and family.
The design of this homemade cell phone projector on Youtubeis easy to build and it will make you popular with your friends. Everyone will want you to bring the DIY projector to their house so videos can be watched on a large vertical surface.
The handle on top of the box allows you to take your portable projector everywhere you go for fun and entertainment.
The size may be mini but this DIY projector is powerful enough to display images on a DIY outdoor movie screen.
This video will show you how to build a small projector on youtube to use with your cell phone for under $5. The projector is lightweight and portable, making it ideal to take along with you on camping trips. The videos can be projected on the side of your camping tents so you won’t miss your favorite shows while roughing it out in the wilderness.
There are many ways to build a DIY outdoor movie screen and it’s easy to find the instructions online so you can build one for your backyard at home. Invite family and friends over and enjoy a movie night in the backyard with this easy and cheap to build mini phone projector and a DIY movie screen.
This mini projector recycles a large shoe box for the exterior. Inside is all the components that will transform your Smartphone into a projector. It’s easy to build and will last a long time for your enjoyment.
This mini projector is customizable so you can work with any size shoe box that you have on hand. The exterior can be decorated so no one will have to know the DIY projector is made from a shoe box. This is a great project to do with children and the whole family can enjoy the finished project.
16- Cinema Projector
If you like to watch movies on motion picture films but can’t afford the projector, build your own with these free YouTube instructions.
A magnifying glass and a flash light are the main things that are required for the DIY projector such as in this youtube video. It’s almost free to build and can be completed in about half an hour. For that small investment of time and money, you will be able to watch all your favorite cinema movies on a big screen for many years.
This will also make a great school project for a science class. It is a basic design with minimal expense and it would be easy for young future scientists and technicians to build in school. The finished projector could be shared among other classes so many students could benefit from this DIY projector. It will be useful at home or school. This cinema projector might even be useful in the workplace if you need to give PowerPoint presentations or use videos to instruct employees.
However you choose to use it, you will find this cinema projector easy and cheap to build. It is great for home, school, or office use. You can build one in less than one hour so you can build it and begin using it right away.
You may want to consider building a DIY outdoor movie screen to go along with a cinema projector. You can build the perfect screen very inexpensively so you can watch your favorite movies outdoors. Set up the lawn chairs and pop the popcorn for a great night of movie watching when you build yourself a DIY projector and outdoor movie screen. You may also like to check out diy bluetooth speakers to enjoy some music without the need to connect it with the cable.
The next YouTube video you watch can be projected onto a big screen or wall so you can see the details more clearly after you make this projector for your cell phone.
Let the kids help you create this cheap mobile projector so they will become interested in DIY projects and search for them on YouTube.
Conclusion:
By just using your cell phone, a shoe box and a magnifying glass you can enjoy the benefit of a large screen. Watch your favourite movies, youtube tutorial and instructional videos with your friends or family members.
Use any of these diy phone projectors we collected for you to make your own projector. If you like the post or have any more ideas please don’t forget to give your feedback in the comment section below.
References:
Researchgate, publication-228868642, pub: January 2010, “Applications of projector phones for social computing”, https://www.researchgate.net/publication/228868642_Applications_of_projector_phones_for_social_computing
Edutopia, Technology Integration, by Jim Moulton, pub:July 18, 2006 “The Power of the Big Screen: The Digital Projector Makes Instructional Materials Larger Than Life”, https://www.edutopia.org/power-big-screen
Thejournal, “Multimedia Projectors: A Key Component In The Classroom Of The Future”, https://thejournal.com/articles/2002/06/01/multimedia-projectors-a-key-component-in-the-classroom-of-the-future.aspx
A Homemade bird feeder is a great way to keep our feathered friends well fed and happy, plus recycle objects that have outlived their original purpose. We tend to remember to feed the birds during the spring and summer when they are most visible in our landscapes, but they need food during the winter months too.
Bird feeder Plans will creative an attractive outdoor piece of art that will remind you to feed the birds year around. Regions that have below freezing temperatures and snow covered ground in the winter make it difficult for birds to find food in their natural habitats. A seed filled bird feeder will keep the bird population thriving and provide you with an interesting and ever-changing view in your landscape.
These 33 bird feeder plans we have collected will show you how to take ordinary objects and quickly transform them into an attractive receptacle for bird seed.
1- Frisbee Jar Bird Feeder Plans
Here we are going to share with you these bird feeder plans by instructables that will shows you to take that old Frisbee your kids never play with any more and use it to make a hanging bird feeder. A recycled lidded plastic jar will hold the seeds and the Frisbee will create the base for the DIY feeder. Holes are cut into the jar and kids can show their decorative talents by painting the jars before filling them with birds seed.
Homemade Frisbee Jar Bird Feeder , Image via: Instructables
2- Acorn DIY Bird Feeder Plans
This DIY birder feeder by triedandtrueblog resembles an acorn and is so easy to make. A round piece of wood for the top and a piece of wire to fashion the rest of the acorn is all that’s needed to create this whimsical and functional feeder. every one of us some leftover items on hand, this bird feeder plan will cost almost nothing to build. The easy access to the seeds inside the feeder will keep the birds happy and squirrels can’t get in to rob the seeds.
An unused wooden salad bowl can be quickly transformed into something usable with this bird feeder plan by Loc.Gov, we are showing with you The wooden salad bowl create the top of the feeder and a plastic bottle creates the bottom portion that holds the seeds. Great form and function, plus it keep unwanted items out of the landfill and gives them a new life.
Here we have one of the best PVC bird feeder for hummingbirds by Birdsandblooms. You can easily make it by getting materials like PVC piping, copper wire, glue from your hardware store. You need to connect the non-threaded ends of the pipes with the PVC adhesive and drill small holes in each pipe piece. Paint the PVC pipe and then wrap each pipe with a wire. Link the feeders and let the feeding hole to face up. Your bird-feeder is ready.
An attractive and decorative piece of outdoor decor that functions as a bird feeder, we love this idea. This bird feeder plan by Marthastewartshow you how to make this lovely wreath that will keep birds well fed and happy. Great for gift giving too.
Using $5, an inspiring finch diy bird feeder like this one by Instructables could be made. Tube pack with small holes and ¼” colored acrylic rods are the main requirements. As the seeds need enough space to come out, a 1/8” hole below the top cap is to be made. The wire hanger would be attached with it. Rods are then fitted into these holes and the feeder is hanged in an appropriate order. This inexpensive feeder for the birds is rightly commendable.
A Finch DIY Bird Feeder
7- A Lantern Homemade Bird Feeder
How surprising it is when old lanterns could be utilized as bird-feeders like this one by mollied.blogspot? ‘Matt Vintage’ came up with one of the squirrel feeder plans that could protect the bird feeder from squirrels. He dissected the veggie grilling container and fastened the layers with bolts in the middle. This further enabled to lift the glass. Thus the invention provided balance for hanging up the feeder so that the birds could get to their seeds.
Here we have Another exciting homemade bird feeder by tonyastaab. It is even interesting for the kids to make. You need some Popsicle sticks, hemp cord, Elmer’s X-TREME glue. It requires lining up the sticks in a certain manner using the glue and attaching the tongue depressor down. The hemp cord is linked at the base of this feeder ad is glued properly.
The things we use in kitchen can also serve the purpose of making large bird-feeders like a vintage coffee pot. For canopy a silver plate napkin ring is used and the bird hole is cut. A complex brass fire screen along with a piece of steamer fin is mounted and the top lid is dismantled. Placement of the broken pieces is done and you could use fine paints for attraction purpose also.
A Coffee Pot Homemade Bird Feeder
10- Wine Bottle DIY Bird Feeders
Different wine bottles can also encourage you to try making a bird-feeder and why not when it is so easy. Like Michelob’s experiment, a DIY bird feeder by thegardenroofcoop requires drilling holes in the glass bottle. These are one of the glass bird feeders that work well for small seeds like safflower. Drilling process needs to have water supply also. After drilling, epoxy is used to attach a saucer at the base. Moreover, copper wire is used for wrapping. Enjoy watching birds in summer coming to these feeders.
For $15.00 you can create this tube diy bird feeder like this one thegardenroofcoop by using two terracotta saucers. Holes are made at the center of each saucer and a hardware cloth is used to roll the tube. The tube edges are connected using zip ties and ferrule is compressed using pliers. You must thread the wire rope on the mesh tube so that it prevents the seed wastage.
Saving empty tequila bottles gives an advantage of bringing hummingbirds into spring. Costing about $12 this homemade bird feeder by DIY Network could be made in an hour with colorful beads. You need to cut the wire and wrap it around the neck of the bottle. Make clean twists. Thread the beads, separate wires and then loop the wires around a dowel. Fill it with the nectar for the birds and hang it in your garden. Get the instructions here
Sight of hummingbirds is surely what all of us desire. This homemade hummingbird feeder is a way of capturing their amazing presence. It simply requires painting the glass bottle with attractive colors and then wire hanger is attached with it. Twisting of wires is also needed at the top of the bottle. Fill this hummingbird feeder and insert a feeder tube for the them. Hang the feeder and relish watching them.
Bird Feeder Plans
14- Mason Jar Homemade Bird Feeder
Anything made from a Mason jar is highly sought after in todays decorative market. Even the birds like to eat from them! We found this is one of the best bird feeders to create that will add a touch of old world charm with a modern twist to outside decor. Mason jars can also be fashioned into DIY outdoor lights and other decorative items to create an outdoor decorating theme.
Homemade Mason Jar Bird Feeder, a unique and brilliant ideas We just love this design,
15- Five Minute Homemade Bird Feeder
It is a pine cone bird feeder plan by madeeveryday that will amaze you for sure. Peanut butter is a superb invitation for the birds, so just put it on the cone and sway it in the birdseed. This is easy to make by the kids even and consumes less time. The feeder is ready to be hung on the tree. However, twig balls could also be used if you don’t have pine cones.
Five Minute Homemade Bird Feeder, Image via: Madeeveryday
16- Cheerio Bird Feeder Plans
This is very simple and requires threading the cheerios onto the pipe cleaners. Different shapes could be made by giving heat to the bended cleaner like a heart. Connect these shapes and twist the ends of the cleaners and attach a ribbon for attraction. The beautiful feeder is ready!
Cheerio homemade bird feeder
17- Pie Tin DIY Bird Feeder
We can almost utilize the used things for bird feeders plans like in this plans by Birds And Blooms. An old pie tinis used to make one by simply decorating it. This recycled bird-feeder is very easyto make by drilling holes at required places of the pie plate and vent cap. Threads and eye-bolt movement is also needed for making this masterpiece. Fill the feeder with birdseed and hang it.
A great way to re-purpose and re-use an out dated light fixture. This homemade bird feeder was created from an old chandelier that was no longer functional for its original purpose. You can feed the birds and pay homage to the past by creating a bird feeder with a chandelier that has been handed down from a past generation. If you don’t have an old chandelier in the attic, they can often be found at a flea market for just a few dollars. You may also like to check out homemade deer feeders.
Chandelier Homemade Bird Feeder
19- Sisal Rope Bird Feeder Plans
This bird feeder plan by dabblesandbabbles is helpful for welcoming a variety of birds living near the beach. Taking only 20 minutes this feeder is liked by kids also. Using tin can lid, sisal rope, glue and metal piece this DIY feeder is made with care. Appropriate sticking of the metal, lid and sisal rope is required for making it so that the seeds don’t fell. Once the feeder is ready you can hang it from a hook enabling birds to get their food.
Lovely bird-feeders could be made by using the vintage teacups. Sharon came up with this easy idea, using cracked china cups. After kneading the lard into the seed fill each teacup with enough room for the birds to grip them. A ribbon can also be tied and the feeder cup is ready for being placed in the trees. Get the details
Vintage Teacup Homemade Bird Feeders
21- Round Light Shade Bird Feeder Plans
Updating light fixtures is an easy way to give a room a modern look. Recycling the old light fixtures into a unique homemade bird feeders by theartofdoingstuff is a great way to give a round light shade a second life.
Tie a length of rope around the light shade and secure it with hot glue. The opening in the light fixture is used and the entrance for birds to come in and eat.
Many people like to make their own bird food in the form of suet balls. A mixture of beef suet, bird seed and sunflower seeds can inexpensively be created and formed into nutritious food balls that will last a long time. However, those delicious and nutritious suet balls need a holder that enables the birds to reach them while holding them securely in place. Try this bird feeder plan by rainydaymum if you enjoy making suet balls. You may also like to check out plants that attract birds.
This unique hanging bird feeder plan by rainydaymum attracts thirsty fliers of all species; birds, butterflies and bees will stop and have a drink of fresh water from this easy DIY project. An old pie pan, smooth stones, a grape vine wreath and some twine is all that’s needed to fashion this attractive and functional DIY water feeder.
Everyone has a couple odd bowls and plates in their kitchen collection that never get used. This bird feeder plan by erinscreative.blogspot will show you how to put those odd pieces of tableware to good use as a DIY bird feeder. Plastic type tableware works best for this project, and the end result will be a unique and colorful bird feeder. You may also like to check out diy bird baths.
Many people enjoy a glass of orange juice for breakfast each morning. That creates a lot of empty juice cartons that could end up in the trash heap, unless you know how to recycle them into a cute homemade bird feeder by redtedart. This is a great DIY project for kids and costs almost nothing to create.
Juice Carton Bird Feeder Plans, Image via: Redtedart
26- Flower Pot DIY Bird Feeder
End of summer is the perfect time to purchase flowers pots very inexpensively. The summer clearance sale can enable you to stock up on terra cotta flower pots and use this great idea to transform them into homemade bird feeders by allthingsheartandhomefor yourself and friends. The end of summer also alerts us that Christmas is not far away and this bird feeder plan will create a unique and desirable gift for anyone on your Christmas list.
This idea will show you how to make a bird feeder by Kellyelko out of a Bundt cake pan. So easy and inexpensive, it’s a great way to recycle an unused cake pan. Easy to create and hang, easy to fill and clean, nothing hard or costly about this homemade bird feeder. If you have more than one Bundt cake pan, transform it into a bird feeder for a friend.
Bundt Pan Homemade Bird Feeder, Image via: Kellyelko
28- Wooden Homemade Bird Feeder
An old piece of wood and a drill is all that is needed to create this homemade bird feeder by instructables. The wood can be any length, but around 1-2 feet is perfect. Drill a few holes halfway through the wood at different intervals, then fill the holes with suet. Hang and watch the birds flock in to eat.
This is a great way to recycle some of those empty plastic bottles that we all have. Any size will work for this DIY bird feeder project by guwillowbankgarden. Add a couple of holes to the bottle and slide in two wooden spoons to create perches and feeding stations for the birds.
If you have a garden (or know someone who does) you can grow gourds and create attractive homemade bird feeders. If you can’t grow them, most farmer’s markets have them for sale for a nominal price.
People are given plaques throughout their lifetime to commemorate some type of milestone or achievement. While the plaque is valuable to the person for which it was created, it often means nothing to other people after the person dies. Those plaques can live on in someone’s memory when they are given new life as a homemade bird feeder with this unique idea by instructables.
Here we have a design that is unique because it’s an edible homemade bird feeder by hoosierhomemade. Fresh apples are sliced and dried, then strung together with twine and suspended from a tree limb for hungry birds to peck on. The dried apple slices can be smeared with peanut butter and sprinkled with bird seed to increase the nutritional value. Nothing to clean, refill or maintain with this edible design.
Fun and colorful addition to any landscape. These bird feeder plans by hometalk will show you how to add a pop of color to your outdoor space while creating a feeding station for a wide varieties of bird species. This colorful condo is a bird house feeder that provides space for food and lodging for feathered friends. Easy to create with a mix of pre-assembled bird houses and scrap lumber. A few different colors of leftover paint will round out the DIY project into a one-of-a-kind piece of yard art.
So these are some of the best homemade bird feeder designs we have shared with you. Now you can choose any one of these to make in your garden. We hope you like our post! Please don’t forget to share your thoughts in the comment section below.
If you love wildlife like I do, making your own deer feeder is a fantastic way to get up close and personal with nature. I’ve spent years observing wildlife, including deer, and crafting homemade feeders has been a big part of that.
Building a homemade deer feeder can be a great way to get closer to wildlife. When I made mine, it became a special routine for me to fill it with treats and watch the deer, turkeys, and other animals gather around. It’s amazing to see them interact up close.
With the right homemade feeder, you’ll become the talk of the forest. Deer are creatures of habit, so once they find your feeder, they’ll keep coming back for more, giving you endless opportunities to observe them.
And the best part? You don’t need a big budget to make it happen. Our list of DIY feeder ideas proves that you can attract wildlife without breaking the bank. Plus, by providing them with nutritious food, you’re helping them stay healthy and thrive, which is rewarding in itself. So, get ready to witness the beauty of nature right from your own home with these homemade feeder ideas.
1- PVC Homemade Deer Feeder
One 10-feet piece of PVC pipe can make two homemade deer feeders like this one by Hub Pages. Use the PVC pipe that is 6-inches in diameter and you will create a large sized deer feeder that holds lots of corn. You won’t have to refill it often and the deer won’t get spooked by your presence or human scent. Material needed to make this diy deer feeder are PVC couplings, PVC caps, PVC reducers, PVC sch, and ratchet straps.
What I like about this feeder, it is a budget friendly building project and these free plan will show you how to build this PVC feeder step by step. A pictorial guide and written instructions are included in this building manual that is in PDF format.
If you have PVC pipe leftover from another project the cost of this DIY project will be very good for a small budget.
This covered deer feeder is easy to build and it will keep the feed dry until all of it has been eaten.
This is one of the best Deer feeder plans that we just love. The larger size and stand alone design makes this wild game feeder ideal for attracting various forms of wildlife. The wide bottom tray allows you to put corn, grain, salt lick, and hay in it at the same time. The more variety of food that is offered, the more variety of wildlife will show up to eat. Tools needed to build this deer feeder are tap measure, framing square, drill machine, sanderand screwdriver.
A covered homemade deer feeder by My Outdoor Plans like this one will keep the wildlife food protected from the weather so nothing will be wasted. You can fill the feeder with lots of treats and not have to worry about re-stocking it for several days. The deer and other wildlife will appreciate the covering that keeps their head dry while they eat.
These free plans provide step by step instructions so you can easily build one of these DIY deer feeders.
Here is a budget friendly deer feeder that requires no carpentry skills to build. This homemade deer feeder is made from PVC pipe and attached to a tree with wire. It’s simple design, cheap to make, and deer will love it.
Make this homemade deer feeder using 2 inch diameter pvc pipe, hacksaw or PVC cutter, metal wire, rope, or string, two 2 inch pvc pipe caps, and pvc glue. This is a very simple DIY project that will only take a few minutes to build and cost less than $10. These free plans will show you how to make a cheap homemade deer feeder by Instructablesso you can enjoy watching deer in their natural habitat.
You can create several of these if you have a large piece of property so you can get a good view of deer from different locations. These DIY deer feeders would also make a good gift for family and friends that live in a wooded area.
This deer feeder plan, unlike previous ones we have discussed, will show you how to build a basic wooden box structure that has a storage bin on top. The storage bin is filled with food and as the deer eat from the bottom, fresh food drops down from the top. The removable lid on top makes filling the bin easy.
A salt lick or mineral block can be placed in the deer feeder like this one by feltmagnet instead of corn or grain. All types of wildlife will be attracted to this wooden feeder box and for birds you may need a diy bird feeder. If you have some scrap lumber on hand the cost to build this will be almost nothing.
You can make this homemade deer feeder using the following parts cutting list Part A (sides): 18″ long by 8½” wide (quantity of two needed), Part B (back): 18″ long by 7½” wide, Part C (slanted front): 17″ long by 7½” wide,Part D (bottom): 7¾ long by 7½” wide,Part E (lid): 10″ long by 10½ ” wide,Part F (tray front): 9″ long by 2½ ” wide.
This barrel deer feeder is so easy and inexpensive to build and will attract a lot of attention from wildlife.
A plastic 55-gallon barrel and a few pieces of lumber can be used to create a long-lasting DIY deer feeder like this one by TaylorMade Creations in this YouTube video. This video will take you through the building process so you can make one for your landscape.
The roof will keep most of the rain water out of the feeding trough, but drill a few holes in the bottom so rain water can drain through and not cause the grain to ruin. You can also place a trail camera on the side so you can capture up-close videos or pictures of the deer as they eat.
6- Five Gallon Bucker Feeder
A five gallon bucket can easily be transformed into a hanging deer feeder with this unique idea.
These plastic buckets are cheap and can be bought at any building supply center. A wooden dowel, piece of rope, and screw are the other component needed for this DIY project.
This homemade deer feeder by fivegallonideas can be made in 15-minutes. Fill it with corn or other grain, hang it up from a sturdy tree limb and the deer will arrive shortly afterward to feed. You don’t have to have carpentry skills or a big budget, just a bucket and a rope.
There are a few other designs that can be used to create a feeder with a five gallon bucket, but this is the simplest and cheapest. You may also like to make a DIY squirrel feeder to enjoy watching the habits of squirrels when you are close to them.
Place the large end of the spout at the top and add gutter connections to the bottom to create a narrow end so the grain won’t pour out. Attach the down spout to a tree with wire or screws and fill it with one of the recipes included with these free plans.
Corn, oats, and molasses make a tasty and wholesome treat for deer. Stale bread, honey, and molasses will also make an irresistible treat for deer. Making this feeder is cheap and the homemade recipes for deer food make keeping the feeder full inexpensive and easy too.
Simple and affordable to make, this DIY deer feeder by realtree is made from PVC pipe and will last for years.
These free plans include a video and written instructions so the build will go smoothly even if you have never built anything before. No cutting is required but you might need to use a drill.
Spray paint the finished deer feeder with camo paint and it will blend in with the surrounding landscape. The large PVC pipe won’t need to be re-filled daily so you can rest and enjoy watching the deer eat with minimal work or expense.
These free plans will show you how to recycle a five gallon bucket and a tin can into a new hanging deer feeder by diyjoy.
The five gallon bucket holds the corn or grain and the tin can hangs from the bottom to catch the attention of the passing deer. When the deer come by to investigate and nudge the tin can, some of the feed inside the bucket will drop out.
When the deer discover they get free food each time they nudge the tin can they will come around often and stay a long time.
Recycle a five gallon bucket into Hanging DIY Feeder, Image via: diyjoy
10- Covered Deer Trough
It gets tough for deer and other wildlife to find enough food to survive during the winter and a deer feeder like this will help keep them well fed.
These free detailed plans will show you how to build acovered deer trough by myoutdoorplans that will help nourish the deer during the cold winter months. The large trough holds plenty of food so it will only need refilling every 5-6 days.
If you have basic carpentry skills and a small budget, download this PDF file that contains all the building plans. You can build this covered trough in one weekend and it will last for years.
Learn how to build ahomemade deer feeder like this one by PilotPatriot on youtube that uses gravity to keep the corn flowing downward.
A 55 gallon barrel, either plastic or metal, is used for this DIY project. The barrel is placed up on metal legs so the deer can go under the barrel feeder to get to the corn. A salt lick can be placed under it to provide an extra treat for the deer and other wildlife. A mineral block will also help keep the deer healthy.
12- Homemade Barrel Feeder
Here’s another ideafor creating a DIY deer feeder by Eremos Outdoors on youtube with a 55-gallon barrel. This detailed YouTube video will show you how to recycle a metal 55-gallon barrel into a functional deer feeder. This is a great idea for a small budget project and it will provide plenty of corn for the deer.
The digital feeder kit that is attached to the bottom is affordable and available at hunting supply centers. It will release the corn as needed so it won’t be wasted when wildlife is not near the feeder.
If you have a metal barrel and some metal poles, the cost for building this barrel feeder will be very low. Plus you’ll be doing a good deed by recycling metal and feeding the wildlife.
13- Plastic Barrel Feeder
Learn how to build a gravity deer feeder like this one by The Antler Geek in this YouTube video using a plastic barrel. The barrel feeder costs less than $20 to build and is great for a small budget.
The barrel feeder has a PVC pipe feeder on the bottom so the deer can easily access the corn or grain inside that is inside the barrel. The barrel can be suspended from a tree or it can be placed on wooden legs to get it off the ground.
The 55 gallon plastic barrel holds plenty of corn or grain to keep the deer well fed for several days. The cheap building costs leaves more money for you to spend on corn to put into the feeder.
Remember to put a few drainage holes in the bottom of the plastic barrel feeder to allow rain water to escape. Paint the plastic barrel camo so it will blend in with the surrounding landscape.
14- Gravity Feeder
Building a gravity feeder has never been easier! Get all the free instructions you will need for building a DIY deer feeder for your hunting land.
A PVC deer feeder like this one by kig outdoors in this YouTube video that works with gravity to keep the feed flowing will attract the deer and keep them coming back for more food. Build this gravity deer feeder on a small budget since the components are very inexpensive. A length of PVC pipe, a cap for the top, and an elbow joint are basically all that you will need to build this DIY deer feeder.
Many DIY enthusiasts will have these PVC pipe components on hand so building this efficient homemade deer feeder will be almost free.
This deer feeder is ideal for hunters who want to keep the deer in the area well fed without spending a lot of money on batteries. Even if you are not a deer hunter but just enjoy feeding and watching wildlife, this gravity feeder will be ideal.
15- Barrel Corn Feeder
Use a 55 gallon plastic barrel to create a corn feeder for deer. This homemade deer feeder by Micro Food Plots on youtubewill hold plenty of corn so you won’t have to return often to refill it.
If humans are in the area too often it will spook the deer and they will find another feeding location. Building a large barrel corn feeder like the one shown in this YouTube video will allow you to stay away from the feeding area so the deer won’t be spooked by the human scent.
This YouTube video will show you how to build a deer feeder using a plastic barrel and PVC pipe.
16- Automatic Deer Feeder
Making an automatic deer feeder like this one by TightlineTV on YouTube video will enable you to keep food in the selected area at all times. The deer will return again and again to feed because they know food will always be there for them.
This is ideal for hunters and wild life watchers. You can count on deer being in the area because they can count on food being there. Build it and fill it with corn and the deer will come.
This instructional YouTube video will provide the automatic deer feeder plans so you can get started building one this weekend. It is a budget friendly DIY project that won’t cost much to build. A 55 gallon plastic barrel and some left over lumber are the main components of this building project.
17- Covered Deer Feeder
Building this homemade deer feeder for your landscape will give you an incredible view of wild life from your back porch. Make this covered trough feeder to be the focal point of your backyard. It’s easy to build with lumber, plywood, and shingles.
This DIY deer feeder by howtospecialist is a covered trough that will attract deer and keep the food dry during rain or snow. The way the feeding trough is designed will give you a great view of the deer as they feed.
These detailed instructions will show you how to make a deer feeder that attracts deer, look good in your yard, be easy to fill and refill with corn, and keep the corn dry. This feeder is made from wood so you can paint it to match your house or paint it in camouflage colors to blend in with the surrounding landscape.
Watch how to build a wooden deer trough like this one by Maddux Woodworks on this YouTube video. Use leftover wood and build it to fit perfectly on your hunting land or to use it to make a deer blind. The covered trough is made from wood and will protect the food inside the trough while attracting the deer to come and eat.
This homemade deer feeder can be built on a small budget, especially if you have some leftover wood on hand from previous DIY projects. This covered feeder is sturdy and built to last for years. Coat the wood with a clear coat of water seal and that will help the wooden deer feeder last even longer.
19- More Deer
Bring more deer on your hunting land fast with this cheap and easy to build deer feeder.
Transform an ordinary 55 gallon plastic barrel into an efficient homemade deer feeder like this one by CR42 Hunting in this YouTube video in just a few minutes. You may want to make several of these for your hunting land.
A 55 gallon barrel with a lid makes an ideal storage unit for deer corn. When you cut a few holes near the bottom to allow the corn to come out as needed the barrel becomes a cheap deer feeder.
This YouTube video will also show you how to paint the barrel in camouflage colors so it will bend in with the landscape.
20- Automatic Bucket Deer Feeder
If a 55 gallon barrel feeder is too big for your hunting land, how about a 5 gallon bucket deer feeder? Learn how to build a deer feeder like this one by WORM GITTER in this YouTube video with a 5 gallon bucket and make it automatic.
This feeder is cheap and easy to build and will keep the deer coming back daily for more food. Ideal for a back yard view point or for placing in several prime locations around hunting land. The budget friendly cost and easy build will enable you to build many of these automatic bucket feeders. Suspending the deer feeder from a tree branch will also keep the raccoons and possums out of the corn.
21- PVC Pipe Deer Feeder
This is cheap, easy, and fast to build! PVC pipe makes a long lasting deer feeder that can hold a lot of corn and stand up to the weather conditions.
Take a length of 6 inch PVC pipe and easily transform it into a gravity diy deer feeder like this one by Fern Hill Farm in this YouTube video. The cheap cost will enable you to build several of these homemade deer feeders and place them around your hunting land. Leave the PVC pipe white or paint camo or green to blend in with the landscape.
Watch this detailed YouTube video to learn how to build a deer feeder using PVC pipe. One like this can be built in minutes and enjoyed for years.
Expert Tips and Opinion On Feeding Deer
Are deer feeders a good thing or a bad thing? Expert answers some questions in this guide.
As said by James Foster, Private Lands biologist, Arkansas Game and Fish Commission in his expert opinion “Deer feeders have positive benefits if well managed, but making sure that wildlife has access to food plots is a better strategy“.
Conlusion
So these are the ideas we have gathered around the internet to make it convenient for you to make your own custom design deer feeder. Now you have a lot of options to try starting from pvc pipe, bucket, hanging feeder and a 55 gallon drum. These feeders are made using one thing sure that is less wastage of feed and easy to refill. Hope you like the article!
References:
Nova SCOTIA Canada, Department Of Natural Resources And Renewables “A Question of FeedingDeer”, https://novascotia.ca/natr/wildlife/conserva/feed-deer.asp
Field and Stream, “10 Things To Know Before You Buy A New Deer Feeder” Published Sep 30, 2019,
Tpwd.Texas.gov, “Supplemental Feeding” by J.R. Perkins, Texas Parks and Wildlife Department Fisheries & Wildlife Division 1991, https://tpwd.texas.gov/publications/pwdpubs/media/pwd_bk_w7000_0033.pdf https://www.fieldandstream.com/10-things-to-know-before-you-buy-new-deer-feeder/
University of New Hampshire, “More Harm Than Good: Why You Shouldn’t Feed Deer”, https://extension.unh.edu/resource/more-harm-good-why-you-shouldnt-feed-deer
Imagine having your very own DIY generator that you’ve crafted from scratch, practically for free. Drawing energy from the sun or wind to fuel your electronics, no matter where you find yourself, is within reach, even if you’re not an expert. It’s a project I’ve personally delved into, perfect for powering up devices in places like our home, office, campsites, or remote cabins, where traditional electricity might not be an option. In my experience, these homemade generators are invaluable, especially when working in off-grid locations where power tools are essential.
1- Portable DIY Solar Power Generator
I remember stumbling upon Lewis02’s DIY solar generator project on Instructables a while back. What intrigued me was its simplicity and portability. Unlike bulky traditional generators, this one was designed to go wherever you go, making it ideal for camping trips or outdoor adventures.
The thought of being able to turn on a light, catch up on my favorite TV shows, or listen to music even in the midst of nature was incredibly appealing to me. It’s not just about embracing modern conveniences; it’s about enhancing the camping experience without compromising on sustainability.
With this portable solar power generator, I could envision myself enjoying the serenity of the wilderness while still having access to the comforts of home. It’s amazing how a simple DIY project like this can revolutionize the way we approach outdoor living.
Building A Portable DIY Solar Generator , Image via: instructables
2- Bicycle Power Homemade Generator
Clean and free power provided with the use of an old bicycle. A project close to my heart! Use these DIY generator plans to build your own free electricity generator with old bike parts and a few other components.
Below are short steps to make this bicycle power homemade generator.
Build or buy the bicycle stand. Make the front bike stand by a 4x4x24” wood blocks. Sandwich the two support blocks on either side of two high blocks by sawing about 4 inches off of the 2x4s. Attach the motor to the back wheel or chain as you like. Find a motor that will mount the cylinder and attach the motor to the upper plate of aluminium.
I would like to recommend this diy bicycle power generator to you as it is made using what you already have in hand i.e bicycle and some other componenets. Run this generator without fuel, sun, winds etc. by doing some cycling as well as getting a healthy exercise at the same time.
With a multi meter check the voltage coming out of your motor and connect the positive output of motor to the positive input of charger and vice versa with the ground wire. Use 18 Amp-h battery and connect the terminals. Connect inverter to the battery to convert DC to AC.
Bicycle Power Homemade Generator
3- DIY Wind Generator
I recall coming across the Mother Earth News article featuring their homemade wind generator project. What struck me was its simplicity and the idea of harnessing renewable energy from the wind. The thought of having a reliable source of electricity, especially on days when solar panels might not be as effective, was intriguing.
The project’s emphasis on using just four basic components highlighted the accessibility of renewable energy solutions. It felt empowering to know that with a little DIY spirit and some basic materials, anyone could contribute to reducing their reliance on traditional power sources. I could envision myself taking on this project, not just as a way to generate electricity but also as a step towards living more sustainably.
Cheap and Easy To Build DIY Wind Generator, Image via: motherearthnews
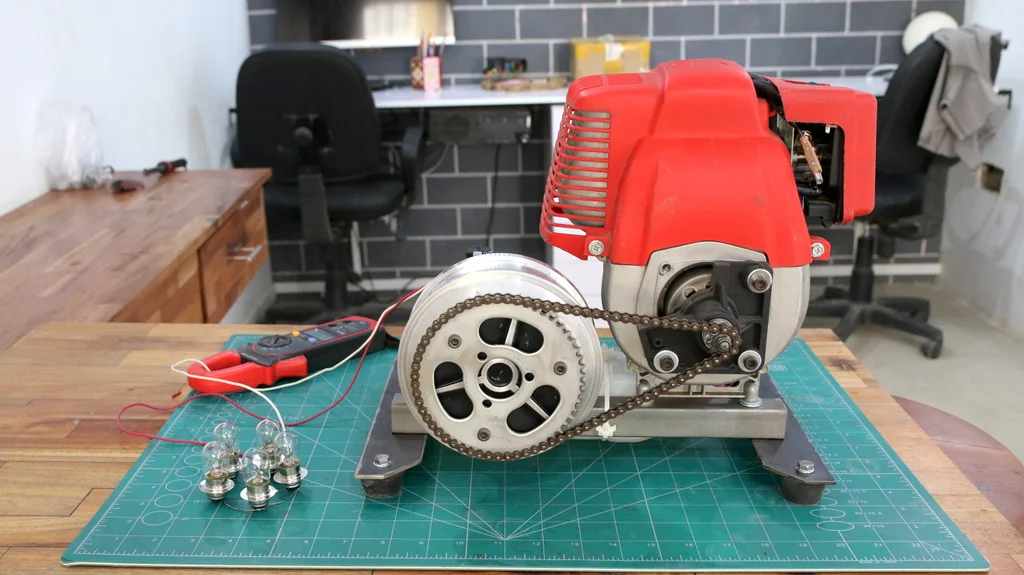
4- Homemade Gas Generator
These free plans will show you how to build a small and powerful gas generator. It is a DC generator that is run by a 4 stroke gasoline engine.
This would be great to use at an off grid homestead or hunting camp. It would also be very useful for charging the car battery when you are miles away from a charging station. A gas generator has many uses and it is a valuable tool for anyone who is wanting to find ways to cut back on the amount of on-grid power they use.
The 4 stroke gas engine is small, lightweight, and uses very little gas. This is the size motor that is typically used on weed eaters and leaf blowers. They are lightweight and powerful enough to handle several tasks at once, like powering a small appliance, charging electronics, and providing lights.
The small size makes it a portable homemade generator by instructables so you take it wherever you go. Its usefulness and low building cost make this a must-have item. These free plans are detailed and make building this DIY generator easy.
Everyone should have a homemade generator on hand just in case of an emergency and the power goes out. The small size of this gas generator makes it easy to keep stored on a shelf in the garage until it is needed. You will feel more secure during rain storms when you know that you have a source of electricity that is free and easy to use.
This mini homemade generator building project would be great for a school science project. It’s an easy build for a student and teacher or parent can easily work along side the child to teach some basics about how electricity works. This project would provide a good teaching tool for the classroom or home.
It’s not only good for a science project, these free YouTube plans show you how to create a mini functioning generator. The DIY generator is small but it has enough power to charge a cell phone or run a small fan.
If you don’t have enough electric outlets in your home to charge all of the family’s electronic devices, a DIY mini generator like this one could be very useful. it would also be good for charging your phone or iPad while traveling. The small size of this DIY generator by Mini ideas on youtube makes taking it along with you very easy.
Place the mini generator in your backpack and take it to school, on a camping trip, road trip with friends, or any time that you may be away from an electrical outlet and can’t charge your phone.
It is always disheartening when your phone battery is almost dead and you have no place to charge it. This mini generator will solve this problem and you won’t have to worry about a dead phone or laptop battery again.
This project is easy and inexpensive to complete when you follow these detailed plans.
6- Battery Powered DIY Generator
Encountering a captivating DIY generator project on Instructables.com, crafted by a skilled DIYer, left a lasting impression on me. Their ingenuity in repurposing everyday materials to generate electricity caught my attention. It was inspiring to see how accessible and practical renewable energy solutions could be, even in the realm of DIY projects.
What impressed me the most was the simplicity of their design and the clear step-by-step instructions they provided. As someone who enjoys hands-on projects, I could immediately see the potential of building a similar generator for myself. The thought of having a reliable source of power, created from scratch, sparked my curiosity and motivated me to delve deeper into the world of DIY energy solutions.
This is a great way to recycle used car parts to create free electricity for your homestead or camp site. This YouTube video will show you how to take a used flywheel and alternator and put them together to generate enough electricity for your home.
This DIY electric generator will generate 7kw 230v. That is enough electricity to run low watt household appliances, like lights, television, and refrigerator with plenty left to charge all of your electronic devices.
The cost is minimal if you have a flywheel and alternator on hand. All thats left to build is a small metal frame to sit the generator on and a little wiring. It is an ideal build for a mechanic and easy for the non-mechanic with this instructional video.
This homemade generator by Electric Multi Workson Youtube is easy to take along with you when you go camping so you can have the comforts of eletricity without the discomfort of a power bill. This would be nice to take along with you for tailgate parties during the football season. It could power small cooking appliances, a television, and a small fridge that will keep beverages cold while you enjoy the football game.
Build this flywheel and alternator generator for use at home so you can live off grid or at least reduce your electric bill each month. Then when you are ready to travel for a day or two and will need electricty at your destination, take this homemade generator along with you.
8- Mini Homemade Solar Generator
As small and portable as a personal ice chest, this mini homemade generator by instructables is actually built with a small ice chest. Don’t let the small size fool you, this DIY generator can provide the power to light up a room.
Here are brief steps to make this homemade generator.
Drill 5 holes on the top of lid, four for the panel to be mounted on the lid and one for panel wire. Bolt the panel to the lid and ran the wires throw. Place the 12v socket and applied glue to the nuts. Drop the battery and plugged in the battery. Plugged in the power and test the lamp with a compact fluorescent bulb. See also some other DIY solar generator projects.
Small Homemade Solar Generator Idea, Image via: instructables
9- Simple DIY Generator
Sometimes simple is all you need, like this simple and effectivediy generator by creative-science.org. This basic design and step-by-step instructions on how to build a generator will even give a novice DIY’er free electricity for small appliances and power tools.
Simple Generator for small appliances and power tools, Image via: creative-science.org
10- Backyard Homemade Wind Generator
Easy and inexpensive to build, yet this DIY wind powered generator by thekevdog can produce as much power as a high-dollar, store-bought solar panel. Follow the easy steps detailed in the instructional video and build your own three bladed backyard wind generator and start saving money on your utility bill today. See also DIY windmill ideas to produce electricity on a small level to run some power tools.
Three bladed backyard wind generator, Image via: thekevdog
11- Hydroelectric DIY Generator
I go through the Mircea Sandru’s hydroelectric generator project on Mother Earth News.The concept of harnessing the power of a nearby stream to generate electricity was fascinating to me. It felt like a truly sustainable solution, especially for remote locations or off-grid living situations.
What struck me the most was the versatility of this DIY generator. It wasn’t just about living entirely off-grid; it could also serve as a cost-effective supplement to existing power sources. I could imagine myself implementing a similar setup at a remote fishing cabin or campsite, where electricity is needed intermittently. The idea of having access to power without relying on a monthly utility bill was both practical and empowering.
An old plastic tool box can house a portable homemade generator like this one by intrepidoutdoors that you can take anywhere. For less than $200, these DIY plans will enable you to power up your power tools wherever the job needs to be done. Since the DIY generator is housed inside of a tool box, it will be easily recognizable on the job site and never get left behind at the end of the work day.
A great DIY project for a school science project and it really works! Use these plans for building a low power, cheap and easy generator by wikihow for demonstration of what can be accomplished with a few components and little ingenuity.
Learn how to making a free energy generator like this one by Creative Life in this Youtube video tutorial from easily available and cheap material. Use this guide to make your own inexpensive homemade generator.
15- Easy Homemade Generator
Learn how to build a small DIY generator in this instructional Youtube video tutorial by BOKIN. The detailed video is easy to follow and will provide you with a clear understanding of how generators work and will enable you to build one for your own use.
16- Van de Graaf Homemade Generator
What does a nail, a soda can and a rubber band have in common? They’re all components of the Van de Graff homemade generator by sci-toys and this idea will show you how to make a generator to power small appliances. The step-by-steps instructions are easy to follow for this unique project.
Make a generator to power small appliances, Image via: sci-toys
This homemade generator is powered by a 4-stroke gas engine and will provide enough electrical power to meet basic household needs. Great to have on hand for times when the power goes out at home.
18- Phone Charger DIY Generator
When the power goes out and your cell phone battery is dead, you need an emergency source of electricity. This homemade generator by TKOR on youtube will provide enough electrical energy to charge a phone and power a light bulb in case of an emergency.
All you need is a cordless drill and a couple of other common household items and you can power your way through an electrical emergency with this easy to build generator.
19- Thermoelectric Homemade Generator
These detailed plans will show you how to make a generator by wired that has no moving parts and is very reliable. Thermoelectric generators are the types used on space crafts where reliability is essential.
This DY project would also be good for use as a school science project since it is easy to build with items you probably already have on hand.
If you are looking for a DIY generator by instructables that can provide enough electricity for an off-grid homestead, this is the one.
Each brushed magnet in this homemade generator will provide 110 volts of electricity, and the number of magnets used in this DIY project is up to you. High voltage electricity is produced with a very low RPM so the electrical output is steady and reliable.
Powerful DIY Generator For An Off-Grid Homestead, Image via: instructables
21- Lawn Mower Engine DIY Generator
Don’t trash that old rusty lawnmower if the engine is still good. Re-use the lawnmower engine and give it new life as part of a homemade generator.
These free plans provide written instructions as well as detailed pictures of how the project should look at each stage of the building process. Used lawn mower engines can be purchased cheaply for this project if you don’t have one on hand.
Lawn Mower Engine DIY Generator
22- Hydroelectric Homemade Generator
For less than $50 you can build this hydroelectric DIY generator by publiclab that will provide enough power to run small appliances and power tools.
Great for use in a small workshop that is not wired for electricity or for an off-grid homestead that is near a running source of water. When trees or surrounding landscape prevent the building of a homemade wind generator, a water-powered generator can provide the needed electricity.
These detailed instructions also include a list of materials you will need for this DIY project so the build will be easy and inexpensive. Power up what you need, when you need it, without increasing the monthly electric bill.
What can you do with an old bicycle, an old treadmill and a few pieces of leftover lumber? Build a functional homemade generator like this one by The Do It Yourself World on youtubethat can provide electrical power for your household.
This is one of the most most popular idea in our roundup. You also get healthy exercise with this completed Bicycle DIY generator project. When you want to generate electricity, you have to take a ride on the bicycle. The bicycle is stationary, so it won’t take you anywhere but it will give you heart-healthy exercise and enough power for small appliances and power tools.
This bicycle generator is easy to take with you on camping trips and will give the kids something to do if they get bored.
24- Small Homemade Generator
Make sure you always have a power source to recharge a phone battery no matter where you are with this easy to build DIY generator by Mr Electron on youtube.
Easy to build and compact so you can take along with you wherever you go. Ideal for backpacking, camping, or other long-distance travel where you might not be close to an electrical power source for several hours.
25- Lawn Mower Powered DIY Generator
The engine on a lawnmower is powerful and is perfect for use on a DIY generator by instructables. These free plans show you how to use a lawnmower engine to build a 500-watt generator that can power small appliances and power tools.
Most of the parts for this DIY project were gathered from junkyards and recycle centers, so the cost of the build is very cheap.
This would make a great science project for school and for inspiring children to take old things and make re-purpose them into something new.
One of the main components of this homemade generator by instructables is old CDs. Energy is generated when the CDs rotate and enough electricity is generated to power an LED light bulb. Not only is this a great science project and learning tool but it’s also a functional generator that can provide light without the use of electricity.
Have your kids build a couple of these DIY generators to keep on hand in case of an emergency.
Recycled CD Homemade Generator, Image via: instructables
27- Screw Hydrogenerator
If you would like to be able to use water power to generate electricity, check out these free plans that will show you how to make a generator that can do just that. There is an instructional video to watch and written instructions for you to follow.
This is great for the family that likes to spend time hiking, camping, fishing, and hunting out in the wilderness. After you build this homemade generator by interestingengineering, all you will need is a little running water to start generating electricity. A small creek or branch out in the wilderness will enable your screw hydrogenerator to generate enough power to enjoy some of the comforts of home.
This generator is lightweight and easy to carry along with you in a backpack. You will be able to have electric lights after dark and have enough power to run an electric fence around your camp to protect you from predators.
This simple design uses water power to turn the large screw and as the screw turns, it generates electricity. A simple wood frame holds everything in place while the water pours over the screw. The screw is made from lightweight plastic sheeting and the frame could be constructed from PVC pipe to make the entire generator even more lightweight and portable.
Even when you are roughing it out in the wilderness, it is still nice to have a few basic comforts of home and this little generator will help provide those comforts.
Save on your electricity bills or get a free energy source when you are in a remote area. By using solar, wind power, hydro and mechanical power you can make your own homemade generator to run small appliances and power tools. From our list of diy generators you can select any one that you find easy and comfortable to build to suit your needs.
Here we have prepared a questionnaire to answer some common questions.
FAQ’s
How a does generator works?
An electric generator works on the principle of electromagnetic induction. Turning the rotor inside the generator makes an electric current flow in each section of the wire coil. Each section becomes a separate electric conductor and the motion is turned into electrical energy.
A gas powered generator has an internal combustion engine which provides the mechanical force needed to generate an electrical current through copper wiring. The engine fires and is converted to electricity which travels directly into the home or building.
Generators are used as a back-up power source for homes, businesses, and medical facilities.
Can generators be AC or DC?
Generators can be either AC (alternating current) or DC (direct current) and they can produce either type of power. However, you may need different generators for different power needs.
The rings inside of a generator are the difference-maker between AC and DC models. An AC generator has slip rings that provide a smooth surface and a DC generator has split rings that communicate differently
As a general rule, portable generators produce only DC power but can be fitted with an inverter so they can also produce AC power.
What are the different types of generators?
There are two basic types of generators known as AC and DC. However, this basic type branch off into 7 other categories: Portable generators, Diesel generators, Solar generators, Inverter generators, Whole House generators, Gas generators, and Natural Gas generators.
Each category of generator works in essentially the same way the defining factors for the best one will be how you need to use a generator.
How do you make electricity with magnets?
Moving a magnet around a coil of wire pushes the electrons in the wire and creates an electrical current. This motion induced energy, called kinetic energy, is converted into electrical energy by a generator.
References:
Forbes, Home Improvement Electrical, by By Kelly Weimert,Corinne Tynan and Samantha Allen, “How Much Does A Generator Cost?” https://www.forbes.com/home-improvement/electrical/generator-cost-guide/
WebMD, “Generator Safety: Tips for Running One Safely”, by Alexandra Benisek, published: September 18, 2023, https://www.webmd.com/a-to-z-guides/generator-safety-what-to-know
Linked In, Meromac, Published May 24,2023, “Best Practices for Extending the Lifespan of Your Generator”, https://www.linkedin.com/pulse/best-practices-extending-lifespan-your-generator-metromac
Building your own pallet shed is like putting together a giant puzzle that you designed yourself. I remember when I decided to tackle this project, I sifted through countless plans online, searching for the perfect fit for my backyard. Finally settling on one, I gathered up a bunch of old pallets and got to work.
As I followed the instructions, I realized how much freedom I had to make this shed truly mine. I could tweak the design to fit my storage needs perfectly, adding shelves here and there for organization. And because pallets come in all shapes and sizes, I could play around with the style until it matched the vibe of my home.
It wasn’t always easy, though. Some parts of the build required extra effort, and I had to get creative to overcome obstacles along the way. But seeing the finished product standing proud in my backyard made it all worth it. My DIY pallet shed wasn’t just a storage space; it was a reflection of my hard work and ingenuity.
Look over our round up of these 27 amazing diy pallet sheds that I have gathered from the internet and choose the design that is right for your storage needs.
1- DIY Pallet Garden Shed
Build a perfect building to hold all of your garden tools with these free pallet shed plans by Instructables. As we all know that several tools are needed to grow a garden, maintain a lawn and do simple home repairs. All those tools need a place to be kept that is dry and out of the elements.
This garden shed is an ideal DIY building project that will hold all of your garden tools in one dry location.
To build this pallet shed plan you need material such as Pallets, Nails, screws, other various fasteners, Hammer, Drill, Chop saw, circular saw, shovel, Leftover lumber from other projects.
Download these free plans to build a DIY pallet shed by Goodshomedesign that looks like a mini barn. We like this shed design as it provides large double front doors that allow us more space for driving in a riding lawn mower and other large pieces of gardening equipment.
If you are looking pallet shed on a budget I would suggestion you this is outdoor She Shed that is made with mostly recycled building materials. Recycled wooden pallets are used to create the entire frame and subfloor for this cute shed that can be used for many things. Leftover building supplies are used to complete this DIY project that has multiple uses.
Use the finished shed as a She Shed where you can have some quiet time to relax or create crafts, or the finished shed can be used for storage. You can use these pallet wood shed plans on Youtube to make a larger shed that can be finished with new building materials and use it for a mother in law suite or guest cottage.
Watch this YouTube video and start with these pallet wood shed plans and build the outdoor shed that will meet your needs.
4- Barn Style Pallet Shed
Learn how tobuild a pallet shed in this YouTube video that resembles a little barn. This would be a perfect outdoor storage building to compliment an old farm house or a house that is built to resemble a barn. These pallet shed plans can also be used to build a chicken coop for a backyard flock of hens.
If large storage is your preference I like to recommend you this shed that can not only store outdoor equipment but also would be perfect for storing the riding lawn mower, ATV, or tractor if you put in a wide exterior door. The equipment would be easy to drive in and out of the storage building as needed.
It’s easy to build a shed from pallets and it will save you a lot of money on building materials. The wooden pallets are usually given away free of charge or a very small price is charged for them. You will be able to increase your outdoor storage space cheaply when you use pallets for building materials.
5- DIY Pallet Shed With Sliding Glass Doors
When you don’t want your garden shed to look like a shed, we advice you to consider using these DIY building plans by Rural route diaries. For this pallet shed plan, start with recycled pallets, add siding and a sliding glass door, and the finished project will look more like a guest house than a place to store outdoor garden equipment.
Use these wood shed plans by theownerbuildernetwork to create an attractive outbuilding that will meet any code law and add value to your property. No one will guess it was made from recycled wood pallets.
This pallet storage shed by Buzznickedby is made to look like a mini barn. Easy to create roof line give this functional storage shed an aesthetically pleasing look that will increase property appearance and value.
A sliding barn door completes the barn style, and a couple of windows bring in plenty of natural light. Create a small bump-out under the barn roof overhand to use for firewood storage. This area will keep firewood dry without taking up any room inside of the shed.
This diy wooden shed by Instructables has a simple design, but a lot of character. Easy to build and large enough to store a riding lawn mower, snow blower and all the other tools needed to keep a yard and garden looking their best.
Plenty of natural light will flood the interior of this DIY pallet shed by Hometalk. Two front windows and a glass panel front door let in the sunlight and add a touch of yesteryear’s charm to the overall look. Create a relaxing faux porch by placing a few pallets on the ground in front of the shed and an old rocking chair to rest in after a day of gardening. You may also like to check out diy lean to shed plans for building an inexpensive storage space.
Garden Shed With Natural Light, Image via: Hometalk
10- 8 x 6 DIY Pallet Shed
If you need a lot of outdoor storage space, we suggest this large shed by Instructables to you. Made almost entirely of recycled pallets, this large storage shed can be built within one week and provide plenty of room to meet all your storage shed needs.
Watch your garden grow from inside in this sunny and bright storage shed by Allotmentyorkshire. Small enough to place in the garden, the two large windows facing the garden will give the feeling of being in the garden while you’re inside the shed working on projects.
Use these garden shed plans by Grit to build an attractive and sheltered location in which to store all your garden tools. Large enough to hold all outdoor tools, small enough to leave plenty of landscape space for the garden.
Mixing building mediums is modern and stylish, and it’s easy to do with these free plans. This small wood and metal shed by instructables created from recycled pallet wood and metal roofing provides a safe and dry pace to store a lawn mower, leaf blower, and a few other needed lawn care items.
This shed style takes up very little space in the backyard and looks very attractive. The total cost for this DIY build will be almost nothing if you have a sheet of metal roofing on hand.
DIY Pallet Storage Shed, we love this design as we can use small space to build such a nice shed, Image via: Instructables
14- DIY Pallet Cabin
Versatile pallet cabin design can be used for a variety of things, you may even want to live in it! The front porch is ideal for sitting, the side shelter with roof is ideal for an outdoor cooking area and the interior is roomy enough for a living space.
Learn how to build a shed from pallets by 1001pallets with these free and easy to follow plans, then you can decide how to use it. This pallet cabin could be multi-functional and be used for storage, camping and an outdoor cooking area.
Here are plans to build the perfect off grid vacation cabin in the woods. These free shed plans by Tinyhousetalkwill take you through the entire build so you can create a woodland get-away from recycled pallet wood.
This adorable tiny cabin feature a high ceiling, natural light and a front porch. The nearby outhouse can also be created from recycled pallet wood as well. All the creature comforts to make your camping experience comfortable while keeping the DIY affordable.
Add insulation and siding to the cabin to make it usable year around. This DIY pallet shed could also be used for full time off grid living.
This large DIY shed can be used for storage, as a play house for kids, an off grid homestead or any number of other uses. This free pallet shed plan by Imgurwill show you how to build a 12 feet by 16 feet building with a sloped roof.
We love The high ceiling, wide door entrance and sloped roof of this shed that would provide plenty of interior room and make the pallet shed usable year around.
Recycle used 2×4‘s plywood and concrete blocks in the building process to keep the cost down. Adding sliding barn doors to the front of this large shed would make it ideal for using as a barn for small animals, like goats or sheep.
Kids love to have their own backyard play house. It’s a place where they can let their imagination run free and a place they can call their own. Use these pallet shed plans by Hometalk to create an attractive and cozy play house for your kids.
The design will increase your property value, plus it will make a great tool storage shed when the kids outgrow it. Add window and a glass panel door for plenty of natural light to come inside this adorable wood pallet play house.
These free pallet shed plans by Instructables will show you how to build a wood storage shed that will keep your firewood dry and provide you easy access to the wood.
The slim design holds a lot of firewood without taking up much space in the back yard. the design has two separate spaces and two doors to allow for the separation of seasoned firewood and green firewood. The wood shed is easy to load and unload with firewood.
Open the window and let the fresh air come in! These free storage shed plans by ana-white will help you create a space in which you not only store garden items, but start seedlings, make repairs and enjoy the view.
These diy pallet shed plans by Instructableswill show you how to create a DIY storage shed that is just the right size for a small back yard. This 8 feet by 6 feet pallet shed is easy and inexpensive build, and it can hold a lot of equipment for its small size.
Add a front window so natural light can get inside and to make the shed look attractive. This shed design is inexpensive and quick to build.
If you need a cover space for storing pallets at outdoor this is the brilliant idea for you. This diy wood shed by Instructables is going you a little cost as most of the material used is salvaged.
When you need more outdoor storage but you don’t have much money, recycled wooden pallets are what you need.
Building a shed out of pallets is cheap and this YouTube video will provide you with free building plans. The recycled pallets provide you with enough wood to build this large outdoor shed for about $50. Some places that recycle wooden pallets give them away for free so the lumber for the shed could cost even less.
This sturdy, attractive DIY pallet shed can be used for outdoor storage space to keep items clean, dry, and out of the elements. The shed could also be used as a workshop to keep you out of the elements while you work.
Be kind to the environment and your budget by using recycled wooden pallets to build an outdoor storage shed.
The large size of the structure will allow you to store lots of items and still have space leftover for crafting. If you don’t enjoy crafting, create a personal space in the pallet shed to relax and catch up on some alone time.
The sloped roof is easy to construct and will allow the rain and snow to quickly move off the roof. Windows are easy to incorporate into the design and can be placed where you want them. Use these pallet shed plans to increase your outdoor storage space and increase your property value. A well built storage shed like this one is desirable and will increase the re-sale value of your home.
24- Garden Pallet Shed
Get these pallet shed plans that will show you how to build an attractive garden shed that will hold your garden tools and add value to your property.
This garden shed is constructed mainly from the wood of recycled pallets. It is the perfect size for a suburban backyard. This pallet shed will keep all your garden tools handy and out of the elements while taking up very little space in the backyard.
Keep your bags of mulch and compost dry and prevent metal garden tools from rusting by storing them in a pallet shed like this one by Easypalletideas. The shed is also large enough to store a push mower weed whacker, and leaf blower. Everything you normally use to keep your lawn and garden in tip-top shape can be stored in this pallet shed.
These free building plans can be downloaded and printed out for easy access. Wooden pallets are very cheap, sometimes even free, so this DIY pallet shed will be an inexpensive asset to your backyard.
If you need a large storage shed or maybe need extra living space, this house size pallet shed can solve your problem. This large shed is constructed out of recycled pallets and will save you a ton of money on building materials while providing you with a large versatile outdoor building.
The large building can be used as a workshop, storage space, mother in law suite, teenager hangout, or a multitude of other things. the interior can be finished with new building materials, add windows, doors, and electricity and the pallet shed would become a pallet house.
This video will show you how this large building can be built for a small price when you use these free pallet shed plans on youtube and recycled wooden pallets. Wooden pallets are easy to find and cost very little (sometimes they are free) and the wood is sturdy, already cut, and ready to use.
Wooden pallets are great for any type of building project. They can be used to construct outdoor storage sheds, living spaces, decks, kids’ playhouses, outdoor garden furniture, and much more. Locate a source for wood pallets near you so you can have the pallets on hand for your future DIY projects like this pallet shed.
26- DIY Pallet Wood Shed
Here have have a great idea for keeping your firewood neatly stacked and dry. Use these free pallet shed plans by Lisasscribbles for constructing a pallet wood shed right next to the location where you chop firewood.
Great for construction in the backyard of any home that has a wood burning stove or fireplace. Also great for use at an off grid homestead. These free pallet shed plans are easy to follow and the shed will cost less than $20 to build.
Use these freepallet shed plans by Olivierlonguet to build a large studio for your art projects. This pallet storage shed design create a large stand alone unit that can be used for painting, pottery, jewelry making, wood working or any number of other art projects you may enjoy doing.
After the pallet shed studio is completed, recycle more wood pallets into custom furniture to furnish the shed. This design would make an ideal detached office, backyard man cave or she shed. Finish the look off with a picket fence around the shed created from wood pallets.
By recycling a wood pallet you can do most of your DIY projects without buying expensive material. They don’t cost much or even you can get free. Recycled pallet shed is a great way to store your garden equipment, lawn mower, different woodworking and power tools. We hope this article guided you well in making your own wood pallet sheds.
Here we have prepared a questionnaire to answer some of the frequently asked questions.
FAQ’s
How Many Pallets Does It Take To Build A Shed?
To build a pallet shed of standard size that is 48 by 40 inch. So you need 9 pallets to create a structure that is 4 feet deep and 6.5 feet wide.
How do you weatherproof a wooden pallet?
To make pallets weatherproof you need to apply a coat of lacquer or varnish sealant. However while applying sealant to your pallet keep them at room temperature and in good ventilation.
Is it cheaper to build a shed or buy a pallet?
For making wood pallet shed it’s always cost efficient material and sometimes even free. It saves the cost of hiring labor, Buying expensive material from the market and you have your own custom design pallet shed. Typically the cheapest shed to build costs you only 500$.
Is it safe to use pallets to make a shed?
The first thing you need to do when buying pallets is make sure they are not damaged. Pallets are used for transport of goods and during this they can break due to mishandling. Splinters, cracks, loose nails, warping, or shrinking. Also some research conducted by the National Consumers League found E.coli bacteria that is harmful for your kids.
References
Nc State University Bio Resources, “Process methods and levels of automation of wood pallet repair in the United States”, https://bioresources.cnr.ncsu.edu/resources/process-methods-and-levels-of-automation-of-wood-pallet-repair-in-the-united-states/
An off grid washing machine will enable you to have clean clothes without the use of electricity. And who doesn’t like clean clothes? If you thought the only way to wash clothing off grid was to take them down to the creek and wash your clothes by your hands, think again! We have prepared a round up of 23 off grid washing machines that will show how to keep clothes clean while living in a remote location that is cut off from the power grid.
DIY Off Grid Washing Machines Ideas
Bucket DIY Washing Machine
Small, compact, inexpensive to build and easy to use. The tutorial I am sharing with you will show how to take a 5-gallon bucket and transform it into an efficient off grid laundry appliance by kraftingwithk.
Small apartments don’t always have space for a washer and dryer, and living off grid means finding new ways of doing thing without electricity. This bucket washer can solve the laundry problem for those who live in the city or in the wilderness.
Get these free plans that will show you take a bucket, a mortar mixer and some PVC pipe and create a DIY washing machine for just a few dollars. The light weight bucket washer is easy to move and the hand crank mechanism is easy to use.
Get these free plans that will show you how to take an old washing machine and bicycle, then combine them into a pedal powered diy washing machine. Recycle old items into a new off grid washer by thegreenlever and save money while getting your clothes clean.
Pedal your way to clean clothes and strong muscles with this idea. No more boring days at the laundry mat, you will be able to get in a workout while doing the laundry at home. A pedal powered washing machine can last indefinitely and only cost a few dollars to build. Minimal DIY skill needed for this project.
The components are easy to replace as needed, so this DIY washer can last forever.
Pedal Power Off Grid Washing Machine, Image via: thegreenlever
Lehman’s Own Hand Washer
This hand washing machine by lehmans allows users to give clothes a thorough cleaning with a triangle-shaped agitator. The machine design keeps clothes submerged in water during the entire wash cycle.
I like the idea of using what most of us have such as plastic barrels. These plans will walk you through this easy DIY project so you can get off grid and out of the laundry mat. A simple plastic barrel can be transformed into an off grid washing machine by askaprepper so you can have clean clothing no matter where you live.
A wooden stand elevates the barrel to a comfortable height and the top loading feature makes this not only an efficient washer, but one that is easy to use. The bottom drain plug allow the barrel to empty itself of water quickly and completely, resulting in less heavy lifting for you.
An old bicycle is the man-power behind this unique design so you can get in a healthy workout while doing the laundry.
This DIY washing machine by steemit is ideal for the large family or those who wait until all clothes are dirty before doing laundry.
A 55 gallon barrel is used for the project and creates a large load capacity washing machine that uses no electricity. The streamlined designed makes the hand crank easy enough to be turned by a child, even when the big barrel is filled with laundry and wash water.
Photos and videos will walk you through this easy project so you can build a durable off grid washing machine for just a few dollars. Most items used in this build are recycled materials, so it’s possible to build this DIY washing machine for free.
This simple, but effective, design was created out of necessity by a 14 year girl who had to do the family laundry. If a 14 year old can build an off grid washing machine such as this on inhabitat from odd and ends, so can any beginner do-it-yourselfer!
This video will show you how to build this ingenious washing machine that doubles as an exercise bicycle. The bottom drain plug makes emptying the machine of water quick and easy. After the water has been emptied from the machine, a few more minutes of pedaling will provide a spin dry cycle that nearly removes all the water from the freshly laundered clothes.
Stay in shape and keep your clothes clean at the same time with this off grid washing machine.
Bicycle Powered Off Grid Washing Machine, via: inhabitat
Bucket Clothes DIY Washing Machine
Use a five gallon bucket and a plunger to do off grid laundry on your next camping trip. This bucket design is perfect for small loads of dirty clothes, plus the bucket can be used for other things when it’s not acting as a manual washing machine by survivopedia.
Amish Style Off Grid Washing Machine, Image via: YouTube
Solar Powered DIY Washing Machine
This is one of our favorite DIY washing machine design by shtfpreparedness. This idea is very unique unlike the ones I have shared before. If you want to do laundry the easy way, yet without the use of electricity, harness solar power to do the work for you with this idea.
Sometimes you just need a small, compact washer for washing clothing worn during a short camping or hiking trip. If that is your need, then this mini washing machine by amazon will meet the need.
Mini DIY Washing Machine Design, Image via: amazon
This can easily be taken and used anywhere you want to hike or camp. Gentle on both clothing and the environment, this manual washer is very affordable too.
Laundry Pod
Do a load of laundry in 10 minutes with this efficient laundry pod by amazon. Great for camping, boating, RVing or any other scenario that takes you off grid.
Dual funnels work together to get clothes clean in the manual off grid washing machine by instructables The tub of this off grid washing machine is made from re-enforced concrete, so it will outlast any conventionally made washing machine.
The only components that will need to be replaced occasionally are the two plastic funnels, which can be purchased for less than a dollar. Cheap to build, cheap to maintain and this funnel powered washing machine will last a lifetime.
Funnel Power Washing Machine, Image via: instructables
Tiny House Off Grid Washing Machine
The tiny house movement is growing in popularity. Down-sizing as a way to simplify life, spend less money and take up less of a carbon footprint on the planet is the trend of the future. But people still need clean clothes and this tiny house washing machine can be the answer.
This DIY washing machine on Youtube provides a thorough cleaning and spin dry for each load of laundry and can be constructed for under $10.We consider this as an Ideal for tiny house living, camping, road trips or to reduce your use of natural resources right where you currently live.
Wringer Style Washing Machine
This DIY washing machine design by web.archive.org is somewhat different that the previous ones we have discussed with you. This design uses the old wringer type washing machines as a model to create a new style that uses pedal power instead of electricity.
How to make: The large capacity tub can clean several pieces of laundry at once with an easy to use hand crank. Empty the wash water, re-fill with rinse water, then run the clothes through the wringer to take out excess water. The wringer is operated by a hand crank and slashes drying time in half.
Detailed photos and plans make this off grid washing machine with wringer and simple DIY project. The heavy duty construction will keep this wringer washing machine operating smoothly for decades.
Do ur laundry without when you have cut off power source or electricity bills consuming much of your monthly budget. Off grid washing machine ideas we have discussed above will save you a lot. If you like these ideas please don’t forget to comment below!
Natural News, 04/05/2018 by Zoey Sky, How to make your own DIY washing machine, https://www.naturalnews.com/2018-04-05-how-to-make-your-own-diy-washing-machine.html
The Open University, “making a DIY washing machine and even toothpaste”, https://connect.open.ac.uk/science-technology-engineering-and-maths/how-to-make
A DIY bird bath can be incorporated into your landscape design and created to look like a natural part of the landscape. Birds of all sizes will be attracted to the watery oasis you create for them from ordinary objects.
These 40 DIY bird bath ideas we have collected round the internet sites will show you how to make a bird bath that will attract pollinating birds to your garden and landscape, plus add an attractive and soothing water feature to your yard.
1: Planter and Bird Bath Duo
With cute color terracotta pots you can create a lovely planter and diy bird bath like this one by homestoriesatoz, however measurement would be something that you need to adjust as per your requirement. With using rebar, you can adjust the pots in slanting position and add necessary aesthetic elements. You will be catering two needs and utilizing your time effectively too.
At number forth we’ve one of the simplest type of diy bird bath at theartofdoingstuff.com that would only cost you $20. Take three wood dowels and one candle plate (you can use some from your store room, in any) to make this diy bird bath. Hammer the dowels into the ground and level them. Place the Ikea plate onto the dowels. Due to its light weight, you would be able to move it to different places in your garden.
An ordinary wire tomato cage and a large dish with a rim can become an ideal diy bird bath to place in a flower garden to attract them.
This homemade bird bath by mylifeabundant.com is small and colorful, just the right size to tuck into a small flower garden. We suggest this diy bird bath idea to small gardeners. Plant a few nectar-rich plants in the flower garden and birds will stop by for a meal and a bath. When placed near a window or just off a porch you will be able to enjoy viewing the friendly fliers from indoors and outdoors.
To make this diy bird bath you can choose any pots, three or four, color them as you want, glue them to form a stand and add plate at the top. If you have kids, let them color it, it would be fun activity for them. The plate at the top would be the bird water section; it is simple to make and would serve the purpose too in almost no costs.
DIY Floral Pot Bird Bath
5: Two Tiered Flower Pot DIY Bird Bath
Make a diy bird bath like this one at Web.Archive.Org with two flower pots with this unique idea. Use a large flower pot on the bottom to plant flowers that are rich in nectar or bear seeds and the top flower pot can become a diy bird bath.
We found this diy bird bath idea to be attractive for use on a porch or patio and irresistible to friendly fliers. The two tiered planter and bird bath can be spray painted any color you desire. Plant fragrant flowers, like petunias, that will enhance the beauty of the bird bath and fill the air with an enjoyable scent.
Get these free bird bath plans by natalme.com that will show you how to recycle an old, out-dated lamp into a modern and lovely bird bath. Depending on the style and size of the old lamp, you may be able to create two unique diy bird baths from one old lamp.
If you have any old or wall mounted sink lying in store, it’s time to play with it. It would be fun filled activity, plus your garden would be decorated in a different way.
Don’t forget to follow the mentioned steps to attain the best type of diy bird bath by hgtv.com; fill it with shells to attract the birds around.
This is one of the best diy bird bath ideas by littlehouseinthesuburbs from our list. Take basic (an attractive shape and color would help) and some rods to design this breathtaking homemade bird bath and invite many bird guests to your yard. Make sure you pay special attention to its cleaning and keep pouring in fresh water time to time. Your yard would be filled with nature lovely creatures all the time.
Here we have a unique diy bird bath idea by empressofdirt to use all those sea shells you have collected from beach vacations. Encase them in a clear glass display jar, then top it with a clear glass bowl for birds to use to bathe in.
Mementos of past beach trips are combined with visits from friendly fliers to give you a unique visual image that is sure to make you smile.
These detailed instructions will show you how to use different objects, including seashells, to make bird bath.
Follow these step by step instructions to create your own hummingbird bathing tray that will look lovely setting on an outdoor table. You may also like to check out homemade hummingbird feeders.
Hummingbird Birdbath From Cookie Sheet Image via: hometalk.com
11: Rocky DIY Bird Bath Fountain
This type of DIY bird bath by dailykos would enhance your yard appeal and would give much natural look unlike the other ideas we have in our list; you need to fix a bucket and cover it with multiple sizes rock, on the top add a big plate and adjust the water system.
This would be amazing DIY bird bath by hgtv, as it involves your aesthetics for colors and playfulness. Pick up bowls, shallow plates and platters and make a lovely water source for birds and enjoy cheering in your yard.
This type of diy bird bath by birdsandblooms.com would be serene and attract various birds, butterflies and other beautiful creatures to your yard. You need to have a big leaf which will help you making a concrete and sand based deep platter for the birds.
Birds are like people when it comes to bathing preferences – some prefer to take a shower instead of a bath. This quick and easy bird bath by westcoastnotebook creates an outdoor shower that birds will flock too on a hot summer day.
Find some twigs in your garden or get them from your neighborhood; insert these in the garden side and use big wooden or plastic saucer to make the top.
Look for large steel saucer in your kitchen, maybe you have some lying there. Place stakes one on one and make the pillar for placing the saucer. You can create two or three nearby to attract more birds. Follow the instructions to make this Deformed Stones Bird Bath Idea by ourfairfieldhomeandgarden.com.
Get two big saucers, and three pots for this diy bird bath by sunnyslifeinrehab; assemble pots together by fixing saucers at the opposite ends. Color them neon maybe (or your choice) and decorate with accessories to make it vibrant. Birds will fall in love with it and visit often.
In order to make this DIY Tile Bird Bath by meandmydiy.com you need to get mosaic tile saucer from local garage; look for old CDS, cut them into small pieces and color them; decorate the saucer to make it vibrant. You can then use that saucer as a water source for birds.
DIY Tile Bird Bath from old Cds, Image via: meandmydiy.com
19: Tree Type DIY Bird Bath
To make this diy bird bath by birdsandbloomsYou need to have wooden rods that you can place in a way that it looks like a small tree. Add iron rods at adjacent sides, and place small saucers on it.
Use terra cotta pots to make the stand for the DIY bird bath by everydaydonna.blogspot.com and use colorful saucer or shallow bowl to add water. Use interesting colors to make birds fall in love with it.
This is ideal for the regions where it remains cold most of the time. It would help in keeping the temperature normal for birds when they land to enjoy water. Find the details of this Solar diy bird bath at builditsolar.com
To make this diy bird bath by homejelly.com you all need Ask your mom for a colorful old kitchen dish which has shallow enough to keep water. Add a plastic pole or wooden pole at its base, fix in your garden, add some water to bowl and enjoy many hours of birds watching. You may also like to check out diy squirrel feeders.
A simple galvanized oil pan which can be purchased from any auto supply store can be transformed into a lovely bird bath by homestoriesatoz.
Add a few decorative stones and plants in and around the oil pan, along with a small water pump, and you will have created a lovely bird bath. No one will know it’s made from an inexpensive oil pan.
Anything that can hold water can be transformed into a garden bird bath such as this one by thenavagepatch, even an inexpensive thrift shop find. A large, shallow pan is an ideal size and shape to use as a bird bath. Birds prefer shallow water for their bathing rituals so they can quickly take flight if a predator shows up during bath time.
Visit a local thrift shop or yard sale and look for any items that is shallow, wide and can hold water. Then use this bird bath idea and transform it into an eye-catching part of your landscape decor.
Transform an eye-sore in your landscape into a thing of functional beauty by turning a tree stump into a bird bath like this one by hgtv.
These free pictorial instructions will show you how to save money and increase your home’s curb appeal by taking and stump from a felled tree and creating a DIY bird bath. Only a couple of other components are needed for this DIY project and it will only take a few minutes to complete.
Here is a bird bath idea by club.chicacircle.com that will create a clear and colorful addition to your landscape or patio for bird bathing. The pop of color will be a welcomed addition in the landscape and invite different types of birds to come in for a refreshing dip in the clear water.
Easy and inexpensive to create from items you may already have on hand.
Do you have an old ornate fruit bowl that was handed down to you from a grandparent? It may hold memories, but outlived its time to hold fruit. Up-cycle that old fruit bowl into a garden bird bath such as this one by redcottagechronicles so it can remind you of a past loved one and still be useful today.
Updated with non-toxic paint and placed on a pedestal, a fruit bowl can become a popular bathing spot for the birds this summer.
Use these free plans to create a DIY bird bath by instructables.com that will attract hummingbirds and won’t increase your electric bill. It’s also inexpensive to create.
This cheap bird bath is made from two baking pans and a solar powered water pump. Cheap to build and cheap to maintain.
Wondering what to do with that old satellite dish that you’re no longer using to receive television signals? Recycle it into a DIY bird bath like this one by instructables with this interesting idea.
Paint the satellite and add a few components, like a water sprayer, to create a lovely bird bath that will invite friendly fliers into your yard.
This idea is both functional and attractive, ideal for use on a small patio or deck. Inexpensive materials can be put together in just a few minutes for this DIY project.
A galvanized garbage can lid has the ideal width and depth for use as a bird bath by rspb.org.uk. Many bird baths fail to attract birds because they are not wide enough or are too deep. A garbage can lid is the perfect size, and can be elevated in many different ways.
Get inspired with these free plans for transforming an ordinary lid into a bath tub for birds.
Garbage Can Lid DIY Bird Bath, Image via: rspb.org.uk
Check out this diy bird bath idea by morenascorner.com that creates a work of art for display in your garden. Stack an old teapot, saucers and cups in an eye-pleasing arrangement, then attach them to each other with ceramic glue.
End the stack with a plate on top for use as a bird bath. Unique and inexpensive garden art that provides birds with a safe place to take a bath.
Built to last using inexpensive concrete mix, this diy bird bath by ashleydiy.blogspot.com only takes a couple of hours to build and will last for years. Paint it and add embellishments to make it a one-of-a-kind design.
Stack old bricks and top with a shallow container to create a lovely bird bath. This diy bird bath idea by robinsnestingplace.blogspot.com will inspire you to put old bricks to a new use. The birds will thank you.
This bird bath plan by birdsandblooms is ideal for humming birds, since they fail to enjoy water in other types. On a colorful container, you need to add misters (three or four) and create a fountain bird bath. It looks appealing and ultimately you will be calling in lots of birdies.
Here we’ve homemade bird bath by instructables.com that can be easily made from items lying in your garage or store room. However, it may require some technicality and would consume time too. If over the weekend you are in mood of some fun experiment making bird bath, don’t forget to check this one out.
Solar Powered Incredible DIY Bird bath, Image via: instructables.com
Every one of us likes the pleasant sound and appearance of these little whimsy creatures. Having a diy bird bath in your backyard garden allows them a source of water. We have shown you some of the most popular bird bath ideas, we hope you will like any one of them to be in your garden area.
A homemade log splitter will save you time, energy and money when it comes to cutting wood for use in a fireplace or wood heater. With the trend moving towards living a more sustainable lifestyle, many people are looking for alternative heating sources and wood is a primary source. Wood is sustainable, renewable, available and inexpensive.
The biggest disadvantage to heating (or cooking) with wood is the amount of work needed to prepare a tree for use as heating fuel. Wood splitting tools makes the job easier, but when purchased from the store they can be expensive.
Check out our round up of ideas and plans for homemade firewood processors so you can build your own homemade wood splitter and save yourself a lot of time and money.
1- Screw Homemade Log Splitter
Turn large logs into fireplace sized logs quickly and easily with this homemade log splitter. Use this diy splitter idea I am showing you to cut trees into stacks of ready-to-burn wood for your wood stove. The three-horse power motor make this DIY log splitter by Instructables able to handle even the largest logs with ease.
Use this DIY log splitter project that is simple and has several safety features that you will be building into the splitter. To Power the motor a large screw is activated by the push of a button, and it will quickly bore its way through a log.
This diy log splitter guide has detailed step by step instructions with pictures and video tutorial. This design also instructs you on how to place a safety switch on the machine for instant deactivation in case of an emergency.
To transform the energy produced by a motor or engine into a concentrated burst of force, kinetic homemade log splitters on Youtube make use of enormous flywheels. Because of this force, a moving rack and push plate are pushed into a log and cause the wood to break.
As it rotates, the flywheel generates kinetic energy, which is stored. After that, you pull the lever to start the log splitting process.
The fact that kinetic splitters are so much faster than their conventional counterparts is often regarded as their primary benefit. The cycle time of many of them is between 2.5 and 3 seconds.
Build a kinetic log splitter
Build this DIY log splitter in your garage using readily available materials. You need square tubes, a flywheel, toothed racks, and gears as shown. Tutorial:
3- Unicorn Cheap Wood Splitter
Unlike the first two splitters I have shown you, this unicorn log splitter is one of the strangest but very easy designs for a homemade log splitter on Youtube. You feed a piece of wood into it by hand, and as it rotates, the screw burrows into the wood and splits it. Essentially, it’s a gigantic tapered screw that’s rotating.
There are types that can be attached to the power takeoff of tractors, and there is even one that is meant to be attached to the wheel of a car. After jacking up the rear axle, putting the vehicle in gear while it is still running, and attaching it to the lug nuts of one of the drive wheels, you will have a wood splitter.
You can make this Unicorn diy wood splitter easily and it needs little maintainance. All you need is tapered screw, 3 vertical 35mm bearings, 1 stainless steel shaft and some bolt and nuts.
4- Recycle Old Car Parts
This log splitter by weldingweb shows you how to recycle used car parts from a wrecked vehicle and transform them into a functional log splitter.
The rear axle from a small car is ideal to use for this DIY project, so are parts of the car frame. The steel can be shaped and welded into a sturdy frame for log splitter.
Use these free log splitter plans to recycle those old car parts into a new homemade log splitter, If you are tired of splitting wood with an axe and have access to a wrecked car.
log splitter from Recycle Old Car Parts, Image via: weldingweb
The motor is an old freight motor that is still in good shape, wheels and axle from an old garden trailer, recycled steel tubing and I-beams are the main components of this DIY wood splitter. A few smaller, inexpensive components to put everything together may have to be purchased, but the total cost will be very cheap.
The end result is a functional log splitter that is small enough to fit into a garage or shed, yet powerful enough to split logs into usable fireplace wood.
I have chosen this mini splitter to include in this list as it is simple and easy to make. Using a giant screw, this diy log splitter device on Youtube can rapidly and efficiently reduce big logs into logs suitable for a fireplace. All you need is, drill screw, motor, and axle. With a fireplace or stove, this is the best log splitter for you. The three-horsepower engine of this DIY wood splitter makes it capable of handling even the biggest logs with relative ease.
Several safety elements will be included in the splitter as part of this basic DIY project. Pushing a button activates the motor that drives the huge screw, which swiftly bores its way through a log. A safety switch is included in this design for quick deactivation in the event of an emergency.
The benefits of using screw homemade wood splitters include speed, as well as the fact that they are easy to make. One of the drawbacks of using this kind of splitter is that it can be dangerous.
7- Two-Way Log Splitter
Use these step-by-step instructions on how to make a log splitter and you’ll be able to build a powerful wood splitter by Practicalsurvivalist that can cut both large and small pieces of wood quickly and easily.
Two-Way Homemade Log Splitter
8- Scrap Metal Build Log Splitter
This YouTube video will show you how to build a 20 ton wood splitter on youtube from scrap metal. Cheap to build, keeps usable items out of the landfill and the splitter makes wood cutting a lot easier for you.
Don’t let the smaller size of the wood splitter fool you, it has a 20 ton motor that is capable of handling tough pieces of wood and splitting them with ease. The small size is ideal for storing or for taking into the woods for splitting wood on-site.
The small size of this diy log splitter also makes it quick to build, and by recycling scrap metal, the cost is almost nothing. Quick, easy, cheap, and effective, that’s a winning combination in any DIY project.
9- Scrap Metal DIY Log Splitter
A little scrap metal laying around your home can be transformed into a homemade firewood processor with this simple building plan by practicalsurvivalist.
Scrap Metal DIY Log Splitter
10- Manual Log Splitter
I would recommend this diy log splitter if you don’t have much know how of welding work. Easy to follow diagram will enable you to build this manual log splitter by makezine with very little out-of-pocket expense. This one requires some elbow grease to use, but still makes splitting wood a lot easier and quicker than just using an ax. You may also like to check out wood shed plans to keep firewood dry.
Alog splitter by Beckmannag can be both powerful and small. And the portability of this log splitter plan makes this one a winner for anyone wishing to heat their home with wood.
Small And Portable DIY Wood Splitter, Image via: Beckmannag
13- No Lifting Wood Splitter
Here’s a diy wood splitter by Grit that will lift the wood for you and put it into place on the machine. Follow these detailed instructions for a DIY machine that will split your wood and save your back.
Keep your wood box full without a lot of effort with this DIY hydraulic system by Motherearthnews that will split wood with ease and help keep your home warm all winter.
This easy-to-build DIY log splitter by Instructables does its work with foot power. Easy to build and easy to to use, just step down on the pedal to split the log.
This design is different, but just as effective for splitting firewood. This homemade log splitter on Youtube does not have a motor and is operated manually.
These free plans will show you how to recycled old iron into a useful wood splitter. Even though it is operated by manpower, the design incorporates a heavy duty spring that does most of the work for you. This hammer splitter also gives you more flexibility in the size of wood you start with and end with. you can split even the widest log into small pieces of kindling wood.
When you’re done with the hammer splitter, it’s easy to put away.
18- Thirty Ton Log Splitter
If you need to split tough oak wood or large pieces of wood, then this 30 ton log splitter is for you.
This is not a build for a small time wood burner that only needs a half a cord of firewood each year, this is a big build for big wood.
An ideal homemade log splitter on Youtube for someone who sells firewood and needs to split a lot of large logs into smaller logs. Also a great log splitter for a homesteader that cooks and heats with wood. This heavy duty homemade wood splitter can handle the toughest and biggest pieces of wood with ease. Make splitting lots of wood quick and easy with this DIY machine.
19- Homemade Portability
Sometimes it’s easier to take the homemade log splitter to the wood instead of bringing the wood to the splitter. These DIY plans will enable you to build a strong and portable wood splitter by Hearth very inexpensively.
To make this diy log splitter you will need 10HP Diesel (china clone) engine (just because!), 16GPM 2 stage pump, auto return valve horizontal only-8″ wedge.
If you have an old axe lying around, you should definitely avoid throwing it away since you can turn it into a homemade wood splitter like this one on youtube in only a few hours’ time. You will need several square metal pipes, an axe head, a giant circular metal pipe, and a welding set to complete this project.
When you are through with the process of manufacturing the axe, the blade will be positioned so that it is pointing upwards. You will lay the piece of wood on the axe, then use a hammer to smash it down, and the wood will split flawlessly. When compared to the hydraulic wood splitter, it is simple to make and simple to use, but the amount of time it takes to split wood is significantly greater.
How to build
You will need an axe, metal pipe, and a welding set.
When you need to cut and stack and a lot of firewood for winter use at home or to sell in a firewood business, this heavy duty hydraulic log splitter can get the job done quickly. This DIY machine can change large hardwood trees into piles of split wood that’s just the right size for a wood heater. Work smart and not hard with this homemade firewood processor.
Off grid living means you have to find an alternative heating and cooking source that is sustainable and affordable. Wood is an excellent alternative fuel source but it has to be processed into a size that is small enough to fit into a wood stove, heater, and/or fireplace.
This video tutorial will show you how to build a log splitter on youtube that is ideal for an off grid homestead. This log splitter is safe, fast, and efficient to use for all types of wood.
The wedge is beefed up so the small log splitter can easily split larger logs to make the cutting of firewood faster and easier for the homestead. When heating and cooking with fire wood, it takes a lot of wood to get through the winter, and this DIY transformation will help you stockpile firewood in a short amount of time.
Save time, money, and energy by re-purposing a small log splitter into a larger one with these free plans.
24- Old Car Wood Splitter
An old wrecked car with a good engine can have a second life as a DIY wood splitter. This YouTube video will show you how to make great use of an old car by recycling it into a homemade log splitter in this YouTube video. Split even the biggest, toughest hardwood logs with this DIY design.
Transform a felled tree into a pile of ready to use firewood quickly and efficiently with this old car wood splitter.
25- Gas Powered Splitter
A small gas engine provides the power for this large log splitter. Great for use on an off grid homestead or cabin in the woods, keep the firewood stocked in a shed, and ready to burn with this powerful machine.
The two rear wheels make this homemade log splitter portable so you can move it around as needed. Hitch the log splitter up to your truck or ATV and haul it out into the woods where the trees are so cutting firewood is more efficient. This video will show you how to build this gas powered splitter on youtube.
Watch this YouTube video to learn how to split firewood and create small pieces of kindling with one machine. One DIY build, two uses. It takes small pieces of kindling wood to get a fire started, then large pieces of firewood to keep the fire burning for a long time. This homemade log splitter provides both small and large pieces of wood so you can keep your home toasty warm all winter.
27- Two Way Homemade Log Splitter
This super efficient design will cut firewood both coming and going so the work gets done in half the time.
This design can basically split two logs at once when two people are operating it. One can put a log in the front and the other person can put a log in the back as the splitter moves from front to back.
Time is money and this log splitter in YouTube video saves time by cutting wood both ways. Simple design, very efficient, and easy to build with this YouTube tutorial. The rear wheels on this machine make it easy to take with you wherever there is wood that needs to be split.
Cut enough firewood to get you through the winter with your farm tractor. The tractor usually sits idle in the barn during the winter months and this is a great way to put the tractor to use during that idle time.
Build this three point log splitter and let the tractor do the hard work of splitting firewood for you.
29- Three-HP Motor
This heavy duty log splitter on youtubeis built to last and provide years of service. The 3-HP engine makes quick work of splitting big logs so you can get back indoors where it’s warm before your fingers get frost bitten.
It’s not fun to be outdoors in below zero weather cutting firewood with an ax, so build this DIY log splitter so you won’t have to spend much time outdoors in freezing weather. This YouTube video provides detailed instructions so the DIY project is very simple to build.
30- Manual Splitter With Four Blades
Four ax blades are used to create four cutting blades on the homemade log splitter in this YouTube video. This splitter is a little different than the others because it’s a manual splitter. No gas or electricity is used to power this machine so it’s ideal for use on an off grid homestead or at a remote hunting cabin.
It’s a simple way to split firewood and it can be used anywhere you need to build a fire. Place the log in the metal frame on top of the four ax blades, then give the log one hard hit and the log becomes four perfectly sized pieces of firewood.
If you live in an area prone to heavy snowfall and frigid winter weather, you will need a dependable log splitter like this one. Always have plenty of ready to use firewood on-hand for the unexpected winter snow storm with the help of this wood processor.
32- Wood Processor
If you heat your home exclusively with wood, then you need an efficient, fast, and safe wood processor like this one.
Learn how to build an efficient wood processor in this YouTube video that is tractor-powered. Hook up the log splitter and the wood hauler to the tractor and drive to where the felled trees are located so the firewood can be processed on-site.
33- Screw Log Splitter
Small size but it has plenty of power to split the big logs. Ideal for small indoor spaces so you can stay warm and dry while processing firewood for your home.
A simple hydraulic log splitter by Interestingengineering works by applying pressure to a cylinder. A hydraulic pump is powered by either a gas engine or an electric motor. Hydraulic oil is used to produce pressure in the pump. Log splitter levers activate a valve that permits the pressurized oil to drive the hydraulic cylinder and break your log.
When you let go of the levers on most hydraulic splitters, the cylinder retracts to the starting position automatically. This is a crucial safety feature, as well. The cost of maintenance and ease of use are the benefits offered by hydraulic log splitters.
Quick Working Homemade Log Splitter, Image via: Ringolake
36- Flywheel DIY Wood Splitter
Scrap parts and a little ingenuity created this flywheel wood splitter on youtubeand now you can build your own by following this youtube instructional video.
37- Homemade Log Splitter Under 200$
This log splitter can be made from an old car engine that has been reused. It is powered by a vertical shaft engine with 8 horsepower that may be salvaged from an old tractor or car. This DIY wood splitter on Youtube will cost you less than $200 for the equipment and take less than 6 hours to manufacture. It will enable you to simply convert hardwood logs into firewood. The major benefits of this homemade log splitter are its simplicity of use and low cost of maintenance.
How to build
All you need is an engine, a hydraulic pump, and scrap metal.
38- Homemade Log Splitter
The next one I am showing you has great photo tutorial for building your own log splitter by Hearth. Detailed photos walk you through the process so you can have your own log splitter that will do the wood splitting for you. Small enough to be towed behind a vehicle so you can take this splitter to the wood where it is located instead of having to bring the logs to the splitter.
The less you have to handle the logs, the better it will be on your back. Retire your old axe and build this new diy wood splitter that will do the hard work of cutting wood for you.
39- Take Your Pick For These Several Homemade Log Splitter Plans
This video shows several homemade log splitting designs on youtubeand how they work. With many styles, size and designs, you can take your pick of the one that will work best for your log splitting needs.
This YouTube video and following comments will also point out some design flaws in some of the wood splitters. Along with the flaws there are also comments of ways to make the log splitters more effective. It’s always good to have feedback on designs so fewer mistakes will be made when you build your own homemade log splitter.
Safety must come first when building a log splitter and this very informative video and following comments will point out features that need to be improved on some of these log splitters. Making wood chopping easier and quicker is the goal of building your own homemade log splitter, but no one wants to lose a hand or arm in the wood splitting process.
This YouTube video is worth watching regardless of which design you choose to build. It will point out things you may not have considered and safety features you may want to incorporate into your DIY build.
Conclusion
So this was our list of 39 homemade forge plans we have compiled for you from simple to complex, small to large and easy to difficult depending upon your diy matal working skills. You can choose any of the above that suits to your requirement for cutting of trees of logs into stack of wood.
Based upon some of the most common questions asked I have prepared a questionnaire.
FAQ’s
Can I build my own log splitter?
Yes, you can. You can save time and money with a log splitter, plus it will be much less work for you. A store bought log splitter is expensive but you can build one for a fraction of the cost. Basic welding skills will be needed to build a log splitter and some heavy duty angle iron.
Are log splitters safe to operate?
Since you are building the log splitter you will able to implement as many safety features as needed to ensure safe operation. An emergency cut off switch and protective guards can be put in convenient places on your DIY log splitter. And always be sure to wear the right protective gear when operating the machine.
What is the fastest way to split wood?
A log splitter is the fastest way to split wood. A log is placed in the wood splitter and in a matter of seconds the log will be cut in half. The process is continued until the log has been split down to the desired size. The whole process will take less than 1 minute.
How long should wood dry before splitting?
It depends on the type of wood but a general rule is to cut wood in the spring and allow it to dry until the following fall before splitting.
You can check wood for dryness by feeling and smelling it. Dry wood is much lighter and dry wood has almost no smell.
What is the easiest wood to split?
Ash, hard maple, and oaks provide the easiest wood because they have straight grains. If the wood has spiral grains, like the sweetgum or elm tree, the wood will be harder to split.
Dry, seasoned wood will be easier to split than freshly cut wood.
References:
MDPI,Int. J. Environ. Res. Public Health 2022, 19(18), 11507, Published: 13 September 2022, “Wood-Splitter-Related Upper-Limb Injuries: A Single-Centered Case-Series Study”, https://www.mdpi.com/1660-4601/19/18/11507
Family Handyman, by Robert Maxwell, Sep. 27, 2023, “4 Great Techniques on How to Split Wood”, https://www.familyhandyman.com/article/4-great-ways-to-split-firewood/
MDPI, Published: 25 April 2020, “Prediction Model of Wooden Logs Cutting Patterns and Its Efficiency in Practice”, https://www.mdpi.com/2076-3417/10/9/3003
Archdaily, “How Tree Trunks Are Cut to Produce Wood With Different Appearances and Uses”, by José Tomás Franco, Published on August 08, 2019, https://www.archdaily.com/894449/how-tree-trunks-are-cut-to-produce-wood-with-different-appearances-and-uses
Is about simple living,growing your own food,raising livestock,Do It By Yourself,off grid living,gardening,homemade products