The importance of quality food in daily life cannot be ignored. If all you seek is taste, freshness and nutrition, then only a local farmer or your own garden can facilitate your need. Not every fruit or vegetable that you like would be available around the year. So, how to plan a healthy lifestyle while making sure you get what you want throughout? There are different methods of preserving food, but what way seems more legit to you? Have you heard about diy solar dehydrator – they are absolutely worth it.
You do not have to spend much money in acquiring them from the market as homemade food dehydrator can do the job for you. You might be thinking how on earth is it possible to craft a solar food dryer at your home? Well, here we have gathered 8 simple yet effective DIY plans which would answer your biggest question, “how to build a food dehydrator”?
I would recommend this homemade dehydrated by backwoodshome to experienced DIYers. In order to make your own homemade food dehydrator, and that even a sophisticated type, here is something that you would like the most. It is made from pinewood and basic covering from aluminum. It may take up a few days to get into shape, or you can take professional help for getting the wood chopped. Project details at
By now you must be cleared enough on how to make a food dehydrator – if you want to put your hands in a project that is a little challenging, you must go for this diy solar dehydrator plan on Youtubewhich has chimney along. It would be fun making this type, if you know how to make the simplest ones.
The link given below would help you in giving the details about how the plans go about. The Youtube video link would help you in actually witnessing the entire process.
4: Large Solar DIY Dehydrator
This is a fantastic plan for preserving seeds long term. In order to have an efficient plan, you need the following items:
Large Solar DIY Dehydrator, Image via: instructables
5: Basic DIY Solar Dehydrator
This dehydrater plan by instructables helps you in getting the simplest, sun energy efficient diy food dehydrator. To make this diy dehydrater you would need the following things:
This diy food dehydrater by instructables belongs to the category of the best food Dehydrators as it is highly functional, yet consumes less time in making. You will need the following materials:
Plywood ( for making the body)
Wood for braces (support)
Window
Screen (as cover for vents)
Stalking for drying racks
Hinges
Screws
Staples
Thermometer
In order to know about the process exactly, go through the complete plan at
Thin Plywood Solar dehydrator, Image via: instructables
7: Workable Homemade Dehydrator
Make your life simple by working on the simplest type of homemade solar dehydrator idea by thesurvivalistblog – it is more like a book with a front covered with plastic sheets and base made from the wood. The basic mechanism goes the way it is for every type of Solar dryer, but the outlook is why elephants and sophisticated. In order to know about the details and exact measurements for this homemade dehydrator Get the details at:
The basic outlook of this kind of solar diy dehydrator by ecohearth is slanted, which looks more like a vertical garden placed. It is simply the best-looking plan that you would have come across. It has various slabs that would help you in getting multiple items dried simultaneously.
A DIY projector screen can transform your backyard or any room of your home into a home theater. Enjoy summer movie watching outdoors and winter movie watching indoors with your own inexpensive homemade projector screen.
You know how expensive it can be to take the family to the theater to watch a movie. Save that money and enjoy watching favorite movies at home with a DIY projector screen that you can create for about the same price (or less) of one family trip to the theater.
Check out our 15 DIY projector screen ideas to learn how to make a projector screen that is just right for your space and budget.
1- Movie Screen For Deck
This DIY outdoor movie screen is ideal for a deck or other outdoor space that has a pergola over the top.
The DIY project screen is mounted from a strong overhead timber with eye hooks so family movie night can be enjoyed outdoors. Use this projectorscreen idea by HGTV to create a home theater outdoors near an outdoor kitchen or swimming pool so family and friends can eat, swim, and relax while watching a movie together.
Creating an outdoor movie theater is a great way to bring the family together for a night of fun and laughter. An outdoor gathering space is also much safer in these current times and helps prevent the spread of germs.
Watch this YouTube video for the detailed plans of this easy DIY project. The best thing I like about this PVC Project is, PVC pipe is lightweight and affordable, plus it makes the frame very easy to take down and move indoors when the weather is too cold for outdoor movie watching.
The lightweight PVC pipe frame will allow you to suspend the projector screen from an interior or exterior wall, pergola, deck frame, wooden fence, or other outdoor structure.
3- Outdoor Projector Screen
This inexpensive outdoor movie screen idea is ideal for enjoying the warm summer nights outdoors under the stars.
Build this DIYprojector screen byinstructables and pop some popcorn so you can enjoy watching movies at home on your own outdoor home theater. Ready-made projector screens are very expensive but this one is easy and cheap to build with PVC pipe.
The movie screen is lightweight and can be taken down and easily stored at the end of the movie night. That’s the reason I am recommending this pvc project to you. Assembling the projector screen and disassembling it takes less than 5 minutes once you get the hang of it.
A few simple tools and these detailed instructions from Home Depot will enable you to build an outdoor movie screen. Save time and save money by building a projection screen that can be used over and over again.
This is a great idea for watching movies on a large screen in your outdoorhome theater like this one byHomedepot. A relaxing evening with the family watching a good movie while eating pizza and popcorn is a great way to build a close family bond. A full moon and bright stars can also turn the movie watching night into a romantic date night.
These free plans will take you through the building process with ease. You may also like to check out DIY Phone Projector.
Check out this idea for building a low cost projector screen so you can watch movies on a big screen in your home theater.
This DIY projector screen is adaptable to any size space that you have so you can build it for indoor or outdoor usage. This idea will show you how to build a free-standing DIY projector frame with PVC pipe that can be used in a small family room or outdoors on a large patio.
These free instructions detail how to build a 5-foot by 10-foot projector screen but the size can be adjusted. Enjoy all your favorite movies on a big screen anytime you want in a home theater. This inexpensive, free-standing DIY projection screen like this one by life Wire. will work in a small apartment, large home, or any outdoor space.
Watch this YouTube video to learn how to build an inexpensive backlit projector screen for your home theater.
This idea shows you how to mount LED panels to the wall to create the backlighting that will enhance your movie watching experience. The YouTube video provides step by step instructions for the building process so you can easily build this DIY projection screen on youtube.
The size of the screen can be customised to fit your interior space.
Watch and learn how an entire home theater system is constructed and set up. This same set up can be created in any room of your home for your family’s enjoyment. It is inexpensive to build and out of the way so the room can be a bedroom when needed and a home theater when you want to watch a movie.
8- Large Projection Screen
When you want a large DIYprojection screen like this one by DIY With Rick that will fill up an entire interior wall you will need a few pointers. Check out these detailed pointers and pictorial instructions before you start building.
A large screen like this one makes you feel like you’re part of the movie and enhances your viewing pleasure. The large size is easy to customize with these instructions and can be built to 100 inches up to 150 inches.
For around $100 you can create a giant projection screen for your home theater. The frame is created from PVC pipes, so even though the screen is giant it’s still not overly heavy and can easily be moved by two people.
It can be used as a DIY outdoorprojection screen on youtube or an indoor one but unless you have a large room with this screen will be best used for outdoor movie watching. The giant screen is stable and sturdy so it won’t be tipped over easily. The thin screen is easy to store against a wall or in the garage when not in use.
10- Recycled PVC Pipe
Here is a great idea for reusing PVC pipe – create a homemade projector frame with it. PVC pipe is inexpensive and can be used and reused for multiple projects. By recycling some you may have leftover from another DIY project, the cost of building a DIYprojection screen frame like this one byInstructablesis almost nothing.
Find some cheap fabric at a local discount fabric store (or recycle some suitable fabric) and tie it onto the frame like a drum. Great for any room in your home or for suspending outdoors on a porch or deck.
Here is a great idea for an affordable, portable homemade projector screen that can be used indoors or outdoors.
The DIY movie screen like this one by Instructables is created on a retractable stand so it can be put up and taken down quickly. Storage is not a problem either since the large screen can be rolled down and take up minimal space.
These free plans will show you how to build a large 150-inch projection screen on a stand but it can be built a smaller size using these same plans.
Projector Screen With Stand, Image via: Instructables
12- 100 Inch Projector Screen
Use this idea to transform a few 1-inch by 3-inch boards and rubberized cloth into a large projector screen.
The cost of this DIY project by Culture South West is minimal, and if you have the boards on hand, it will be almost free to build. This can be used indoors or outdoors and the white backing of the rubberized fabric provides a clear, sharp image of your favorite movies.
These free plans show you how to make this 100-inch projector screen cheaply and quickly.
13- Sixteen Foot by 20 Foot Outdoor Projection Screen
This large DIYprojection screen on youtube makes outdoor movie watching comfortable for a large group of people. With a screen this size, everyone can have a good seat and be able to see the movie without a problem.
Easy and cheap to build, this YouTube video will show you how to use conduit pipe and a tarp to create a large, affordable outdoor movie screen. Step by step instructions are easy to follow.
This YouTube video will show you how to build a sturdy wood frame projection screen that will last for years. The budget friendly frame is quick to make so you can build it and start enjoying outdoor movie watching this weekend.
15- Large and Cheap
Pay close attention to this YouTube video that will show you how to build a 100-foot projection screen for under $25. Now that’s a bargain.
The wood frame and blackout cloth used for this DIYprojection screen in this youtube video provides a professional appearance clear movie viewing. Easy to build and affordable, this is a must-have item for your home theater.
Conclusion:
DIY projector screens are easy to make and don’t cost you much money. Watching movies in the theater with your family is quite expensive these days. By building one of these from our list of diy screens, you can save money and enjoy the benefits of watching movies indoors or outdoors depending upon the weather.
Are you a game lover? Building a DIY gaming table will allow you to enjoy your favorite games right in the comfort of your home. You can play with friends and family and have a great time.
If you are considering building a DIY gaming table, then you should check our round up of 27 cool DIY gaming tables you can build.
1- Cool Steampunk Gaming Table
The first one I am showing you involves building a classic multipurpose DIY gaming table by homecrux. The primary function of the table is gaming. However, it can be used as a coffee table, dining table or conference table. The table is big enough with a 4’ x 6’ size. It has a 55” 4k display screen embedded in it. This can be used for gaming visuals as well as presentations and displaying maps.
The tabletop is covered with a ¼” tempered glass to protect the TV screen from damages or spillage. This diy gaming table also has a stereo audio system, which produces audio through attached speakers. There are also external power outlets, USB, HDMI, and Cat6 etc. There are also leaf inserts to protect the game from kids and pets.
The table has a standard 5 x 7 area. It also has eight drawers with stainless steel cup holders close to the top of the table. This cool gaming table costs about $2,000 to complete, and I have to say it is worth every penny of it.
If your kids were game lovers, then this would be an ideal weekend family project you can do. Unlike the previous two it involves building a board game table with built-in storage to store all your games. The DIY gaming table plan by instructableswas designed to be quickly completed with just hand tools. Aside from the table, you will need a sheet of plywood, boards; lumber saw drill press and a planner.
This diy gaming table project is relatively cheap, costing about $400 to build. You will need a few materials like glue, wood screw, brushes, and urethane. The tools used in the original project includes a router, circular saw, drill with bits, clamps, hammer and brads and a few others.
Homemade Gaming Table with Built-in Game Storage, Image via: instructables
3- DIY Puzzle Game Table
It takes days and even weeks to put together a jigsaw puzzle. And if you are using the dining or coffee table you may have to redo the puzzle every time; you use the table for other purposes. Although you can buy those puzzle mat, nothing beats having the puzzle on a particular diy puzzle table in its own organized space.
This gaming table plans will guide you to build a DIY puzzle game table by designeddecor for your home. The project also comes with a stool you can pull out when you want to work on the puzzle. It contains detailed information on how to build it from scratch.
This YouTube video will show you how to build a lovely wood dining room table that has a removable top surface and plenty of room for games underneath. Removable side trays are also incorporated into the DIY build so you can have a place for your phone and snacks while you play a board game.
The table is sturdy and the wood can be stained or painted to match any interior decor. Host a Holiday meal for your friends and family on top of the table, then remove the top and host game night.
The large table provides plenty of room for all your favorite card and board games. The attractive design makes it an eye catching piece of furniture and the bottom shelf provides plenty of storage space for games and puzzles.
Built in cup holders, sunken play area, and decorative wood trim make this more than a game table, it’s a valuable piece of furniture.
6- Custom DIY Board Game Table
These gaming table plans involve building functional DIY board game tables like this one by imgur. The table was constructed with hardwood. The construction is broken into four sections – legs, frames insert and playing surface. The plan contains step-by-step information on how to build the table with pictures.
The building involves using a router; mitre saw, chisel, jigsaw and other. You will also need materials like glue, screw etc. the project can be completed in a few weeks and is placed at an intermediate experience level. Related: DIY computer desks for gaminng.
Custom FUnctional Board Game Table, Image via: imgur
7- Classic Gaming Table
This project involves building a DIY gaming table like this one by boardgamegeek with maple wood. Its designed such that the legs can be taken off during transportation. The vault is 3 inches deep, and it has seven desks, two on each side. The project is placed at an advanced woodworking level. It has an estimated completion time of 120 hours or 37 days. It will cost about $2,000 to complete.
You will need various sizes of maple hardwood for each part of the table, and other materials like hinges, cabinet pulls, cabinet hardware and tools like drills, saw etc.
Are you a broad game fanatic? Then you should build this table to make playing your favorite games easy. The project involves converting a regular table into a DIY board game table like this one by littlethings. The original DIY gaming table was built to accommodate six players. The surface of the table is covered with thick blue neoprene fabric.
To build this gaming table, you will need materials like wood stain, nails, or screw. You will also need a few tools like miter saw and drill. You will have to create the various aspect of the table separately following the plan and couple when done. You may also like to check out diy router table.
Turn An ordinary Table Into a DIY Gaming Table
9- Gaming Table For Under $40
Playing games with friends is one of the best ways to relax. This gaming table plan involves converting a kitchen table into a proper gaming table like this one by simplifiedbuilding. Asides the table, you will need a suitable board for the top. A plasterboard sized 1.2m by 900mm was used in the original plan.
You will also need materials like spray paint, mixed plaster, Velcro strip etc., and a few tools to construct. The original project was built for under $40. It can be completed within a few days following the plan.
This project involves transforming a door into a DIY shuffleboard by thisoldhouse. The tabletop was made with sewing elastic. This original plan has pre-primed 1×4 installed at the sides of the door to keep the pucks from flying off the table.
Asides the door, you will also need some woods for the legs, and a few materials like paint or spray, screw etc. You will also need tools like a drill, screwdriver, tape measure etc. It is essential to follow the instructions on the plan while building. However, you can adjust the table size as you wish. You may also like to check out diy welding table.
This project involves building a DIY gaming table like this one by shanty-2-chic that can be used for a variety of games including chess, checker etc. It Is designed to also function as a coffee table, providing extra functionality. The top of the table is made to flip over. The project is quite easy to build, it is placed at a beginners experience level.
To build this gaming table project, you will need lumber, screw, gum, paint and other materials. You will need tools like a mitre saw, chisel, brush, and others. The project can be completed in a weekend and costs about $40 in lumber.
Board games are fun to play, and building this DIY board game table by imgur will make you even enjoy it more. To build this project, you will need wood boards. The legs for the original plan were purchased and attached directly. Other materials include screws, sandpaper etc. you will also need tools like a jigsaw, circular saw, misc hand tool, and drill.
The plan is placed at an intermediate experience level, and it can be completed within a few days. Upon completing the other parts of the table following the project, you can then couple everything and attach the legs. Related: diy table saw.
This DIY outdoor table by blackanddecker is functional, durable and attractive. It can serve as both a gaming table and a dining table. The table has enough room for six people, and its portable enough to fit almost anywhere in your patio or deck.
To build this table, you will need; plywood of different sizes (all listed on the plan) and cedar board. You will also need materials like a screw, wood glue, as well as tools like drill, jigsaw, hammer, router etc. the plan contains an in-depth step by step guide on how to build from scratch. The project can be completed in a weekend.
Outdoor Checkers Game Table
14- High-End Gaming Table
The next project we have involves building an all-incorporating DIY gaming table by makezine with a built-in flat screen TV for playing software driven games. This table is versatile and can handle all types of games, from miniatures, to board games and RPGs. The original plan was made from an old gaming table. It has a size of 4” x 4”, which you can easily modify to suit your needs.
To build this table, you will need materials like a lag-bolts for the legs, Wood screw, Wood Putty, Wood Treater, Stain, Polyurethane and others. You will also need tools like mitre saw, drill, jigsaw and others. The project can cost as little as $150 with small savings listed in the plan.
This project involves converting a dining room table into a functional tabletop gaming table like this one by boardgamegeek. The original gaming table plan has a total playable area of 61 x 41”, with a raised border around it. It also has shelves below the table to place things like cell phones, etc.
To build this project, you will need a wood board and other materials like foam, tablecloth, adhesive, etc. The total cost for the board and fastener is about $150 at the depot. You will also need tools like a staple gun, drill, etc. The project can be completed in a weekend, and it’s relatively easy to construct.
This plan involves building agaming table like this one by caethial.tumblr.com that can fit perfectly into the house. The size is big enough to accommodate three persons. The gaming table has a 40” TV attached to it and is connected to a touch screen workstation running display maps, and all the details needed for the game.
This plan contains information to convert an existing table into a DIY gaming table like this one by instructables. The plan contains specific measurements, however, its designed to allow you to change the dimensions easily.
To build this tabletop gaming table plan, you will need plywood and other materials like pipe clamps, wood conditioner, and wood stain. You will need velvet or similar high-quality fabric for the tabletop. The original gaming table plan was coupled with glue; however, you may use screw or nails. You will also need tools like a mitre saw, drill etc.
The top of this interchangeable surface gaming table is created with one sheet of plywood. The sides and legs were created from a recycled mantel. The cost of building agame table like this one by imgur is under $20, making it an affordable asset for any family.
These free gaming table plans will show you how to build a table like this for your home. The table will help bring the family together for years of gaming fun. The interchangeable surfaces let your family enjoy playing their favorite games on one table so this piece of furniture won’t take up much space in your home.
Use these free plans to create a DIY gaming table like this one by inmyownstyle from an unused coffee table. If you have a coffee table that you no longer use in the living room and have wondered what to do with it – check out this great idea.
A coffee table can be recycled into a portable gaming table so it’s easy to move around in any room of your home. Add a shelf on the bottom (if the coffee table doesn’t already have one) so you can store games when they’re not in use.
If you don’t already have a coffee table, they are inexpensive to purchase at a local thrift shop.
Poker night can be hosted at your house after you build this DIY gaming table by blackanddecker this 8-sided poker table allows each player to sit and play the card game comfortably, plus the DIY game table has pull out trays to hold snacks and drinks.
Easy to follow building plans will enable you to build a poker table like this in a day so you can play cards with your friends this weekend. Other card games can be played on the DIY poker table too.
This unique design creates two tables in one – it’s a coffee table and a gaming table. It is also built to last so it can be handed down as a family heirloom.
Have hours of fun with your kids and grandkids with this game table by geekdad. And when it’s not being used for playing games, slide the top shut and use it as a traditional coffee table.
Follow these free gaming table plans and build a priceless piece of heirloom furniture for your family to use today and future generations years from now.
Toddlers learn through play and this DIY gaming table by the36thavenue will help your child learn while having fun. The table is ready-made from heavy duty plastic and would make a great outdoor game table for a toddler.
The table top is covered with games created from self-adhesive vinyl that is easily changed as the toddler grows. The plastic table is sturdy enough to support the weight of a toddler and the table can double as an outdoor picnic table.
Easy clean plastic and vinyl is great for toddler furniture and items that stay outside. The ready made table is cheap so you may want to create two – one for outdoors and one for indoors.
This is an ideal gaming tables plan for small spaces. It’s a coffee table with pull outs for gaming. This design is a perfect DIY board game table by homemadebycarmona for multiple games. When the family is done playing, just push the pull outs back into place. The board games will be ready for playing next time and you can start right where the game ended.
When the table is not being used for gaming, it’s an attractive coffee table. Guests will not know that games are being hidden from view inside the coffee table. You can customize the table size to fit your living space.
These free gaming table plans by boardgeekgirl that I am sharing will show how to build pull out trays that can be customized to fit any size table that you have. The pull out trays provide space for cards, play money, and any other items needed to play games. The tray can also hold snacks and drinks while the family plays games.
Create these trays for a coffee table, desk, dining room table, or any other table surface you want to transform into a gaming table. The pull out trays are multi purpose and can be used in many different ways.
This DIY gaming table by instructables has a sunken center for games and a wide ledge around the perimeter of the table. The wide ledge is perfect for setting a laptop, tablet, or snack tray on.
The whole family can gather around this game table and do different things while being together in the same space.
Do schoolwork, eat lunch, hold a conference call, and play a game with all members of your family seated at this DIY game table.
This wooden board game table by nothans has everything you will need for an evening of family fun. It has a large space for gaming, pull out drink holders, side shelves for placing all game pieces, and the design even has electrical outlets built into the table.
Charge your phone or laptop while enjoying a game with family and friends around this large, wooden DIY gaming table. The detailed instructions will make this DIY project easy enough for a beginner.
The last one we have is a multipurpose sturdy wooden table on youtube that can be used for dining, entertaining and playing a multitude of games. With a sunken center, side shelving, cup holders, electrical outlets, cord storage, and several other features, this multi purpose table is ideal for a growing family.
Watch this YouTube video to discover how to create this multi functional gaming table that will become the most used location in your home. Even when the table is not being used for gaming it’s sure to become the favorite gathering place for the family.
The easy to follow video instructions make this a simple DIY project that can be completed in a weekend.
Conclusion
Conclusively, only a few things beat an evening with friends or family playing games. Make your home more comfortable by building any of our above listed DIY gaming tables.
References:
Gutenberg, by Andrew Steinmetz, pub: November 29, 2009, “The Gaming Table”, https://www.gutenberg.org/files/531/531-h/531-h.htm
The University of Melbourne, By Melissa Rogerson, “The ongoing popularity and variety of board games, especially among adult hobbyists, can teach us about how we can better design the digital versions”, https://pursuit.unimelb.edu.au/articles/loving-the-bits-and-pieces
UNLV University Libraries, Fall 2012, Bama Varsanyi University of Nevada, Las Vegas, “Perfecting the T ecting the Table Games Dealer: Impr able Games Dealer: Improving Initial T ving Initial Table Games able Games Dealer T Dealer Training Curriculum t aining Curriculum to Create Mor eate More Versatile Gaming ersatile Gaming Employees” https://digitalscholarship.unlv.edu/cgi/viewcontent.cgi?article=2482&context=thesesdissertations
A DIY privacy screen provides many benefits and only requires a minimal investment of time and money. An outdoor privacy screen will give you the feeling of seclusion even if you have close neighbors. Not only is a DIY privacy screen suitable for use on a patio, deck or pool side to prevent unwanted onlookers, these easy to build screens can also be built to hide an eyesore in the yard and increase property value. No one wants a view of a tool shed or other unsightly backyard structure, but a decorative privacy screen with hanging flower pots adds a pop of living color to any outdoor location. Check out these 33 free diy privacy screens we have prepared for you to find the one that will provide the seclusion and separation that your landscape needs.
1- Slat Wall DIY Privacy Screen
The first one we have is a simple slat wall hides a tool shed and provide vertical space for hanging planters.
Decide on height and width of wall
Dig two holes 2 feet deep with a post hole digger
Place fence posts in hole and file in holes with concrete
Allow concrete to set up and harden for two days
Attach wood slats horizontally to the fence post with screws, leaving a 1 inch space between each slat
Create a dual purpose item with this diy privacy screenidea by thisoldhouse. Attractive and easy to build, this idea provides you with privacy from the neighbors and a place to grow plants. Made from cedar for a long lasting screen that can withstand the elements and provide you space for an outdoor herb garden.
Enjoy your glass of wine at sunset in privacy with this attractive outdoor wall by homedepot. Perfect addition to an outdoor deck, this privacy wall provides seclusion and separation from neighbors. Add a few vertical planters to the deck wall to drown out the traffic noise.
Procure enough old doors to create the length of screen desired
Paint each door a different color with exterior, high gloss paint
Allow paint to dry, then attach doors to each other with hinges
Stand upright at angles in selected location
The angled doors should provide enough secure support to keep the doors upright. However, braces can be added to the back side for additional support. You may also like to check out diy screen doors.
Use roofing tin to create a focal point on a privacy fence by craftytexasgirls. A good way to use leftover roofing tin to create an outdoor area that is inviting as well as secluded.
Living in a subdivision offers families a lot things, but private outdoor space is not one of those things. Create your ownpatio privacy screen like this one by loweswith this idea so you can enjoy outdoor living without everyone in the subdivision seeing what you’re doing.
Easy to build and lightweight, this PVC pipe privacy screen by hgtv can be moved anywhere outdoors where you want a little privacy. Place it in front of the hammock for a quiet afternoon nap, then move it to the outdoor cooking area when it’s time to fire up the grill and prepare dinner. Easy to fold up and store during the winter. You may also like to see pvc pipe projects.
Add a decorative touch to your patio or deck with this attractive diy privacy screen by diypassion. Wood placed in a classic chevron pattern will provide separation from neighbors, add beauty to your outdoor living space and increase the value of your home.
This is a perfect solution for people who have neighbors living on a hill above them. When homes are located above yours, a fence or wall does not provide the desired privacy, but a simple pergola will. Make it a permanent structure or temporary with these free plans by hometalk.com.
A simple and attractive outdoor privacy solution like this one by organizedchaosonline is the use of lattice panels. Available in wood or composite material, lattice panels are easy to cut to size, lightweight and provide privacy without completely blocking the sunlight and fresh air.
Great for blocking out the afternoon sun, but still leaving space to view the landscape. Simple and eco-friendly to build, this bambooprivacy screen by ladyleeshome can be built to any size using these step by step plans. Easy to attach to an existing wood frame porch. You may also like to check out diy screened in porch.
Easy to build, easy to use. This wood screen is portable and can be placed anywhere in the landscape where a little seclusion or shade is desired. The woodprivacy screen like this one by thisoldhouse can be built as large as needed, then folded up into a small size to be stored away for the winter. Add wheels on the bottom for easy mobility.
Living in the city or very close to your neighbor’s house makes having a privacy screen like this one by nelidesign essential. But if the porch or patio privacy screen is a solid piece of wood it hinders the airflow and impeded the view.
Create the best of both worlds by building this DIY ventilated privacy fence that has wooden slats that can be opened and closed as desired. Close the wooden slat when complete privacy is desired and open them when airflow and a view is desired.
Use this outdoor privacy screen idea by pineandpoplar to create a focal wall for your outdoor space. Instead of just building a blank wall between you and your neighbor, use that wall to grow plants.
The vertical space is ideal for attaching planters and filling them with living greenery. Low-light vining plants that will spill over the planters will make the outdoor space cozy and inviting while the wooden privacy wall will block the view of nosey neighbors.
This DIY privacy screen by the-brick-house is ideal for use on the front porch of a home that sits near a roadway. The horizontal slats provide enough privacy from passers-by without completely blocking the view from the inside out.
You can still enjoy filtered sunlight shining through the slats and see what is going on outdoors. The people who are walking on the sidewalk or driving on the roadway won’t be able to see through your front window into your home.
Inexpensive and easy to build, this front porch privacy screen will also improve the curb appeal of the home and increase property value.
Enjoy your outdoor hot tub in total privacy with this DIY privacy screen idea by diynetwork. Four cedar panels are created in a folding door style so they can be placed where they are needed and folded for easy storage.
The cedar frame is covered with fence wire and then that is covered with fabric for a customized look and size. Attractive, lightweight and inexpensive to build.
The small open squares in the panels allow for plenty of light to filter into the space and won’t hinder the view. Each privacy panel is suspended from the top of the porch with a chain and attached to the porch rail with another chain. The chains hold the panels securely in place but make the panels look as though they are floating in the air.
If you enjoy spending time in your garden but have neighbors close by, this idea is for you. Enhance the appearance of your garden area while blocking the prying eyes of neighbors with this garden screening idea.
This idea recycles old bi-fold closet doors and gives them new life as a DIY privacy fence like this one by interiorfrugalista for your backyard garden. Easy and inexpensive to create, plus this idea will keep usable doors out of the landfill.
This is an ideal design for a patio privacy screen by hometalk and is easy to customize. Bamboo is cut to the desired length and tied together to create a durable, lightweight privacy screen that will last for years.
Use this design to create a patio retreat with an oriental theme so you can relax and de-stress after a long day. The bamboo privacy screen can be created to remain in an extended position or rolled upwards to allow more sunlight to shine on the patio.
Use this DIY idea to build a privacy screen for your outdoor living space that will also double as a trellis for climbing vines. Backyard privacy ideas like this one by familyhandyman that are attractive and functional make outdoor living space more comfortable while adding value to the property.
Make a focal point for your outdoor living and create a feeling of privacy for this easy DIY project.
Use these free plans to build a free-standing privacy screen that can be placed anywhere in your landscape. Use this DIY project by gardengatemagazine as a garden screening idea or to create a personal private outdoor space.
Easy and inexpensive to build, this free-standing privacy screen idea has multiple potential uses in the landscape. Build one to hide a heating unit, a pool pump, a trash receptacle, or any other unsightly object in the landscape.
This idea will enable you to transforms a tiny front porch with an unsightly view of trash cans into a welcoming entrance-way with an attractive view of trellised plants. Easy to build and customize for use on any front porch.
This YouTube video will take you through the building process so you can easily build this living wall DIY privacy screen on youtube.
The spaces between the wooden slats allow sunlight and air to come through and the living greenery creates beauty and privacy. Recycle wooden pallets and paint wood to match your home’s exterior for a professional appearance and increased curb appeal.
29- Thrifty Bamboo DIY Privacy Screen
Make your outdoor porch feel more like a room with the use of these thrifty bamboo privacy screen panels by christinamariablog. Create as many or as few as you want to shield the outdoor area from direct sunlight or neighbors’ view.
The bamboo is inexpensive and long-lasting, so it won’t break the budget to create several of these DIY panels. The bamboo panels are also easy to make and will only require minimal tools for installation.
When kids are small the clutter accumulates both inside and outside. One way to keep the yard looking neat and allow kids to be messy with toys is to build a DIY privacy screen fence byana-white.
Use these free plans to learn how to build an attractive solid fence that will hide all the clutter without hiding the beauty.
Use these easy to follow plans to build a DIY privacy screen like this one by homemadebycarmona that will hide your unsightly garbage cans. Improve the outdoor view and help keep the odor away from the living area with a wooden privacy screen in front of the garbage cans.
Reduce the amount of measuring and cutting for this DIY project by ehow by using ready-made lattice panels. These panels are pre-cut and painted so much of the work has already been done for you.
Lightweight, easy to handle and affordable, lattice panels allow the sun and sir to come through while providing you with a little backyard privacy.
These plans show you how to build a DIY privacy screen by fromhousetohome for your porch that looks like a work of art. Make your porch feel like an indoor room complete with artwork on the walls with this unique idea. Easy to follow instructions will show you how to build your own decorative privacy screen.
Ready made panels make this DIY project quick to build so you can enjoy your outdoor space soon rather than later.
Building a DIY solar air heater is a cost-efficient way to heat your garage during the winter months. Draw the energy from the sun to produce heat so you can continue to work in your garage or out building all winter without increasing the cost of your monthly utilities. A solar air heater is also an eco-friendly way to heat a garage (or home) with a renewable energy source so you will be leaving a smaller carbon footprint on the planet.
Check out these 17 easy to build solar air heaters and choose the plans that are right for your heating needs this winter.
1- DIY Solar Garage Heater
Check out these free plans that will show you how to install solar panels on the roof of your garage so you can have electrical power for a heater and charging your battery operated car.
Free electricity is what you will get when you follow these solar air heater plans. These plans are detailed and the solar panels won’t be an eye-sore on top of your garage but will actually look very nice.
Not only will these solar panels provide you with enough free electricity to power a heater in your garage during the winter, you can stay cool running an air conditioner in the garage during the summer. Charge your electric car, power your tools, and whatever other electric appliances you want in your garage for free. You can keep your garage warm with little cost this winter so you can enjoy spending time in it.
Many people have hobbies they enjoy doing in the garage but the cost of heating the garage during the winter months makes their hobbies inaccessible when it’s cold. Change that and enjoy your hobbies year-round by installing solar panels so you can have a DIY solar heater like this one by instructables for the garage.
For some people a garage is more than just a place to park the car and store Holiday decor, it’s their sanctuary. The garage is the place where they can go for a little while each day and have some alone time. But if it’s cold and dreary outdoors and the garage does not have heat, it’s not the sanctuary they need.
Building a DIY solar heater for the garage is essential for being able to use the garage during the cold winter months. Follow these plans so you can have electricity and heat in your garage.
Building a DIY Solar Garage Heater, Image via: instructables
2- Solar Air Heater
Stay warm in your garage without spending any money on electricity with a solar air heater like this one.
Follow these detailed plans so you can build a DIY solar heater for your garage or other outbuilding. You can harness the warmth of the sun to provide heat inside your off-grid garage or another outbuilding that you need to be in during the cold winter.
Work does not stop because the snow fall and the temperature dips below freezing so you need to have heat inside your garage so you can continue working year-round in a comfortable environment.
These free plans for a DIY solar heater for garage by instructablesprovide written instructions, pictures of the building process, and a construction video so you can all the information needed to build one for yourself.
Don’t work in a cold garage this winter, stay warm with a solar heater you can build yourself. You may also like to check out diy solar pool heater.
You will be able to stay warm and be productive throughout the winter when you have a heated garage to work in. You can keep your garage warm for little cost when the power is coming from the sun and it’s free.
Complete all those projects that you have been putting off and enjoy the winter more inside a warm garage. If there is no heat in the garage or workshed, projects do not get done during the cold winter months. This results in way too many projects that need to be taken care of in the spring and summer. It’s impossible to get them all completed before winter begins again so the cycle of not being able to work in an unheated garage starts all over again.
Break that unproductive cycle and get the most out of your garage by installing a DIY solar heater and stay warm and productive this winter.
Solar Powered Heater For Garage, Image via: instructables
4- Desk Top Solar Air Heater
Every garage needs a desk and a chair so you can sit down and draw up your work plans. The desk can also be used to hold your computer and a space to eat lunch. Sitting at a desk during the winter can also get cold without a nearby heater.
Stay warm while you’re sitting at your garage desk with a desk top solar heater. These free plans will show you how to build a DIY solar air heater like this one on youtube that is small enough to sit on top of your desk yet powerful enough to keep you warm.
The off-grid design will not cost you anything to use and the building cost is minimal. Ideal for use in your garage so you won’t have to go indoors to get warm when you sit down. This desk top heater is great and it can be moved as needed to keep other areas of your garage warm.
Window air conditioning units have been around for decades providing cool air for one room. With these diy solar air heater plans by motherearthnews you can build a DIY window heater that will provide dependable, efficient heat for one room.
Create an aluminum frame (an old storm door frame is ideal) that will reach from the ground to the house window.
Add blackboard and foam insulation board to collect heat from the sun.
Place at a 45 degree angle in a south-facing window and enjoy the free warm air coming in the window.
These plans will show you how to create a largediysolar heater like this one by instructablesthat fits securely on the exterior of your home. The large size enables this DIY heater to provide warmth for the entire house.
Convection DIY Solar Heater For Garage, Image via: instructables
13- Cheap DIY Solar Air Heater
Recycle aluminum storm windows, aluminum cans, a couple of fans and some insulation board into an efficient diy garage heater like this one by sites.google.com. If you have the materials on hand, this solar heater could cost you almost nothing.
Lower your home heating costs significantly with this easy to buildsolar air heater by homepower. On sunny winter days, home heating costs will be slashed to zero. These plans allow you to build an efficient DIY heater for under $100.
DIY Air heater for under $100, Image via: homepower
15- $100 DIY Solar Water Heater
These diy solar air box heater plans by instructableswill show you how to build a large heater for around $100. The large size enables the box heater to produce enough warmth harnessed from the sun to heat a large garage. You may also like to check out diy solar water heater.
$100 DIY Solar Water Heater, Image via: instructables
16- Large DIY Solar Air Heater
This large diysolar air heater by rimstaralso utilizes empty soda cans in the design. The large designs provides enough solar heat to keep a 1,000 square foot garage or home warm.
Large DIY Solar Air Heater keep a 1,000 square foot garage or home warm, Image via: rimstar
17- Solar Thermal Collector
A solar thermal collector like this one can be built very cheaply using recycled materials. It’s efficient and can easily provide enough power for a DIY solar heater like this one by instructables for a garage.
This solar thermal collector is reliable and you can depend on it to collect the solar energy needed to heat your garage. Depending on the size of the solar collector, it might collect more than what a heater will need so you will have extra electrical power to use for other things in your garage.
It would be great to have a warm place to work during the winter without increasing your utility costs. These free plans will provide you with detailed instructions so you can build a solar thermal collector that is just the right size for your garage. The location and tilt of the collector will determine how much solar energy it can collect. You want it to collect the maximum amount of solar heat during the winter and the minimal amount during the summer.
These plans will explain all that you need to know for building and installing your own DIY solar thermal collector. You will be able to keep your garage warm with very little out of pocket building expenses and no monthly heating bill.
Science Direct, Volume 228, 25 June 2023, “Experimental study of a solar air heater with modified absorber plate through square obstacles with threaded pin fins”, https://www.sciencedirect.com/science/article/abs/pii/S1359431123005732
IOP Science, Singuru Rajesh et al 2019 IOP Conf, “Performance assessment of a sustainable Solar Air Heater (SAH) by using different profiles of absorber plates”, https://iopscience.iop.org/article/10.1088/1755-1315/312/1/012023
MDPI, Energies 2021, “Eco-Friendly and Economical Solar Heater Design Using Internal Structure and Phase Change Materials”, https://www.mdpi.com/1996-1073/14/21/7423
Your garden may be filled with all the eye candies like displacement of floral pots, benches, and vertical gardens, but is there something unique? Don’t you want to have something that differentiates your garden from the rest? You can work this out by simply using the old pallets. You must have never thought about creating beautiful decors from the pallets that you have in the junkyard or storeroom.
It is the right time to begin with some fun activities, which would certainly result in the exquisite and chic look. After all, your garden is closer to your heart. This excerpt is all about pallet garden ideas, and uses of pallet furniture in the garden and home; which can assist you to make your garden more worthwhile.
You can join the pallets together by forming a base, sides and back in order to provide it a look that resembles a couch. Once done, you can simply add cozy and comfortable pillows or any old bed sheet to make it soft and enjoyable for sitting.
You can place this homemade pallet couch in your garden and enjoy reading or talking with friends. It is a wonderful seating to enjoy with your spouse. Well, if you do not have a pallet in your house, do not worry – simply buy them from any store. One of the most inquired questions, how much do pallets cost? They are hardly $5 to $6 per pallets.
2: Pallet screen planter:
As the name suggests, this is one of the wonderful garden pallet idea. You can place the pallet on the entrance of the garden in the vertical position. In the gaps, add the planted bottles with small flowers, plants and herbs. It gives an amazing appeal.
You can place a ladder and along the sides add wooden recycled pallets slabs with a good distance between each. You can place flowerpots or plant new flowers to fill the fertile gaps. Within a few months, you would get a beautiful place to enjoy in the garden. This is one of the highly adored wood pallet garden ideas.
4: Pallet Coffee Table:
You can simply take two pallet slabs can join them in a way to provide it a look of a table. Use this table to serve tea or food to the guests.
5: Pallet Furniture Glowing Bed:
You can have some fun with this kind of pallet bed idea. Place the pellets in such a way that there is some gap between each slab. Once you are done with fixing the base and the vertical stand, place some LED lights to make it a masterpiece. You can have this in the garden so for a perfect date.
6: DIY Pallet Swing Idea:
Take a pallet slab, tie it with solid ropes and attach it to the tree or any other firm support. Your garden swing is ready. You may also like to see porch swing plans and diy swing swing for garden.
7: Pallet Pathway Idea:
Enough of the red carpets and expensive rugs – place the pallets in the garden so that it can help you form a rug like look.
Rearing rabbits are an enthusiastic encounter, and rightly along these lines, for it’s tackling a considerable measure of obligation to bring new lives into the world. A huge rate of child rabbits doesn’t get by past weaning age. The mother is likewise in danger of death.
First-time rabbit mother’s likewise having a track record of losing their whole litter Keeping bunnies as pets are a big obligation and not only a passing whim, stage or amusement. There are many pet rabbit breeds, Downy breeds oblige day by day prepping.
Selecting a pet Rabbit breeds
You may select pet rabbit breeds according to the smaller bunnies and the larger bunnies. There are varieties of rabbits for the most straightforward, taking care of and fellowship of a rabbit general, make certain to have yours spayed or fixed by 6 months to counteract territorial checking and conduct. All rabbits make perfect pets! Anyway, there are a few different breeds of rabbits that are known for their diverse qualities and identity attributes.
Here are our list of best pet rabbit breeds
1.Mini Rex
The smaller than expected Rex Rabbits, which incorporate the castor, chinchilla, Himalayan, and others, are minimized; little pet rabbit breed with little ears and honestly think face. You don’t require costly rabbit supplies to prepare min Rex’s. This breed from breeds of domestic rabbits can make an incredible pet.
2.The Holland Lop
These minor, adorable little bunnies never surpass four pounds, and may be as little as two pounds, even as grownups. Holland Lop comes in numerous distinctive shades and hide sorts, including ticked, agouti, white, and strong patterns. The Holland Lop breed is best known for its hefty yet little construct, medium-thick hide, and floppy ears. It is one of the best rabbits for pets.
3.Dutch rabbit
There are more than four dozen distinguished types of pet rabbits, which fluctuate in size, color, hide sort, figure sort and ear sort. Dutch rabbit is one of them; this breed can develop any place from 3 to 5 pounds with med short, adjusted form. You may also like to check out meat rabbit breeds.
4.Mini lop
Any rabbit breed can make an incredible pet, but a mini lop is perfect. It can grow up to 6 pounds with a reduced bulky figure. Despite the fact that sweet, the breed has a tendency to be less dynamic contrasted with other pet rabbit breeds we are sharing with you. You need to do a ton of support before you can see a small cut shake its bunny tail.
5.Jersey wooly
The Jersey wooly are an extremely charming, extravagant pet rabbit breeds that develops just up to 3 pounds. They got thick woolly hide and to a great degree delicate demeanor that makes the breed immaculate house rabbit.
6.Florida white
The Florida white has a place with the minimal kind of rabbit with short, adjusted figure, round head, and thick upright ears. A Florida white is reasonably tempered when they’re legitimately standardized while they’re junior; you may need to fix or spay this pet rabbit breed to keep them carrying on splendidly.
7.Himalayan Pet Rabbits
Offering a name to the feline breed known for comparable markings, Himalayan rabbits are a most loved of reproducers and pet managers. They have a tendency to be little, with short layers and cool, accommodating identities. You may also like to check out giant rabbit breeds.
8.The Havana
A fabulous decision as a pet due to its adorable and fun identity, the Havana rabbit is little in size and fantastically charming.
9.Satin angora
A satin angora pet rabbit has long hide on the constitution, cheeks, and here and there on tip of ears. The breed’s hair strand is bizarrely praise that provides for it a silken gleam, accordingly the name glossy silk angora. You may also like to check out rabbit hutch plans.
10.The Harlequin
These rounds, medium-estimated pet rabbits have short layers with hued markings. They come in two fundamental hide assortments: “Japanese”, or red with markings of an alternate color, or “Jaybird”, characterized as white with hued markings. You may also like to check out tips on raising rabbits.
Building a rabbit hutch
As you arrange how to build a rabbit hutch, determine it offers the security and solace that rabbit’s requirement to flourish. The rabbit must be secured from sun, rain, and wind on all sides, but be permitted satisfactory ventilation. The legs of the box ought to be tall enough to secure the rabbits inside from puppies, raccoons, and different predators. In conclusion, as you assemble the pen you ought to pay special mind to fragments in the wood or unpleasant edges of the wire that can harm your rabbits’ eyes or nose.
Summary
So these are the rabbit breeds you can slelect for raising as a pet. These pet rabbit breeds have different characteristics and attributes. You can select any of these you like the most. Hope we guided you well in making the decision to purchase pet rabbit breeds.
The medicines that we see today, including the heavy antibiotics and the normal syrups, never existed century ago. However, people since inception have been taking a different form of medications for illness and other health problems. The power of herbal medicines cannot be overlooked at point time – prior to all the modern medicines, these herbal medicines even cured deadly diseases.
Once again, pharmacy is going into the herbal era to explore and bring out the human health benefits. This is because of the ease of use and yes, the affordability and the power to heal almost every human health disorder.
Unfortunately, we lack medicinal plant information and that is why never think of having some quick doctors (medicinal plants) at home. Indeed, everyone seems to be pleased and delighted with the importance of medicinal plants; are you intrigued to have a small healing garden of your own? I mean its fun and benefit for generations. People have always been inquiring about:
Are herbal remedies safe?
Which are the best healing herbal plants?
Is growing medicinal plants a great and beneficial hobby?
This excerpt deals with the most common medicinal plants and their uses – moreover, you would get to know about the medicinal plants list which can easily been grown at home. For your knowledge and better understanding, you can easily relate the information with medicinal plant pictures over the internet and grasp the idea in a better way.
In case of emergencies your little medicinal herbal garden would always stand besides you – for example, my mother was lucky enough to have aloe vera at home garden because I got burnt by the heater and during the cold nights there was no one to take me to doctor. Well, now you must check out the simplest yet effective medicinal plants that must be there in the garden:
This herbal plant can be gown under normal conditions because it just needs moist soil and sun exposure. The big leaves contain sap, which works amazingly against:
Burns
Wounds and cuts
Eczema
Skin allergies
The intake of aloe vera juice can heal:
digestive problems and appetite
Chronic constipation
ulcerative colitis
2) Marsh Mallow:
You must have an idea; it is the same plant from which edible marshmallows are obtained. The roots of this medicinal plant are extremely beneficial as they treat:
The best thing about this medicinal plant is it can be grown under normal climatic conditions. It is commonly known for its great benefits for the skin – however, it is amazingly for external uses like:
Insect bites
Sore eyes
Wounds and stings
It also works best for:
Fevers
Infections (chronic)
Varicose veins
4) Chinese yam:
These types of medicinal plants such as yam can be eaten to cure tonic effects in spleen and stomach. In addition, it helps in treating lungs and kidneys. You can also treat:
Tiredness
Diarrhea
Dry coughs
Poor digestion
Helps in weight loss
Problematic urination
Diabetes
Snake and Scorpio bites
5) Tea tree:
You must have heard about tea green a lot, especially for treatment against loss of hair and headaches. It contains amazing benefits like antibacterial, anti fungal and works best as antiseptic. In addition, it treats:
The leaves of this medicinal plant have mint like smell and provides nourishing image. It has big summer flowers, which can be rubbed against the skin for:
Animal bites
Mosquito bites
Sores
Herpes
The nectar that is used with water in form of juice is beneficial for:
Fevers
Colds and cough
Depression
Headaches
Upset stomach
Insomnia
7) Thyme:
This medicinal herb is mostly known for its strong antiseptic nature. It is wonderful when it comes to the treatment of:
Congestion
Stomach gas
Coughs
8) Basil:
You must have used this herbal plant ‘basil’ lot many times in food but have you ever tried it to heal flatulence? It has the power to treat:
Cuts
Lack of appetite
Stomach gas
scrapes
9) Sage:
You must have had used sage in your food – interestingly, it has the capacity to treat:
Skin infection
Gum infection (mouth infections)
Helps in digestion
Helps in unblocking menopause
10) Fenugreek seeds:
These herbal plants are very nourishing and carry great nutritional value – they can treat:
Labor pain
Inflammations
Digestion issues
Drain ducts
Diabetes (initial)
Blood cholesterol levels (low)
Refresh breathe
11) Comfrey:
This herbal Plant contains allantoin, which helps in a replacement of body cells naturally. In addition, it can treat:
bronchial issues
broken bones (weak bones)
arthritis
severe burns
cuts and acne
sprains
ulcer
12) Turkey Rhubarb
This medicinal herb works well for the digestion problems and maintains balance in the digestive system. This herb is very gentle and treats:
Constipation
Menstrual problem
Bladder problem
Diarrhea
Hemorrhoids
13) Ginseng:
This herbal plant is known for its natural ability to promote health and prolong the life. The roots can used to treat:
Peppermint is known as the world most powerful and oldest herbal plant that can treat human health effectively. It is enriched with Vitamins like A and C – contains manganese and iron. The leaves of this herbal plant can be used to treat:
Are you tired of spending long hours sitting in front of your computer? Do you want to improve your posture and overall health while working? If this is what you want, then a diy standing desk might be the perfect solution for you.
In recent years, the popularity of standing desks has increased as more and more people are realizing the benefits of working while standing up. While standing desks can be quite expensive, there is no need to break the bank to own one. With a little creativity, you can easily build your own standing desk at home while using very basic materials.
In this article, we have rounded up 13 DIY standing desks to get you on your feet while you work. You can build these DIY projects yourself, regardless of your budget or skill level. From the simple and affordable to the more complex and advanced, there is a DIY standing desk project on this list for everyone. You’ll find projects that are designed to convert your existing desk into a standing desk, as well as projects that involve building a brand-new standing desk from scratch.
Each project we have on this list is accompanied by a detailed description that includes the project’s cost, level of difficulty, estimated time to complete, necessary materials and tools, as well as step-by-step instructions and diagrams. We have also included links to websites and YouTube videos for each project, so you can easily follow along and start building your own DIY standing desk today.
Whether you are a seasoned DIYer or a beginner looking to try your hand at building your own furniture, these 13 DIY standing desk projects we have listed for you are sure to inspire and motivate you. So, what are you waiting for? Get ready to take your productivity and health to the next level by building your own DIY standing desk.
The cost of building this diy standing desk is around $100-$150, and to build this desk, you will need a sheet of ¾ inch plywood, a few 2x4s, some screws, a drill, a circular saw, and a jigsaw. Other items like sandpaper, wood glue, and a stain or finish are optional.
The skill level you need to have this diy standing desk project completed is intermediate and advanced, as it involves cutting the plywood and the 2x4s to specific sizes and angles. If the time needed to complete this project is one of your worries, you will need a day or two days to build your standing desk, depending on the skill level of the builder.
The website provides a list of materials, cutting diagrams, and step-by-step instructions with accompanying photographs. The instructions are clear and easy to follow, and the diagrams help to visualize the project.
If you want to have a custom-built desk without spending a lot of money, this project is perfect for you. Even if it requires intermediate to advanced woodworking skills, the instructions provided are clear and easy to follow. And with the right tools and materials, you can build this adjustable standing desk in a day or two. You may also like to check out diy computer desk.
Convert any regular desk into a diy standing desk by Instructables using this project design.The materials required for this project are a shelf, brackets, screws, and a hydraulic jack. All you need to do is, attach the shelf to the brackets and then attaching the brackets to the desk. After this, attach hydraulic jack ito the shelf to allow for height adjustment.
We recommend this DIY standing desk projectto be a great project for those who want a simple and affordable standing desk conversion. The hydraulic jack used in this project allows for easy height adjustment and the shelf provides enough space for a monitor, keyboard, and other essentials. This project is relatively easy to complete and can be finished in a few hours with basic tools. So what are you waiting for?
Here we have a project that involves building a standing desk on Youtube from scratch using wood, steel pipes, and fittings. The desk has a motorized system that allows for easy height adjustment. To build this standing desk you will need to cut and assemble the wood pieces, drill the holes for the steel pipes, and wire the motorized system.
This diy stand up desk is a more advanced project that requires some woodworking and metalworking skills. However, the end result is a very sturdy and versatile standing desk that can be adjusted to any height with the touch of a button. The motorized system used in this project makes it easy to switch between sitting and standing throughout the day, and the desk can be customized to fit any workspace. So wait no more, start building your own standing desk now! You may also like to check out diy gaming table.
4- DIY Adjustable Desk for Under $25
To build this diy standing desk by codeovereasy , use a cinder block and a wooden board to create an adjustable desk. Place the board on different levels of the cinder block to adjust the desk to different heights. Cut the board to size and sanding it down for a smooth finish.
Code Over Easy’s project is extremely budget-friendly, and it requires only a cinder block and a wooden board to be done. While this desk is not as stable as some of the other desks we will discuss in this article. It is a great option for those who want a basic standing desk without spending a lot of money. It is very easy to complete and can be built in less than an hour. You may also like to check out diy gaming table.
DIY Adjustable Standing Desk, we love this design, Image via: Code Over Easy
5- Standing Desk with a Clever Flair
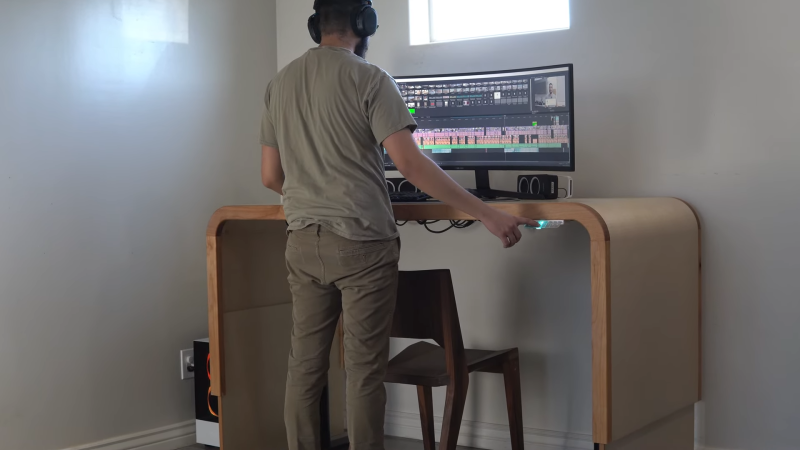
This project involves building a standing desk by hackaday with a unique design that allows it to be adjusted without any visible mechanisms. This diy standing desk is made using wood, steel pipes, and fittings. Getting this project done involves cutting and assembling the wood pieces, drilling holes for the steel pipes, and wiring the hidden adjustment mechanism.
If you are looking for a unique and stylish standing desk, we suggest this project to you. This desk’s hidden adjustment mechanism allows it to be adjusted to any height without any visible moving parts. Even if this project requires more than seven days to be completed, the end result is a very cool and modern desk that is sure to impress anyone who sees it.
This diy sit stand desk project by davidgunter is a step-by-step guide on how to build an electric standing desk from scratch. This website includes a detailed list of materials and tools needed, as well as instructions on how to assemble the desk frame and install the motor and control panel. The finished desk can be adjusted to different heights using a keypad, and this makes it easy to switch between sitting and standing positions.
DIY Electric Standing Desk, Image via: David Gunter
7- DIY Standing Desk with Crank
This video tutorial on youtube shows how to build a standing desk using a crank system for height adjustment. The project requires basic woodworking skills and tools, and the desk frame is made from metal pipes and fittings. The crank handle can be turned to raise or lower the desktop, allowing you to customize the desk height to your needs.
We found this diy sit stand desk to be an excellent option for those who want a more industrial or rustic look for their workspace. The desk frame is made from black iron pipes and fittings, which give the desk a sturdy and durable feel. Watch the tutorial and start building your own modern standing desk now! You may also like to check out diy router table.
8- DIY Standing Desk Converter
Learn how to convert a regular desk into a standing desk in this youtube video tutorial using a tabletop riser. This diy standing desk converter project requires minimal tools and materials, and the riser can be adjusted to different heights using a lever mechanism. The finished product is a portable and affordable option for those who want to try out a standing desk without committing to a full desk makeover. Watch this tutorial now and make your flexible standing desk effective!
9- DIY Standing Desk with Storage
The photo gallery of this website page showcases a custom-built standing desk by imgur with built-in storage compartments. The desk frame is made from wood and the top is covered in cork for a comfortable work surface. The storage compartments include a drawer, a cubbyhole, and a shelf for holding office supplies and personal items. Getting this project done requires more advanced woodworking skills and tools, but the end result is a functional and stylish standing desk that can be customized to fit your needs.
On the page, you will find detailed step-by-step instructions along with photos to guide you through the process. The finished desk has a modern, minimalist design and it is adjustable to suit your height. This DIY sit-stand desk project should take around 2-3 hours to be completed and will cost around $100-$150 depending on the materials you choose.
Building a Standing Desk, it is one of our favorite desk that are so easy to build., Image via: A Beautiful Mess
11- The $40 Standup Desk
Build a standing desk like this one by opensoul without investing too much money using this project design. This project involves using simple materials like cinder blocks and a board to create a makeshift desk. The project is quick and easy to complete, and the resulting desk is surprisingly sturdy. You will find in the page clear instructions along with photos to guide you through the process. So waste no more time!
This project is for those who already have a desk but want to convert it to a standing desk. To get this diy desk built by simplifiedbuilding, you will use a kit of pipe and fittings to create a simple frame that can be placed on top of an existing desk. The project is easy to complete and can be customized to fit any size desk. You may also like to check out diy puzzle table.
This project is designed for those who work in a cubicle and want to convert their workspace to a standing desk. To get this DIY stand-up desk done by jeffgeerling, you will need to use a few basic materials like PVC pipe and clamps to create a simple frame that can be adjusted to fit any cubicle. The project is quick and easy to complete, and the resulting desk is both functional and customizable. Visit the link provided now and start building your own DIY standing desk now!
Building a Cubicle Standing Desk, Image via: Jeff Geerling
Conclusion
DIY standing desk projects offer a cost-effective and customizable solution to the problems associated with prolonged sitting. By building your own standing desk, you can easily adjust the height, size, and style to meet your specific needs and preferences. The process of building a DIY standing desk can also be a fun and rewarding experience that allows you to unleash your creativity and hone your woodworking skills. But beyond the personal benefits, standing desks also have important health benefits. Research has shown that standing desks can help improve posture, reduce back pain, increase energy levels, and even lower the risk of chronic diseases such as obesity, diabetes, and cardiovascular disease.
So if you are tired of sitting all day and looking for an affordable and practical way to switch to a standing desk, why not give one of our DIY standing desk projects a try? With the right materials and tools, you can create a beautiful and functional workspace that will help you feel better, work better, and live better. Waste no more time and pick one now!
Based upon some of the most common questions asked I have prepared a questionnaire.
FAQ’s
Can I convert my existing desk into a standing desk?
Yes, you can. There are several DIY ways to convert an existing desk into a standing desk. Metal pipes can be used to create an industrial-looking standing deck that can fit on top of your existing desk. Another idea is to simply add a bed tray on top of an existing desk to make the conversion from sitting to standing.
Is it better to sit or stand all day?
Standing for the majority of the day will improve your overall health. Standing instead of sitting will help lower blood sugar, reduce stress, reduce the risk of heart attack, and leave you feeling less fatigued at the end of the day.
Sitting all day can be detrimental to your health by increasing the risk of developing chronic health conditions. Sitting all day also causes weight gain and weakens muscles.
Does a standing desk fix posture?
You can develop low back pain from sitting all day. Sitting places pressure on the lower vertebrae and causes them to compact. Sitting at a desk also causes you to be in a hunched-over position while working online and your posture will suffer for it.
Standing relieves the pressure on the lower back and having the monitor at eye level keeps your back and shoulders in an upright position instead of being hunched over.
Is it Cheaper to Make Your Own Standing Desk?
You will save a significant amount of money by making your own standing desk. You can choose from many DIY ideas and styles, some of which may enable you to do the conversion project for free.
Recycle materials whenever possible to save money and keep usable items out of the landfill. In addition to it being cheaper to make your own standing desk, it will also allow you to customize your desk area to meet your exact needs. The DIY standing desk will also be a unique one of a kind piece of furniture.
References:
SHRM, February 22, 2017, Tamara Lytle, “Promote an Active Workforce with Standing Desks”, https://www.shrm.org/topics-tools/news/hr-magazine/promote-active-workforce-standing-desks
National Library of Medicine, Published online 2017 Aug 21, “Taking a Stand: The Effects of Standing Desks on Task Performance and Engagement”,
https://www.ncbi.nlm.nih.gov/pmc/articles/PMC5580641/
Health.Harvard, By Robert H. Shmerling, MD, September 23, 2016, “The truth behind standing desks”, https://www.health.harvard.edu/blog/the-truth-behind-standing-desks-2016092310264
A homemade mosquito trap is an inexpensive and easy way to make outdoor summer activities more enjoyable. One of the main issues that keep people indoors during summertime is the abundance of mosquitoes. Not only are the tiny creatures annoying as they buzz around the head and face area, their bites are painful and potentially dangerous.
Several deadly diseases are carried and transmitted by mosquitoes, including several types of encephalitis, west nile virus, zika virus, dengue and yellow fever. Beloved pets are at risk when bitten by a mosquito, heart worms are transmitted to dogs when bitten by a carrier.
A homemade mosquito trap will help protect your health (and the health of your pets) while you and your family enjoy having a BBQ and swimming party in your backyard. Some of the DIY mosquito trap designs are so small that they can be discreetly placed so no one has to be aware that a mosquito catcher is around.
These disease-carrying blood suckers also find their way inside our home, so it’s advisable to build an indoor mosquito trap to work in conjunction with outdoor traps. You will have the best ways to get rid of mosquitoes with these 13 homemade mosquito trap ideas.
Soda Bottle Homemade Mosquito Trap
Recycle a soda bottle into an efficient mosquito catcher like this one by askaprepper that will work both outdoors and indoors. The remaining ingredients needed to make this design will cost less than $5.
The water, sugar and yeast in the bottom of the recycled soda bottle create a cloud of carbon dioxide which attracts mosquitoes. Once inside the bottle, the flying pests can’t escape. The black paper around the exterior of the bottle creates an inviting dark environment for the pests while hiding from view the mosquito carcasses inside.
A five gallon bucket has so many uses around the house, including being used as a DIY mosquito trap. Two types of pesticides are used in the making of this best mosquito killer by gardeningchannel for outdoor use. For a few minutes of your time and a few dollars, you can create an effective mosquito killer that will keep your backyard pest free for 90 days. Create one of these at the beginning of summer before the mosquito population become rampant so their numbers will be kept low throughout the warmest time of year.
This homemade mosquito killer uses a black sock and bucket to put an end to all those blood sucking pests in your yard. This idea is so easy and inexpensive, yet so very effective. A great homemade mosquito trap by instructables to create for use on large pieces of property. This homemade design is reportedly used on military bases with great success. Military bases located in humid, tropical environments have more than the normal population of mosquitoes plus an increased risk of disease carrying mosquitoes in the area. So if this DIY idea works for the military in overgrown, humid, jungle regions, it will certainly work in your backyard. You will need four of these DIY traps per acre of land, but at less than .50 cents a piece, they are affordable. You may also like to check out plants to repel mosquitoes and flies.
Keep mosquitoes away with this simple solution by instructables that is created from a window fan and screen. Detailed building instructions provide you with a step by step pictorial plan plus a video that will take you through the building process with ease. The fan can be powered by electricity or a battery, so this trap is portable and can go with you on a camping or fishing trip. This design will also reduce the air temperature by keeping the air circulating.
This lighted mosquito trap can be used indoors or outdoors. Easy to follow YouTube instructional video makes building this DIYmosquitotrap very easy. Use scrap pieces of wood that you have on hand to save money. The small design makes the trap easy to place in a location where it won’t be visible by house guests. Perfect for recycling small pieces of wood and for use in every room of your home.
https://www.youtube.com/watch?v=ZygdwbvxpGM
Coffee Ground Mosquito Repellent
Save your used coffee grounds and watch this instructional video to discover how to transform those used coffee grounds into an effective mosquito repellent by naturallivingworld. Easy to make, very inexpensive and will keep the blood sucking insects away so you can enjoy your outdoor space without being bitten. As an added bonus, coffee ground also repel other flying insects, like wasps and flies. Use this idea at your next summertime outdoor function so guests won’t be exposed to potential health threats caused by mosquito bites.
This is a great DIY mosquito trap by theindianspotto use inside the home. It’s an effective trap that is small and uses no chemicals. The sweet aroma of vinegar attracts the mosquitoes (and flies) into the trap, then the dish detergent causes them to sink instantly to bottom so their biting career is over.Use recycle water bottles to create this effective and inexpensive trap, place one in every room of the home, then open your windows and enjoy the fresh air without having to swat at mosquitoes. Because the ingredients inside the recycled bottle are natural, this design is safe to use around children. You may also like to check out homemade fruit fly traps.
For under $1, you can get rid of those pesky mosquitoes like this one by thegoodsurvivalist. Great for use indoors since the fan will kill pests and keep cool air circulating. This instructional video will show you how to make this idea come to life with very little effort or expense. Mosquitoes are sucked into the netting and left to dry out by the wind created by the fan. Protect yourself from the west nile virus, malaria, yellow fever, canine heartworms and a host of other diseases carried and spread by mosquitoes.
The very things that often become a breeding ground for mosquitoes can be turned into a death trap for them. Mounds of old used tires hold stagnated rainwater and attract mosquitoes as an ideal place for them to lay their eggs. This idea will show you how to recycle an old tire to create a homemade mosquito trap like this one by smithsonianmag. The chemical scent in the rubber along with the warmth generated by the black rubber when it’s exposed to sunlight is a strong attraction for mosquitoes.
An old plastic bowl and a 9 volt battery can be transformed into an effective mosquito trap. Inside the bowl are two things mosquitoes finds irresistible – yeast and brown sugar. These two ingredients combine to give off carbon dioxide and attract all the mosquitoes that are in the area. This effective co2 mosquito trap on youtube costs less than $5 and is easy to make with this detailed video. The small size makes them good to use in different rooms of the house so your indoor living space will be pest free. You may also like to check out homemade wasp traps.
Homemade Solar Mosquito Trap
This is the DIY trap on youtube you need to create when the mosquito population makes going outdoors a miserable experience for you. Catch and kill thousands of tiny blood suckers each night with nothing more than a fan and a screen. No tools are needed for this DIY project, the screen wire is attached to the fan with magnets and the dead pests are removed by simply shaking off the screen wire each morning. Easy, effective and inexpensive. Follow this YouTube video for all the DIY details and start killing the mosquitoes by the thousands tonight.
Low Cost Bait
Use this idea to create low cost bait to place in areas around your home where there may be standing water. Rain barrels, rain gardens, ponds and other yard accessories often contain water. We need and want those accessories, but they are prime locations for mosquitoes to use for breeding grounds. This DIYbait by motherearthnews can help reduce the mosquito population and allow you to keep your water features. This bait has been used with success in underground storm drains and cisterns, and the low cost makes it a good choice to try in your backyard near a water feature.
Dry ice is frozen carbon dioxide, and carbon dioxide is irresistible to mosquitoes. Dry ice is the main ingredient in this homemademosquitotrap by doityourself that only takes minutes to makes and is very effective for outdoor use. This is a great way to keep the pests away during an outdoor event like a birthday party or wedding.
Put on a pair of gloves before handling the dry ice, then tie twine around the packs and suspend them from trees. Create one inexpensive trap for each piece of dry ice and place it near the dry ice. Place them away from areas where people will be gathered. As the carbon dioxide is released into the air, multitudes of mosquitoes will flock in and get caught in the DIY traps, leaving you and your guests alone. You may also like to check out homemade tick repellents.