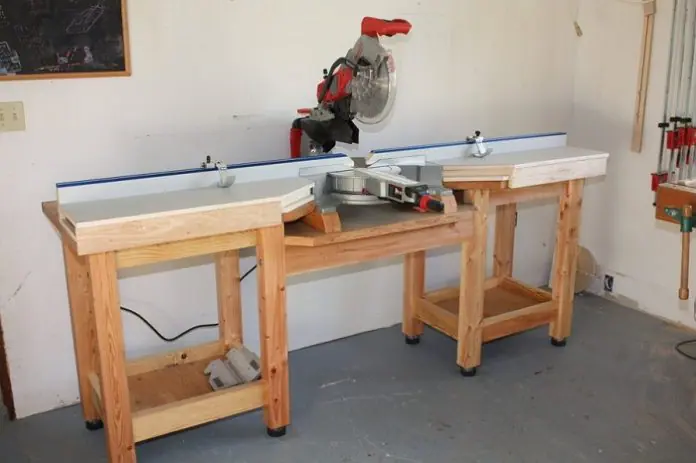
16 DIY Miter Saw Stands For DIY Woodworkers

A DIY miter saw stand helps makes your cuts easier and more accurate. If you have used a miter saw to make cuts before, then you will know that it’s a hassle. You have to deal with the saw moving all over the place, as you work. The saw stand prevents this.

Another reason to make a DIY miter saw stand is because its way more studier than those bought from the store. Not to mention cheaper.

If you desire to build a table meter saw, then you should check out these 16 DIY miter saw Stands for DIY woodworkers.

Related: DIY sawhorses, DIY table saws and fenceshomemade power hammers, diy gaming table, diy puzzle table and homemade propane forge.

DIY Miter Saw Stand Plans

1. Mobile Miter Saw Station

It can be hard to find the exact miter saw stand that suit your miter saw, but you can build a DIY saw workstation according to its exact specification.

Building a DIY stand avails you the chance to make it according to the exact measurement of your saw and add any feature you want. You can add storage, dust lines etc. The original DIY miter saw stand is 39” tall with a 93” wide side wing. It has a spot for dust and vacuum control and a shelf for storage. To build this workstation you will need 2 sheets of plywood, wood screws, bolts, washers etc.

DIY Miter Saw Stand

2. Mobile Miter Saw Workstation

This plan involves building a DIY miter saw stand that can be used in the shop or at any job site. it has a built-in infeed and outfeed features. The table is designed to provide adequate support during the cut.

Before you start building, diy miter saw stand you will have to find the height of the miter saw deck, so it would be the same measurement as that of the infeed and outfeed tables. You will need plywoods, gussets, and basic tools like hand saw, marking gauage, screwdriver, etc. the project can be completed in a day. Its placed at an medium difficulty level.

DIY miter saw

3. Rolling Miter Saw Stand

The miter saw is one of the most important tools for DIYers, having one will make your other DIY project easier to build. This miter saw plan is designed to ease the stress that comes with wood cutting and sanding.  It also rolls very easily, allowing you to move it wherever you please.

To build this diy miter saw, you will need wood boards, plywood, pocket-hole screws. You will also need tools like hand saw, screw drivers, drill, etc. the project can be completed within a few hours following the detailed steps on the plan.

DIY Miter Saw

4. Mobile Miter Saw Stand

This plan involves building a DIY workbench for a big-sized miter saw. It’s the perfect addition to help you tear woods easier and faster. It also comes with storage and fold down extension. The miter saw bench allows you to blade, chisel, and sand paper wood easily. It’s also mobile, hence you can move it around anywhere you want, and roll it away when you are not using it.

This DIY miter saw stand is designed like a big desk with drawers for storage. The material you will need is, Plywood, piano hinges, ball bearing drawer slides, wood screw to build. You will also need tools like tape measure, jig saw, speed square and others tools.

DIY Miter Saw

5. DIY Miter Saw Table

This plan contains a step by step guide on how you can build a modern miter saw table. The table is designed to support the blade, locking down your saw to stop unnecessary budging. It also has built-in cubby-holes where you can store small parts and tools for the job.

To build this diy miter saw, you will need hanger bolts, wing nuts, and some basic carpentry tools like circular saw, clamps, tape measure etc.

Miter Saw Table
DIY Miter Saw Stand Image Via: familyhandyman.com

6. Miter Saw Bench

This plan contains a downloadable material that outlines the processes involved in building a pro-grade miter saw bench. To get started building a miter saw, you will need plywood, pine boards, MDF shelving boards and wood glues. You will also need basic tools like drill, nail gun, wood screws and others. The plan is placed at an intermediate experience level. It can be completed within 6 hours.

DIY miter saw

7. DIY Miter Saw Station Build

This is one of the best miter saw stand you can build. The original plan is 8 feet 10 inches long, 29 inches deep and the counter top is 37 inches tall. The station has drawers where you can store tools and materials, as well as dust collection ports.

It features 25 drawers, and the storage can contain a miter saw, drill press and belt sander. To complete these diy miter saw stand plans, you will need plywood, pine woods drawer slides and other materials and tools. The plan can be built within a weakened and its placed at an intermediate experience level.Miter Saw Station Build

8. DIY Miter Saw Cart

This plan involves building a miter saw from plywood. Its basically designed for work in tight places. The plan can be built in a few hours. You will need Plywood sheets, plate mount caster, shelf hinge supports etc. the design works perfectly for any meter saw.

Miter Saw Cart
Miter Saw Cart Image via: ana-white.com

9. Portable Miter Saw Stand Plans

If you are searching for a compact saw stand that takes little space, then this DIY plan fits in perfectly. The DIY miter saw stand is designed to allow you work in tight spaces. Also you can easily move it from one place to another.

To build this diy saw stand, you will need Melamine covered particle board, Treated wood, Deck screws and basic tools like chisel, compass, hand saw. The project can be completed within 4 to 5 hours and its placed at a medium difficulty level. The plan has a downloadable PDF that guides you on how to build the project from scratch.Portable Miter Saw Stand Plans

10. Mobile Miter Saw Stand Plans

You can find saw stands at the store; however, they are quite expensive and are not as versatile and user-friendly as most DIY miter saw stands. This plan involves building a classic saw table stand that will enhance the precision of your cuts, creating a balance and making your work easier. It also has adequate space for storage.

The plan contains comprehensive steps on how to build the stand with pictures. You will need basic supplies like wood boards, screws, and tools like handsaw, power screw driver, drills etc.

Mobile Miter Saw Stand Plans
Mobile Miter Saw Stand Image Via: woodarchivist.com

11. Workbench Hardware Kit

If you are finding it hard to build a DIY miter saw table, then a workbench hardware kit will come handy. The kit comes with precut lumbers which you can easily couple to make a miter saw workbench. There are also connectors, fasteners and every other attachment needed to build a saw table. You can also modify the plan by reducing the original size of the lumbers as you wish.

This will not only save you time, but also the need to get lots of tools.

DIY miter saw table

12. Mobile Miter Saw Station and Storage

Using an ordinary table as a holder for a miter saw can be frustrating. It won’t hold properly and would result to poor and inaccurate cuttings. Instead, you should build a mobile DIY miter saw workbench following this plan.  The plan is designed to build a miter saw table with storage for your tools and materials. You would need wood boards and pine woods, and a few other materials and tools to get started.Mobile Miter Saw Station and Storage

13. Saw Table

A saw table provides the needed support when you are making cuts. The plan involves building a DIY miter saw table with a single sheet of 4×8 plywood, pocket screws and other materials. You will also need a table saw or track saw and a power screw driver. This mister saw plan also has space for storage.

You can make the cuts at the depots, if you don’t have a saw. The project is placed at an intermediate experience level and can be completed in a weekend.DIY miter saw table

14. Long Saw Table

This saw table plan is designed for cutting any length of wood. Its long wing on both sides provides the needed support when making a cutting or sanding. There’s a opening at the middle that allows the saw to work and access more wood depth. The table can be used at a job site or a shop.

You will need to first measure the height and ensure it’s the same as the saw’s depth. You will need plywood, screws and basic carpentry tools to build.saw table plan

15. Miter Saw Table

This plan involves building a DIY meter saw table.  It can be customized to work for any kind of meter saws. You will need Plywood, wood board, wood studs, bolts and nuts, nails or screws. You will also need tools like drill, pencil, pencil, tape measure etc.

There’s space underneath the table where you can store small tools and materials.  The project can be completed with a few hours work.

DIY miter saw

16. Miter Saw Fence

Having a meter saw fence is very important as they allow you to cut different sizes of wood with better precision. The fence sits on the saw, creating a zero clearance slot for the blade.

The large opening through the fence allows the blade to cut small parts accurately. It eases trim work or frame making. If you have an existing miter saw table without a fence, then you can easily follow this miter saw plan to create one for your miter saw. The plan comes with a video illustration on how to build it.

Miter Saw Fence

Final Thoughts!

Conclusively, whether you are a DIYer or a professional craftsman, having a diy miter saw table will save you a whole lot of stress, making you job faster and way easier.

27 Homemade Smokers to Add Smoked Flavor to Meat or Fish

One of the simplest ways to infuse flavor into meat and fish is with a homemade smoker. An inexpensive cut of meat or fish will develop a rich flavor and texture like its more expensive counterpart after being smoked. Look over these 27 DIY smoker plans that we have gathered from different internet sites to get started smoking your favorite meat for supper tonight.

1- Grill Meat Cuts On  Backyard Homemade Smoker

Download this PDF file containing homemade smoker plans by popularmechanics. Easy to follow instructions will enable you to build a backyard smoker large enough to hold several racks of ribs.

Backyard DIY Smoker
Backyard DIY Smoker, Image via: popularmechanics

2- Make A BBQ Smoker From Oil Drum

Use these smoker plans to recycle an old oil drum into an outdoor cooker by instructables. Use the cooker for hamburgers, hot dogs and to slow smoke large cuts of meat.

Oil Drum Homemade Smoker
Oil Drum Homemade Smoker, Image via: instructables

3- Use Metal Trash Can To Make A DIY Smoker

Cheap and easy to create, a new “aluminum trash can’’ can easily be converted into meat smoker with these bbq smoker plans by cruftbox. It’s portable too.

Trash Can Homemade Smoker
Trash Can Homemade Smoker, Image via: cruftbox

4- Brick Smoker

Here we have free plan that will show you how to build a smoker like this one by dengarden with bricks that will last for decades. This DIY smoker is not portable and will be a part of your landscape for many years. If you enjoy smoking meat and fish often, then this is a great DIY project for your backyard as part of your outdoor kitchen area.

This smoker runs off propane gas and uses an interior burner to create the heat. It uses very little wood to create smoke so this will be an ideal addition to a small backyard in the suburbs.

Brick Smoker
Brick Smoker, Image via: dengarden

5- Mini Smoker

We recommend this one to you if a full-size smoker is too large for your meat-smoking needs, build this mini-smoker by ilovegrillingmeat so you can prepare small amounts of mouth-watering meat and fish.

This mini smoker is completely portable and is ideal for tailgating or camping. This detailed tutorial and photos will walk you through the building process of this homemade smoker.

Portable homemade smoker
Portable homemade smoker, Image via: ilovegrillingmeat

6- Smoke Meat In An Indoor Oven Smoker

If you don’t have outdoor space but love the flavor of smoked meats, use these homemade smoker plans by kelliskitchen to create an indoor oven smoker. A couple of aluminum pans and wood chips is all you need to smoke food in your oven. You may also like to check out diy pizza oven.

Smoke Meat In An Indoor Oven Smoker
Smoke Meat In An Indoor Oven Smoker, Image via: kelliskitchen

7- Transform An Ordinary Grill Into BBQ Smoker

No need to purchase anything fancy if you already have a grill. Create a custom bbq smoker like this one by esquire with your grill. Use these homemade smoker plans to make your grill serve double duty as a smoker.

Transform An Ordinary Grill Into BBQ Smoker
Transform An Ordinary Grill Into BBQ Smoker, Image via: esquire

8- Turn An Old Barrel and Bricks Into DIY Smoker

Simple design and parts, but it will produce complex food flavors. Use these plans to transform an old metal barrel and old bricks into a new diy smoker by instructables that works just like a smokehouse.

Barrel and Brick Homemade Smoker
Barrel and Brick Homemade Smoker, Image via: instructables

9- Use Clay Pot To Make A Homemade Smoker

Follow these step by step instructions on how to build a smoker like this one by motherearthnews. and you’ll amaze your family and friends with your resourcefulness. These plans transform a clay flower pot into a unique and functional smoker that is the perfect size for a small deck or patio. Take this model with you to the beach or mountains for smoking meat away from home. Also check out diy clay pot heater.

Clay Pot Smoker
Clay Pot Smoker, Image via: motherearthnews

10- Build Your Own Stovetop Homemade Smoker With Kitchen Gear

Here is another great idea for those who don’t have outdoor space – build a stovetop smoker like this one by lifehacker. Great for smoking brisket, pork shoulder or other larger cuts of meat because this design really enables the smoke to penetrate deeply into thick cuts of meat.

Stovetop DIY Smoker
Stovetop DIY Smoker, Image via: lifehacker

11- Combine Two Barrels To Make A Homemade Smoker

This unique double barrel smoker by instructables requires no welding and is easy to build with these detailed instructions. Smoke lots of meat at once with the large interior this model has to offer.

Combine Two Barrels To Make A Homemade Smoker
Combine Two Barrels To Make A Homemade Smoker, Image via: instructables

12- Recycle Old Fire Cabinet Into BBQ Smoker

Use this idea to transform discarded items into a new diy smoker. An old file cabinet and shopping cart, are two of the things recycled in this unique bbq smoker plan by therecykler.

Recycle Old Fire Cabinet Into BBQ Smoker
Recycle Old Fire Cabinet Into BBQ Smoker, Image via: therecykler

13- Build DIY Smoker From 55 Gallon Drum

Touted as being the best step by step guide to building your own backyard smoker on youtube, these plans are worth a look. Some cutting and welding is involved, but the end result is durable and functional.

14- Make A Smoker Out Of 250 Gallon Propane Tank

Build a custom bbq smoker like this one by thesmokerking from a 250 gallon propane tank with these instructions. Perfect for smoking meats for a large gathering.

You may like to see plans for Homemade Propane Forge.

Propane Tank Homemade Smoker
Propane Tank Homemade Smoker, Image via: thesmokerking

15- Use This DIY Plan To Make A Ugly Drum Smoker

Nothing ugly about it, but that is the nick-name of this bbq smoker design by howtobbqright. Easy and inexpensive to build, these plans rival smokehouse plans and the ugly drum smoker will cost less to build.

Ugly Drum Smoker
Ugly Drum Smoker, Image via: howtobbqright

16- Make BBQ Smoker Without Welding 

This classic design smoker use a 55 gallon barrel and requires no welding. Built to hold large cuts of meat and turned sideways and standing on legs, this smoker design by theownerbuildernetwork is also easy to use.

No-Weld Barrel Homemade Smoker
No-Weld Barrel Homemade Smoker, Image via: theownerbuildernetwork

17- Filing Cabinet Smoker

These free smoker plans will show you how to transform an old metal filing cabinet into a functional and efficient smoker for meat and fish like this one by instructables.

The bottom drawer in the filing cabinet is used for wood to create smoke while the other drawers are used to place the meat and fish. Plenty of room for smoking a lot of meat but the filing cabinet won’t take up much storage room when not in use.

Filing Cabinet Smoker
Filing Cabinet Smoker, Image via: instructables

18- Trash Can Smoker

Use this idea and learn how to make a smoker from a new metal trash can. This idea will save your time and money and provide you with a long-lasting, efficient homemade smoker like this one by domesticallycreative. Add a few holes to the metal trash can for wood chips and ventilation, plus a couple of grill racks inside to hold the meat and you’re ready to start smoking meat. You may also like to check out diy grill station.

Cheap to build and easy to store when not in use.

Trash Can Smoker
Trash Can Smoker, Image via: domesticallycreative

19- Flower Pot Smoker

A heavy-walled ceramic flower pot and a hot plate can be used to build a smoker like this one by z12projects that’s just the right size for preparing a family meal.

Easy and cheap to create, this flower pot smoker can smoke enough hot wings to feed the family or a group of friends. These detailed instructions provide pictures and written instructions so the DIY project is super easy to complete. The plans even tell you where to find the items needed to build this meat smoker.

Flower Pot Smoker
Flower Pot Smoker, Image via: z12projects

20- Clay Pot Smoker

This homemade smoker by makezine is ideal for people living in a condo or apartment. It’s safe, easy to use and takes up very little space. Great for smoking meat for a meal for two people and the cost of building is minimal.

A couple of clay pots and a wire rack are the most of the building components needed. If you ever want to upgrade to a large meat smoker, the clay pots can be recycled and used for their original intentions – holding flowers. You may also like to check out diy solar oven.

Clay Pot Smoker
Clay Pot Smoker, Image via: makezine

21- Plywood Homemade Smoker

This large smoker is created from plywood and is lined with fireproof boards. This heavy-duty smoker can hold a lot of meat and fish at one time and is ideal for people who like to hunt and fish.

The interior is completely fire retardant and castors on the bottom of the homemade smoker by barbecue-smoker-recipes make it easy to move about as needed. This would make a great addition to an off-grid homestead so meat can be preserved without the use of electricity.

Plywood Homemade Smoker
Plywood Homemade Smoker, Image via: barbecue-smoker-recipes

22- Concrete Block DIY Smoker

These free plans will show you how to build a large smoker like this one by smokingmeatforums. using concrete blocks. This DIY smoker is not portable, but it is large enough to smoke a whole hog at once.

Make delicious smoked pork to share with friends and preserve for the future with this large smoker. Smoke a whole hog, deer, or several turkeys, chickens, or fish at the same time in this concrete block smoker. Keep the cost down by usinBy g recycled concrete blocks of this build.

Concrete Block DIY Smoker
Concrete Block DIY Smoker, Image via: smokingmeatforums

23- 55-Gallon Drum Smoker

An efficient smoker does not have to cost a lot of money to be an asset to the backyard or homestead. This homemade smoker by popularmechanics created from a 55-gallon drum costs almost nothing and it smokes meat and fish to perfection.

These detailed plans are free and will take you through this DIY project step by step so you can build a smoker and enjoy smoked meat at home.

55-Gallon Drum Smoker
55-Gallon Drum Smoker, Image via: popularmechanics

24- Under $10 Homemade Smoker

Do you want to build a cheap smoker? Follow these free plans and you can build a mini smoker for under $10 like this one by instructables. This small and inexpensive smoker will get the job done and infuse your meat and fish with just the right amount of smoke,. Great size for preparing enough meat for a family meal.

Great size of a dorm, condo, or apartment. Easy to use on a small balcony and easy to store when not in use.

Under $10 Homemade Smoker
Under $10 Homemade Smoker, Image via: instructables

25- Cold or Hot Smoker

This elaborate design allows you to control the smoke so you can infuse meat or fish with cold or hot smoke like this one by instructables. One smoker, two smoking methods. It’s like getting two pieces of equipment for the price of one.

The design is easy to build with these simple to follow instructions. You can get the DIY project completed in one day and start enjoying smoked meat this weekend.

DIY Smoker you can infuse meat or fish
DIY Smoker you can infuse meat or fish, Image via: instructables

26- Cardboard Homemade Smoker

Sounds impossible, but you can create a smoker like this one on youtube that uses fire out of a recycled cardboard box. You will need a large box, some wooden dowels, an aluminum drip pan, and some wood chips.

Add some meat or fish and you’re ready to start smoking meat. It’s a low and slow meat smoking process but it’s cheap, easy to build, and infuses great smoky flavor into meat and fish.

When your done smoking meat, recycle the cardboard again in the fire pit to build a fire for roasting marshmallows.

27- Build Your DIY Smoker From 55 Gallon Steel Drum

Build your own smoker like this one by instructables with a 55 gallon steel drum and a few plumbing parts. Easy to assemble with the detailed instructions and built to last.

 55 Gallon Steel Drum Smokers
55 Gallon Steel Drum Smokers, Image via: instructables

Conclusion

Now you have many options to make your own homemade smokers from our list by using drums, file cabinets, flower pots, cardboard, concrete and propane tanks. Many of these diy smokers are made using items you may have already on hand or you can buy for a few dollars. These smokers are a cost efficient way to infuse smoke flavour into meat without buying expensive ones from the stores.

23 DIY Windmill Ideas-Learn How To Make a Windmill Cheap

When I was living off-grid in the countryside, I decided to build my own DIY windmill to generate electricity for my cabin. It was a challenging yet rewarding experience that taught me a lot about renewable energy. With just basic tools like a wrench and a drill, I was able to construct a small wind turbine that provided enough power to charge my devices and light up the cabin at night.

One of the most important lessons I learned during the process was the importance of proper planning and research. Before starting the project, I had to carefully assess the wind patterns in my area to determine the best location for placing the windmill. Additionally, I had to educate myself about the various components needed for the system, such as the rotor blades, generator, and tower.

Assembling the windmill was a hands-on learning experience that required patience and attention to detail. I followed step-by-step instructions from DIY guides, making adjustments along the way to ensure everything fit together correctly. Seeing the windmill spin for the first time and generate electricity was incredibly satisfying and made all the hard work worth it.

Overall, building a DIY windmill not only provided me with a source of renewable energy but also empowered me to take control of my energy needs. It’s a project that I’m proud of, and it continues to inspire me to explore other sustainable living solutions.

Check out these 23 DIY windmill ideas we have found for you and discover how you can save money and have all the electrical energy you need without having to spend a lot of money.

1- DIY Windmill Redo

I stumbled upon this DIY windmill project on YouTube when I was looking for ways to spruce up the old windmill in my backyard. The video caught my eye because it promised an easy and cost-effective way to give my windmill a new lease on life.

What I particularly liked about this project was its emphasis on using leftover materials. The idea of repurposing metal ductwork, rods, and PVC pipe to breathe new life into my windmill was both ingenious and environmentally friendly. It appealed to my DIY sensibilities, as I’ve always believed in making the most out of what you have.

Watching the video, I was impressed by how simple the process seemed. The minimalistic approach to construction made it accessible even for someone like me, who isn’t exactly a DIY expert. Plus, the fact that the materials would cost next to nothing was a huge bonus. It meant I could tackle this project without breaking the bank.

But beyond the practical aspects, there was something satisfying about the idea of giving my windmill a makeover. It wasn’t just about functionality; it was about adding a touch of creativity and personality to my outdoor space. And knowing that I could achieve that without spending a fortune made it all the more rewarding.

Ultimately, this DIY windmill project resonated with me because it embodied the ethos of DIY culture: resourcefulness, creativity, and sustainability. It was a reminder that with a little ingenuity, we can transform the ordinary into something extraordinary, all while minimizing our impact on the planet.

2- Wind Turbine

The second one we are going to discuss is a great project for a school science fair and it’s cheap to build. Watch this YouTube video to discover how to build your own wind turbine using PVC pipe.

To make this diy windmill project like this one on Youtube just take small sections of PVC pipe, cut in half and attached to the ends of the blades to catch the wind. As the sails begin to turn, they will increase in speed and generate electricity. Very simple principle and an easy DIY project that can be increased in size for use on an off-grid homestead.

Anywhere you need to generate free electricity, this powerful PVC wind turbine can do it.

3- Deck Sized Windmill

Here we have a stylish wooden windmill by Instructables that is small enough to fit on your back deck. It adds decor and keeps the air circulating while you enjoy sitting outdoors.

The wooden tower is crafted in an octagon shape and has a double set of sails that allow the windmill to swivel and turn with the wind. A great addition to any backyard deck!

This video and written instructions will take you through the building process with ease. The extra airflow created by this homemade windmill will also help keep the mosquitoes and flies away so you can enjoy your outdoor space without fear of bug bites.

DIY WIndmill
Deck Sized DIY Windmill, Image source: Instructables

4- DIY Dutch Style Windmill

Popsicle sticks, craft sticks, and wooden dowels are some of the main building components for this DIY windmill by Instructables. Learn how to make a windmill that looks like a miniature version of the traditional Dutch windmills and is powered by a wind turbine.

This is a fun DIY project that will teach students several lessons about generating electrical energy. A wind turbine will be constructed along with the Dutch windmill and a solar panel is used in this design.

This would make a fun project to build and place in the garden. The popsicle sticks are easy to paint and this wind-powered Dutch windmill would make an attractive piece of outdoor decor.

DIY windmill
DIY Dutch Style Windmill, Image via: Instructables

5- Cardboard Windmill Project

Students can learn how to build a small wind turbine cardboard and glue in this YouTube video. The result of this cardboard windmill project will provide enough power to run a small LED light bulb.

It’s easy to construct and this idea takes the design one step beyond building the cheap windmill, but also a small scale house is created with cardboard with an LED light inside. This DIY project provides detailed instructions for creating a visual display of how a windmill works as an alternative energy source. Tutorial:

6- Homemade Wind Generator

The homemade wind generator project I found on DW.com immediately captured my attention. As someone who appreciates ingenuity and sustainability, I was intrigued by the idea of a bicycle repair shop owners creating their own electricity off-grid.

What stood out to me the most about this project was its practicality. In a location without access to traditional electricity, the homemade wind generator provided a simple yet effective solution. It was inspiring to see how they harnessed the power of the wind to generate enough electricity to light up their shop and power their tools.

The video’s detailed explanation of the construction process was invaluable. It gave me a clear understanding of how they repurposed salvaged components to build the windmill, ensuring that nothing went to waste. This aspect resonated with me deeply, as I believe in the importance of recycling and repurposing materials whenever possible.

Moreover, I admired how they stored excess energy in batteries for use on days when the wind wasn’t strong enough. This showed a thoughtful approach to energy management, ensuring that they had a reliable power source even in fluctuating conditions.

Overall, what I liked most about this homemade wind generator project was its practicality, resourcefulness, and commitment to sustainability. It served as a reminder that with a little creativity and determination, we can create solutions to our energy needs while minimizing our impact on the environment. It also inspired me to explore other DIY projects like solar generators, further harnessing the power of renewable energy sources.

Homemade Wind Generator
DIY Windmill Generator, Image via: dw.com

7- Table Fan DIY Windmill

Learn how to make a windmill by The Do It Yourself World from an old table fan with this idea. The finished windmill will produce 24 volts AC at a couple hundred milliamps but more power can be generated by using a more powerful magnet.

These pictorial instructions are easy to follow and give you advice for using a box fan instead of a table fan to generate more power. This is a great way to recycle an old fan or two and generate enough free power to keep an off-grid lifestyle well-powered and comfortable.

Table Fan DIY Windmill
Table Fan DIY Windmill, Image source: The Do It Yourself World

8- Printer Parts DIY Windmill

This is a great way to recycle parts from an old printer to make something new and usable. This homemade windmill at Tree Hugger can generate enough power to charge your electronics and will produce a steady 5V 1A output on a breezy day.

Learn how to harness the power of the wind with recycled parts by watching this instructional video. Great for an off-grid fishing or hunting cabin when we need energy for charging a phone and iPad.

Printer Parts DIY Windmill
Printer Parts DIY Windmill, Image source: Tree Hugger

9- Printable DIY Windmill Template

Create an attractive and functional DIY windmill by Adventure-In-A-Box with this easy to use template. Teaching students how to make a windmill couldn’t get any easier than this free template can make the project to be.

Making a craft at home or in the classroom not only entertains kids but also teaches them how stuff works.This template idea also promotes using different blade angles and the number of blades to discover the amount of energy output is changed.

This idea is more than just a windmill template, it’s a valuable learning experience for kids. Get your template printed today so you can start this fun learning project.

Printable DIY Windmill Template
Printable Windmill Template, Image source: Adventure-In-A-Box

10- Small DIY Windmill

This video will provide you detailed instructions for constructing a small wind-powered generator on Youtube. The generator is small, easy to build and ideal for providing electrical energy for outdoor lighting or other small-scale power needs.

11- DIY Mini Windmill

This is a great project for a school class that is learning about alternative energy sources. This DIY project contains step by step instructions for building a mini windmill like this on Youtube that is functional and can provide a few watts of power for lighting.

12- Working Cardboard DIY Windmill

Here we have another cheap idea for building a windmill by paksc.org as a school science project, and it’s made from cardboard.

This idea for a cardboard windmill comes with downloadable PDF instructions so it’s very easy to follow during construction. Minimal building materials are needed so it’s very cheap to build.

Working Cardboard DIY Windmill
Working Cardboard DIY Windmill, Image source: paksc.com

13- DIY Small Windmill

This is a good place to start if you have never built a windmill like this one by Newphysicist.com before. The instructions are clear, easy to follow and the homemade windmill needs very components to build.

This is a great DIY project for the novice builder and the finished windmill will produce enough power to recharge a rechargeable battery.

DIY Small Windmill
DIY Small Windmill, Image source: Newphysicist.com

14- Minute DIY Windmill

This idea will show you how to create a homemade windmill by Instructables cheaply and in just 10 minutes using an old computer fan.

A fan removed from a non-working computer can be the main component in a mini homemade wind turbine that will generate enough power to light a small LED light bulb.

homemade windmill
Minute DIY Windmill, Image source: Instructables

15- DIY Mini Windmill Craft

Learn how to construct a mini windmill craft in this Youtube video that is both fun and educational for kids. The windmill works and makes an ideal science project for the classroom.

No cutting or large tools required, which is another plus for building a DIY windmill with kids. The components for this building project are inexpensive and you may already have them laying around.

16- DIY Miniature Windmill

Wind power is quickly becoming the desired energy source. It’s clean, free, renewable and available to everyone, everywhere. No matter where you live it’s possible to have a consistent source of electricity that won’t cost you anything after the initial investment of building materials for a wind turbine.

Learning how to build a miniature DIY windmill cheaply by Popular Mechanics and discovering how it works to create energy through wind power can provide you with the know-how for building a larger scale wind turbine for your homestead.

DIY Miniature Windmill
DIY Miniature Windmill ,Image source:Popular Mechanics

17- Garage Sale DIY Windmill

One man’s trash is another man’s treasure, and you may find building materials for a DIY windmill at a garage sale like the maker of this YouTube video did.

Watch and learn how to transform garage sale finds into a usable windmill that can produce enough watts to meet the electrical needs of an off-grid cabin.

18- DIY One Pound Windmill

This idea is for a portable windmill by Instructables that only weighs one pound and is easy to carry with you into the back-country.

When camping, hiking, hunting, or fishing, you still need to stay connected to loved ones but finding an electric outlet to recharge your cell phone is not easy in the back-country. Change that by building this DIY windmill that weighs only one pound and is easy to carry with you in a backpack.

Just a light breeze will be enough for this small windmill to generate enough power to recharge a cell phone and other small electronics.

DIY One Pound Windmill
DIY One Pound Windmill ,Image source: Instructables

19- Wooden Windmill Base

Learn how to build a windmill base like this one on Youtube from a few peices of wood. This is a great way to use some leftover 2×4‘s or similar pieces of wood and create an attractive wooden windmill for your garden.

For this DIY build, the sail was recycled from another windmill and updated with a good cleaning and painting. All that was needed was a solid base to mount the sail on. Used sails can often be found at flea markets or thrift shops very cheap and a wooden base like this one is cheap to build.

This would make a nice addition to the front yard, garden area, or anywhere else that you want a windmill. The height can be customized to fit into your outdoor space.

20- Windmill Water Pump

A windmill water pump is a cheap, efficient, and low maintenance way to get fresh water out of the ground for use on your homestead.

As the sails of the DIY windmill turn, water is pumped up and out of the ground for your use. Learn how to build a cheap and functional windmill water pump in this Youtube video for your off-grid homestead or camp site. No more buying fresh water or hauling it in from the closest water source, you can have fresh water right in your own yard by using wind power to draw it up from below the ground.

The fresh water will be available even in the winter when other water sources are frozen.

21- Ductwork Pipe Blades

This video will show you how to use what you have on hand to create something new – like ductwork pipe blades for a DIY windmill.

The base of the windmill is a simple wooden structure that is several feet tall but you can build a DIY to a customized height. The blades of the sail are created from metal ductwork pipes in this instructional video but other similar materials can be used.

By using what you have on hand you can build a DIY windmill generator like this one on Youtube very cheap. Use the windmill to pump water, generate electricity, or increase the air circulation around your home and garden.

22- Energy Generating Windmill

With the uncertainty of the economy and high cost of electricity, people are looking for alternative ways to power their homes. We all want electricity to power our appliances, electronics and to give us light but we also want to be eco-friendly and budget friendly.

This energy generating DIY windmill on Youtube video is cheap to build and will provide free electricity to your home. The use of inexpensive, lightweight PVC pipe and recycle wood material keeps the cost low and electricity output high. This little energy generating windmill can help reduce your electrical consumption and lower your monthly bill.

Ideal to build as a school science project or for use at an off-grid homestead. Watch this YouTube video and learn how to make one for yourself.

23- Straw and Fabric DIY Windmill

This miniature wind turbine by Instructables is made of drinking straws and fabric. The straws are used to create the frame of the windmill blades and then covered with lightweight fabric that can easily turn in the breeze.

This idea will show you how to create a cheap and functional wind generator that will produce enough electrical energy to power an indoor or outdoor light. This will make a great school project for a science class and inspire students to create a larger scale wind turbine that can generate more energy.

Straw and Fabric DIY Windmill
Straw and Fabric DIY Windmill, Image source: Instructables

Conclusion

By building a diy windmill you can get free energy required to power up small devices or tools. This is also a great scientific project for students to learn how to get free electricity from wind power. Hope you like our round up of these diy windmills projects.

References:

MDPI, Sustainability, volume 13, pub: 19 August 2021, “Bridging Education and Engineering Students through a Wind Energy-Focused Community Engagement Project”, https://www.mdpi.com/2071-1050/13/16/9334

Boston University, “Lesson plan for Windmill activity”, https://www.bu.edu/gk12/tommy/Windmill.htm

BYJUS, atmosphere, “how to make a windmill”, https://byjus.com/physics/how-to-make-a-windmill/

21 Homemade Crossbows For Hunters And Survivalists

Crafting a homemade crossbow has been a rewarding experience for me, providing a versatile tool for hunting and protection. Unlike firearms, a DIY crossbow allows for silent hunting and defense, making it ideal for scenarios where bullets may not be readily available or appropriate. As a hunter and survival enthusiast, I’ve found that wooden crossbows can be constructed at minimal expense and operated without ongoing costs, making them invaluable for off-grid living or as a supplement to traditional hunting methods.

Whether you’re living off-grid or simply enjoy the sport of hunting, a homemade crossbow offers a cost-effective and sustainable way to procure food. By mastering the art of crossbow hunting, you can enhance your self-sufficiency and provide for your family during hunting seasons. Additionally, the simplicity and primitive nature of crossbow hunting add a unique dimension to the sport, appealing to those seeking a more traditional approach to hunting and wilderness survival.

Having explored various Homemade Crossbows myself, I understand the importance of having the right tools for poultry processing. Similarly, I’ve delved into crafting homemade crossbows for hunting and survival. Just as with chicken pluckers, having a few homemade crossbows on hand ensures you’re always prepared for hunting opportunities, whether it’s for food or protection.

1- Survival DIY Crossbow

Having faced survival situations myself, I understand the importance of having essential tools like a homemade crossbow for hunting and protection. With the right DIY crossbow, you can fulfill crucial needs for food and security, which are vital for survival in challenging environments. Following detailed instructions, such as those provided by instructables, ensures that you build a strong and effective crossbow capable of aiding in your survival efforts.

By utilizing free crossbow plans and mastering the art of crossbow construction, you gain valuable knowledge and skills that can be used for bartering in times of need. Beyond mere survival, the game meat, pelts, and fish harvested with a DIY crossbow serve as valuable commodities for trade and negotiation. As you become proficient in building and using homemade crossbows, you empower yourself to navigate survival situations with confidence and resourcefulness.

homemade crossbow
Survival DIY Crossbow, By instructables

2- DIY Crossbow Pistol

The second one we have is a DIY crossbow by instructables that sounds like a lethal weapon but it’s not. The finished crossbow is made to have a little fun with rather than for hunting wildlife like deer. Perfect for shooting wine corks, bottle caps, small rocks, or other small projectiles. But it’s powerful enough to take down a small game.

In these detailed instructions we will see how to use a strip of poplar lumber to create a crossbow pistol. It’s a simple project and would be great for the novice woodworker. It would also make a good crossbow for a young hunter to begin target practicing with.

DIY crossbow
how to use a strip of poplar lumber to create a crossbow pistol, Image via: instructables

3- Powerful Crossbow

We recomment this for hunting small to medium sized game, this powerful crossbow will help you put meat on the table.

If we follow these free video instructions for building this homemade bow and arrows by instructables we can live a survivalists lifestyle without a store bought firearm. Replenish your arrow supply as needed with the skills you will learn from this tutorial.

homemade bow and arrows
Powerful Crossbow, Image via: instructables

4- Bicycle Wheel Crossbow

I’ve personally delved into the world of homemade crossbows and stumbled upon an ingenious idea from Gianni Pirola GP DIY on YouTube. This method involves crafting a crossbow using recycled materials like an old bicycle wheel, which I found incredibly fascinating. It’s not just about building a weapon; it’s about embracing creativity and resourcefulness while making something practical for hunting and survival.

We like the idea of using what you have and being self-sufficient and its also a trend that continues to grow. Keeping usable items out of the landfill by recycling is good for the planet. This YouTube video will show you step by step Instructions on how to transform a bicycle wheel into a hunting weapon.

Use the DIY crossbow for hunting small game, killing dangerous predatory animals, or for target practice.

5- Wood and Aluminum

In this ideas we will see the classic crossbow design that is made with wood and aluminum to provide the user with lightweight efficiency. This homemade crossbow by motherearthnews won’t weigh you down while on a hunt, and will shoot accurately when a game animal is located.

Get these free plans we are sharing with you to learn how to build this DIY crossbow that looks and performs like an expensive store bought model. The front bead design will enable the user to get an accurate shot on the target every time.

homemade crossbow
Wood and Aluminum crossbow, Image via: motherearthnews

6- DIY Wooden Crossbow

I’ve personally found great value in the step-by-step pictorial instructions provided on instructables for crafting homemade crossbows. Every aspect of the DIY process, from materials to firing techniques, is thoroughly explained and illustrated, making it accessible even for beginners. By following these detailed instructions, you can transform simple materials like wood and rope into a powerful and accurate weapon capable of hunting small game effectively.

how to make a crossbow
DIY Wooden Crossbow, Image via instructables

7- Monster Crossbow

Crafting a mega-sized monster crossbow isn’t just a DIY project; it’s an adventure that demands respect for its immense power, as I’ve learned firsthand. Even seasoned hunters should approach it with caution, acknowledging the potential risks associated with handling such a formidable weapon. Tailored for serious hunters, the free plans provided by wideopenspaces offer guidance on constructing a DIY crossbow boasting an impressive 1,000 pounds of pull power. Particularly suited for survivalists or hunters residing in regions abundant with large game animals such as caribou or elk, this formidable weapon stands as one of the top choices for safely and effectively bringing down sizeable prey.

Video instructions make the process of building this heavy-duty crossbow from wood and metal straightforward and accessible. Drawing from my own experience, I recommend paying close attention to each step, ensuring precise assembly to maximize the crossbow’s performance and safety.

DIY crossbow
Monster Crossbow, Image via wideopenspaces

8- Adult Toy

I remember when I made my own crossbow at home. It was like a grown-up version of the toy crossbows we used to play with. Just like those toys, it’s only for shooting targets, not for anything serious.

If you want to practice your aim for hunting, or teach someone new, a homemade crossbow like this one by woodgears with big arrows is perfect. You can shoot into hay bales safely and get better at aiming.

DIY bow and arrow
Adult crossbow toy, Image via woodgears

9- Automatic Crossbow

Crossbows were originally designed to have one arrow loaded for shooting at a time but in this plan we will see this new homemade crossbow design by popularmechanics has changed all of that.

Fully automatic crossbow is created from wood and can hold several arrows at once to reduce the re-load time. Smooth and accurate arrow shooting will provide you with a weapon that is capable of taking down more than one game animal at a time, or stop an attack of a pack of wild predators threatening you or your livestock.

homemade crossbow
Automatic Crossbow, Image via popularmechanics

10- Repeating Crossbow

This is one of my favorite homemade crossbow by vintageprojects as it can handle as smoothly as a rifle and provide five arrow shoots at once without re-loading. A vintage design that has stood the test of time, and in the hands of a skilled hunter, this homemade crossbow will be able to hit a target 40 yards away.

Free plans are on a downloaded PDF file and will take you through this homemade crossbow build step by step.

homemade crossbow
Repeating Crossbow, Image via vintageprojects

11- Crossbow Made From Scratch

Making a homemade crossbow was one of the coolest things I’ve ever done. It’s a weapon you can craft using only natural stuff you’d find in the wild, making it perfect for survival situations.

If you’re curious, there’s a helpful video by survivallife that guides you through the process of turning regular items into a precise homemade crossbow. It’s a handy skill to have in your survival toolkit.

homemade crossbow
Crossbow Made From Scratch, Image via survivallife

12- Crossbow Revolver

I remember when I tried making a homemade crossbow after seeing one on Gizmodo. It’s perfect when you need both speed and accuracy from a simple weapon.

The crossbow I made from their free plans shoots arrows so fast you can’t see them without slow motion. It even has a cool feature using a toothbrush to let it fire up to four arrows without reloading.

Crossbow Revolver
Crossbow Revolver, Image via gizmodo

13- Crossbow Made From All Wood

Making a homemade crossbow like the one from Instructables was a fun project for me. It’s made entirely of wood and is super accurate, perfect for target practice or hunting.

If you like archery or need a reliable hunting tool, this DIY crossbow is a great choice. It’s simple, effective, and gets the job done, arrow by arrow.

wood crossbow design
Crossbow Made From All Wood

14- Medieval Crossbow

These free plans will show you how to make a replica of a medieval crossbow by popsci like those used centuries ago in battle.

As we know crossbows were popular weapons during warfare because they did not require physical strength to use. The crossbow was also smaller and lighter than a traditional longbow and made it much easier to carry into battle.

The characteristics that made the crossbow popular centuries ago are the same ones that make them popular today. Learn how to make a functional medieval crossbow with these detailed instructions.

Medieval Crossbow
Free Plans For Medieval Crossbow, Image via popsci

15- Pocket Crossbow

This small sized DIY crossbow by instructables is meant to be a created as a practice craft and not as a real weapon. Made from popsicle sticks and a paper clip, this pocket crossbow is an ideal craft to create on a rainy day. You can hone your creative skills with this free video on how to build a pocket crossbow.

DIY crossbow
Pocket Crossbow, Image via instructables

16- Pistol Crossbow

Exploring homemade crossbows featured on Instructables, I learned about their potential for hunting and protecting livestock, similar to DIY electric fences, without relying on bullets. This inventive solution could save a significant amount of money typically spent on ammunition, given the reusability and ease of crafting arrows.

If you’re interested, you can also create a pistol crossbow using similar methods. It’s not just for shooting arrows – you can use it for various projectiles, making it perfect for off-grid living and hunting without relying on expensive ammo. Check out the free plans to make one yourself. Even if you’re not into hunting or living off-grid, it’s great for target practice.

homemade crossbow
Pistol Crossbow, Image via instructables

17- Wooden Crossbow

Exploring homemade crossbows like the one featured on Wikihow, I gained insight into their design and utility. Though I didn’t personally construct them, I found the free plans helpful for understanding how they’re made from wood, suitable for both hunting and recreational use.

Even without building it myself, I could see the potential benefits of having a crossbow like this. It could be handy for hunting small game or just for fun target practice. If you’re interested, these plans make it easy to get started with your own wooden crossbow.

Wooden Crossbow
Wooden Crossbow, Image via wikihow

18- DIY Mini Crossbow

Learning how to craft a weapon like a homemade crossbow can be incredibly useful, especially in survival situations. Even though I haven’t personally made one, I recognize the value of having such a skill. The mini crossbow from Survivalsullivan, for example, seems like a practical choice for hunting, self-defense, and even trading if needed.

These plans offer guidance on making a crossbow using sturdy and flexible materials, like paracord or dental floss for the bowstring and a large nail for the trigger. Whether you’re living off-grid or simply interested in survivalist techniques, mastering this skill can be crucial. Even if you’re already familiar with crossbow making, these plans might still offer some helpful tips and tricks.

how to make a mini crossbow
DIY Mini Crossbow, Image via survivalsullivan

19- Homemade Crossbow Fishing

Make this homemade crossbow to harvest fish to supplement your diet. Watch this video and discover how to make a crossbow for fishing on youtube and how to use it for fishing.

Crossbow fishing is a great way to add variety to the diet. It will allow you to harvest fresh fish from any lake, stream, or river you may be nearby.

A DIY crossbow is lightweight and is easy to carry along with you when you’re backpacking or camping. Fresh fish is rich in nutrients and protein and is plentiful throughout the year. This strong crossbow built for fishing will let you harvest large or small fish. Ideal for areas where fishing with a net or rod is not a good option.

20- DIY Longbow Transformation

Repurposing an old longbow into a DIY crossbow is a clever idea. I found a helpful video on YouTube by Scott’s Place that demonstrates how to do just that. With the crossbow being lighter and more compact, it’s convenient for hunting trips and just as effective for gathering food.

Whether you’re hunting small game or safeguarding your homestead, a sturdy crossbow like this one proves to be a valuable and versatile tool. It’s worth considering for anyone interested in self-sufficiency or outdoor activities.

21- Crossbow Pistol

The last one we have is small but accurate, this crossbow pistol by instructables is easy to carry along with you when hiking through the woods. This DIY build is made simple with the free plans included on this website, and a video of how to shoot this crossbow pistol is also on this website.

The trigger on this crossbow pistol enables you to time to get a good aim on the target so when the arrow is shot it will hit the desired target. Compact in size, yet powerful enough to kill small game.

Homemade Crossbow Pistol
Free Plans For Homemade Crossbow Pistol, Image via instructables

Conclusion

Homemade crossbows help you in any survival situation where you need three basic necessities of life i.e food, shelter and water. You can build from any of these diy crossbows that help you hunt for food or living off the grid.

References: 

Science Direct, Journal of Forensic and Legal Medicine, Volume 79, April 2021, 102147, “Crossbow injuries: A case report with experimental reconstruction study and a systematic review of literature”, https://www.sciencedirect.com/science/article/abs/pii/S1752928X21000329

MDPI, Engineering Proceedings Volume 55 Issue 1 10.3390/engproc2023055048, Published: 5 December 2023, “Ancient Chinese Repeating Crossbow: Basic Research to Science Education in Museums”, https://www.mdpi.com/2673-4591/55/1/48

Quora,”Are crossbows good for hunting?”, https://www.quora.com/Are-crossbows-good-for-hunting

13 DIY Bluetooth Speakers To Enjoy Great Quality Sound

Why spend the money on an expensive speaker when you can make your own DIY Bluetooth speaker? Building your own DIY speaker box is a weekend project that allows you to dabble in technology. It also gives you the chance to be creative without going broke on the supplies.

There are many plans for building a DIY Bluetooth speaker. You may need to know a bit about technology so you can connect the pieces, but many plans include a materials list and easy-to-follow instructions. Use our round up of the following plans to learn how to make a Bluetooth speaker.

You may also like to see my other articles: diy charging stations.

1. PartyBar DIY Bluetooth Speaker

By using the first plan from our list you can build your PartyBar speaker with two Neodymium speaker drivers and the Nsiway’s NS4263 dual 3W SMD chip. The Nsiway chip is used as an amplifier to deliver a high-quality sound. Your DIY speaker like this one by instructables includes a rechargeable Li-ion battery, 15 meter Bluetooth range and mini USB charger. The best part is you’re going to build the case with an eyewear container and matte spray paint.

PartyBar DIY Bluetooth Speaker
PartyBar DIY Bluetooth Speaker, Image via: instructables

2. Battery-Powered Bluetooth Speaker

Another idea from our list is to build a battery-powered DIY Bluetooth speaker like this one by craftedworkshop with two rechargeable battery banks. With both battery banks, you can use the speaker for 42 hours at 50 percent volume on a single charge. The parts also include the Dayton Audio KAB-250v3 Amplifier Board, 18650 batteries and Parts Express C-Note Bookshelf Speaker Kit. The speaker itself includes a volume knob, handle and rubber feet.

Battery-Powered Bluetooth Speaker
Battery-Powered Bluetooth Speaker, Image via: craftedworkshop

3. 3D Printed DIY Bluetooth Speaker

When learning how to make Bluetooth speaker like this one by electronoobs, you need parts such as a Bluetooth receiver, TDA2030 amplifier, 18650 3.7 Li-ion batteries and 55 mm speakers. If you’re looking to save money, consider recycled parts, such as batteries from an old laptop. You can give it a stylish, colorful look by investing in a 3D printed case.

3D Printed DIY Bluetooth Speaker
3D Printed DIY Bluetooth Speaker, Image via: electronoobs

4. DIY Bluetooth Speaker With Lights

The best thing about a DIY Bluetooth speaker such as this one by hackster, is you can break away from the same shape and design. One idea is a speaker that stands up vertically and features colorful LED lights. It creates a visual appeal that’s perfect for nighttime, parties or just relaxing. The other parts include a touch sensor, power adapter, PVC pipe, wooden plyboard, cylindrical wooden block and frosted acrylic cylinder lamp shades.

DIY Bluetooth Speaker With Lights
Bluetooth Speaker With Lights, Image via: hackster

5. Portable DIY Bluetooth Speaker

If you’re looking for wireless speakers you can easily carry with you, you’re sure to love this portable Bluetooth speaker by imgur. You’re going to use a Bluetooth amplifier, li-ion battery, speaker, case, vintage shoulder strap and other parts for this project. Your portable Bluetooth speaker features an LED light, charge monitor, storage space and two USB sockets for charging your mobile devices. It’s a great speaker for on-the-go activities with friends, such as beach and camping trips.

Portable Bluetooth Speaker
Portable DIY Bluetooth Speaker, Image via: imgur

6. Handheld DIY Bluetooth Speaker

You’re going to use basic tools to build this handheld DIY speaker box like this one by instructables so you don’t have to worry about going over your budget. The parts include a full range speaker, stereo amplifier module and micro USB battery charging module, and the tools include a mini handsaw, hot glue gun and masking tape.

Your handheld Bluetooth speaker features a Bluetooth 2.1 connection, high-efficiency amplifier, USB charging port and Li-Po battery. It may be a small, simple speaker, but it offers an incredible sound.

Handheld DIY Bluetooth Speaker
Handheld DIY Bluetooth Speaker, Image via: instructables

7. Boombox DIY Bluetooth Speaker

This amazing boombox Bluetooth speaker does more than just amplify your music. It also plays MP3 files, tunes to FM stations and charges USB devices! The Bluetooth speaker is made out of a pelican-like case for style and durability, as well as a Bluetooth module, amplifier modules and LiPo batteries. Your DIY speaker offers a Bluetooth 3.0 connection, IR remote control compatibility and 18 hours of playback on a single charge.

Boombox DIY Bluetooth Speaker

8. DIY Bluetooth Speaker Kit

A DIY Bluetooth speaker kit by popularmechanics makes it easier to gather your supplies. The kit includes everything you need for your DIY Bluetooth speaker, such as a tweeter, woofer, acoustic stuffing, drivers and gaskets. You need to buy the lumber and wood glue separately. You have the option of painting the lumber to add a splash of color to your speaker. When you’re finished, you’re left with an amazing sound system that’s just as good, if not better, than other speakers.

DIY Bluetooth Speaker Kit
Bluetooth Speaker Plan, Image via: popularmechanics

9. Gowanus Audio Bluetooth Speaker

You can learn how to make Bluetooth speaker by solidsmack using tips from Gowanus Audio. They offer a list of parts needed for this project, such as a speaker cabinet port tube, adapter power supply and Bluetooth amplifier boards. You also need supplies such as solder, a soldering iron, wood glue and adhesive foam strips.

You’re going to start by assembling the wooden case, and then you’re going to take care of the solder components. Once you’re finished connecting the components, you can screw on the back panel on and enjoy your speaker.

Gowanus Audio Bluetooth Speaker
Gowanus Audio Bluetooth Speaker, Image via: solidsmack

10. Magic Box Bluetooth Speaker

The magic box Bluetooth speaker such as this one by imgur features a case in the shape of a hexagon, which gives it a unique look. The best part is you can buy the hexagon box at an affordable price. Once you have the box, remove the hinges from the lid and attach them to the bottom as feet.

You’re also going to use hot glue to attach NeoPixel LEDs inside the box for a cool effect. Of course, you’re going to need your speaker, amplifier, Bluetooth module and the other usual supplies.

Magic Box Bluetooth Speaker
DIY Bluetooth Speaker Idea, Image via: imgur

11. Upcycled DIY Bluetooth Speaker

Are you looking for a way to save money on your DIY Bluetooth speaker? Build an upcycled Bluetooth speaker out of materials such as a car speaker, 9V battery, TPA3116DA amplifier board and USB-powered Bluetooth audio receiver. You can buy these materials brand new or reuse the parts you have around the house. One example is a case made of an old broken toy guitar amplifier.

Upcycled DIY Bluetooth Speaker

12. DIY Portable Bluetooth Speaker

The plans for this portable Bluetooth speaker by instructables don’t require you to spend a lot of money, but you’re going to need materials such as two 3W speakers, a micro USB charger and 3.7V lithium 18650 battery. You’re going to place everything inside a small PVC T-profile that measures at 50 mm in diameter. This speaker may be small, but it has a big sound.

DIY Portable Bluetooth Speaker
DIY Portable Bluetooth Speaker Idea, Image via: instructables

13. Powerful Bluetooth Speaker

You can build a powerful Bluetooth speaker like this one by instructables without breaking the bank. The list of materials includes a USB Bluetooth audio, micro USB charger module, 5W speakers and 3.7V lithium 18650 battery. Everything is placed inside a box made of wood, which you can touch up with paint and a grill.

Powerful Bluetooth Speaker
Powerful Bluetooth Speaker, Image via: instructables

Ending Note

Remember, you’re going to need a Bluetooth module so you can pair the speaker with your devices. Whether you’re building a simple speaker or including additional features, your DIY Bluetooth speaker is sure to offer a quality sound.

16 DIY Table Saws and Fences For Your Workshop

A DIY table saw in your home workshop can make construction projects much easier to start and complete. A table saw is an essential tool for building the smallest bird house, medium dog house or a large house for your family to live in.

Home remodeling projects are also much easier when you have a DIY table saw. Think of all the things you could build that would improve your quality of life if you only had a table saw. Prices at the home improvement store often make the purchase of a table saw to expensive for a someone who is just looking to do some DIY projects around the house, but a homemade table saw will fit into anyone’s budget.

Check out these 16 DIY table saw plans that will enable you to build your own table saw and start working on all those wood building projects you’ve have in mind this weekend.

1. Large Table Saw

Tackle even the largest building projects with this large DIY table saw by ibuildit.ca Having a good table saw, such as this one, will make all your wood working projects easier.

A few special feature on this homemade table saw include a DIY table saw fence that locks into place, a sliding tray with up to a 24 inch cut and a ripping capacity of 36 inches. The 10 inch blade can hand most any wood cuts and the dust collection bin will help keep your workshop clean. You may like to check out DIY sawhorses.

DIY Table Saw
Large Table Saw, Image via: ibuildit.ca

2. Inexpensive Table Saw

Sometimes you just need a table saw for one DIY project like this one by instructables, like installing new laminate flooring. After that project is completed, you may never use the table saw again. If this sounds familiar and you don’t want to spend a lot of cash on a power tool that will only be used for one project, consider this inexpensive DIY table saw that is quick to build and easy on the budget.

This design uses a recycle wooden pallet as a table top and a set of homemade iron saw horse as a DIY table saw stand. After the project is complete, the circular saw is easy to remove from the table top and the saw horses can be used for other projects.

 DIY Table Saws and Fences
Inexpensive Table Saw, Image via: instructables

3. Homemade Table Saw Fence

Follow these instructions and build a homemade table saw fence like this one by instructables from aluminum and wood. This fence is lightweight and the design can be scaled to fit any DIY saw table and only requires a few components to build. To build this diy table saw all you need is, Aluminum rectangular profile, Wood screws (50mm), Square 2.5×2.5cm wood pieces, 2x7cm wood board for fence + some plywood. Cut wood safely and precisely with this easy to build homemade fence. You may like to check out DIY miter saws.

Homemade Table Saw
Table Saw Plans, Image via: instructables

4. Circular Table Saw

These step by step instructions will guide you through building a table saw with a circular saw like this one by  instructables Written instructions are accompanied with pictures to help you understand the building process from beginning to end.

To build this diy table saw all you need is, Melamine, plywood or other board for table top and legs, Wood screws (50mm) and 16mm with flat head, Zip tie, Drill and bits, Clamps, Square and Circular saw.

A diy circular table saw will enable you to do many building and remodeling projects around the house, like installing new wood or laminate flooring, building and installing new cabinets or building a chicken house so your family can raise chicken and enjoy eating organic eggs.

 DIY Table Saws and Fences
Circular Table Saw, Image via: instructables

5. Under-mount Table Saw

Use these plans to create a under-mount diy table saw by enredandonogaraxe that will enable you to make more difficult wood cuts for building projects. This type of table saw allows you to maneuver wood to create odd cuts that will fit perfect into your planned building project.

Easy to build with these detailed instructions that include pictures. Every workshop should have one of the versatile saws.

diy table saw
Under-mount Table Saw, image via: enredandonogaraxe

6. Make a Wood Table Saw Fence

This PDF manual will show you detailed instructions on how to make a wood table saw fence such as this one by ibuildit.ca for your table saw. The attached tape measure makes precision cutting simpler and helps to remind you to measure twice and cut once during any wood working project.

Look at the photos, read the instructions and follow the video so you can build your own wood table saw fence.

Make a Wood Table Saw Fence
Make a Wood Table Saw Fence, Image via: ibuildit

7. Portable Table Saw

This DIY design creates a homemade table saw that can be taken to the building site so wood can be cut on-site. This portable table saw by woodgears is not attached to a permanent base, so any solid surface can become a base for cutting wood.

Ideal when building something outside of your workshop, like a detached man cave or she-shed.

Great for build an off grid cabin in the woods too, the DIY table saw can be powered by solar energy and used to build all the wood items needed for off grid living.

Portable Table Saw
homemade table saw, Image via: woodgears

8. DIY Table Saw Fence

The first power tool a wood worker wants in the workshop is a table saw with a fence that allows wood cutting freedom. They are not easily found and very expensive. These free plans will show you how to build a DIY table saw fence like this one by hackaday that will give you all the safety plus wood cutting freedom needed to build any project you have in mind.

DIY Table Saw Fence
Homemade Table Saw Idea, Image via:hackaday

9. Take Down Table

This is a great idea for small workshops and big projects – a take down table saw. This large table saw cabinet can handle cutting long boards and large pieces of plywood. The table also provide storage space for all the accessories needed for the DIY project.

When the DIY project is completed, the large table saw like this one by familyhandyman is easy to dismantle and store against a wall until it’s needed for the next project. This frees up workshop space while providing you with a large table saw when needed.

 large table saw
Take Down Table For Small Workshop, Image via: familyhandyman

10. Homemade Table Saw Fence

If your store bought or homemade table saw needs a fence like this one by instructables, here is an easy to build fence to help you make better wood cuts. These free plans include written and pictorial instructions so it make the DIY project very easy to complete.

One of great things about this design is that it does not create a space for sawdust to get wedged into and it doesn’t add a lot of bulk to the front of the table.

Homemade Table Saw Fence
Making a Table Saw, Image via: instructables

11. Flat Folding Table Saw

This is another ingenious design that will allow you to have a table saw like this one by instructables and plenty of space in your work shop. When not in use, this design will fold flat and take up very little space. Set up a couple of sturdy saw horses and place flat folding table saw on top and you’re rip to rip lumber in just a few minutes.

Easy to build, easy to set up when needed and easy to store when not needed. Get the best DIY table saw and keep your work space free from clutter when the saw is not in use when you build this project with these free plans.

Flat Folding Table Saw
Flat Folding Table Saw, image via: instructables

12. Multipurpose Work Bench

Build once, enjoy three tools. This is an ideal way to maximize your time and workshop space while having all your powers tools handy. This 3-in-1 work bench holds a table saw router table and inverted jigsaw like this one by creativityhero.

In addition to having all your tools together in one work space, the workbench is on wheels and can easily be moved outside. The height is ideal also to help backache caused from being bent over while ripping lumber. You may like to check out DIY gaming tables.

Multipurpose Work Bench
Multipurpose Work Bench, Image via: creativityhero

13. Wooden Table Saw Fence

Simple, strong and functional, this wooden table saw fence by ibuildit enables you to get precise cuts. The fence is light, easy to adjust and locks into place with very little effort.

Free instructions are well written, with pictures and a video to help you easily create this DIY project. You may like to check out DIY welding tables.

diy table saw fence
Wooden Saw Table Fence, Image via: ibuildit

14. Cheap Wooden Table Saw Fence

Cheap and easy to make, this wooden table saw fence by popularmechanics is ideal for any table or cabinet. Follow this YouTube video and build your own with new or leftover lumber in just a few hours.

Cheap Wooden Table Saw Fence
Cheap Wooden Table Saw Fence, Image via: popularmechanics

15. Table Saw Fence

All table saws like this one by woodgears need a fence that will help guide the wood for precise and safe cutting. The table saw fence also needs to be easy to adjust, lightweight, and easy to lock into place. This table saw fence does all this and keep saw dust from piling up in the front. This is an easy DIY project when you follow these free, detailed plans.

DIY Table Saw Fence
Make A Table Saw, Image via: woodgears

16. Front Rail Locking Fence

Fences that lock from the front and back do not always provide an accurate wood cut, but one that locks from the front rail only always helps achieve an accurate cut. The aluminum fence is lightweight and bolts together, so no welding is required for this DIY project.

These free plans show you how to build this front rail locking fence by woodarchivist that can be scaled to fit a small or large table saw.

Front Rail Locking Fence
Front Rail Locking Fence, image via: woodarchivist

10 Most Popular Sheep Breeds Raised For Meat And Wool

Sheep breeds are highly demanded in the areas where people have backyards or farms. It is indeed among the highly adored backyard fellows because of its advantages. It is a multi-purpose livestock that is raised for skin, meat, dairy and fiber. Truly, all the breeds of sheep can be used for dual-purpose; that is meat and fiber. However, particularly some breeds excel in one aspect. For example, there may be one kind of breed that tastes amazing; some type may be fantastic in providing with a good amount of milk. This also depends upon their growth cycle; therefore, you must choose the breed after clearly understanding the benefits of each types of breed.

10 most popular sheep breeds are:

1: Merino:

It is the sheep breed, which remains popular for its quality wool. It produces a premium quality fine sheep fleece, which is highly demanded all over the world. The hand-spun obtained from merino is used in making clothes for babies, shawls and other warm accessories. However, it cannot be used in daily wear. It is sensitive to handle, so only the experienced weavers tend to purchase this high quality wool. If you have it as your livestock, you can earn a lot.

Sheep Breeds

Wool Sheep Breeds:

2: Leicester Long-wool Sheep

With the origin from Britain, these medium to large sized, curly hair sheep breed is known for its quality carcass. Not only this, but it is also valued for its skin by the weavers. It is considered as “rare” in many parts of the world – but, farmers are trying to form newer breeds out of this wool sheep breed because it is valuable for human use. Approximately, they are around 2000 in the world today.

Leicester Long-wool Sheep

Dual Purpose Sheep Breeds:

3: Lincoln Sheep:

This sheep breed remains popular worldwide and weights between 260 to 350 pounds. It is popular for its lovely and finest wool and fleece, which is demanded all over the world for weaving and designing.

lincoln sheep

Different Breeds Of Sheep (meat)

4: Dorset Sheep:

It belongs to the category of sheep that produces delicious meat. It is popular among the domestic sheep farming and can be found easily in major states of the US. The sheep has an amazing milk producing and meat giving ability – it even has a faster breeding ability. This is among the most popular white face sheep in the world and has a huge presence all over the globe. Suffolk sheep, however, retains the strongest position in terms of presence over the world. You may also like to see meat rabbit breeds.

Dorset sheep

5: Dorper Sheep

Belonging to arid climatic condition, this sheep breed has the ability to adjust to varying seasonal changes. It is highly popular in western regions. The body has a good combination of hair and wool and they vary from medium to large size. It produces delicious mutton, which sells like hot cakes in the market. The wool is even used by the weavers for producing clothes and other stuff. You may also like to see famous goat breeds.

Dorper sheep

6: Hampshire Sheep:

Known for its excellent and delicious mutton, this breeds of sheep has medium wool,dark faced and hornless breed. They are medium sized, quickly growing breed. This meat sheep breed is a result of cross culture, and that is the reason for its varying skin tone.

Hampshire sheep

7: Suffolk Sheep Breed:

Those who are interested in having the best type of meat sheep breed must go for Suffolk sheep. They contain medium wool with black legs and face. This is among the largest rowing breed, which offers tasty mutton. You may also like to see pet rabbit breeds.

Suffolk sheep

Hair Sheep Breeds:

8:American Black Bellied/Barbados:

American Black Bellied

These Types of sheep breeds are used for hunting, hair and beautiful horns. The meat is lean and lacks muttonly flavored as other wool breeds have that is good for people who dislike strong mutton smell. Some of the hair sheep breeds are obtained by mating the cross-cultural breeds like Jacob sheep, Merino and Rambouillet. Other popular hair breed includes:

  • Painted Desert sheep
  • Black Hawaiians
  • Texas Dallas

More information about this breed.

9: Jacob Sheep Breed:

With impressive horns, dotted monochrome body and face, this hair sheep breed remains popular for its beauty, skin and appeal. They lack the outer coat and have a thinner, fine fleece. They are highly used for hides and wool. You may also like to see giant rabbit breeds.

Jacob sheep

Dairy Sheep Breeds:

10: East Friesian:

This is the most productive and common sheep breed which is known for its quality milk in the world. On average, it produces around 990 to 1,100 pounds per 220 to 240-day. You may also like to see breeds of chickens.

 East Friesian sheep

12 DIY Archery Backstop To Catch Stray Arrows

A DIY archery backstop is a lifesaver during target practice, especially when those stray arrows escape the bullseye. I remember the frustration of constantly retrieving missed shots before I built my own backstop. Reflecting on my own journey with archery practice, I found that repurposing soft materials like old foam padding or carpeting not only saved money but also made for an effective backstop.

Additionally, using a bale of hay as a DIY solution proved to be both economical and durable, lasting several months of regular use. With these creative ideas and a bit of DIY spirit, you can save time and energy by building your homemade archery backstop, ensuring you spend more time perfecting your aim and less time chasing down stray arrows.

Check out these creative ideas and get busy building a homemade archery backstop so you won’t have to chase down stray arrows.

1- Archery Backstop With Roof

Utilizing this free plan, I embarked on constructing a large archery backstop akin to the design by standardamericandad, complete with a roof for uninterrupted year-round practice sessions.

Drawing from my own endeavors, I can attest to the effectiveness of the wooden frame paired with a roof cover fashioned from metal roofing material. This setup proved invaluable in shielding the target from the elements, ensuring consistent practice regardless of weather conditions.

Moreover, my experience with the backstop’s generous size allowed for versatile target options, from traditional bullseye targets to lifelike 3D archery targets like deer, turkey, or hog.

Crafted from a recycled rubber floor mat, the backstop showcased durability and reliability, effectively halting all stray arrows and sparing me the hassle of retrieving missed shots.

And with just a few spare building materials on hand, I found that this DIY project was not only cost-effective but also rewarding in its practicality and functionality.

DIY Archery Backstop
DIY Archery Backstop, Image via: standardamericandad

2- Portable Arrow Backstop

Drawing from my own experienc while going through this DIY archery target from ArcheryTalk, I can attest to its effectiveness in stopping stray arrows. The plywood construction, coupled with the roof to shield against the elements, provides a reliable and durable solution. As someone who enjoys target practice in various outdoor conditions, I appreciate the convenience and affordability of this homemade backstop.

It’s satisfying to know that with some scrap lumber and a bit of effort, I can set up a reliable target anywhere I choose, regardless of the weather.

Portable Arrow Backstop
Homemade Portable Backstop, Image via: archerytalk

3- Backyard Archery Range

As someone who enjoys the art of archery but lacks access to a nearby range, the idea of constructing a backyard range resonates deeply with me. Following the free plans provided by Surviving Prepper, I embarked on creating an archery range featuring two targets and a secure DIY backstop. It was an exciting endeavor, knowing that within just one day, I could transform my backyard into a personal archery haven. The design, tailored for suburban settings, was particularly appealing, especially considering the limited space required by the backstop.

If you enjoy shooting with bow and arrows but don’t have an archery range nearby, build one in your backyard.

Backyard Archery Range
Backyard Archery Range, Image via: survivingprepper

4- Horse Stall Mat

A horse stall mat is made from thick rubber and it will stop an arrow that misses the target. Learn how to build a frame from recycled landscape timbers and suspend a horse stall mat behind the arrow target in this idea by Fabville.

It’s a permanently placed backstop that is concreted into the ground. It will last for years as you hone your archery skills on the target.

Horse Stall Mat
Horse Stall Mat, Image via: Fabville

5- Exercise Mat

Learn how to take a large exercise mat and create a DIY archery backdrop like this one by Donald Porta on Youtube video. It’s easy to build and easy on the budget too.

The large mat is thick and strong, yet it has cushioning so stray arrows won’t break when they hit the backdrop. This backdrop will stop all of your practice arrows and broadheads that miss the target.

6- Foam Block

Having ventured into DIY projects myself, I found this video tutorial by longdread575 on YouTube immensely helpful in crafting a secure archery backstop. The ingenious use of lightweight foam blocks to slow down stray arrows, complemented by a thick rubber horse mat for added protection, instilled confidence in the safety of the setup.

Constructing the wooden frame to hold everything together not only ensured the durability of the backstop but also provided a reliable target for honing my archery skills in a controlled environment.

7- Under $50 Backstop

All you need is a few 2“x4“ pieces of lumber and a horse stall mat to create a safe backstop by diydanielle.

The target goes in the center and the mat is wide enough on each side to stop all the stray arrows. This is a great size for a small backyard and the price is right for any budget. Arrows are not cheap and you won’t be losing any more of them after you build this effective arrow backstop.

Under $50 Backstop
Under $50 Backstop, Image via; diydanielle

8- Carpet Backstop

Get an excellent idea for recycling an old piece of carpeting or rug into diy archery backstop like this one by Aaron Matters in Youtube video.

Carpeting and rugs are made from thick, soft materials and do a great job at stopping strays arrows. So when it’s time to replace your flooring, save the old carpeting and rugs for this DIY project.

The carpeting or rug is easy to suspend behind the archery target. If the space must serve double duty, then the carpeting or rug will be easy to take down and rolled up when not in use. The backstop can be put up in a few minutes and you can enjoy target practicing without losing any arrows.

9- Cardboard Backstop

Drawing from my own experiences, I’ve found cardboard to be a readily available and cost-effective material for crafting a DIY archery backstop, as suggested by Gateway To Airguns. Layering several sheets of cardboard creates a sturdy barrier that effectively stops arrows. Moreover, cardboard’s composition from trees renders it surprisingly durable, especially when packed densely in a cardboard box configuration.

Over time, I’ve learned that while cardboard backstops may not withstand harsh weather conditions, they can remain resilient if kept sheltered. Exploring shooters forums has been instrumental in discovering innovative ideas for building targets and devising secure methods to catch wayward arrows.

DIY archery backstop
Cardboard Backstop, Image via: gatewaytoairguns

10- DIY Portable Backstop

Learn how to build a portable backstop for your arrows like this one by TightlineTV in this Youtube video.

The backstop is created from 2“x4“ boards and a thick horse mat. Wheels are attached to the bottom so it’s easy to move around. The design creates a thin DIY archery backstop that is easy to store in a small space when it’s not in use.

The mat is thick and well able to stop stray arrows so you won’t have to chase them down after target practice. You won’t lose any more of those costly arrows either. This is a simple build and it’s budget friendly.

11- Homemade Backstop

Improve your archery skills for the next bow hunting season with your own target and homemade backstop in your backyard.

This project costs less than $50 and it will help you develop the arrow shooting skills needed to harvest a big buck or other wildlife. Practice with peace of mind, knowing your arrows won’t be lost or broken.

A horse mat seems to be the most popular item to use as a backstop for arrows. This backstop design by Clarks Outdoors on youtube uses a horse mat and a 2“x4“x8 wooden frame to create a perfect, cheap homemade backstop. Watch this YouTube video for complete instructions.

12- Anti-Fatigue Mat Backstop

Those cushiony anti-fatigue mats that are made for people who have to stand in one place for long periods of time make great DIY archery backstops.

These mats are relatively cheap and the backstop is easy to build. The thick cushioned anti-fatigue mats are sturdy and durable and will last through a few seasons of target practice. The narrow width makes the backstop easy to store when not in use.

Improve your archery skills and quit losing arrows with a backstop like in this Youtube video.

https://www.youtube.com/watch?v=8iA-7exUT2w

Ending Note!

DIY archery backstop helps you in target practicing to have a clear shot when you are on hunting. You can also use these 12 diy archery backstop we have shared with you for fun with your kids or teaching them art of hunting.

References

Washington Department of Fish & wildlife, “Target shooting on WDFW lands”, https://wdfw.wa.gov/about/wdfw-lands/recreation-planning/rule-development/target-shooting

Department of Natural Resources, “Getting Started: Archery”, https://ohiodnr.gov/discover-and-learn/education-training/wild-ohio-harvest-community/getting-started-archery

11 DIY Lean to Greenhouse Plans to Build with Your House

When I embarked on the journey of building a lean-to greenhouse, it wasn’t just about creating a space for my plants; it was about creating a haven for my passion for gardening. I vividly recall the excitement of planning and constructing this greenhouse, envisioning how it would revolutionize my gardening experience.

As I built the structure against the sturdy wall of my house, I couldn’t help but feel a sense of pride and accomplishment. It was more than just assembling materials; it was a tangible manifestation of my dedication to nurturing green life. Each step of the construction process was filled with anticipation, knowing that soon I would have a sheltered space where my plants could thrive.

Once completed, the benefits of the lean-to design became apparent. The solid wall absorbed the warmth of the sun during the day, providing a stable and conducive environment for my plants. Even as the evening chill set in, the greenhouse retained the heat, ensuring that my botanical companions remained cozy and protected.

Moreover, the proximity of the greenhouse to my home fostered a deeper connection to nature. I found myself spending more time tending to my plants, observing their growth, and reveling in the beauty of the natural world. It became a sanctuary where I could escape the hustle and bustle of daily life and immerse myself in the tranquility of gardening.

Not only did the lean-to greenhouse fulfill my gardening aspirations, but it also added value to my home in more ways than one. Beyond its practical utility, it became a focal point of admiration for visitors and a source of inspiration for fellow gardening enthusiasts.

In retrospect, building a lean-to greenhouse wasn’t just about creating a structure; it was about cultivating a passion, nurturing life, and fostering a deeper connection to the natural world. It’s a project that continues to bring joy and fulfillment, reminding me of the transformative power of gardening.

Check out our list of free lean-to-greenhouse plans and find one that is just right for your home gardening needs.

1- Wooden Lean-to-Greenhouse

A lean-to greenhouse does not have to look like it was added on, this idea will show you how to create a matching design that looks the greenhouse is part of the house.

This wooden lean-to greenhouse by backwoodshome is covered with clear panels of polycarbonate to let the sun shine through and allow the matching wood structure to be visible.

Not only will a greenhouse provide a location for growing food 365 days a year, but it will also help combat Seasonal Affective Disorder (SAD) that impacts many people during the winter. Spending a little time every day inside a warm, sunny greenhouse can lift your mood, relieve stress, and banish depression.

Wooden Lean-to-Greenhouse
DIY  Lean-to-Greenhouse Made From Wood, Image source: backwoodshome

2- Half Wood, Half Polycarbonate

Building a DIY lean to greenhouse is a low-cost way to create a space to garden year-round. By using an existing wall, the building time and expense are reduced, plus your home value is increased.

Get these free lean to greenhouse plans by empressofdirt that will show you how to build an attractive structure that is half wood and half polycarbonate. The bottom is wood and makes ideal interior storage space, and the top half is clear polycarbonate to let the natural sunlight come in.

This is a great idea for using leftover pieces of lumber from a building project. These plans are adaptable to your particular gardening needs and building space.

free lean to greenhouse plans
Half Wood, Half Polycarbonate Greenhouse, Image source: empressofdirt

3- Basic Lean to Plans

Get detailed lean-to greenhouse plans in this YouTube video that will show you how to build a basic enclosed garden space. Every detail, from the framing, to the flooring, and even an adjacent outdoor garden space, is shown in this informative video.

The building costs are kept low with this basic idea we are discussing about and this lean to greenhouse can be built for under $600. Clear plastic is used to cover the wooden frame to let the sunshine through and keep the warmth inside.

Great low-cost way to create an indoor garden space so you can enjoy fresh tomatoes, peppers, cucumbers, lettuce, and your other favorite vegetables all winter.

4- Wooden Lean To Greenhouse

Get these step-by-step instructions that will show you how to build a wooden lean to greenhouse by myoutdoorplans for growing and storing plants all winter. Grow vegetables and overwinter dormant plants in your own attached greenhouse.

The best thing we like in this plan is that the size of the wooden greenhouse is customizable so you can build it as large or small as you need. The free plans are on a downloadable PDF file for easy use while constructing the lean-to greenhouse.

Wooden Lean To Greenhouse
DIY Lean-to-Greenhouse plans, Image via: myoutdoorplans

5- Polycarbonate Lean to Greenhouse Plans

Here is a great way to enjoy gardening year-round without spending a lot of money. The wooden frame of this DIY lean to greenhouse in this youtube video is covered with clear polycarbonate to allow maximum sunlight to come in. About 2-feet up around the bottom is covered with wood to help provide stability and to provide some interior storage space that is hidden from the outside view.

Grow food year-round and have a warm place to de-stress during the winter months when you build a lean-to greenhouse like the one we have in this YouTube video.

6- Recycled Window Lean to Greenhouse

If you want to build a greenhouse cheaply, then check out these lean-to greenhouse plans that is built with recycled windows. Some old windows and scrap lumber can be transformed into an efficient diy lean to greenhouse by fabulesslyfrugal for under $100.

Build it around the window sizes and shapes to create a one-of-a-kind lean-to greenhouse that will enable you to grow food 365 days a year. Gardening in a lean-to greenhouse is also easier on your back because you don’t have to bend over to garden. Most of the plants are in raised beds, on tables, or in hanging pots.

Recycled Window Lean to Greenhouse
Recycled Window Lean to Greenhouse, Image source: fabulesslyfrugal

7- Top Vent Lean to Greenhouse

Enjoy your gardening hobby year-round with this attractive and easy to construct lean to greenhouse by howtospecialist with top vents. The vents on top can be opened or closed as needed so the interior temperature of the greenhouse remains perfect for the plants. The vents will also increase air flow to prevent mildew.

Start plant seeds in the spring to get a head start on outdoor vegetable growing season and grow food producing plants inside the greenhouse during the winter for a year-round harvest. This simple structure will add value to your property, allow you to enjoy your gardening hobby, and provide space for growing food and flowers 365 days a year. You may also like to see diy pvc greenhouse you can build on a small budget.

Top Vent Lean to Greenhouse
Top Vent Lean to Greenhouse, Image via: howtospecialist

8- Behind the Shed

A DIY lean to greenhouse can be built against any outdoor structure, including a shed. These lean to greenhouse plans on YouTube video will show you how to build one against the back of a storage shed. The greenhouse is out of the way, yet close enough to the house for easy access.

The lean-to greenhouse is as wide as the shed and has plenty of interior space for shelves and it’s tall enough for hanging pots of flowers and herb plants.

9- Small Lean To Greenhouse

This small lean-to greenhouse by gardenplansfree is ideal for storing dormant plants during the winter or starting vegetable seeds in late winter. It’s better than a cold frame because you can stand up straight in this lean to and can work with your plants without bending over.

Save your back, save your plants, save some money by following these free plans and building yourself a small lean-to greenhouse.

Small Lean To Greenhouse
Little Lean To Greenhouse Plans, Image source: gardenplansfree

10- Pre-Fab Lean to Greenhouse

If you don’t have the time or skills needed to create a lean to greenhouse from scratch, consider using a pre-fab kit. This YouTube video will show you how to put together a small 4-feet by 8-feet pre-fab lean to greenhouse so you can enjoy gardening all year.

It’s a simple and efficient structure that takes up very little space in the back or side yard and is easy to put together. Don’t let the small size fool you, you can grow a lot of fresh produce, herbs, and flowers in this small greenhouse.

You can purchase a pre-fab lean to greenhouse like this one on youtube from any garden supply center at a reasonable price. Then you’ll want to watch this YouTube video for tips on how to put it together.

11- Aluminum Frame Lean to Greenhouse

Lightweight and strong, aluminum is ideal building material to use for creating a frame for a lean-to greenhouse. Easy to work with and inexpensive, aluminum and plastic sheeting are the main components of this lean to greenhouse on Youtube that fits nicely against a barn.

Get seeds and seedlings off to a healthy start in late winter with a greenhouse like this one. Continue the garden season through the winter by growing vegetables in the sunlit and warm environment inside this lean to structure. Great for any homestead, this DIY lean to greenhouse won’t take up much of your time to build or use up much landscape.

Watch this YouTube video for the free plans and custom build a lean-to greenhouse from aluminum and plastic sheeting. You may also like to check out indoor greenhouse plans.

Summary

Lean-to-greenhouse is a great option to grow your plants year round by building a greenhouse adjacent to your house wall. A lean to greenhouse is also a better option than a free standing greenhouse. Hope we have helped you in making a similar or your own custom design greenhouse through these wide selections.

17 DIY Router Table Plans You Can Build Easily

A DIY router table will help you complete building projects faster than with just a router alone.  It’s so easy to cut your own moldings and shape narrow pieces of wood when you have a homemade router table to hold the router in place.

If you work with larger bits and need to make multiple passes to shape the lumber correctly, one of these 17 router table plans we are sharing with you will show you how to build a sturdy work table that will make your woodworking tasks easier and quicker.

1- Portable Routing Table

As we all know that most woodworking hobbyists want their own routing table to make their projects easier. But the cost can be a little pricey and the table may get pushed to the bottom of the list of things needed for the home.

Use these free plans to build a router table and you can save a lot of money and get that table for your shop that you always wanted. This is not an ordinary DIY router table this one by oneprojectcloser has wheels on the bottom so it can be moved wherever it’s needed.

Being able to move the routing table to different locations makes the woodworking projects easier and faster. No need to lift the wood and carry it to the table then back to the original location, just roll the table to the lumber. The bottom casters can be locked into place so there’s no danger of the table rolling away while.

Portable Routing Table
Portable Routing Table Image via: oneprojectcloser

2- Plywood Routing Table

Use these router table plans to construct a solid work surface using plywood and 2x4s. These free plans will show you how to build a routing table by instructables that will fit your router and your usage needs.

The size and location of the mounting hole are easy to adapt to fit your specific type of router, plus the dust collection hole location can be changed if desired. The basic plans can be adjusted to create a custom DIY router table for your home woodworking business or hobby.

Plywood Routing Table
Plywood Routing Table Image via: instructables

3- Wood Frame Table

Make your own router table with these step-by-step instructions and all of the decorative woodworking you do will be so much easier. Cut grooves and bevels into the wood with a stable router that is attached to a solid table so you create the smallest details into the wood.

A stable router will enable you to cut intricate designs into the wood with fewer mistakes due to the router slipping. This simple table can be built in just a few hours and will keep your router stable while it’s in use.

This router table plan PDF by wikihow has detail written instructions and pictorial instructions to make this DIY project go smoothly. It can be easily downloaded and printed out so you can follow the building instructions in locations where internet services might not be available. You may also like to check out diy gaming tables

Wood Frame Table
Wood Frame Table, Image via: wikihow

4- Mini Router Table

Not all wood workers need a large router table, sometimes a mini router table is perfect for the task. So we recommend this router table to those who have small woodworking needs. This video will provide detailed instructions for building a DIY routing table on youtube that will fit into a small space but can handle large routing tasks if needed.

This mini router table also has plenty of storage underneath so you can keep all your woodworking tools secure and handy. A plexiglass door encloses the bottom of the router and a small light is installed for illumination.

Keep tools handy and your work area neat with this homemade routing table.

5- Fully Loaded DIY Router Table

If you want (or need) a routing table that is loaded with extras, then check out these router table plans that we have listed on number five.

The table has plenty of work space with both over and under dust collectors to keep the work surface clean, tool holders, stop blocks, adjustable fence, storage cabinet, and safety switch. This video provides all the detailed instructions so you will be able to construct this fully loaded DIY router table like this one on youtube for your home or business workshop.

The overall size is not too big so the homemade table can easily fit into a small workshop and keep all your tools at your fingertips.

6- Table Saw Router Fence

Your new table saw and DIY router table like this one by jeffbranch.files will need a fence so you can create various types of joineries and moldings to make your woodworking projects look professional. A router fence like this one will be needed to cut wood just the way you want to.

This detailed PDF file will show you how to build a router fence so all of your wood projects can have smooth, detailed edges. The fence is crafted from melamine covered particle board and plywood, so the cost of this DIY project is minimal. You can use other similar materials that you have on hand to make the router fence free.

Customize your router table so woodworking projects will be easier, faster, and more enjoyable. You may also like to check out diy welding tables.

Table Saw Router Fence
We love this Table Saw Router Fence, Image via: jeffbranch.files

7- Bit Storage and Dust Collection

Working with wood creates lots of dust, and you don’t want that dust all over your workshop. This compact designed DIY router table by craftedworkshop will keep the dust collected in one spot, plus keep all your woodworking bits at your fingertips.

Follow these free router table plans to build a secure work area for your router that has bit storage and dust collection. Add casters on the bottom to make the router table mobile so it can go wherever you need it.

This DIY project is simple and will make all your woodworking projects so much easier. The sturdy construction will last for decades and provide a solid work surface for almost any project you want to undertake.

Bit Storage and Dust Collection
Bit Storage and Dust Collection Image via: craftedworkshop

8- Decorative and Useful

Some people want their workshop to look less like a workshop and more like an extension of their home. If this sounds like you, then this decorative and useful DIY router table idea by ana-white is just your style.

Form and function join together in this DIY project to make your woodworking projects easier while looking stylish. Two side pull out drawers and two bottom drawers provide hidden storage to keep woodworking tools neatly concealed and bottom casters make the router table easy to move.

The compact size makes it ideal for use in a small workshop. At the end of the work day the table can be rolled to an out of the way corner where it will look like a decorative cabinet until it’s needed again.

DIY router table
Decorative and Useful Router Table Image via: ana-white

9- No-Frills and Rock Solid

This router table by woodsmithshop gets back to the basics for a no-frills, rock-solid design that is created for heavy duty woodworking projects.

Easy and straightforward to build with downloadable PDF files, this heavy-duty router table has a simplistic design with a base constructed from 2x4s. The free plans provide two options for the finished appearance of the tables – it can be an open table design with the four bottom legs exposed and an open shelf, or there is an option for enclosing the bottom with sides and front cabinet doors.

Either design will provide a rock-solid table for your router and woodworking projects.

No-Frills and Rock Solid
No-Frills and Rock Solid Image via: woodsmithshop

10- DIY Router Table For Big Jobs

Are you planning to do some home remodeling that will require a lot of routing work? Then this homemade routing table is for you. Remodeling tasks, like cutting and installing new wainscoting, require a lot of routing work and you will need this DIY bench by oneprojectcloser to help you get the job done efficiently and safely.

It’s a simple four-legged design constructed from 2x4s and plywood but it’s stable and able to handle the large sheets of wood and long pieces of wood trimming. Add four casters to the bottom of the bench legs to make the router portable so you can take it wherever you go. You may also like to check out diy puzzle tables.

DIY Router Table For Big Jobs
DIY Router Table For Big Jobs Image via: oneprojectcloser

11- Benchtop Routing Table

This is a must-have for working on a remote job site! This portable benchtop routing table is easy to take along with you and is ideal for use on a tabletop or on the back of a truck. Any sturdy flat surface will work for placing this self-contained router table by instructables so you can get the wood work done on site with ease.

Great for use with a battery powered cordless router but it will also work with a corded electric router. This portable table has space for a few bits so your woodworking tools will always be handy while you’re on the job.

Benchtop Routing Table
Benchtop Routing Table, Image via: instructables

12- Not Found In Any Store

Router tables can be bought in most hardware stores but not this table. This table can only be constructed at home using these free plans.

All the features you want in a table router such as this one by popularwoodworking at a fraction of the cost. Easy to build and easy to use. This homemade router table will help you complete any woodworking job you undertake.

The bench features a tool-free fence that can be adjusted quickly and sub fencing that can be adjusted to any bit size. A sturdy top and dust collection make this ideal for anyone who regularly works with wood.

homemade router table
homemade router table Image via: popularwoodworking

13- Simple Router Table

Simple to build and easy to use, this DIY router table familyhandyman will help you do woodworking projects that you never thought possible before.

A handheld router is a great tool for any woodworking shop but when you turn it upside down and mount it onto a table, it gives you much more versatility. Plus, this simple table has double dust collection, storage, adjustable fence, safety switch, and is sturdy.

Build this simple router table this weekend and enjoy easier work next week.

Simple Router Table
Simple Router Table Image via: familyhandyman

14- Stand Alone Router Table

This portable, stand-alone router table by finewoodworking goes where it’s needed and makes the tough woodworking task easy.

This easy to follow video provides detailed instructions so you can build this sturdy stand-alone routing table that can help you with all your woodworking tasks from building a house to installing decorative trim on bathroom cabinetry.

Storage and dust collection are also included in this sturdy router table project. You may also like to check out small woodworking projects.

Stand Alone Router Table
Stand Alone Router Table Image via: finewoodworking

15- Versatile Table

This versatile routing table by popularwoodworking can help you complete many woodworking projects and has plenty of storage for all your bits and attachments.

Dust collecting is included in the design so this versatile, heavy-duty table can be used inside a workshop without making a mess. Keep the dust down and the finished wood projects up by using these detailed plans to build this versatile router table.

DIY router table
DIY router table Image via: popularwoodworking

16- Trash Can Router Table

Any ordinary metal trash can is easily transformed into the base for this router table design by woodworkingtips. The trash can serves double duty as the table base and as the dust collector. When the router is not in use, the trash can is used for its original purpose – collecting trash.

This is a great idea for small spaces and when woodworking is not done on a steady basis. A sand bag placed in the bottom of the trash can keeps it stable and the table top is secured to the top of the trash can with screw eyes. It’s easy to set up for work and easy to dismantle when the work is completed.

Follow these simple instructions and create your own cost effective, space saving DIY router table.

Trash Can Router Table
Trash Can Router Table Image via: woodworkingtips

17- Self-Contained Router Table

The last one in our list is a homemade router table that puts everything at your fingertips in a compact and functional design.

Pull out drawers hold all your bits and other woodworking tools and the side mounted safety stop is easy to reach in case of an emergency. This self-contained router table on youtube is a must-have in your woodworking shop so you can complete all your wood building projects with ease.

The table is small and is ideal for small spaces. Add four casters to the bottom legs of the table to make it mobile and easy to move wherever it’s needed.

This YouTube video will show you how to build this custom router table for less than half the price of store-bought tables that are not as good.

Conclusion

Router tables bring perfection in your woodworking projects by holding the router and provide a plane surface to smoothly run the router. Building your own router is always more cost effective than the marker made routers. You choose any of these router tables plans from our round up to build the table that suits your needs.

Based upon some of the most common questions asked I have prepared a questionnaire. 

FAQ’s

What is a good size for a router table?

A good size for the top of a router table is 2 feet x 3 feet. Take into consideration the size of the wood you will be working with most often and adjust the table top size accordingly.

The height of the table should be determined by the user and should be a comfortable height for the user. You don’t want it to be too high or too low as either one can result in back and/or shoulder pain after a day of woodworking.

What materials do I need for a router table?

You will need 3/4 inch plywood or MDF and solid pine boards. Hardware like wood screws, bolts, washers, a router plate insert, and an on/off switch.

You will also need tools like a table saw, miter saw, jigsaw, router and bits, drill and drill bits, clamps, sanding block, and wood glue.

Accessories for a router table include adjustable fencing, feather boards, miter sled, T-track, and a dust collection system to keep your woodworking shop clean.

Are router tables safe to use?

As with any power tool, safety precautions should be used when using a router table. Always wear protective eye gear, face shield, and ear protection. Never wear loose fitting clothing when operating a router.

Kickback is the main hazard of using a router table. When a router bit become stuck in the material, it will try to spin the material it’s stuck in which can result in kickback. It’s the same scenario as when a saw blade becomes stuck and tries to free itself.

Use caution, safety precautions, and common sense and a router table will be a safe tool to add to your woodworking shop.

References:

Fine Homebuilding, by John Michael Davis, “Routers: The Best Tool You’re Not Using”, https://www.finehomebuilding.com/2004/01/01/routers-the-best-tool-youre-not-using

Wood Craft, by Paul Anthony Posted on Jan 8, 2019, “ROUTER-TABLE TRICKERY”, https://www.woodcraft.com/blog_entries/router-table-trickery

Is about simple living,growing your own food,raising livestock,Do It By Yourself,off grid living,gardening,homemade products