Category Archives: DIY

Collection of Ideas to do it yourself whatever you can do on your own using your basic knowledge and skills for a more sustainable living.

33 Inspiring DIY Trellis Ideas For Growing Climbing Plants

DIY trellis is a great way to save your garden space that supports climbing flowers, vegetables and fruits plants to grow vertically and increase your yield per square feet. Apart from this it also help in protecting plants from plants  pests. Building trellis is not so difficult; you can make your own diy trellis by using copper, bamboo, wooden poles and sticks, lumber, wire mesh, etc.

You can choose from a wide range of ideas for building a trellis in your backyard. All you need to do is choose the plans that work for you, and then you need to follow the instructions. Here are 33 plans that we have found for you on how to build a trellis for your garden.

33 DIY Garden Trellis Ideas With Tutorials

1- Simple Backyard Cedar Trellis

For building this diy trellis by removeandreplace

  • Get some cedar slabs and join them to form a robust frame structure.
  • After that, make sure the wooden lattice that you have formed fix in this structure properly, otherwise you will have to spend time cutting it.
  • Dug 4 inch in the ground (backyard) so that you can place the trellis and secure it.
Simple backyard Cedar trellis
Image via: removeandreplace

2- Twine and Twig Trellis

When learning how to make a trellis like this one by chickenscratchny, one idea is to start with a simple project, such as a twine and twig trellis. While it does require a bit of work, using materials that are easy to find and manage is a good start. The supplies include your twine and twigs, two T-posts, outdoor zip ties, pruning scissors and a handsaw. You’re going to attach the twine and twigs to the T-posts, as this creates a sturdy place for your trellis to hang.

Twine and Twig Trellis
Image via: chickenscratchny

3- Pea Trellis

Consider a pea trellis if you’re looking for an easy DIY garden trellis like this one by gardentherapy to work on with kids. The supplies include bamboo poles and garden twine, which is simple enough for the whole family. You’re going to attach the garden twine to the bamboo poles, but do so vertically so the pea plants can grow. Once you’re finished, gently tuck the tendrils of the pea plants onto the twine. This project is a great way to teach your children about gardening.

DIY garden trellis
Image via: gardentherapy.ca

4- PVC Garden Trellis

With these DIY garden trellis plans, you’re going to learn how to build a PVC garden trellis by instructables. Of course, the materials include PVC pipe, PVC 90 degree elbow, PVC 3-way elbow and PVC tee. You’re also going to need natural fiber twine for this project. The PVC pieces are used to construct the frame of your garden trellis, and the natural fiber twine is used to create the spaces for your garden to grow. Building a PVC garden trellis is an easy, affordable project for your garden.

PVC Garden Trellis
Image via: instructables

5- Wall Fixed Trellis

Firstly, have a sketch ready in front of you before building this diy garden trellis, so that you can easily go about it. Then, build a wooden lattice and following that a wooden frame. They both should complement each other while joining them together. Give it finishing touch by putting up the cap rail. With help of the nails, attach the frame to the wall. You can spray paint if you want to hide the cedar color.

Wall fixed trellis
Image via:

6- DIY Trellis From Bike Rim

Did you ever think of doing such a diy plan like this one by goodshomedesign? Here are brief instructions for building garden trellis from bike rim.

  • Attach the two rims by joining the center from metal rod.
  • Later, with garden twine, draw lines in both the rims so that it forms a support structure. You can place desired plants at the base of the wire.
Trellis from bike rim
Image via: goodshomedesign

7- Wire Wall Trellis

Are you planning to build a grape vine trellis like this one by salvagedliving against a solid structure? Consider a wire wall trellis for your vines. One idea is to build it on the exterior of your home, right above the garden next to your house. This DIY trellis is a fun alternative to the usual shrubs you may plant in this area.

Once you create and mark your design, you can build the trellis using cable wire. The other supplies include masonry drill bit and anchors, a drill, eye screws, hammer and wire clamps and cutters. In addition to grape vines, you can also plant cross-vine, trumpet vine, moonflower and coral honey suckle.

 build a grape vine trellis
Image via: salvagedliving

8- Squash And Melon Trellis

This is beautiful garden trellis ideas by onecreativemommy for growing melon and squash – within this structure, make lattice with nylon garden trellis mesh. You have your diy trellis ready to be used; it works well for planting peas.

Squash and melon trellis
Image via: onecreativemommy

9- DIY Garden Trellis You Can Build On A Weekend 

Go step by step for this amazing bean trellis idea by thisoldhouse

  • Size the frame and mark the cleft so that you can easily cut.
  • After you have smoothened the structure, assemble the horizontal frame.
  • Attach the lattice to the frame and attach the caps.
  • Make three of the same kind and place them side by side on the wall so give an aesthetic look.
Weekend trellis plan
Image via: thisoldhouse

10- Super Cheap Trellis Idea

If you wonder how to make a trellis like this one by sybilalfano, here is a simple yet effective type of a solution for you. You can now keep your plants the way you want, and that even without requiring any space, as such. Get some wooden stakes and look for nails with wooden ends.

You need to form diamond frames with that, and one the base of each, attach pencils for support. The dull wood trellis does not appeal much, so spray paint it, and it is ready to be used in some pot, or attach in to the roof.

Super cheap trellis
Image via: sybilalfano

11- Sophisticated And Elegant Patio Trellis

This diy patio trellis like this one by blueroofcabin can be made on the front side of the house, because it exhibits great aesthetic appeal. You need to make a wire lattice within the lumber structure and fix it in space that you have in your garden space. It can be an old door or wall, as per your wish. Make sure you dig in 3 inches and then fix the frame in the soil. It can be ideal cucumber trellis too.

Patio Trellis
Image via: blueroofcabin

12- DIY Flower Trellis From Treated Lumber

You can follow the structure for growing flowering vines which has various sizes of frame, made from treated lumber. Once you have the basic frame, you can attach the netting along with it and form the perfect garden trellis like this one by lowes. Attach all the frames together and you have the desired type of garden trellis. By lowes

Flower Trellis
Image via: lowes

13- Crib Wall Trellis Idea

Take the crib wall and paint it whatever color you like – once done, attach spacers at the back of it, so that it can easily be placed with the wall. See the detail by domainmarket.

Crib wall Trellis
Image via: domainmarket

14- Pea And Cucumber Trellis Ideas

With cattle panel’s electric fence stakes and twist ties, you can have a lovely garden trellis in your backyard. It won’t cost you at all, other than time and patience. Other than the lattice making, you need to make sure you tie twist ties to the stakes and panels (joining part).

Pea and cucumber trellis ideas

15- Sculpture Look DIY Trellis

With help of aluminum cage, and overall cone with frame, you can have diy trellis made with a mask attached at the top.

Sculpture look trellis

16- DIY Tomato  Trellis

Just make a conventional plant trellis like this one by gardentherapy, this one needs to have lattice fixed in steel structure. This one works best for securing the growth of tomatoes. You may also like to see our other article diy tomato cages.

Tomato trellis
Image via: gardentherapy.ca

17- Privacy Garden Trellis

Are you looking to create more privacy in your garden? You may enjoy these privacy garden trellis idea like this one by thisoldhouse. The materials for this trellis include cedar pieces, pressure treated pieces, casters and carriage bolts. You see, the idea is to create enough space for your plants to grow upwards, which also blocks other people from peeking into your garden.

Privacy Garden Trellis
Image via: thisoldhouse

18- Multipurpose Clothesline Garden Trellis

If you’re planning to grow different types of plants or produce, you need a multipurpose clothesline garden trellis like this one by motherearthnews. In addition to clothesline, the materials also include post, lintel and cross beams. You also need supplies such as self-drilling timber screws, screw eyes, a cordless drill and gravel. This project is going to take a lot of work, but you’re going to have an amazing vertical trellis for different plants when you’re finished.

Multipurpose Clothesline Garden Trellis
Image via: motherearthnews

19- Farm Tool Garden Trellis

Whether you need cucumber trellis DIY plans, or you’re looking for a green bean trellis, these farm tool garden trellis plans by sadieseasongoods are perfect for your harvest. The trellis is built with a tall garden spade, fork and shovel, with several pieces of wood trim attached to the back as lattice. You can use wood glue and jute twine to connect the pieces. Stick the longer, center piece into the ground, and you have a garden trellis made with your farm tools.

Farm Tool Garden Trellis
Image via: sadieseasongoods.com

20- Tee-Pee Trellis

You’re not only going to learn how to build a tee-pee trellis like this one by thecouponproject with these plans, but you’re going to build this trellis without breaking the bank. All you need are three pieces of bamboo per each trellis, heavy-duty twine and a pair of scissors.

The best part is you can find your bamboo at just a little over $1 per stake. You’re going to arrange the bamboo stakes in a triangle, and use the twine to attach them and create your spaces. Place the completed trellis into the planter or ground.

Tee-Pee Trellis
Image via: thecouponproject

21- Fence Garden Trellis

Now, the fence garden trellis by thehandymansdaughter is a little different from other trellis projects. Instead of tucking posts or bamboo into the ground, you’re going to attach this trellis to your wooden privacy fence. You’re going to build the trellis using fence pickets or cedar boards. The tools include a table saw, saw for crosscuts and an optional nail gun.

You can change the shade of your trellis with outdoor wood stain. Not only are you creating a trellis for your plants and flowers, but you’re adding some beauty to your plain fence.

Fence Garden Trellis
Image via: thehandymansdaughter

22- Rustic Trellis

With these plans, you’re going to build a rustic grape vine trellis like this one by coffeeforroses out of branches of various sizes. You’re going to cut the branches into your preferred sizes, with the two longer branches acting as the posts. Then, you’re going to attach the smaller branches horizontally onto posts with thin screws, and you can use garland and wire for decorative and hanging purposes. Your trellis is not only great for your annual vines, but it also fits your rustic, farmhouse or country decor. You may also like to see our other article hanging herb garden ideas.

build a rustic grape vine trellis
Image via: coffeeforroses

23- Simple Tomato Trellis

You can make a simple tomato trellis like this one by offaithfiber.blogspot using a trellis sheet and PVC pipes. The PVC pipes are strong enough to withstand rain and wind, so they make a great frame for your trellis. The trellis sheet comes in a diagonal crisscross pattern for your garden, and you can screw it onto your PVC frame.

As for your aesthetic, consider a white trellis on a white frame, as it goes with any interior. In addition to tomatoes, you can also grow your peas, beans, cucumbers and ornamental squash.

Simple Tomato Trellis
Image via: offaithfiber.blogspot

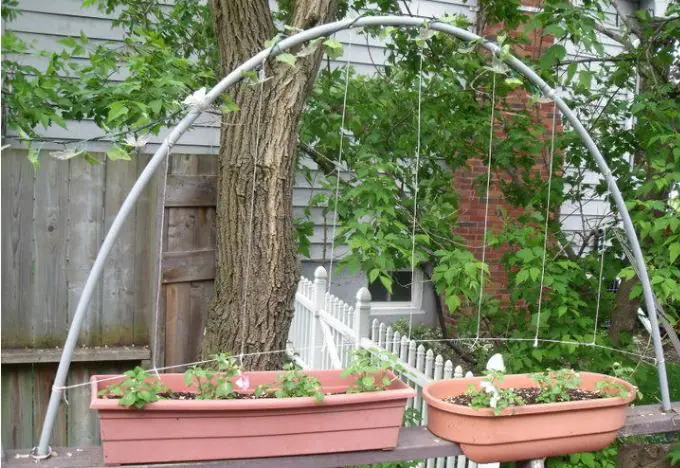
24– Pea Arch Trellis

If you’re looking to build a DIY trellis for growing climbing peas like this one by getbusygardening, consider this pea arch trellis. Your materials include, but are not limited to, conduit pipes, conduit pipe elbows, screw couplings and chicken wire.

You’re also going to need supplies such as a metal pipe cutter, cable or wire twist ties and work gloves. The arch frame is made of the conduit pipes and pipe elbows, with the chicken wire attached to the top of the frame.

Pea Arch Trellis
Image via: getbusygardening

25- Kee Klamp Trellis

When learning how to make a trellis like this one by moderninmn.blogspot, it never hurts to explore different types of materials for your project. One idea is to build a Kee Klamp trellis, which is made of lightweight galvanized fence posts, spool of cable and plug-and-play fittings known as Kee Klamps. These materials give you a quick way to build a sturdy trellis for your annual vines, and you don’t even need a huge garden to grow the vines in your trellis.

Kee Klamp Trellis
Image via: moderninmn.blogspot

26- Wood and Conduit Pea Trellis

These plans offer another way to build a pea trellis like this one by bountifulboxes, which is made of two pointed cedar stakes and electrical conduit. You’re also going to need a chop saw, deck screws and string. The cedar pieces act as posts, and the electrical conduit is used as the top and bottom frame. You’re going to create several rows by tying the string in a zigzag pattern from top to bottom, but make sure the spaces are wide so your peas have somewhere to climb.

DIY Tomato Trellis
Image via: bountifulboxes

27- DIY Tomato Trellis

Are you planning to build a tomato trellis in your backyard like this one by motherearthnews? You can build your DIY tomato trellis out of hardwood stakes, reo mesh, L-brackets, cable ties and timber screws. Once it’s assembled, you should see multiple square spaces to encourage your tomato plants to grow vertically. It takes a bit of skill and hard work to build your tomato trellis, but you’ll have a sturdy place to grow your delicious tomatoes.

DIY Tomato Trellis
Image via: motherearthnews

28- PVC Trellis

Here is another PVC trellis by instructables that is affordable, sturdy and easy to build. You want to use PVC electrical conduit, pressure treated board, para cord, string or light cord, hose clamps and wood screws. You’re also going to need a carpenter’s square, power drill, power auger bit, hand or power saw and wrench or nut driver.

The base is made with the board and the arch is made with the PVC electrical conduit. Use the string to create evenly spaced areas for the plants to grow vertically. Instead of a garden, you can set one or two planters on the wood base to grow into the trellis. You may also like to see our other article diy tower garden ideas.

PVC Trellis
Image via: instructables

29- Strawbee Mood Light Trellis

A strawbee mood light trellis like this one by instructables is great for both aesthetic and gardening purposes. For this project, your materials include strawbee and straws, addressable RGB LEDs, 4 mm clear acrylic plastic, enameled copper wire, solder and a compatible micro controller and USB cable. You also need tools such as pliers, scissors, a hot glue gun and soldering iron.

Your trellis is designed in a fun geometrical pattern, with LEDs that light up your garden after the sun goes down. If you’re looking for a DIY trellis that stands out from the crowd, consider the strawbee mood light trellis.

Strawbee Mood Light Trellis
Image via: instructables

30- Simple Garden Trellis

If you’re looking for simple garden trellis ideas like this one by ourheritageofhealth, look no further than these easy-to-follow plans. You can build your trellis using garden stakes and twine, and if applicable, an old clothesline frame is a good area to build your trellis. The frame is sturdy enough for your plants, and the hooks at the top of the frame are perfect for your twine.

A fence is a good alternative if you don’t have an old clothesline frame. It may be a good idea to place a stake between two plants, so there’s enough room for your plants to grow, and you don’t have to use too many stakes. You’re going to tie the twine between the stakes and the top of the frame to create the spaces for your plants.

Simple Garden Trellis
Image via: ourheritageofhealth

31- Copper Garden Trellis Idea

You must be thinking how to build a trellis with copper like this one by familyhandyman? Well, here is a quick guide for your knowledge, it is simple yet requires patience:

To buils this diy trellis:

1: Cut the thick (medium sized) copper tubes

2: Use hammer to flatten the ends of the copper rods

3: Use jigs so that you can keep the copper rods aligned, as it will form the basic structure.

4: Your trellis is ready to be installed in the backyard.

Copper garden trellis
Image via: familyhandyman

32- DIY Pot Trellis

In a pot, add the structure of branches for support of the plants and tie it from the top. You can enjoy a lovely plant show than. For detail see this diy tutorial by thisoldhouse.

branch trellis in pot
Image via: thisoldhouse

33- Wooden Maze

This one is an intricate type of diy trellis by runnerduck, as it involves attaching various shapes of wooden frames together, to form a door type structure.

wooden maze
Image via: runnerduck

Final Thoughts

As you can see, the sky is the limit when building your own garden trellis. You can build the trellis from scratch, use certain structures as the frame or build it against a wall. All you need to do is ensure your materials are strong enough to keep your trellis standing.

Once you learn how to build a trellis, you can start planting your vertical garden of produce, vines and plants. Now there is one tip you need to keep in mind with any vertical garden, and that’s how to train your plants to grow up the trellis. For most plants, you’re going to find the tips once they grow a little taller. Then, you’re going to gently tuck the tendrils or vines onto the string, twine, wire or whatever you’re using to create your spaces. This is an important step because you’re encouraging your plants to grow upwards into the trellis.

Remember, when handling materials such as chicken wire, it’s best to wear work gloves to protect your hands. If your child is helping you build the trellis, you may want to let them handle tasks such as tying the strings or planting the seeds. Of course, this depends on how experienced your child is with gardening and yard work.

It’s not difficult to build a DIY trellis in your own backyard. In fact, building a trellis can be a fun weekend project. The best part is watching your garden grow into your trellis. When you take the time to research the different plans, you are sure to build a trellis that’s just right for your garden.

17 Cool DIY Camper Trailers To Enjoy Your Outdoor Trips

A DIY camper trailer will provide you with a mobile home at a very economical price. Plus, when building a camper trailer yourself, you are able to build it to meet your exact specifications. Travel, sleep and eat in comfort are some reasons to swap your tent with a DIY camper trailer. You can travel the country with your home right behind you when you create a DIY camper. No need to pay for expensive hotel rooms when traveling, just park your vehicle and walk a few steps to your free lodging that is connected to the back of your vehicle.

Check out from our list these 17 cool DIY camper trailers and build the one that’s right for you so you can start traveling and enjoying the country this spring.

1- Tiny Home

This cute little tiny home by tinyhousetalk we have in this plan is light-weight enough to be pulled by a four cylinder vehicle, yet big enough to contain the comforts of home.

Use these plans to build this tiny home diy camper trailer and install components like a refrigerator, TV, stereo system, microwave and several 110 electrical outlets. The back has a door that raises up to reveal an outdoor kitchen and the side door is equipped with a glass panel to let plenty of natural light come into the camper.

DIY Camper Trailer
DIY Camper Trailer, Image via: tinyhousetalk

2- Outdoor Kitchen

Keep your living quarters and kitchen separate with this DIY camper trailer by Viralnova floor plan. The hatchback design quickly raises up to reveal a counter top with sink and food preparation area, plus storage space.

We found this DIY trailer smaller, compact and lightweight than others, making it easy to pull behind any vehicle. The free detailed plans make this an easy DIY project for anyone interested in building their own camper.

DIY camper trailer
Outdoor Kitchen, Image source: Viralnova

3- Slide Out Kitchenette

Build this DIY camper trailer by Instructables that features a slide out kitchenette that is outfitted with a sink, two burner cook top, counter-top, drawers and storage under the counter.

Compact size allows for easy pulling and maneuverability, while the design utilizes space efficiently so everything needed for a week long stay in the woods can be packed and taken along.

This model has been spray painted in a camo colored pattern, but you can paint your any color.

DIY camper trailer
Slide Out Kitchenette, Image via: Instructables

4- Box Trailer

Who knew an ordinary box trailer could be transformed into a comfortable homemade camper trailer such as this one by doityourselfrv. These free plans will show you how to transform a basic box shaped camper into a livable space that can hold all the comforts of home.

Small enough to be easily pulled behind your vehicle, yet large enough to be comfortable, have storage space and have electrical power. Step by steps plans show you how to take a plain box trailer and create a livable, usable space with it.

homemade camper trailer
homemade camper trailer, Image source: doityourselfrv

5- Recycled Pop-Up

Pop-up campers are great, but the cloth sides have a short life span. Fortunately, the frame of these type of campers are sturdy and can easily be recycled into DIY camper trailer by Do It Yourself RV that will last for years.

These free camper trailer plans will show how to strip down an old pop-up camper and transform it into a hard sided home on wheels. The plans include an updated interior that contains a two burner stove, sink, bathroom and plenty of seating.

 DIY camper trailer
Recycled Pop-Up camper trailer, Image via: Do It Yourself RV

6- DIY Teardrop Trailer

This is another design for a recycled pop-up camper like we have shown you in the previous plan but it takes the shape of a teardrop. These teardrop camper plans by Make Zine will show you how to take the frame of a dilapidated pop-up camper and build a usable and attractive teardrop trailer on top of the frame.

Easy to pull and light-weight enough for one person to maneuver, this mini diy camper trailer contains all that you will need for a weekend get-away to the mountains.

DIY Teardrop Trailer
DIY Attractive teardrop trailer, Via: Make Zine

7- Hidden Storage

These free teardrop camper plan by The Tear Drop Trailer shows you how to build a comfortable travel trailer that contains hidden storage.

A false floor provides plenty of hidden storage under the bed and in the kitchen area. The overall size of this tiny home on wheels is 8 feet in length and 5 or 6 feet in width, depending on the frame it’s built on.

These easy to follow free instructions will take you through the building process with ease.

teardrop camper plan
Build a comfortable travel trailer, Image via: The Tear Drop Trailer

8- Off Road Camper

We recommend this DIY camper trailer by Shawnee Hills Workshop to those who are adventurous travelers that like to get off the beaten path and explore the back roads.

This rugged camper can take the twists, turns and bumps that the back roads have to offer. Equipped with all the comforts of home, including a heater, this off road camper can be your home away from home year around.

Use these free plans to build your own year around usage diy camper so you can enjoy the ski slopes in winter and mountain trout fishing in summer, all while staying in a comfortable camper.

DIY camper trailer
Off Road Camper, Image via: Shawnee Hills Workshop

9- Stunning Teardrop

Creativity can shine when you’re creating a DIY project like a homemade camper trailer by Little Things in the teardrop shape. Romantic design is both comfortable and attractive. Heads will turn as you travel across the country pulling this little teardrop camper behind your vehicle. And at the end of the day, the design will provide plenty of space for a comfortable night’s sleep.

Use these free plans to start with a basic teardrop shape, then customize the camper with your own creativity.

homemade camper trailer
We love this homemade camper trailer design, Image via: Little Things

10- Teardrop Traveler

Use these free teardrop trailer plans by Instructables to build yourself a small home on wheels that is easy to pull on the highway.

The iconic teardrop shape is pleasing to the eye, plus it will improve aerodynamics and fuel efficiency. This design creates a roomy teardrop traveler that has a stove, sink, camping shower, bed and storage, making this an ideal mini camper trailer for weekend get-aways or cross country travel.

Detailed plans with photos make this an easy DIY project.

Teardrop Traveler
mini camper trailer, Image via: Instructables

11- Homemade Trailer

Here is an idea that will allow you to travel the country without breaking the bank. For only a couple hundred dollars, you can build a tent style trailer by Mother Earth News on top of a sturdy base.

The base can be created from scratch, or pieced together from various components of a camper or utility trailer. The main idea is to keep the DIY project inexpensive so the money can be spent on traveling.

The minimal design makes pulling this homemade trailer easy and fuel efficient. It’s an ideal way to get out and enjoy nature without spending much money.

build a tent style trailer
Homemade Trailer, trailer, Image via: Mother Earth News

12- Back Country Camper

If you’re idea of fun and relaxation is heading to the back country for a few days, then this DIY camper trailer by Motortrend is what you need to take along with you.

Rugged, easy to maneuver, and just the right size to hold all the needed equipment plus a comfortable bed, this design is ideal for the rugged outdoors-man.

Sleep up and off the ground, plenty of storage space for all equipment, and the same width as a four wheel drive jeep. Load the jeep, hook up the DIY camper and head off to the back country for a few days of fishing, hunting or just relaxing beside a quiet lake.

DIY camper trailer
Back Country Camper trailer, Image source: Motortrend

13- Camper On A Budget

When money is low and the desire to travel is high, this homemade camper can get you on the road without breaking the budget.

Recycling old camper parts and using hardware you have on hand, the cost of building a DIY camper trailer by Camper Trailers can be kept very low. This design uses a box base from an old pop-up camper to create sleeping and storage space. A canvas tent topper was customer designed to cover a large outdoor space for cooking and relaxing.

The two bed design allows for a family to go camping and see the country together, and do it all on a budget.

homemade camper
Camper On A Budget, Image via: Camper Trailers

14- De Markies Camper

The De Markies style of camper is innovative, roomy and unique. It’s part camper, part tent, and all affordable comfort.

This is one of our favorite camper trailers that we personally like to build. Create this unique style by building a homemade camper trailer by Inhabitat using this unique design that actually triples the livable space when the side tents are fully extended.

The small center base of the camper looks like an ordinary travel trailer when being towed behind a vehicle. It’s not until it’s time to park the camper and get camp set up that it’s uniqueness is discovered.

On each side of the center base are large awnings that let down, transforming one side into a kitchenette and dining area and the other side into a sleeping area. Plenty of room for a family camping trip without the expense of a full size travel.

homemade camper trailer
homemade camper, Image source: Inhabitat

15- Go Anywhere Camper

Anywhere your truck or SUV can go, this little truck camper can go too. Just hook it up to your vehicle and pull it up into the mountains for a quite weekend re-treat.

These plans will show you how to build a hard-sided trailer on a four by eight foot trailer frame. The finished DIY trailer by Instructables has windows, an electrical outlet that is battery powered, plenty of room for a full size bed and room to store lots of camping gear.

DIY trailer
Go Anywhere Camper trailer, Image source: Instructables

16- Pop-Up Paradise

In these detailed building plans we will learn how to build a hybrid pop-up DIY camper that is part hard side and part tent. You’ll have photos and a YouTube video to follow to create this DIY camper trailer by Jasman.home.xs4all.nl.

The hard sides protect the interior contents of the trailer as it’s being towed to the camp site and the streamline shape make it fuel efficient. Once you arrive at your destination, the top can easily be raised and one side extended to create more usable interior space. When it’s time to pack up and leave, just roll in the side and roll down the top.

DIY camper trailer
build a hybrid pop-up DIY camper, Image source: Jasman.home.xs4all.nl

17- Back Roads Camper

Create a rugged diy camper trailer that looks good and can take all the bumps of a back road with ease with these free plans. Take your camper off the beaten path and enjoy scenery that most campers never get to see.

This design is both efficient and compact so you can take plenty of gear along with you for an extended stay away from home.

Detailed plans show you how to build this camper trailer and answers many building questions so your project will go smoothly.

DIY Camper Trailer
Back Roads Camper

Ending Up

A DIY camper trailer helps you to travel across the country to exciting areas and visit many places without the worry of bearing hotel expenses, costly restaurants and feeling just like your home. So what you are waiting for, try one of these diy camper trailers we bring for you to build according to your specifications and enjoy visiting different areas.

Here we have prepared a questionnaire to answer some of the most asked questions.

FAQ’s

How long is a standard camper trailer?

While making your on camper trailer you can cutomized it to your desired length. Many camper trailer range from 12 feet to 35 feet long. A 12 feet trailer is comfortable to 2 people or couple. However 35 feet camper trailer allows space for 10 people.

How many types of camper trailers are there?

There are many types of camper trailers but the most popular designs are folding camper trailers (also called pop up camper trailers), tear drop trailers, classic camper trailers and fifth wheel trailers. A classic camping trailer allows a space for stand up and mobile living space inside it. Tear drop trailers make use of most of their floor space, it’s suitable for small vehicles. It has a master bedroom, a meal preparation space and some space on the back for drawers and cooler etc. The fifth caper trailer is larger than all, providing a space for 10 people but needs a strong vehicle.

How many hours does it take to build a teardrop trailer?

A high quality camper trailer takes upto 12 month without a plan. However with good planning you can have your camping trailer real for your first trip.

How wide is a camper trailer?

Generally camping trailers are 8 feet (or 96 inches) wide. The lite ones can range from 6 to feet wide. However large campers shouldn’t be more than 8.5 feet wide.

References: 

J.D.Power, “Winter Is Coming: How to Insulate A Camper Trailer”, https://www.jdpower.com/rvs/shopping-guides/how-to-insulate-a-camper-trailer

Expedition Portal, skills camper trailer, “https://expeditionportal.com/skills/skills-camper-trailer/”

Academia, by Marion Joppe, pub:2014, Journal of Vacation Marketing, “A critical review of camping research and direction for future studies”, https://www.academia.edu/17131201/A_critical_review_of_camping_research_and_direction_for_future_studies

JSTOR, by loyd B. Oglesby Jr. and John L. Morgan, ournal of Environmental Health
Vol. 32, No. 1 (July/August, 1969), “Recreation Vehicles Create New Environmental Hazards”, https://www.jstor.org/stable/44545074

17 Owl House Plans To Attract Owls To Your Backyard

Building owl houses can be a rewarding way to invite these majestic birds into your yard. I remember when I decided to try making owl houses to attract them to my garden. It was exciting to find different plans online, just like the ones mentioned here, that made it easy to get started.

The best part about having these nocturnal birds is that they’re great at keeping pests under control. I noticed a decrease in pesky insects like mosquitoes and flies once the owls started nesting nearby. Plus, knowing that they don’t pose any threat to me or my pets made it even more enjoyable to have them around.

By following one of these owl house plans, you can create a cozy home for these fascinating creatures while also benefiting from their natural pest control abilities. It’s a simple project that can make a big difference in your outdoor space.

1- Little Owl House

Little owls, also known as Athena owls, like living in little houses located in a little backyard. They typically make their home in a small tree cavity and claim a small area around that tree as their hunting territory.

If you have a small backyard this little owl house by instructables will be ideal for attracting an Athena owl. These owls like to remain close to their home and keep their areas well patrolled and free of predators.

These small owls have excellent night vision and are often used as a symbol of wisdom. Use these free owl house plans and build a home for a wise old owl this weekend.

Little Owl House
Owl House For Little backyard, Image via :instructables

2- Barn Owl Nest Box

Here we have a step by step guide that will make building a nesting box in this youtube video for an owl very easy.

This is an owl box plan that shows you how to build a large weather-proof nesting box that would be ideal for climates that have cold winter weather. The large size will attract a pair of large barn owls so they can raise owlets. The warm construction will help increase the survival rate of tiny owlets in cold climates so the population of damaging rodents can be decreased in your backyard and farming areas.

The barn owls will appreciate a warm, safe place to live and raise their tiny owlets and will show their appreciation by keeping your backyard clear of unwanted pests.

3- Two-Chamber Owl House

If you would like to attract a pair of owls to your backyard so they will produce owlets, then this nesting box by Static1.Square Space will be perfect for you.

The two-chamber box allows the owls to build a nest in the back chamber away from the entry hole to help keep the owlets safe from predators. There are no outside perches on this design so the tiny owlets won’t perch outside the box where they would become easy prey for predators. No outside perch also makes it more difficult for predators to attack the owls. Grooves created at the bottom of the entryway make it easy for adult owls to enter and exit the box.

Two-Chamber Owl House
Two-Chamber Owl House, Image By Static1.Square Space

4- Simple Box

Learn how to build an owl house by mycarpentry that is a simple oblong shape with these free plans. This DIY project is a great way to use scrap pieces of lumber leftover from other DIY projects.

This owl nesting box is 8-inches by 12-inches with a 3-inch entry hole near the roofline to help keep predators out. These detailed plans and hanging instructions make these an easy project for young bird watchers to build.

how to build anowl house
Simple owl box, Image via: mycarpentry

5- Screech Owl Box

This simple box is designed to specifically attract screech owls by Felt Magnet to your backyard. Once a screech owl moves into this nesting box it will remain as a permanent resident.

Screech owls are the smallest owl breed unlike the other ones we are going to discuss and typically measure 10-inches tall and enjoy living in suburban areas around people.These owls lay eggs each year in the spring and have a lifespan of around 14 years.

We recommend this small-sized owl box to be perfect if you want to attract screech owls and is easy and inexpensive to build.

Screech Owl Box
Screech Owl Box, Image Via: Felt Magnet 

6- Barred Owl House

These owl house plans will show you how to build a nesting box by Owl Pages that will be attractive to the barred owl.

The barred owl, also called a hoot owl, is quite large and common in suburban areas. These attractive owls are interesting to watch and listen too as they give their familiar ‘hoot-hoot’ calls. This DIY owl house is larger than most designs we have in this article since it is being created to attract a larger bird, If the barred owl is happy with the home it’s possible a pair will move in a raise several broods over the years.

Barred Owl House
Barred Owl House, Image via: Owl Pages

7- Barn Owl Box

If you have a barn chances are you also have rats. A barn owl can help solve the rodent problem better than a cat. Barn owls are also very attractive to look at, with their large white face and black eyes. These attractive owls have a life expectancy of around 4 years so they can remove a lot of unwanted pests from your landscape during their lifetime.

Build this barn owl house by w.ky.gov to attract this nocturnal feeder that is an expert rodent catcher. These free plans will show you how to build the owl box and the best place to hang it to attract a barn owl.

Barn Owl Box
We love this Barn Owl Box, Image via: w.ky.gov

8- Cedar Board Owl Box Plans

Use cedar wood and these plans to create an attractive owl house by hobbyfarms that should attract a pair of owls to your backyard.

The cedar wood will last for years and is a favorite wood type of screech owls. A pair of screech owls are interesting to observe and listen to, plus some of them will become tame and trusting of humans and can be trained to perch on your outstretched hand.

Screen owls are small but they have large appetites and will keep your backyard free of rat, voles, snakes, and flying insects.

Cedar Board Owl Box Plans
Cedar Board Owl Box Plans, Image via: hobbyfarms

9- Strong Box

Learn how to build a strong nesting box in this detailed youtube video that can withstand the outdoor elements for years.

If you live in a climate that is prone to high winds, heavy rainfall with damaging hail, and/or have trees that drop many limbs during the year, then we suggest this strong box is the right one for you. These owl box plans will show you how to create an owl house that will attract owls to your backyard for years. The sturdy wooden box is simple and inexpensive to build and will attract large owl breeds to your backyard.

10- Owl Box With Perch

Use these free owl house plans on Youtube to create a natural-looking box that will blend in well with woodland surroundings.

If you want to create a habitat for owls that does not stand out, then this design is for you. Scrap lumber and a sturdy twig for a perch are the building components used for this DIY owl house.

Owls do not have to have newly built houses to move into, they are opportunistic birds that will build their nests in the old nests of woodpeckers.

The right size box in the right location with plenty of food nearby is all an owl needs to feel at home. Some owls enjoy sitting outside their nesting box on a perch to observe their hunting territory and watch for their next meal.

11- Hinged Top Nesting Box

This free plan will show you how to build a simple wooden box with a hinged top to attract owls to your backyard,

An owl house is like any other birdhouse, just slightly larger and with a larger entry hole in the front. This owl house plan by Audubon will show you how to build the house plus provide good tips for where to hang the box and the proper nesting material to place inside.

owl house plan
Hinged Top Nesting Box, Image via: Audubon

12- Large Owl House

Owls come in all sizes and this nesting box on youtube will attract a large owl or two to your backyard. The sturdy box is built large to attract a barn owl to your property. The design is also a little whimsical as it has an ‘exercise platform’ built onto the front of the box.

Large owls need a large house and several large trees nearby. The Snowy owl, Great Horned owl, and Eagle owls like to fly between the trees for camouflage as they hunt for their prey on the ground.

This sturdy nesting box will last for years and this detailed YouTube video makes it an easy DIY project. If you have leftover lumber to use for this DIY project it will help to keep the building cost down to a minimum.

13- Wooden Owl Box

This large wooden owl box is sure to attract an owl to your backyard. Not only are owls nice to look at and observe in flight, but they are also one of the best organic pest control methods that you can have.

Owls will keep large areas free of rodents, snakes, and flying pests. If you have fruit trees, grapes vines, or field crops, building a wooden owl box like this one on youtube to attract an owl would be a good asset. Once an owl has settled in and made the box her home, she will help keep the pest population down so your crops won’t be destroyed. The owl will save you time and money by eating all the pests.

Place an owl nesting box a few hundred feet away from your house and other high traffic landscape areas. Owls don’t like people coming too close to their nests when they have young inside the nesting box.

This YouTube video will provide you with DIY owl box plans that is easy to make from scrap wood. If you have a table saw you can cut your own wood from a large log and the cost of the DIY will be free.

14- Screeching Owl House

It takes a special type of house to attract a special type of owl. These screech owl box plans by instructables  will enable you to build a perfect house that will attract a screech owl to your backyard.

Screech owls like to spend their days roosting and resting is a safe and secure place where they can’t be seen but can see their surroundings. This specially designed box provides the screech owl with exactly what it is looking for in a home – a hiding place with a view.

The screech owl will leave the box and become active at dusk. It will search for food for itself and the young it may have in the nesting box. Screech owls make ideal organic pest controllers and will keep your landscape free of flying, crawling, and creeping pests like mosquitoes, snakes, and moles.

Follow these detailed owl house plans for building a screech owl box so you can attract one to your backyard. The methods you may use to attract birds, like bird seeds and putting up any type of bird house, will not work to attract an owl. The owl house must be built in a specific way to get their attention and have them make it their new home.

Screeching Owl House
We love this Screeching Owl House, Image via: Instructables

15- Recycled Owl House

This is an ideal way to use a hollowed out log that is not good to use for any other building project. Instead of tossing the hollowed out log onto the fire, use these owl nesting box plans by Instructables to create a recycled owl house.

You can cut the hollowed out log to the right size and attach a recycled board to the top and bottom so the log will have a roof and floor. Attach a board to the back of the log to make it easy to nail the recycled owl house to a tree or barn.

Barn owls would love this house and since most of the work is already done it is an easy DIY project. Use this idea as barn owl box plans that will be good for the environment and good for you.

Trees often have hollowed out spots in them that have been created by birds or squirrels but were abandoned after their young were grown. If you find one of these hollowed out spots in a tree you cut down it’s easy to recycle it into an owl house.

Recycled Owl House
Recycled Owl House made by hollowing out a log, Image via: Instructables

16- Barred Owl House Plans

Each owl species has its’ own house requirements and will not nest until it finds the perfect house. These owl house plans on youtube are specifically designed to attract barred owls to your backyard.

Barred owls are larger than barn owls but not as large as the Great Horned owls and they will keep your landscape and garden area free of most pests. Barred owls are nocturnal hunters and will eat more than their own body weight each night. They hunt and devour rats, moles, snakes, bats, and all other types of flying, crawling pests that are unwanted near your home and food source.

Barred owls do require a special house design and these free plans will show you how to build an owl box that is perfect for them. The owl house also must be located in just the right place to attract barred owls. Barred owls live in thick forests that are near water. If your backyard has lots of trees and dense underbrush, plus has a small stream or the soil remains wet and soggy, barred owls are likely to be frequent visitors to the area. Use these YouTube owl house plans to build them a home so a barred owl will move in.

17- Simple Design

An owl house does not have to be fancy or elaborate, it just needs to be the right size with the correct size entry hole to attract an owl. This simple design can be built quickly and is an ideal way to use scrap pieces of lumber.

The simple design on youtube creates a large owl box with a large entry hole so it will attract large owl breeds, like the barn owl or Great Horned owl. These large breeds are easy to spot in the landscape and interesting to observe.

These larger owls have a large appetite and will quickly rid a large backyard of snakes, rats, and other unwanted vermin and insects.

Wraping Up

Owls have certain requirements to live such as a safe house or nesting box. Those of us who like to enjoy the sweet sounds of owls can build a simple house to enjoy the presence of owls as well as getting rid of pests such as flies, mosquitoes, snakes, and rats.

Here we have prepared a questionnaire that often people ask. 

FAQ’s

Do owls sleep at all?

Owls are nocturnal birds that means they sleep all day long and get energetic during night time. Owls have 35-100 times better night vision than humans. There are also some species of owls that are diurnal which means they sleep at night.

What should be the size of an owl house?

There should be enough space for owls to stress and exercise their wings. It is thought that the length of owl houses should not be less than 7″ than their wingspread and at least half in width.

What is the best size of an owl house?

For making an owl house always use untreated wood such as fir, cedar, or pine. All owl houses must have an entrance space above 6″ high above the base. For Barn owls it should be a square about 6 by 7 inches and for an ellipse it can be a horizontal axis of 4 ½ inches.

What color should Owl House be?

Light colors are usually better than dark one as lighter colors become bright at night and bold colors can overheat during the sunshine.

17 DIY Bike Sheds to Provide You Best Space for Storage

Riding bicycles can be a fantastic way to commute without a motor vehicle, get plenty of exercise, and travel through many tourist destinations. Storing bicycles can seem cumbersome or take up a lot of space but there are many excellent outdoor bike storage ideas that can make storage simple without taking up already limited space. Creating a DIY bike shed can be simple and fun for a weekend project.

No matter how limited in storage space or how easily accessible you want bicycles to be while put away, there are plenty of DIY bike shed solutions out there. There are a lot of free plans and video tutorials out there that can help lessen the stress of creating a storage shed. Let us explore seventeen of the most beneficial and simple to create DIY bike shed ideas we have in this list.

1- Cedar Bicycle Storage Shed

Creating this affordable outdoor bicycle storage solution by Prodigal Pieces can be done by using cedar fence pickets. Estimated cost for a DIY bike shed like this one we have is between $350 to $400 dollars compared to pre-built sheds at three or four times more expensive. This project has an easy-to-follow list of instructions and can be completed with simple power tools such as a saw and a drill.

This bike storage shed design describes how to attach the shed to an exterior wall of the house or garage. Besides just bike storage, this DIY bike shed design can also be used to store other outdoor supplies such as garden tools.

Cedar Bicycle Storage Shed
Cedar Bicycle Storage Shed, Image via: Prodigal Pieces

2- Standalone Outdoor Bike Storage

Building a smaller DIY bike shed by 3x3custom with plenty of room for other outdoor toys and supplies is a wonderful idea. This project can be completed in a weekend with a few simple tools. Not attaching doors to this bike shed provides quick and easy access to bikes and other equipment.

The standalone design of this project comes with an easy-to-follow video tutorial on how to construct this bicycle shed. With a free supply list and free downloadable plans, this is a simple solution for bike storage. We suggest this project to be perfect for families with kids or storing other outdoor items such as scooters and skateboards. You may also like to check out DIY electric bike that provide you an inexpensive way travelling.

Standalone Outdoor Bike Storage Shed
Standalone Outdoor Bike Storage Shed, Image via: 3x3custom

3- Metal Roof Pallet Wood Bike Shed

Storing bicycles so they are not in the way is one solution but also being able to protect stored bikes from the weather is another factor. This DIY pallet wood bike shed by Easy Pallet Ideas is built with a metal roof to keep the rain and water away from expensive bicycles. Using pallets saves money and can make this project pretty much free.

Attaching a corrugated metal roofing material to this DIY bike shed is a terrific way to help keep out the rain and snow. Covering the sides with tarps or other outdoor material would be a fantastic addition to ensuring that expensive bikes are not harmed by the weather. This project can be completed in one day or a weekend. Simple tools will create this fantastic DIY outdoor bike shed idea.

Metal Roof Pallet Wood Bike Shed
Metal Roof Pallet Wood Bike Shed, Image via: Easy Pallet Ideas

4- Wood Paneled Pocket Hole Bike Storage

Styled in a lean-to shed design, this wood paneled bicycle storage shed by learn.kregtool is constructed of wood boards and corrugated metal for an attractive looking storage solution. Featuring an open front design, the sturdiness of the wood panels and the weather proofing of the metal help to make this bike shed a solid bike shed.

Using a pocket hole jig, this DIY bike shed storage idea has no exposed screws that can rust due to not being exposed to water. This project plan consists of two videos detailing the supplies, tools, and building instructions to create this storage shed.

Wood Paneled Pocket Hole Bike Storage
Pocket Hole Bike Storage, Image via: Kregtool

5- Large Raised Roof Bicycle Storage Shed

Having a bike storage shed design that not only fits larger bikes but also functions with easy accessibility can be key factors. We like this bike storage shed project made by Instructables as it has a unique feature i.e a roof that raises and lowers using gas struts so the roof can stay raised during storing and retrieving bicycles. This storage solution is large enough to store motorized bikes if desired as well as other outdoor items that can be stored away.

With swinging front doors, this shed can basically be opened all the way out for easy storage accessibility. Materials for building this shed are wood boards and MDF or other wooden sheets. Aside from storing bikes, this storage shed solution is large enough to store lawnmowers, garbage cans, and other items that can be temporarily stored away out of sight.

This shed project can be completed in a weekend with minimal tools as well as the optional gas struts for the roof.

Large Raised Roof Bicycle Storage Shed
Large Raised Roof Bicycle Storage Shed, Image via: Instructables

6- Triple Door Outdoor Bicycle Shed

A DIY bike shed like this one in this Youtube video that is large enough to feature double front doors and an added side door can be a great solution for keeping bikes out of the garage or out of the outdoor elements. This project features an extensive, detailed twenty-minute video explaining how to build this bike shed.

Each stage of the build is time stamped in the description of the video for easy navigation and detailed explanations. This shed design can fit two to three bikes as well as other bicycle accessories.

7- Wooden Lean-To Bike Shed

The free plans featured in this outdoor bike shed project by How To Epecialist are for creating a four foot by eight-foot storage shed. Here we have another stand-alone bicycle shed solution, this project can take a weekend or a little longer depending on expertise with construction skills. The free plans list a jigsaw and a drill as the two power tools needed for this project.

This DIY bike shed also has a raised floor base which helps protect valuable bikes from sitting in standing water or having critters get into the shed. The shed design used wood lumber and plywood panels.

Wooden Lean-To Bike Shed
Wooden Lean-To Bike Shed, Image via: How To Epecialist

8- Shingled Roof Open Concept Bike Shed

If looking for a simple and easy to complete DIY bike shed design this project by Refresh Living is perfect. With a simple two by four-inch wood foundation, the biggest appeal to this project is the shingled roof. The roof blocks most wind and rain conditions from harming stored bicycles.

The wooden base also helps keep weather and water away from bicycles. This project could be completed in a few hours after picking up all the supplies.

Shingled Roof Open Concept Bike Shed
Shingled Roof Open Concept Bike Shed, Image via: Refresh Living

9- Outdoor Wood Timber Bicycle Storage

This wood timber bike shed project by Bicycle Storage incorporates building wood timber panels and joining them together to create a solid bike shed storage solution. This project features easy to follow plans with photos, drawings, colored diagrams, and good descriptions for each step of the build.

The four by seven-foot structure can be built for only a few hundred dollars in materials and can be constructed alone or with a friend during the weekend. Three access doors make bicycle storage accessible without being cumbersome.

Outdoor Wood Timber Bicycle Storage
Outdoor Wood Timber Bicycle Storage, Image via: Bicycle Storage

10- Bicycle Shed with Bonus Upper Storage

Having bonus storage when building a bike shed for storage like this one by Kezzabeth can be a wonderful idea. This DIY bike shed project provides room for storing firewood above the bike shed for added benefit. The bike shed has a slanted shingled roof for added protection from the weather.

This project calls for using concrete slabs or garden pavers for the base for a solid foundation given the extra weight of the firewood storage. The shed plan uses pallet wood to cut down on costs and recycle materials. Old decking could also be to complete this project. A saw and a drill will be handy for completing this outdoor bicycle storage project.

Bicycle Shed with Bonus Upper Storage
Bicycle Shed with Bonus Upper Storage, Image via: Kezzabeth

11- Side Access Outdoor Bicycle Storage Unit

A project with a straightforward design combined with quality materials can go a long way in longevity of this fantastic bike storage shed. This four-foot by eight-foot bike shed can be modified to suit any budget or supply availability. With a side access door, this storage shed can be attached to the side of a garage, house, or fence.

This DIY bike shed storage project by Myoutdoorplans provides downloadable plans and features easy to follow steps for the construction. A detailed list of supplies makes shopping for this project simple and stress-free. A hammer and a saw can be used to construct this bike shed and the outdoor bicycle storage can be built in a one-week timeframe.

Side Access Outdoor Bicycle Storage Unit
Side Access Outdoor Bicycle Storage Unit, Image via: Myoutdoorplans

12- Children’s Creative Bicycle Storage Shed

A video tutorial under ten minutes shows exactly how to construct and customize a creative children’s bicycle storage shed. Using concrete garden pavers and sand for a stable base, this is a great way to have a solid foundation for adequate storage solutions outdoors. Creating the storage shed frame with two by two-inch lumber saves money.

The exterior of the shed is built with fence boards with spacing for air flow. The design and construction of the bicycle storage shed is simple while it may take a weekend to built it on your own. Inside the DIY bike shed in this youtube video, blocking can be put in to hold the bike tires so that they do not move around.

The exterior of the storage shed can be customized to appeal to the children’s interests. This project used colored wood blocks to create some eight-bit video game character art. Getting children involved in painting this shed can be a great way to teach them about DIY projects.

https://www.youtube.com/watch?v=OyrlvK7DMSM

13- Modern Design Slanted Bicycle Shed

Create an outdoor bicycle storage solution like this one on youtube that is both minimal and modern for a limited space. Using four by four-inch wood posts and sturdy two by four-inch boards for a solid frame, this slanted roof storage shed can be used for both adult and children’s bikes. The exterior of the shed is built using decking boards and the slanted roof design features clear corrugated PVC paneling that is easy to cut with a saw.

Two front gate hinged doors complete this project for a minimal space storage shed. The exterior of the shed can be painted or stained to blend in to the house exterior or left to age with the weather. Using treated wood for outdoor use will make this shed last for many years.

14- Custom Designed Felt Roof Bicycle Storage Shed

In ten main steps you can go from having bicycles cluttering the garage or backyard to having an organized DIY bike shed by Honey And Eggs. This project features a 3D rendering of the shed design for seeing how it was constructed. Using gate panels, this storage shed comes together quickly if a second person is assisting.

Further customizing the design with paint, hardware, hinges, and latches can be part of the fun of building this bike storage shed. The felt roof is an interesting concept for creating a shed roof. Felt roofing materials are used most in flat roof areas but it can be an inexpensive solution for a DIY project.

Custom Designed Felt Roof Bicycle Storage Shed
Felt Roof Bicycle Storage Shed, Image via: Honey And Eggs

15- Vertical Outdoor Bicycle Storage Shed

If needing to store a number of bikes, ground level storage solutions can become quite large. The solution for storing up to eight family bicycles is to go vertical, by storing bicycles and hanging them, it saves valuable ground space. A four by ten-foot DIY bike shed in this youtue video can be created by fitting into any budget. This easy-to-follow video tutorial shows the steps necessary to add outdoor bicycle storage without taking up space in the garage.

With a general supply cost of four hundred dollars, this storage solution is much less expensive than buying a pre-built shed. Creating panels to attach to the exterior of the home or garage, this hanging bike shed can be simple to build. Creating a structure that is built with two by four-inch wood boards and plywood makes a simple but solid design.

16- Outdoor Firewood Storage Converted to Bicycle Shed

Part of DIY projects is repurposing and redesigning already existing structures to fit what the necessity is at the time. This DIY project takes building plans for a firewood storage unit by Myoutdoorplans and turns it into bike storage. This simple and inexpensive solution can be built in one day.

With a budget of approximately 250 dollars, this project is affordable for anyone who wants budget-friendly storage solutions. This bike storage shed can be used for other outdoor storage solutions as well. The simple fence board construction and slanted roof makes it ideal for bicycle weather storage.

Outdoor Firewood Storage Converted to Bicycle Shed
Firewood Storage Converted to Bicycle Shed, Image via: Myoutdoorplans

17- Backyard Patio Bicycle Storage Shed

Here we have an almost twenty-minute video tutorial that shows any DIYer how to construct a short backyard patio bike shed. The boxed frame is covered with plywood for a simple and inexpensive design. The slanted and shingled roof provide protection from the rain and snow.

Building a shorter and smaller bike shed like this one one youtube is an amazing option for one or two bicycle storage without taking up a lot of space. Using a weatherproofing stain or coating will ensure that the plywood construction can stand up to years of weather.

Finding inexpensive ways to store bicycles outdoors without creating clutter in the garage can be a fantastic idea. Choosing a DIY bike shed idea that not only fits your budget but also fits your available space and level of construction skills can be a real benefit for storage solutions. Simple storage solutions for bicycles can ensure that they can be utilized and enjoyed by the whole family for many years.

Conclusion

Cycling is a great way to save you on fuel expenses, to avoid traffic in rush areas, have a pollution free environment and also to get healthy exercise. The plans we have shown you above can help you to have a place to store your bicycle in a safe area after you have ridden. You can select any of these bike shed plans to build your own.

31 Homemade Wood Stoves and Heaters Plans and Ideas:Do It Yourself

Homemade wood stove and heater is a beneficial and a cost efficient way to cook food and get warm in the colder month without spending huge amount of money for buying costly heaters and stoves. You will certainly feel good when you cook your food on your own made stove.

Here are our round up of 27 homemade wood burning stove and heaters plans you will love to build at home.

1) Plastic Bottle Wood Stove

The first one idea I am going to share with you, is to use a plastic bottle to make a homemade wood stove. This DIY wood stove is not created from plastic but recycled plastic bottles are used to create a concrete mold. The result is an attractive and functional homemade wood-burning stove that can be used indoors or outdoors.

Watch this YouTube video that will provide all the instructions so you can use a large plastic water bottle and another plastic container to create a stove mold. You can use a size or shape of plastic bottles to create a custom wood stove that will fit your space.

Use this homemade wood stove idea on youtube to create more than one stove since they are so cheap to make. Save money on the utility bill this winter and stay warmer by making one ofthese wood stoves for inside your home. Create one for your outdoor space for warmth and light so you can enjoy being outdoors when the weather is chilly or after dark. This would be ideal to have outdoors on a chilly autumn night to use for roasting hot dogs, making s’mores, and keeping warm.

A wire rack can be placed on top of the DIY wood-burning stove so you can cook food on it. This is an ideal source of free heat and a cooking stove for an off-grid cabin or homestead thats the reason I like this one the most . The concrete is inexpensive and will last for many years. Even though it’s made from concrete, the small size makes it lightweight enough to move as needed.

2) Pyramid Wood Stove

This DIY wood stove is crafted from sheet metal and is lightweight and portable. It is ideal for camping and will provide heat for cooking and keeping yourself warm. It will also provide light and safety when you are out in the wilderness at night.

Three triangles and a small square cut from sheet metal are the main components of this simple DIY wood stove by instructables. The pieces of sheet metal can be quickly and easily be put together to form an efficient wood stove at your camp site. When you are done and ready to move on, it can be taken apart and packed with other camping gear. The sheet metal is easy to resemble when you are ready to build a fire.

I like this diy wood stove as the sheet metal used is durable and inexpensive, making this a cheap DIY project. If you have some sheet metal on hand from other building projects the cost of this build will be almost free. There is a fabricated piece of sheet metal that fits on top of the triangular wood stove to make cooking a one-pot meal easy. It’s a lightweight homemade wood stove that is small enough to tuck into your backpack and take along with you on fishing or hunting expeditions. You will be able to cook what you harvest efficiently on this wood stove.

We suggest you to use these free plans to create a custom-sized pyramid wood stove for use at your homestead. Build one outdoors and use it for rending lard or evaporating liquids. Great for so many uses both at a campsite or a homestead. me warmer without paying more money.

Homemade Wood Stove
Pyramid Wood Stove, we love this simple triangle wood stove, Image via: instructables

3) Homemade Wood Stove Made From Scrap

When it comes to the simpler yet effective diy wood stove by Instructables, there is no option that can beat wood crafted stoves. To build this diy wood stove, you would need special paint for stove color, welding electrodes, and grinder disc.

Also, you need is, an old gas cylinder – make sure it has no air inside. Also, make two holes in the cylinder so that for at least a week you can simply clean it by letting out the water. Also, you need to make a door on the cylinder so that you can later fix in the stove inside. Make sure you go through the wood stove instructions so that you can minimize the risks. The use of gas cylinder without safety measures can cause injury. As I’m not the one who has made this stove.

Homemade Wood Stove Made From Scrap
Homemade Wood Stove Made From Scrap, Image via: Instructables

4) Two Burner Wood Stove

This idea for building a DIY wood stove on youtube is perfect for an outdoor kitchen. When you spend a lot of time outdoors and want to  cook meals outside, this two-burner wood stove will help you prepare a homecooked meal with ease.

Follow this YouTube video that will show you how to use recycled bricks, concrete, and sand to build a DIY wood stove that has two openings to place cook pots on. Build a fire in the wood stove and cook two pots of food at the same time usig this idea. You can make a meal for the family outdoors so you won’t have to heat the indoor kitchen and you won’t use gas or electricity. A small amount of wood will cook a lot of food. You may also like to see firewood rack plans to keep wood dry.

If you only need to use one of the openings to cook, create a clay cover to fit on top of the other opening so the flames won’t burn you while you cook.

This DIY wood-burning stove is inexpensive and quick to build. It is a permanent structure and can’t be moved, so chose a location that is away from structures and walkways to build it. This is a good way to recycle old brick and the wood stove will last for many years.

You can build a table and seating near the wood stove and create an outdoor kitchen where family and friends will love to gather together. This wood stove will generate enough heat for cooking and keep you warm on a cold day.

5) Water Tank Wood Burning Stove

Make this portable diy wood stove like this one by purplesagetradingpost at home from old hot water tank.

Simple steps to build this diy wood stove:

  • Simply cut the tank and make a door – don’t forget to lock the door with chain
  • Make two or three holes as per your wish – you must keep in mind the air passage, pipe passage and chimney sack.
  • Add conventional stove into the set up and take this portable stove to the last night parties with friends.
Water Tank Wood Burning Stove
Water Tank Wood Burning Stove, Image via: purplesagetradingpost

6) Sheet Steel Stove

Almost every bit of this DIY wood stove by instructables is fabricated from sheet metal. If you like working with metal, then these free plans will show you how to fabricate this sheet steel stove to your desired specifications.

The wood burning stove can be made bigger or smaller to suit your needs. The one pictured is a stove that is capable of keeping one large room warm and cooking a pot of stew on top.

The simple design is a classic one and it will look good indoors in your home or outdoors at your camp ground.

DIY wood burning stove
Sheet Steel Stove, Image via: instructables

7) Frontier Homemade Wood Stove

A DIY frontier wood stove like this one is ideal for taking along with you on a camping trip. The main component of this homemade wood stove is an empty gas bottle. These can be obtained free and recycled into this usable camp cook stove with these free homemade wood stove plans by instructables.

These free wood stove plans provide you with a detailed list of everything you will need for the DIY project, plus detailed instructions for putting everything together. Make your next camping trip more comfortable with some good home cooking and plenty of heat generated from this little frontier wood stove.

homemade wood stove plans
DIY frontier wood stove, Image via: instructables

8) DIY Gas Bottle Wooden Stove

To build this diy gas bottle stove by instructables you simply need:

  • Gas Bottle
  • 6 Inch broad Pipes (also required for the chimney)
  • Steel hinges
  • Air vents section
DIY Gas Bottle Wooden Stove
Gas Bottle Wooden Stove Idea, Image via: instructables

9) Easiest Homemade Wood Stove Idea

If you want to invest less time and get the simplest kind of homemade wood stove like this one by floweringelbow, look for a steel or metal barrel, make an air inlet, a door and attach the chimney with it. Lastly, with any pipe or box sections construct the legs for support.

Easiest homemade wood stove
Easiest wood stove idea, Image via: floweringelbow

10) Recycle Electric Water Heater To Wood Burning

If you have an old electric water heater at home, you can simply convert it into an amazing outdoor wooden heater by instructables. Basically, the base would be used as the top of the heater, so you need to cut in down according to the basic wooden stove structure. The fire grill would be fixed there and make the air passage – fix the legs and you would get a perfect wooden heater.

Outdoor Wood Heater
Recycle Electric Water Heater To Wood Burning, Image via: instructables

11) DIY Wood Stove From Paint Can

This is an amazing idea through which you can use any old paint can to construct a stove of your own by bushcraftusa.

Stove from paint can
Stove from paint can, Image via: bushcraftusa

12) Portable Homemade Wood Stove From Steel Barrel

You can use any steel barrel if present at home or buy one from the market and make a nice outdoor wood stove like this one by backwoodshome, it would just cost you $30.

Portable Homemade Wood Stove From Steel Barrel
Portable Homemade Wood Stove, Image via: backwoodshome

13) Wood Stove Water Heater

This is a basic rocket stove design that was created to heat water. Water heaters use a tremendous amount of energy, either gas or electricity, to keep the water hot at all times. This rocket stove water heater in this youtube video can heat 55-gallon of water with only a small amount of wood debris.

This YouTube video will show you how to build this wood stove water heater and attach PEX pipes and copper tubing so the hot water can be sent into the house.

Save yourself some money on the utility bill and reduce your dependence on electricity with this easy to build rocket stove.

14) Off Grid Water Heater

A wood burning water heater is essential for an off grid homestead. It will heat the water quickly, cleanly, and without the need for any type of fossil fuel or electricity.

Enjoy a hot shower, have hot water for laundry, and doing dishes with this unique water heater. Get this detailed plans for transforming a large tank into a wood burning water heater on youtube that can meet all the hot water needs on your off grid homestead. There is one more way to get offgrid hot water by making diy solar water heater yourself.

15) Simplest DIY Wood Stove

To build this diy wood stove by homemadeguides simply look for a barrel, which has removal top, if not you, can get it cut – it must have a lock for safety and space for placing some woods inside. You can follow any video or diagram for proper instructions.

Homemade Wood Stoves
Homemade Barrel Wood burrning Stoves, Image via: homemadeguides

16) Homemade Wood Stove For a Small Boat

You need a small wood burning stove like this one by duckworksmagazine for your small boat. Simply take a steel box, which is 6 inch in length and depth.

Small boat stove
Small boat stove, Image via: duckworksmagazine

17) Mini Wood Stove

Small spaces only need a small amount of heat to keep warm and this mini wood stove by instructables is ideal for a small tent.

Easy and very cheap to build, this mini stove can burn wood or will produce heat with the use of a tea light. If you are planning a camping trip in an area where wood might be difficult to find, use a tea light candle in this DIY wood stove.

The mini stove is small and lightweight so it’s easy to pack with your camping gear and carry along with you. Tea light candles are also small, lightweight, and easy to carry along with you on camping or hiking trips.

Just a few small twigs or a tea light candle will keep this DIY solo stove burning for 25 minutes. That’s plenty of time for boiling a cup of water or heating a small tent.

Mini Wood Stove
Small and lightweight Wood Burning Stove, Image via: instructables

18) Homemade Mass Heater

For a cool and effective diy wood burning heater like this one by permies, you need to fix insulated burn tube in the first chamber. Also, you must have sufficient space to fill in cement on the first chamber and also the fiberglass so that heat easily gets transferred from inside to outside.

The second chamber features a small opening (door). The overall setup is lined with wooden frames for the support – the third chamber is lined with clay and sand mixture. You can simply add chimney by using a stove piped wrapped with insulated material. You may also like to see wood shed plans to keep firewood dry so it can burn prefectly in the heater.

diy wood burning heater
Homemade Mass Heater, Image via: permies

19) Pellet Wood Stove

Learn how to create an efficient diy pellet stove in this YouTube video that produces plenty of heat and burns up all the pellets. No wasted heat going up the chimney and no wasted pellets that are left half-burned.

Great for use indoors or outdoors, this pellet stove can be used for heating and/or cooking wherever you need it. Save money on your home heating bill and stay warmer with this efficient DIY pellet stove.

20) Garden Wood Stove

Watch this YouTube video tutorial to learn how to build an attractive and functional wood burning stove to place in your garden.

The chimney is created from cement and uses a 5-gallon bucket as the mold. The base is created from brick and cement and the result looks good and produces plenty of heat. This homemade garden stove in this youtube video will allow you to sit outside and enjoy your garden on chilly evenings or enjoy a cup of coffee and read the newspaper on chilly mornings. Build a fire in this homemade wood stove and you will stay warm while you enjoy the view of your garden.

21) Car Camping Stove

This unique diy camping stove by backpacking is great to take with you when you travel by vehicle to a camping location, Too big to carry in a backpack but a great wood burning stove to have with you when car camping.

The unique design of this homemade wood stove allows it to produce high heat with a very small amount of combustible material. It works on the same principle as a blacksmiths forge and has a fan for air circulation. A set of two batteries operates the fan so the wood stove burns hot and clean.

Use this unique wood stove for purifying drinking water, heating water for coffee or cleaning, or boiling freshly harvested seafood as you travel around in your vehicle.

Car Camping Stove
Car Camping Wood Stove, Image via: backpacking

22) Stainless Steel DIY Wood Stove

Solid construction from stainless steel will make this DIY wood stove by manta-bushcraft.blogspot a durable item to have on hand for camping trips. The rugged stainless steel can withstand the rugged elements of outdoor camping.

These free plans will show you how to build two versions of this small stainless steel wood stove. This wood stove would also be great to have on hand at home in case of a power outage for use as a back-up heating source.

Stainless Steel Wood Stove
Stainless Steel Wood Burning Stove, Image via: manta-bushcraft.blogspot

23) Stainless Steel Silver Canister

These free plans will show you how to create an efficient wood burning stove like this one by hillpeoplegear from a stainless steel silverware canister that you can purchase at any retail store for under $10.

The size and shape of the stainless steel canister are perfect for carrying along with you for a tent camping trip. The shape burns wood more efficiently and produces more heat for cooking and heating the tent.

The stainless steel is durable and will last for many camping seasons. The easy and cheap build make this a must-have piece of camping equipment.

wood burning stove
Stainless Steel Silver Canister Stove, Image via: hillpeoplegear

24) BBQ Chimney Hack

You can create an efficient homemade wood burning stove like this one by instructables from an inexpensive BBQ chimney charcoal starter.

The BBQ chimney is an ideal size and shape, plus it’s built from durable metal that can withstand the heat and flames of a wood burning stove. Minimal work needs to be done to transform the BBQ chimney into a wood burning stove that is portable and efficient for cooking and heating at a campsite.

Follow these detailed instructions and learn how to create this easy camping hack.

homemade wood burning stove
BBQ Chimney Hack Stove, Image via: instructables

25) Darth Vader Homemade Wood Stove

Here is one for all the Darth Vader fans out there – a DIY wood stove by instructables that looks like the Star Wars character.

Unique and fun design, this functional and efficient homemade wood burning stove is created from a gas bottle. These step by step instructions will show you how to create the character wood burning stove safely.

This DIY project would make a great addition to a backyard seating area or whimsical garden.

Darth Vader Homemade Wood Stove
Darth Vader Wood  Burning Stove For Backyard, Image via: instructables

26) Two Burner Homemade Wood Stove

We find this stationary homemade wood burning stove in this youtube video efficient, good looking, and burns for a long time in a small amount of wood.

The two top burners make this an ideal wood burning stove for outdoor cooking in your backyard. Fun and practical, keep the heat outdoors during the hot summer months by cooking meals outdoors on this wood stove.

This simple design is also smokeless and would make a great addition to a backyard patio or garden. Informative YouTube video will show you how to create this DIY project.

27) Car Rim Wood Stove

Learn how to transform old car rims into a functional homemade wood stove by watching this YouTube video.

Car rims are often made from heavy gauge steel and are very useful even after being damaged in a wreck or otherwise unusable on a car. Recycle them into an attractive wood burning stove such as in this youtube video that can put out enough heat to keep a workshop, garage, or even a large room inside your home toasty warm.

The unique appearance is sure to create a focal point in a room and be a great conversation starter. The flat top surface is also good for cooking on. Follow this instructional YouTube video and recycle some old car rims into a new wood stove.

28) Pizza Oven Wood Stove

Here is a beautiful way to combine two desirable items into one unique piece of home décor–a wood stove with a pizza oven on top.

The DIY wood stove by naturalbuildingblog is built for use inside a home and is covered with adobe to retain heat. The top portion is rounded and has a pizza oven built-in. You can enjoy the warmth of a fire and cook a pizza for dinner at the same time. You can also use diy solar ovens to cook food while you are living a offgrid life or when you are on camping.

Pizza Oven Wood Stove
Pizza Oven Wood Stove, Image via: naturalbuildingblog

29) Gas Tank DIY Wood Stove

If you do not want to freeze to death in chilly winters, get yourself a homemade wood stove like this one by instructables which can be made from old gas tank – you need:

  • 1 into 1 inch long box which can be used for the legs
  • Fire cement
  • Steel hinge
  • Flat bar
  • few pipes
  • weld mesh
  • scrap tank

With a good and comprehensive guide, you can simply assemble these parts and make a diy cheap wood burning stove

Gas tank pot belly stove
Gas tank pot belly stove, Image via: instructables

30) Homemade Wood Burning Heater

To build this diy wood burning heater by permies you can use any steel body for making the basic body – also, you would need a tube for wall paneling and for center tube, wall pipe can be used. For the legs, you can use plastic box sections and for chimney, you can take any stovepipe.

homemade wood heater5 copy
Steel Body DIY Wood Heater, Image via: permies

31) Heat Exchanger

If you already have a wood-burning stove inside your home and need a way to produce more heat with the use of another heater, check out this idea that I have included at the end of the list. These instructions will not only show you how to build a wood stove by heatinghelp but how to increase the heat your existing wood stove puts out.

A heat exchanger fabricated from copper pipes and attached to your wood stove will heat water to send it to other rooms to keep them warm. This is perfect for a home remodeling job and you need an inexpensive way to heat the additional rooms you are building onto your home.

A series of copper tubing will need to be laid on the floor of the new home addition so heated water will travel through it and heat the room through radiant heat. The wood stove heats water that is in the copper pipes that are attached to the stove sides. That heated water travels through the copper tubing on the floor and circulates back to the wood stove for constant heating.

It’s all operated by relay switches that will need to be powered by a battery or electricity. This radiant heat is a great way to heat a new home addition without increasing your home heating bill.

I would suggest this free plan to you if you are planning a home remodel shortly. This may be the solution you need to keep your home during the winter.

how to build a wood stove
Heat Exchanger Wood Stove, Image via: heatinghelp

Choosing Your Stove And Heater

Wood is a cost effective source of energy to either cook food or heat water. So why not build your own wood stove and heater when you have so many options from our list to try ranging from simple, low on budget, lightweight, durable and repurposing from scrape.

Hope you enjoy the article! If you have any question or diy idea for a wood stove you can give it in our comment section.

Based upon some of the most frequently asked questions I have prepared a questionnaire.  

FAQ’s

What is the best type of wood to burn?

Ash wood will burn long and produce lots of heat. Dried oak and maple will also burn long and hot. Beech and hawthorne are very good but must be allowed to dry for several months.

Cedar, cherry, apple, plum, and pear will provide long lasting heat and fragrance.

Which wood burns the longest?

Dried wood from the ash tree is said to be the longest burning type of wood. In second and third place are dried oak and maple wood.

Always allow the wood to become ‘seasoned’ (dried) before using. Most cut wood is allowed to dry for 6 months to 1 year before it’s burned. If any moisture is remaining in the wood when burning, it will create heavy smoke and not burn efficiently.

Are wood stoves safer?

Wood stoves have safety features, like a locking door that will keep the flames contained. There’s also a temperature gauge on the stove pipe to alert you to the temperature inside the wood stove and a damper that will help regulate the air flow into the stove.

What are the different types of homemade wood stoves?

Several types of homemade wood stoves are available for the DIYer. You can select from styles that include pyramid shaped, styles with two burners, round, or frontier style. The materials used to build a DIY wood stove can be recycled items like an old hot water heater, paint can, or steel barrel.

References:

Smithsonianmag, innovation, pub: January 19, 2016, by Rachel Kaufman, “How to Modernize the Wood Stove and Help Save the Planet”, https://www.smithsonianmag.com/innovation/how-modernize-wood-stove-and-help-save-planet-180957866/

Nationwide, Home insurance resources, “Wood burning stove safety tips to prevent fires”, https://www.nationwide.com/lc/resources/home/articles/wood-stove-safety

MDPI, Energies/ Volume 13, Issue 5 10.3390/en13051028, pub 2020, “A New Design for Wood Stoves Based on Numerical Analysis and Experimental Research”, https://www.mdpi.com/1996-1073/13/5/1028

21 Off Grid Cabin Plans-Build One For Your Homestead Living

Building an off-grid cabin is like crafting your own cozy haven away from the bustle of city life. I remember when I decided to venture into this, craving a retreat that echoed my love for nature. The idea of having a place to escape to whenever I needed a break from the chaos was enticing.

Designing and constructing my off-grid cabin allowed me to tailor it precisely to suit my family’s needs. From the layout to the materials used, every detail reflected our vision of an ideal getaway. It wasn’t just about a physical shelter; it was about creating a space where we could recharge, connect with nature, and bond as a family.

And it’s not just about the cabin itself; it’s the whole lifestyle it represents. Embracing off-grid living opens up a world of possibilities for self-sufficiency and sustainability. It’s about forging a closer relationship with the land, learning to live in harmony with it rather than just on it.

If you’re considering taking the plunge into off-grid living, I encourage you to explore the various cabin plans available. They’re not just blueprints; they’re guides to creating your own little slice of paradise, tailored to your unique needs and desires.

Check out our 21 off grid cabin plans that can help you design and build one for your homestead.

1- Off Grid Homestead

Learn how to build an off grid homestead like this one by Bushradical on youtube from start to finish with these detailed plans. This YouTube video will show you how one couple transformed a piece of wooded property into an off grid log cabin of their dreams.

I like this off grid cabin plan as they only used a few power tools and built this cabin by hand with the wood they harvested from their own property. The off grid homestead has a kitchen, bathroom, and plenty of living space.

No more utility bills, no more noisy and nosey neighbors, just you and your family living off the land in a cozy off grid cabin that you built yourself.

Enjoy a simpler way of life and be less dependent on others when you create an off-grid homestead. It’s easier and cheaper than you think.

2- Get Away Off Grid Cabin

This off grid cabin by Canadian Castaway on youtube can help you find the peace and rest you need from living a hectic lifestyle. We all get caught up in the day to day work grind and find our self working way too much and being gone far too long from our loved ones, and a get away cabin can help change that.

Take a break for a weekend, week, or forever in a get away off grid cabin like this one. Follow this instructional YouTube video and custom build an off grid house so you can get away from the stressful demands of life.

3- Small Cabin In The Woods

Learn how to building an off grid cabin like this one by The Wooded Beardsman in this Youtube video so you can enjoy living in the woods.
Cut financial ties with the power company and enjoy living off the land in the small house in the woods. Ideal for a hunting or fishing cabin, or for a small family to live in year-round. Save money, live better, and create your off grid homestead with the help of these free building plans.

4- $300 Off The Grid Cabin

This building project will amaze you. No one would imagine that a comfortable and cozy off the grid cabin like this one by
Pure Living for Life in this youtube video
could be built for $300, but it can.
This YouTube video will provide you with free building plans so you will be able to construct a similar cabin for the same low price that I like the most about this off grid cabin plan. Using recycled building materials and doing the work yourself is key to saving money.

Ideal for building as a hide-away for weekends when you just want to get out of the city or for use as a hunting or fishing cabin. You won’t break the budget building this off grid house and you won’t worry about paying the utility bill either.

5- Off Grid Homestead Business

I woud recommend this off grid cabin by Mother Earth News to build for the diyers that like to live off grid and running a small business as well. One off grid cabin can serve many purposes without costing a lot of money. This family decides to build an off grid cabin on their wooded property as a space where they could get away and relax while observing nature. That decision led them into ways that they can use their off-grid cabin to generate revenue also. List of items bought for this project are ramset tool, roof rafters, vinyl siding, tar paper, and stall dog kennel.

The off-grid space contains a loft bedroom, living room and kitchen combo with a front porch that extends across the front of the cabin. Plenty of space for relaxing and running a few businesses.

This new off grid cabin home and business location cost them less than $6,000. That is a very good investment of time and money and will reward them for many years to come. One of the ways they generate income is to rent this lovely off grid cabin out on AirBnB. The cabin is easy to rent and goes for top dollar, so consider the income potential when you build an off grid cabin.

Off Grid Homestead Business
Off Grid Homestead Business, Image via: Mother Earth News

6- $1,000 Off Grid Cabin

You can build an off grid cabin for around $1,000 with these free plans by instructables. This design is called the Thoreau cabin since the design originated from the cabin Henry David Thoreau built in the woods in 1845. It is the place where the famous poet and author lived and wrote, and you can build a replica of the off grid cabin for your enjoyment. floor joists, rough-sawn timbers, hewn lumber and deck blocks.

The simple design features a cozy fireplace and plenty of interior room for a few basic furnishings. The cheap building cost would make this a great off grid cabin design to build as a hunting or fishing cabin.

The cabin is 10-feet by 15-feet and would also make a good out building on a homestead to use as a workshop or storage shed. The low building cost would enable you to build several off grid cabins in the Thoreau style for use on the homestead.

off grid cabin
$1,000 off grid cabin, Image via: instructables

7- Guest Bedroom Off Grid Cabin

It’s always nice to have an extra room for guests but the main house on the homestead is often only big enough for the family.

Use this off grid cabin plan by instructables to build a free standing, solar powered stealth cabin that would make a perfect guest bedroom for company. The cabin has 8-feet by 8-feet interior space with a small porch built onto the front. Plenty of space for overnight guests.

When the stealth off grid cabin is not being used by guests, it can serve as an office, workout space, or other function. The cabin is fully self-contained with a solar power system, RV style water system, shower, storage, DIY washing machine, chemical toilet, and propane appliances.

This would be a great build for a hunting or fishing cabin even if you don’t want to build one on your homestead. The design can be modified to meet your exact needs and can be built without the use of machinery. Download these free plans and start building this weekend.

Guest Bedroom Off Grid Cabin
Guest Bedroom Off Grid Cabin, Image via: instructables

8- Emergency Cabin

This off grid cabin by instructables is small and portable and would make a perfect emergency cabin if the need for emergency shelter ever arises.
The cabin is 8×8 feet and has a small porch that increases the usable space. The basic cabin is not insulated so it will be easy to take down, move, and reassemble in a different location. Insulation can easily be added to make this small emergency cabin warmer and better suited for long term living if needed.

Emergency Cabin
Emergency Cabin, Image via: instructables

9- Simple Cabin

Get free plans for building an off grid home like this one by Bushradical by following thisyoutube video. This simple cabin design has everything that’s needed to create a comfortable and warm living space that is off grid.

Enjoy the scenery as you live off the land and create a productive off grid homestead for yourself and your family. This DIY cabin is simple in style and excellent in durability and function.

This free video plans will show you how to build your off grid cabin so you can enjoy living the life you have been dreaming of.

10- Pallet Wood Cabin

Free pallet wood can be recycled and transformed into a livable and attractive cabin in the woods. Off grid homesteads are typically off the beaten path and roadways and building supplies have to be carried in by hand or ATV making the DIY building project even more difficult. However, wood pallets are lightweight in addition to being free.
Carrying lightweight wood pallets into the woods to use them to build a free, off grid home like this one by TA Outdoors in this detailed YouTube video for your family.

11- Shed Cabin

The sloping roof line gives this two-story cabin the appearance of woodshed on the outside. Inside the DIY shed cabin has high-end finishes and all the comforts of home – and it’s all off grid.

No utilities to pay each month, no worry about a power outage, you can just enjoy everyday living in the large and attractive off grid cabin. Reclaimed lumber and antique appliances and home furnishings further add to the charm of this uniquely designed cabin.
Build your own shed with the detailed plans by Loftis Party of Six this YouTube video offers.

12- Cottage Style Cabin

Here is an adorable design for an off grid cabin by instructables that can be built to use a mother-in-law suite, adult child apartment, or a lakefront cabin retreat.
The cottage style cabin is reminiscent of mid-century tract homes and will provide a cozy, off grid living space. The cottage style cabin is 10×20 feet and has a welcoming front porch to sit on and enjoy the view.
Follow these free building plans and get ready to build this cottage style off grid house that will provide you with cheap living for decades.

off grid cabin
Cottage Style off grid cabin, Image via: instructables

13- Solar Powered Cabin

Small, cute, and solar powered, that’s what this DIY cabin has to offer. Follow these free plans to build this off grid cabin by offgridworld for around $400, then buy yourself a rocking chair for the front porch and enjoy life.

The cabin is 14×14 feet and has insulated floors to help keep the cabin warmer with less firewood. Plus the warm floor juost feels good on your feet. Detailed pictorial instructions will walk you through the building process of this solar powered cabin.

Solar Powered Cabin
Solar Powered Cabin, Image via: offgridworld

14- Family Sized Cabin

This 16×32 feet off grid cabin by Deep South Homestead on youtube is meant to be a permanent living space for a family. Solid construction sets the floor joists on concrete pillars so this off grid house will be able to stand harsh weather and rambunctious children.

Watch this YouTube video to learn how to install the floor joists and windows sills in a large DIY cabin.

15- Off Grid Living

If you dream of living off grid in a lovely secluded cabin and not having to pay a utility bill anymore, then check out this DIY cabin by Ontario Lakeside on youtube.
You can build this cabin by following these free plans so you can fulfill your dream. Detailed YouTube video shows you how to construct the cabin and provides ideas for adding custom details to make your off grid house unique.

16- Appalachian Style Cabin

Learn how to build an Appalachian style off grid cabin by Red Poppy Ranch in this informative YouTube video in the middle of nowhere. Great place to get away from it all and enjoy the sights and sounds of nature. Even if you don’t have a piece of land in the middle of nowhere, this Appalachian style cabin is easy to build with these free plans.

17- Two-Story Off Grid Cabin

Building an off grid cabin will allow you to have peace and quiet like you can’t experience in the city. If you find that your life is too hectic and you’re spending too much time working, traveling, and doing things that are not making you happy, you need time away from it all.

Creating a homestead with a DIY off grid cabin like this one by Canadian Castaway on youtube is a great way to do something for yourself and your future. It can be a permanent home or a retreat when you need time to de-stress. Whatever the reason, watch this YouTube video for two-story off grid cabin plans that you can build anywhere.

18- Cabin In The Woods

Most of us have dreamed of having a little cabin in the woods. A place to call our own little secret hide-away where we could go and relax for a few days.

That dream can become a reality with these off grid cabin plans by Bushradical in this YouTube video.

The off grid cabin is small but it has plenty of interior space for the basic necessities and a front porch for sitting outside and enjoying nature. The windows allow plenty of natural light to come inside the cabin and provide a nice view to the outdoors when you’re sitting in front of the wood burning stove.

This small off grid cabin can be built by one person and it will last for decades. Ideal for use as a hunting or fishing cabin.

19- Off Grid Workshop Cabin

Sometimes you need an additional cabin on your homestead to serve as your workshop and this video will show you how to build that off grid cabin.

This square off-grid cabin is constructed with thick hemlock timbers so it will still be standing a century from now. You will also see how to set up a pulley system that will enable you to get heavy timbers in position without using heavy equipment. This is not only an off grid cabin but also an off grid building project.

Homestead living involves a lot of DIY projects and there is always a need for out-buildings. A workshop, barn, smokehouse, greenhouse, henhouse, and so forth. Knowing how to build an off grid cabin like this one by My Self Reliance on youtube will provide you with the plans to add onto your homestead as needed.

20- Alaska Cabin

Learn how to harvest wood from your property and transform it into a warm and cozy off grid cabin like this one by Wild North Design by watching this YouTube video.
Watch how one man builds his dream cabin primarily by himself with the lumber he harvested from acreage he purchased to create a homestead. The off grid cabin is small but the sleeping loft increases the living space without increase the footprint the cabin takes up in the landscape.
The wood heater is cheaper like if you have DIY solar pool heater and it is well able to keep the DIY cabin toasty warm even during the cold Alaska winter weather.

21- Solar Powered Off Grid Cabin

Having all the comforts of home is great, even when the home is an off-grid cabin in the woods. Learn how to build a large off grid cabin like this one by Off Grid with Jay and Jen in this YouTube video that is complete with all the comforts of home, including free electricity. The electricity is provided by solar panels and they produce plenty of power to run all the appliances on the homestead.

Build an off grid cabin like this one and sit on your front porch and enjoy a view of the surrounding mountains. You will also learn how to mill live edge wood to use as attractive siding on the cabin, how to install a wood burning stove, and how to create an outdoor firepit.

This YouTube video is so informative and is well worth watching for anyone who is considering starting a homestead with an off grid cabin. All the comforts of living in the city without all the bills and stress associated with it. Live in comfort while living off the land on your own homestead.

Conclusion

An off grid cabin serves you many benefits without costing you a lot of money. By building a cabin you can save on your utilities bills and can live close to nature to get rid of any stress you may have after doing a day to day work with the same routine tasks.

We hope this article has guided you to build your own cabin. Now you have a vast choice to pick any of these plans and build a custom cabin according to your requirements!

References:

Scholar works Umass Amherst, Pub: August 2023, by Patsun Lillie, “Off-grid Living for the Normative Society: Shifting Perception and
Perspectives by Design”, https://scholarworks.umass.edu/cgi/viewcontent.cgi?article=2368&context=masters_theses_2

Anker, Home Power Backup, Aug 03, 2023 by anker, “Off Grid Cabin – Become Self Sufficient Today” https://www.anker.com/blogs/home-power-backup/off-grid-cabin

bartleby, Research, “Off Grid Cabin Research Paper”, https://www.bartleby.com/essay/Off-Grid-Cabin-Research-Paper-F5AF5ED804ED022E

archdaily, Written by Eduardo Souza, Published on June 24, 2021, “A Guide to Off-Grid Architectures”, https://www.archdaily.com/963500/a-guide-to-off-grid-architectures

23 Homemade Sawmill Plans To Cut Logs Into Lumber

Having a homemade sawmill opens up a world of possibilities for cutting logs into lumber easily and affordably. When I first learned about the concept of building my own sawmill, I was intrigued by the idea of being able to transform felled trees into usable lumber for my woodworking projects. It seemed like a practical and cost-effective solution that aligned perfectly with my DIY ethos.

Building a homemade sawmill is surprisingly straightforward and doesn’t require a hefty investment. This aspect appealed to me, as it meant I could save money on purchasing lumber while also enjoying the satisfaction of creating something useful with my own hands. With a portable sawmill, I envisioned being able to cut lumber to the exact specifications needed for my woodworking endeavors, right in my own backyard.

The prospect of having a homemade band saw at my disposal filled me with excitement. It meant that I could customize the length and width of lumber according to the requirements of my projects, without relying on store-bought materials. This level of flexibility and control over the lumber-making process fueled my enthusiasm for embarking on the DIY sawmill project.

Exploring the array of 23 free plans for building a DIY sawmill, I felt inspired to select the design that best suited my milling needs. Each plan offered unique features and construction methods, providing me with valuable guidance and inspiration. Armed with the chosen plan, I eagerly dove into the construction process, eager to bring my homemade sawmill to life and embark on a journey of fulfilling woodworking projects.

1- DIY Bandsaw Mill

As someone passionate about woodworking and the art of milling lumber, stumbling upon the homemade bandsaw mill on YouTube was a game-changer for me. What sets this DIY sawmill apart is its ability to handle large logs with ease, making it the perfect choice for anyone serious about milling sizable lumber. The prospect of transforming logs up to 16 feet long into custom-sized boards to suit my woodworking projects is incredibly appealing and aligns perfectly with my ambitions in the craft.

What I particularly like about this homemade bandsaw mill is its robust construction and thoughtful design. Constructed from steel tubing and 8-inch concrete blocks, the sawmill boasts stability, levelness, and the capacity to handle even the largest of logs. The use of square steel tubing for the bandsaw’s frame ensures durability and precision, while the 27-horsepower twin V motor provides ample power to effortlessly cut through hardwood trees. The attention to detail in the construction ensures that the sawmill is not only functional but also built to last, making it a worthwhile investment for any woodworking enthusiast.

Furthermore, the availability of detailed instructions in the YouTube video makes the construction process accessible to DIYers of all skill levels. Whether you’re a seasoned woodworker or a novice looking to embark on your first DIY project, the step-by-step guidance provided in the video offers clarity and confidence in building your own bandsaw mill. Overall, my personal experience with the homemade bandsaw mill on YouTube fills me with excitement and anticipation. It represents an opportunity to take my woodworking endeavors to new heights, allowing me to mill lumber with precision and efficiency while enjoying the satisfaction of creating something truly remarkable with my own hands.

2- Weight Lifting To Homemade Sawmill

Here is another great idea for recycling an old item into something brand new and beneficial. Many of us have an old weight lifting set in the garage that no one has used in years and it can become useful once again when it’s transformed into a sawmill component.

To build this homemade sawmill re-purpose two old car tyres, 2×2 metal square metal, 2×4 thin wall metal and a nine horse tiller into a functional diy sawmill that will take old dead log and mill them into fresh new lumber. Use the freshly milled lumber to remodel or build any type of wood project that your heart desires.

There is always something to rebuild or repair on the homestead and having a DIY sawmill by Forestryforum will make the work much easier and less expensive.

DIY sawmill
DIY sawmill, Image via: Forestryforum

3- Motorcycle Wheels and Angle Iron

Discover how you can recycle motorcycle wheels and angle iron into a homemade lumber mill in this Youtube video.

Use these DIY sawmill plans that are easy to follow and the sawmill can be built very quickly. I think industrial gas-powered engine is powerful enough to cut large logs down to the size you need.

Ideal for a homestead, you can build a sawmill from scratch in less than one day. Parts from a variety of recycled items are used in the building of this sawmill. All the lumber you mill will enable you to expand your homestead without spending a lot of money.

4- Backyard Sawmill

If you enjoy woodworking or have a lot of building projects that need to be completed, this backyard sawmill will be a big asset to you.

This homemade sawmill is stationary so it’s ready to saw the lumber anytime you are. It’s large and well able to take large logs and saw them into boards for building. Milling your own lumber is much cheaper than buying boards and you can mill it to your exact specifications.

Mill the lumber using this DIY bandsaw mill by Makezine for building a house or a coffee table or anything in between. It’s ideal for milling all the lumber you will need to build everything needed for a homestead. I would suggest this diy sawmill to those wood crafters that build artisan furniture from felled trees.

Follow these free plans and build yourself a backyard sawmill this weekend.

Homemade Sawmill
Homemade Sawmill, Image via: Makezine

5- Homemade Band Sawmill

Watch this instructional video that will show you how to build an affordable and efficient homemde sawmill by Practicalsurvivalist from scratch so you can create all the milled lumber you will ever need.

If lumber was more affordable you could build a lot more items for your homestead. Milled lumber can be affordable with this band saw mill that you can build in your backyard.

This diy band sawmill plan is very detailed and will show you every step of the building process for the band sawmill. The finished sawmill can handle long and thick logs, so you will be able to mill lumber for use in building a new house on your homestead. Joists and trusses for new home construction often need to be 12-15 feet in length and this bandsaw mill can handle the logs needed to create long pieces of milled lumber.

Follow these free plans and build one of these useful sawmills for yourself.

Related: You may also like to see DIY sawhorses plans to do many of your DIY woodworking projects.

Homemade Band Sawmill
Homemade Band Sawmill, Image via: Practicalsurvivalist

6- Simple Homemade Sawmill

Learn how to construct a simple homemade sawmill in this YouTube video from a lumber. It is built from construction grade wood and can be built in one afternoon. The design is simple, yet the sawmill is very sturdy and will last for years of lumber cutting. Great for use on a homestead to cut felled trees into lumber that can be used to construct any type of wooden structure needed.

Build a barn for the animal, a storage shed for tools, a smokehouse, outhouse, or any other type of house needed to make life more comfortable on the homestead with lumber milled on this simple DIY sawmill.

7- Homemade Bandsaw Mill

This large bandsaw mill can handle the logs up to 17-feet long and cut them into usable lumber. Logs that are log and have a thick diameter can quickly be sliced into wide planks for use in furniture making or for creating a plank floor.  Large trees can be milled to the desired size with this homemade sawmill on youtube.

Watch this YouTube video for complete, easy to follow instructions.

8- Homemade Bandsaw Mill

A simple homemade bandsaw mill like this one by Forestryforum can be built for less than $1,000. If you have a large DIY project that will require a lot of milled lumber, this bandsaw mill will save you over $1,000 on the first DIY project you use it for.

This is also a homemade portable sawmill that is easy to take with you to the construction site. Hook it up to the trailer hitch on the back of the tractor or truck and pull it to where the logs are located. The portability makes this homemade bandsaw mill a very valuable tool for a homestead.

Fence posts, animal pens, and out-buildings are always needing to be constructed on a homestead, and this diy bandsaw mill can go where it’s needed. Transform those fallen trees into valuable lumber with the assistance of this affordable DIY bandsaw mill.

Homemade Bandsaw Mill
Homemade Bandsaw Mill, Image via: Forestryforum

9- Junk Yard Sawmill

The sawmill did not come from the junk yard but most of the parts to build it did. A little creativity and a trip to the junk yard and flea market can help produce this efficient, powerful, DIY sawmill by Lumberjocks almost nothing.

Building this junk yard sawmill will pay off twice – once when you gather all the building components for free and then again when you can mill lumber from logs and complete wood-working projects for free.

This is a DIY project that keeps giving and is well worth the time to build. You may even be able to get a third benefit from this junk yard sawmill if you sell some of the milled lumber or charge other people for milling their logs.

Junk Yard Sawmill
Junk Yard Sawmill, Image via: Lumberjocks

10- $800 DIY Sawmill

It won’t cost much to build a DIY sawmill by Imgur when you follow these sawmill plans. A small investment of money and time now will save you a ton of money in the future. Lumber that has already been milled is very expensive, and if you enjoy wood-working projects you need a  lot of wood.

Mill your own lumber to your exact specifications with this homemade sawmill. Use dead trees on your property to help build this sawmill and save even more money.

These free plans provide you with written and pictorial instructions so the building process will be very easy. Building a DIY sawmill for less than $800 is a great investment.

DIY sawmill
DIY sawmill, Image via: Imgur

11- Car Wheel as Swmill

There is not too much that can be done with old car wheels but this video will show you a neat idea on how to recycle them.

Old car wheels can be used as an integral part of a homemade sawmill. The wheel enables the bandsaw to go up and down to mill the logs into the desired sized lumber. Mill the lumber you need to build a house, a front porch, a warm enclosure for farm animals, or for building new furniture with this DIY sawmill by Practicalsurvivalist.

The free plans on this video will show you all the details for recycling old car wheels into a new sawmill.

Car Wheels Sawmill
Car Wheels Sawmill, Image via: Practicalsurvivalist

12- Homemade Bandsaw Mill

If you are detailed oriented and need extremely detailed instructions for building something, then here are the perfect free plans for you.

Meticulously detailed plans for this homemade bandsaw by Woodweb show you everything you need to know about the components and building process. Nothing has been left out of the detailed written instructions and photos, plus they are very easy to follow.

This bandsaw was built from junk yard parts, so the components you use for the building  process will vary. These detailed plans are adaptable to whatever parts you have on hand or find in the junk yard. That is one of the great things about a DIY building project, you can adapt and modify as needed to suit your own specifications.

Homemade Bandsaw Mill
Homemade Bandsaw Mill, Image via: Woodweb

13- Portable Sawmill

Move it where it is needed – this portable sawmill is ready to go when you are and it can handle the logs you need to cut.

Easy to assemble, the components are lightweight and easy to move. The portable sawmill in this YouTube video is sturdy and made from metal so it will last for years and can handle all your milling needs. This sawmill is simple but powerful, and this YouTube video will show you all the details of putting the sawmill together.

If you want written plans the maker of this YouTube video will send them to you upon request. Cut logs into lumber and get busy with woodworking projects around the homestead with this powerful portable sawmill.

14- Small Band Sawmill

This sawmill is small and portable unlike the previous ones that I have shared with you, this band sawmill is designed to mill logs up to 6-feet. Great for furniture building and other small wood-working projects.

If you are considering a money making business by crafting handmade wood objects, then this will be a perfect DIY sawmill for you. The sawmill is not too big, yet it is powerful enough to cut hardwood logs into lumber.

Mill the lumber needed to create popular wood items like signs, birdhouses, craftsman furniture, and more. Make money from home by crafting unique wood pieces from lumber milled from this small band sawmill by Lumberjocks.

The sawmill frame is constructed from scrap pieces of lumber glued together. This makes the frame extra sturdy while keeping the build cost down. The motor for the saw is quick and easy to remove when it is time to relocate the sawmill.

Small Band Sawmill
Small Band Sawmill, Image via: Lumberjocks

15- Lawn Mower Transformation

Breathe new life into that old lawn mower by using to build a new sawmill. To build this diy sawmill, all you need is welder, various grinders, cutting tools, good straight edges, levels, squares and gloves. There are many other componets to this DIY build but these free plans will show you all the building details step by step.

Think of all the things you could build if you have an unending supply of free milled lumber.  Now drag out that old lawn mower and follow these instructions to build yourself a homemade sawmill by Instructables. After that, there is no limit on what you can build to make your homestead more comfortable and attractive. It will also help the planet by keeping an old lawn mower out of the landfill.

Lawn Mower Transformation
Lawn Mower Transformation, Image via: Instructables

16- Giant Bandsaw Mill

When you have giant trees to cut into giant slabs of wood, there is only one type of saw that can handle the task – a giant bandsaw mill by wilkerdos.

This homemade sawmill has a 76 inch wide cut capacity and 12 feet long length. It’s a must-have for milling large trees to create large slabs of wood that will be used to create one of kind furniture pieces.

Rustic farmhouse furnishings, like a large farmhouse table, sliding interior barn doors, wooden benches and so many more items that require large slabs of wood must be milled on a giant bandsaw mill. You can take your home building and wood crafting to a new level if you have a mill large enough to handle the big trees.

These free building plans are detailed and easy to follow so you can build a homemade sawmill just like this one.

Giant Bandsaw Mill
Giant Bandsaw Mill, Image via: Wilkerdos

17- Wooden Sawmill

You can build a sawmill from wood with these detailed plans. It’s a DIY chainsaw mill by Brilliantdiy but the frame is built from wood. It’s just as sturdy and efficient as a frame made from metal but it’s a lot cheaper to build.

This is a great DIY solution for making your woodworking tasks easier without spending a lot of money on equipment. The chain sawmill can be customized to meet your needs so that you can efficiently turn felled trees into usable raw lumber.

Milling your own lumber will provide you with high quality material at a fraction of what you would have to pay for it at the lumber supply company. You can even use a homemade sawmill to make money by milling lumber for other people.

Build your family a homestead with lumber milled on your own sawmill. Use fallen trees from your property to build home furnishings for your homestead. Outbuildings, fence posts, and barns will all be cheap to build when you harvest the trees from your property and mill them on your own DIY sawmill like this one.

Watch the video to get the detailed building plans and other valuable information for building this wooden saw.

DIY chainsaw mill
DIY chainsaw mill, Image via: Brilliantdiy

18- Homemade Bandsaw Mill

This homemade bandsaw mill has a wooden frame and can handle large trees. Ideal for building in your backyard so you can mill lumber that will be used to create unique furniture pieces.

These free plans are on video so they are easy to follow and watch over and over again as needed. This bandsaw mill by Ibuildit is cheap to build and does not take up a lot of space in the backyard. Ideal for the hobbyist woodworker or artisan that wants to reduce the cost of the raw material needed for building. Having a sawmill in your backyard will save you a lot of money and you will be able to mill the lumber to your specifications. You can build what you want when you want if you have a sawmill for milling the lumber at home.

A homemade sawmill like this one can be built for a fraction of the cost of buying one. You can save time and money by having your own sawmill in the backyard. You can also use it to make money.

Homemade Bandsaw Mill
Homemade Bandsaw, Mill Image via: Ibuildit

19- DIY Sawmill For Under $1,000

How would you like to build a log home and furnish it with handcrafted furniture? You can do that plus build all the outbuildings and fencing you will need with this inexpensive homemade sawmill by Motherearthnews.

These free plans will show you how to build a strong, sturdy, efficient sawmill for under $1,000. That’s a good investment when you consider all the things you will be able to build from the lumber you mill with the sawmill.

This is ideal for anyone starting a homestead. Build the sawmill first, then you can mill all the lumber needed to build almost everything else needed on the homestead. When your homestead is completed, use the sawmill for milling lumber for other people so you can generate an income.

The initial investment of 1,000 can turn into many 1,000‘s of dollars in saved and earned income. See also some relevant woodworking projects such as diy table saws and diy miter saw stand.

DIY Sawmill For Under $1,000
DIY Sawmill For Under $1,000, Image via: Motherearthnews

20- Scrap Metal Salvage

Build a homemade sawmill like this one on youtube from salvaged materials so you can save money, have a steady supply of lumber, and keep usable items out of the landfill.

All the details you need to know regarding how to build a homemade sawmill from scrap metal can be found on this YouTube video. The 13-horsepower gas motor can handle average sized logs but adding a larger motor to the sawmill would be an easy thing to do. A larger motor would enable you to mill larger logs.

This DIY sawmill incorporates safety features to help keep the user safe while milling lumber.

21- Large Milling Capacity

If you plan on milling large logs into large pieces of lumber, this homemade sawmill on youtube is the one for you. Capable of milling boards 32 inches wide and 16 feet long, this DIY sawmill is a real money maker.

Large boards are needed for building homes and barns on the homestead, plus they are in demand by the commercial housing industry. If you can mill the large boards, you can make money with a homemade sawmill.

Watch this YouTube video for detailed instructions on how to build a homemade sawmill with a large milling capacity.

22- Portable Sawmill

If you need a sawmill that can be moved around the property as needed, then check this portable DIY sawmill in this YouTube video.

The bandsaw is built from scrap parts and cut a whole log into boards the exact size you want. The sawmill is also portable so you can move it to where the logs are instead of hauling the logs to the sawmill.

Built from scrap pieces of metal and recycled parts, this portable sawmill will cost you almost nothing to build. Watch this YouTube video and get started building a DIY sawmill for your homestead this weekend.

23- More Than One

If your wood-working projects will require more than one homemade sawmill, then you need to watch this YouTube video.

Different wood-working projects may need different sizes of milled lumber and these cheap portable sawmills in this YouTube video will enable you to mill the lumber to the desired specifications. Take a sawmill along with you so the cut logs can be milled on-site to reduce the number of times the logs have to be moved.

Having more than one homemade sawmill is convenient and affordable when it’s a DIY sawmill. This YouTube video will show you some different kinds of sawmills that you can build and provide practical advice for building and using each one.

Here I have prepared a questioner that is commonly asked.

FAQs

What is a sawmill?

A sawmill is a machine used for cutting logs into lumber. The machine will contain some type of saw blade and motor and is powered by gas, electricity, or another form of propellant.

How Does A Sawmill Work?

A sawmill uses a bandsaw to cut the logs down to size. A bandsaw is a circular chain of small blades that is kept running by a motor. A log is placed on the frame of the sawmill and moved forward through the bandsaw to cut one board from the log. The moving frame is also operated by the motor.

The log is moved back to the starting point and repeatedly moved through the bandsaw until it is cut into the desired thickness and length.

What Can I Make From A Sawmill?

By turning logs into lumber, you can use the finished lumber for any type of building project. Build houses, furniture, home decor, fences, or barns. You can use the sawn lumber to create works of art or functional pieces for everyday home use.

Whatever you need lumber for, a homemade sawmill will enable you to transform rough logs into smooth boards for your project.

What Are The Different Types Of Sawmills?

There are two different types of sawmills but they all do the same thing – cut logs into lumber.

There are bandsaws and circular saws. Different cuts of lumber can be made with either of these sawmill types.

The lumber cuts are called quarter sawn, rift sawn, or plain sawn. The cut is determined by how the log is placed and cut at the sawmill. One type of cut is not better than the other, it’s just a matter of how you plan to use the finished piece of wood.

There is also a stationary sawmill and a portable sawmill. The stationary type remains in one location and the logs are brought to the sawmill. The portable type can be used in the same place or taken where the logs are, which is ideal when someone is cutting down a large tract of trees.

Can You Make Money With A Sawmill?

Yes, you can make a good income with a sawmill. Look around at all the things that are created from wood. From the smallest pencil to the biggest building, wood is essential for daily life.

The price of lumber has risen sharply in recent years and anyone who has a homemade sawmill can sell lumber cheaper than the lumber yards and home improvement stores and still make a lot of money.

It’s estimated that a sawmill that is operational full time can generate an income of one million dollars per year. Even running a homemade lumber mill part time can generate enough income to provide a good living for your family.

Conclusion

So these are our list of homemade sawmill plans you can choose to make your own milling project. Obviously these would help you to do your woodworking tasks easier without the need to buy expensive lumber from the market.

References:

Acsess.onlinelibrary.wiley, by Tracy Hmielowski, pub:28 October 2016, “Students use sawmill to learn forestry concepts”, https://acsess.onlinelibrary.wiley.com/doi/10.2134/csa2016-61-11-5

Global Spec, “Lumber and Sawmill Equipment Information”, https://www.globalspec.com/learnmore/specialized_industrial_products/wood_processing_products/lumber_sawmill_equipment

Reasearch Gate: Authors: Marika Makkonen, pub: January 2019, DOI:10.14214/df.269, “Renewing the sawmill industry: studies on innovation, customer value and digitalization” https://www.researchgate.net/publication/330562125_Renewing_the_sawmill_industry_studies_on_innovation_customer_value_and_digitalization

USDA, Forest Service Us Department Of Agriculture, Authors: James P. Barnett, Everett W. Lueck, Year: 2020, “Sawmill towns: work, community life, and industrial development in the pineywoods of Louisiana and the New South”, https://www.fs.usda.gov/research/treesearch/61601

17 DIY Chainsaw Mill Projects to Make Your Own Lumber

Thinking about the excessive cost of commercial saw mills to tackle the job of cutting down trees to make lumber is a daunting thought. Fortunately, there are many DIY projects that can help guide the process of creating a DIY chainsaw mill that can be portable and reusable with any standard chainsaw model. Chainsaw mills can be constructed with wood or steel parts and provide added safety features such as using a personal protective equipment for milling lumber using a chainsaw.

The ability to move a sawmill to a large timber rather than moving the timber is another great reason for constructing a portable DIY chainsaw mill. Creating straight and level cuts with beautiful wood slabs for tables or other timber projects is a great homemade project that can be done over a weekend or with a friend.

There are many simple and more complex design styles to choose from when considering a DIY chainsaw mill. Here we prepared a round up of seventeen DIY chainsaw mill projects to make lumber.

1- Portable Chainsaw Mill

Building a DIY chainsaw mill like this one by instructables reduces the significant costs of a larger, heavier sawmill with added benefits. This portable chainsaw mill can be moved to fallen trees and heavy limbs without having to bring the wood to the mill. This portable chainsaw mill tutorial features both written instructions and a video.

A metal chainsaw guide helps reduce the chances of injury by stopping the chainsaw blade and creating straight and level lumber cuts. This tutorial also provides valuable tips and tricks to get the most success from using a chainsaw mill.

DIY Chainsaw Mill
Portable Chainsaw Mill, Image via: instructables

2- Inexpensive Chainsaw Sawmill

With a budget of fifty dollars, this simple and inexpensive sawmill can be used for a variety of milling projects. This twelve-minute video tutorial explains in detail how to build and properly utilize a chainsaw as a functional sawmill. With a cutting position where any DIYer could be standing far enough away from the chainsaw’s blade, this sawmill is a fantastic all-around homemade chainsaw mill.

Complete with a gliding rail, this DIY mill project on youtube allows for a smooth and trouble-free operation while using the chainsaw mill. The budget friendly design can be completed in a weekend or in one day with a friend. The build requires the use of some simple power tools. You may also like to check out diy sawhorses plans that help to do many of your woodworking projects.

3- Turn Style Chainsaw Mill 

Using only the tip of the chainsaw and moving the chainsaw handle up and down, creates cutting depths that are ideal for milling large pieces of timber. Another track style allows this diy chainsaw mill on youtube to glide from end to end with the timber being trimmed down to the desired thickness. Shaping the timber with the end of the chainsaw blade means that there are less hazards with the chain getting caught or for potential kickback.

Essentially using a gliding saw carriage, it is far easier to use the chainsaw to cut straight and even cuts without sacrificing ease of use and the full power of the chainsaw mill. This chainsaw mill design could be used as a makeshift lathe for other woodworking projects.

4- Cost Efficient Metal Chainsaw Mill

Here we have one of the most cost-efficient diy chainsaw mill on youtube and it removes the expense of purchasing a long blade chainsaw. With a metal frame structure, the chainsaw can glide slowly across a large and long wood timber for many DIY projects. In this tutorial, they separated the chainsaw motor from the blade so that they could create as close to a traditional mill and planer as they could while keeping the costs low enough for any DIYer to give this chainsaw mill a chance.

5- Home-Built Portable Chainsaw Mill

Check out this tutorial that will explains in detail how to construct a homemade chainsaw mill by woodweb with the added bonus of high-quality step by step photos. Using a thirty-two-inch chainsaw, this diy chainsaw mill can be a great and inexpensive alternative to a saw mill that is both portable and easy to build. This chainsaw mill can be built in a few weekends and with the help of a friend.

A portable chainsaw mill that is built custom to suit the needs of the user is the best mill to build. Altering the design featured in this tutorial can be done quickly without a lot of guesswork and without spending additional money on the budget.

Home-Built Portable Chainsaw Mill
Home-Built Portable Chainsaw Mill, Image via: woodweb

6- Welded Alaskan Sawmill

Learn how to build a DIY Alaskan sawmill in this Youtube video that can be used to make live edge wood cuts as well as other wood plank cuts without creating a large, guided chainsaw apparatus. A simple metal design that is welded to insert the chainsaw in the jig, this is a fantastic way to make special timber cuts without spending a lot of time or money on professional equipment. A homemade Alaskan sawmill provides a portable way to mill lumber and large timbers without upgrading to a more commercial machine.

7- Wooden Rail Chainsaw Mill

Constructing wooden rails from easily accessible wood lumber and plywood makes this chainsaw mill tutorial by instructables accessible to anyone at any level of DIY building projects. The idea behind this tutorial was created by having to cut up and remove trees and large, heavy limbs from a hurricane without spending a lot of money on hurricane damage cleanup. The chainsaw glides along the two wooden rails while it is attached to a wooden sled. You may also like to check out diy table saws and fences that ease the constructoin process.

Wooden Rail Chainsaw Mill
Wooden Rail Chainsaw Mill, Image via: instructables

8- Twenty-Five Dollar Chainsaw Mill

A DIY Alaskan sawmill by instructables using a chainsaw is a wonderful way to mill large pieces of timber into lumber of various other DIY building projects. Built using a metal frame, simple tack welding can achieve this ingenious homemade chainsaw mill attachment. Made from steel bars and steel tube, this DIY Alaskan sawmill can be built in one day and with a budget of twenty-five dollars.

Cutting the metal steel rod and metal tubing pieces can be done using a portable bandsaw or a battery powered Sawzall. Welding is a simple technique that a lot of DIYers can learn on their own with either a rented, borrowed or bought welding machine. The inexpensive design and sturdy construction make this a great option for creating a chainsaw sawmill.

Twenty-Five Dollar Chainsaw Mill
Twenty-Five Dollar Chainsaw Mill, Image via: instructables

9- Homemade Alaskan Chain Sawmill

With a video tutorial that provides a lot of education and tips, the presenter has a lot of knowledge when it comes to turning a redwood tree into wood slabs using an Alaskan chainsaw mill on youtube. Milling fallen or found trees in the landscape, this tutorial provides valuable information for anyone trying to construct an Alaskan mill and milling timber for wooden slabs. This video tutorial is a step-by-step guide that goes through educating and informing fellow DIYers in an interview type process.

10- Gliding Versatile Chainsaw Mill

Fabricating a jig for the clamp that gets attached to the chainsaw mill this mill on Youtube is constructed using metal tubing with tac and finish welding. Clamping the chainsaw to the mill jig is important for maintaining safety with any potential kickback or saw blade issues. This gliding versatile chainsaw mill allows for wood slabs for table tops or other lumber uses.

The savings of using a regular length chainsaw saves money over a longer blade chainsaw. This youtube video tutorial is over ten minutes which means it provides plenty of descriptions and details so any DIYer can build this jig on their own without lingering questions.

11- Homestead Chainsaw Mill

Comparable to a commercial unit at a fraction of the cost this DIY chainsaw mill by thehomesteadingboards is a fantastic idea. This homestead chainsaw mill uses a DIY Alaskan sawmill design for an inexpensive way to keep costs down and create a mill that can be built by any DIYer who wants to rely on themselves and the land. Simple welding techniques and steel tubing can be used to create this homemade chainsaw mill.

With any chainsaw mill, it is important to have a good supply of gasoline and oil for the saw especially if cutting into harder wood types such as maple. Having enough oil ensures that the lubrication is consistent, and the chainsaw does not overheat with use. You may also like to check out diy miter saw stands that makes your cuts easier and more accurate.

Homestead Chainsaw Mill
Homestead Chainsaw Mill, Image via: thehomesteadingboards

12- Vertical Carriage Chainsaw Mill

With more traditional types of chainsaw mills like this one by ibuildit there is a gliding motion across the horizontal plane to cut timbers into slabs of lumber. With this tutorial, the chainsaw mill is on a vertical plane, attached to a wooden post in the ground. The chainsaw moves up and down the post, letting gravity do much of the work.

This vertical design not only saves space, it also can be used to cut down firewood as well as other vertical cutting projects. With both written and video instructions, this is a great tutorial with a lot of information and knowledge.

Vertical Carriage Chainsaw Mill
Vertical Carriage Chainsaw Mill, Image via: ibuildit

13- One Hundred Dollar Portable Sawmill

Improving on a previously built DIY chainsaw mill this video tutorial on youtube goes through the improvements that can be made from an older design without spending extra time and money. The wooden sawmill apparatus sits and glides on a metal carriage that helps keep cuts straight and level without dragging timbers. The carriage helps prevent potentially catching the chainsaw during the cutting process.

The improvements made from the previous design include a metal cable track with a boat winch that would normally be used to load and unload boats from trailers. The winch cable design allows for operating the sawmill smoothly while also staying away from the chainsaw blade.

14- Improvised Alaskan Chainsaw Mill

Made with wood lumber and an improvised metal table leg, this is a simple and fantastic method for creating a simplified version of a homemade Alaskan sawmill design on Youtube. With a five-step process and a clear list of materials, it is simple and easy to figure out how to build and use this homemade Alaskan sawmill. There is even a video demonstration of the use of this effective sawmill.

The sawmill is powerful enough to cut through long pieces of timber while also allowing the sawmill to detach easily for full use of the chainsaw. One of the nice safety features is that the top of the chainsaw blade is covered by a piece of lumber for added safety. The improvised metal table leg can be used to change the depth of the cut for different thicknesses of wood slabs.

15- Portable Welded Chainsaw Mill

This tutorial features a steel tube design for easy and portable chainsaw milling on youtube. This tutorial also goes through how important it is to have a ripping chain rather than a cross cutting chain for cutting long and dense wood timbers. This tutorial shows how to attach a metal carriage onto a large tree timber in order to glide the chainsaw mill across.

With additional steps, the practice of attaching the metal carriage to the timber allows for cutting any length of timber without being challenged by a pre-made wooden track. Drilling the metal pieces into the ends of the timber can help level out a tree that is too thick for other sawmill designs.

16- Lawnmower Powered Chainsaw Mill

Starting from a different direction, this youtube video tutorial begins with using a sixty-two-inch chainsaw blade and working on creating a motor powerful enough to run the blade without purchasing a heavy-duty chainsaw. The lawnmower motor is powerful enough to run the long chainsaw blade to cut the lumber slabs. This is a five-part video series tutorial for constructing the metal frame that holds the long chainsaw blade and the lawnmower motor.

When fully constructed, this lawnmower chainsaw mill on youtube is large enough to handle the biggest and thickest pieces of timber. The chainsaw blade mill is a two-person build that can easily glide across a metal ladder. This design is unique and more time-consuming to build but with the extra time and effort comes a heavier duty machine.

17- Refined Counterbalance Chainsaw Mill

Refining a previously constructed DIY chainsaw mill this tutorial on Youtube improves upon a popular video tutorial of a counterbalanced design that glides across timbers on a two by four-inch piece of lumber with clamps. Using clamps prevents screw holes in the finished wood slabs. The counterbalance apparatus works better with a small chainsaw so it can be created with a smaller investment into a chainsaw.

The attached box style jig has room for metal weightlifting plates to sit on the jig to offset the weight of the chainsaw, making an even and straight cut. The counterbalance jig allows for a three-cut method that cuts more efficiently and prevents all the powdery saw dust left behind from other homemade chainsaw mills.

Final Thoughts

Finding solutions that help decrease the inflated costs of commercial woodworking machinery and increase the usability of existing power tools, is a fantastic way to DIY a chainsaw mill. We have gathered several chainsaw mills from the internet that are uniquely designed by fellow DIYers out there that fit any budget or any level of construction skills. Whether choosing to cut large timbers horizontally or vertically, our list has several unique designs to achieve a chainsaw mill that is powerful, portable, and versatile.

References:

yumpu, european tropical research network, Issue No. 52, december 2010, “Chainsaw milling: supplier to local markets”, https://www.yumpu.com/en/document/read/8032404/chainsaw-milling-european-tropical-forest-research-network

SCRIBD, by alderstreet, “The potential of chainsaw milling outside forests”, https://www.scribd.com/document/37454314/Chainsaw-Milling

Aviation Pros, by Joe Escobar, July 1, 2004, Vacuum Pumps: Basic operation and maintenance tips, https://www.aviationpros.com/home/article/10386532/vacuum-pumps-basic-operation-and-maintenance-tips

25 DIY Computer Desks For Home Office And PC Gaming

Creating your own computer desk is a great way to have a workspace that suits you perfectly. When I decided to make my own desk at home, it was exciting to think about having a space that was exactly what I wanted for work and gaming. Plus, making it myself meant I could save money and customize it to fit the dimensions of my room.

One of the best things about DIY computer desks is the flexibility they offer. You can design them to have overhead shelving, drawers, benches, and more. Planning mine, I included some overhead shelves to keep my books and other accessories organized. It made my workspace feel more personalized and efficient.

Another advantage of DIY computer desks is that you can tailor them to fit your space perfectly. Measuring the corner of my room where I wanted to place the desk, I decided to go for an ‘L’ shape design. It fit snugly into the corner, maximizing the available space and giving me plenty of room to spread out when working or gaming.

It’s also worth considering building a desk that can accommodate more than one person if you share your space with someone else. When my sibling started working from home too, we decided to make our desk long and straight so we could both use it comfortably. It was a fun project to work on together, and now we have a shared workspace that suits both of our needs.

1- The Bunnings Desk project

If you want to know how to build a computer desk while repurposing an old set of drawers into a functional desk, here we have a diy project to guide you. This project is cost-effective and environmentally friendly, as it allows you to reuse existing furniture rather than buying new pieces. This DIY desk plan by Bunnings is especially perfect for those who want to save money and create a unique and personalized workspace.

The Bunnings Desk project is highly customizable, and you can modify it to suit your specific needs. For example, you can add additional shelves or storage space, or even create a standing desk by attaching a height-adjustable mechanism to the underside of the desk surface.

One of the best things about this project that I like is, it is relatively easy to complete, even for those who are not experienced DIYers. The detailed instructions provided by Bunnings make it easy to follow along and complete the project with confidence. So what are you waiting for?  Start building a computer desk that suits your needs and preferences now!

Steps and material to build this DIY computer desk are

Gather your tools and materials such as Timber screws, Cordless drill, Desk legs, Earplugs, pencil and sawhorse. Measure the area you’ll be putting your desk, Mark out your side and end placement points, use your drill to secure the screws, just place the desk and you are done!

how to build a computer desk
how to build a computer desk, Image via: Bunnings

2- DIY Computer Desk

Having ventured into the realm of DIY projects, I found myself intrigued by the idea of crafting my own computer desk. Popsci’s suggestion to utilize a used door as the primary surface immediately caught my attention. What I personally appreciate about their approach is its simplicity and affordability. Scouring local thrift shops for a cheap door felt like a treasure hunt, and finding the perfect one brought a sense of accomplishment. Assembling the desk with two drawer file cabinets as support was straightforward, and the ample storage space they provided was a pleasant surprise.

What truly sets Popsci’s DIY desk apart, in my experience, is the ingenious use of a hollow core door. Not only does it offer a spacious work area, but the built-in interior space for hiding cords and installing a USB port is a game-changer. This feature not only adds to the desk’s functionality but also helps maintain a clean and organized workspace—a definite plus for someone like me who values tidiness. Moreover, the lightweight nature of the hollow core door makes it easy to maneuver, allowing me to adapt my workspace layout effortlessly.

Overall, my personal experience with the DIY computer desk by Popsci has been overwhelmingly positive. It combines practicality with creativity, offering a customizable solution that fits both my space and budget requirements. Building it was not only a fulfilling project but also resulted in a functional and stylish addition to my home office setup.

DIY Computer Desk
DIY Computer Desk, Image via: Popsci

3- The Good DIY Plans’ Computer Desk

This DIY computer desk design by Good DIY Plans is one of the most simple and practical diy desk plan you will ever find. The Good DIY Plan website page includes step-by-step instructions with a cutting list and diagrams to guide you throughout the building process. The desk is made from plywood and can be completed in a day or two, the thing which makes it a great weekend project.

One of the benefits of I found in this DIY computer desk is, it can fit into any space and can be modified to suit your very specific needs. For example, you can adjust the height and width of the desk to fit your body and space requirements or add shelves or drawers for extra storage. The design is straightforward and doesn’t require advanced woodworking skills, so even if you are not an experienced DIYer, you can easily build this desk with a little patience and effort.

In addition to being functional, this DIY Project is also cost-effective. The materials needed for this diy computer desk are relatively inexpensive, and you can save money by using scraps of plywood or reclaimed wood.

DIY computer desk step by step instructions

Gather material such as saw, impact driver, sander, wood glue, small hinges and pencil. Take require sized lumber pieces, join all the pieces by predrilling holes, adding glue, and adding 3.5-inch-long screws, Next, add the desk top to the main frame of the desk, assemble and attach monitor platform as storage piece, keyboard and mouse tray and the doors to the desk with simple hinges, Next, sand down the desk and you are all done!

DIY computer desk
The Good DIY Plans’ Computer Desk, Image via: Good DIY Plans

4- Lift Top PC Desk

Keep all the computer hardware out of sight with this lift top PC desk. The plans for this DIY computer desk by instructables will show you how to build this functional and attractive desk that will provide plenty of surface space and hide all the hardware components.

If you need multiple monitors and custom built systems for work or gaming, then go an extra step and build a customized PC desk to hold everything neatly.

This desk features storage drawers on each end and built it computers. You will need knowledge of wood working and computer building for this PC desk build, and the results will be amazing.

DIY computer desk
Lift Top PC Desk, Image via: instructables

5- Modern Work Desk

This modern work desk couldn’t be easier to build. On one end is a metal cabinet that supports the wooden desk top and the other end is supported by an easy to build timber frame.

This desk can be built to any length, height, and width that you need. Paint the metal cabinet and wood components in any color to match the decor of your home office.

By using a metal cabinet as support, minimal building will be required for this diy computer desk by bunnings. Build your own desk with these free plans in less than one day. If you have an old metal cabinet and wood that can be upcycled, this DIY project will be very cheap to create.

Modern Work Desk
Modern Work Desk, Image via: bunnings

6- L-Shaped Farmhouse Desk

If you like the look of farmhouse style furniture and need a desk for your home office, you must watch this YouTube video.

You can easily create this adorable, functional computer desk like this one on YouTube for your home office or gaming area with the help of these free and detailed plans. The L shape of the desk takes up very little space in a room but it provides a lot of surface space. You will be able to spread out books, papers, and use more than one computer on this DIY L shaped desk.

You can customize the size so two people can work at the DIY corner desk at the same time. It’s a beautiful piece of furniture that can be built for under $100.

https://www.youtube.com/watch?v=1oVnXnBkxEw

7- Two-Tiered Desk With Shelves

This is the ultimate DIY gaming desk on a Youtube Video and it can be built for $100 with these YouTube instructions.

The two tiers provide ample space for multiple computer monitors, keyboards, and towers. The built-in storage shelves can hold games and other items needed by the serious gamer. In this YouTube video, the desk is painted white and has chrome hardware for a sleek, modern appearance. You can customize the color to make it fit in with any home decor.

What i like about this project, it is simple and classic style will never go out of style and the building cost is budget friendly. The DIY computer desk is strong and sturdy for years of gaming fun. You may also like to check out DIY puzzle tables that will keep you busy for the weekend

8- DIY Desk With Built-In Computer

This awesome design has some amazing features. The solid wood design provides an  appearance that is mid-century modern and looks like a high-end piece of furniture.

The computer is built into the desk and is always out of sight behind a drawer. Ideal for gaming or work, watch this YouTube video to get all the building plans so you can create one for yourself.

If you enjoy wood working, you will love building this DIY computer desk on youtube! And once you have finished the building project, you will love participating in games from this attractive desk for many years.

9- PC Gaming Desk

Check out these detailed plans for a DIY gaming desk by instructables that has room for all your gaming components.

The design has built-in compartments for everything so the desk surface is kept free of clutter. The monitor is mounted on the wall above the desk and the game controllers can be kept on a pull out compartment under the desk top.

This PC gaming desk is ideal for a man cave and will last for years.

PC Gaming Desk
PC Gaming Desk, Image via: instructables

10- Industrial Gaming Desk

If you need an ergonomic gaming desk that has an industrial look, these detailed plans by simplifiedbuilding will show you how to build one.

This custom designed gaming desk features space for multiple monitors and shelving that allows for easy access to everything you need while gaming. The ergonomic design will let you play for hours without becoming fatigued.

Stained wood and chrome pipe fittings give the desk a sleek and industrial appearance that is ideal for a modern living space. The wood and metal design is easy to put together and will provide a sturdy PC gaming desk for years.

DIY Gaming Desk
Industrial Gaming Desk, Image via: simplifiedbuilding

11- Built-in Computer Desk

When living space is small but you still need dedicated desk space for your computer, consider this idea for a built-in computer desk by abeautifulmess.

The work surface is small but functional and it takes up very little space in a room. The desk is attached to the wall and features overhead hangers and shelving to hold items. If the space needs to serve double duty, you could create the desk top to fold and fit flush against the wall when it’s not in use.

Paint the desk and shelving the same color as the walls in the room and it will blend in with the decor. Ideal computer desk plans for home schooling or work from home jobs.

Built-in Computer Desk
Built-in Computer Desk, Image via: abeautifulmess

12- Rustic Modern PC Desk

This DIY computer desk by learn.kregtool is a cross between rustic and modern and will look good in any living space.

The desk provides plenty of surface space for a keyboard and other items needed for work or play. The desk also has an upper shelf for monitors and storage drawers’ underneath. The hair pin legs on one end provide the modern look and the wood top and drawers give the desk a rustic appearance. Quick and easy to build, plus it’s budget friendly.

Rustic Modern PC Desk
Rustic Modern PC Desk, Image via: learn.kregtool

13- Floating Desk

This DIY desk on Youtube appears to be floating in the air with no visible support. The supports are tucked away out of sight underneath the desk surface to give it a floating appearance. Underneath the desk are brackets for supports and it gives the DIY desk a clean, modern appearance. Narrow wire baskets are attached under the desk to hold all the wiring and keep it tucked neatly out of sight.

The finishing touch to this floating desk is the LED rope lights. This is a great desk to place in the bedroom so the LED lights can be used as night lights. Watch this YouTube video to get the detailed building plans.

14- Modern Gaming Desk

This modern gaming desk on a Youtube is a simple design that is built very inexpensively. The straight lines make the wood cutting and assembly an easy task. Modern straight lines and distressed paint finish makes this desk look like it was purchased at a high-end furniture store.

Watch this YouTube video to get the free plans and build a custom gaming desk for your home office this weekend.

15- Wood Computer Desk

This wood computer desk by woodshopdiaries is a classic style that will never go out of style. Center seating area with drawer storage on each side. A narrow center drawer and plenty of surface space complete the classic design.

This desk design is perfect to build for a young daughter’s bedroom because it can grow with her through the years. A desk to do elementary, high school, and college work, then the desk can be used for work from home jobs or gaming fun.

The wood desk is created from plywood and can be painted to stained to match any home decor. Ideal design for use in any room of the home for work, home school, or gaming. Follow these detailed plans and build yourself a classic wood computer desk.

Wood Computer Desk
Classic Style Wooden Computer Desk, Image source: woodshopdiaries

16- Plywood Desk

Get the instructions on how to build a plywood desk in this youtube video. I would suggest this design to you as it provides a professional appearance and would be ideal for use in a business location. The top surface is large and the desk has plenty of storage on each side.

Use this DIY desk for writing, gaming, work, school, or editing YouTube videos. It’s just the right size for home or office and is ideal for multiple uses. Upcycle a used chair and paint the desk and chair the same color so they will display a unified appearance anywhere you place them.

Plywood and 2×4 lumber can be transformed into a beautiful desk when you follow these free building plans.

17- Multi-Shelved PC Desk

Watch this video to learn how to build this fun, functional, multi-shelved PC desk on Youtube.

Design is fun and would make a great addition to a man cave or teenager’s room. The multiple shelves of each end of the desk provide ample storage space so you can keep everything within easy reach. The desk surface provides plenty of space for more than one monitor.

It’s ergonomic to help reduce strain on the back and hands when working or gaming for long hours. If you want something different than a traditional PC desk, check this one out.

DIY computer desk
DIY computer desk, Image via: Youtube

18- The DIY computer desk

This DFR Workshop’s computer desk on youtube is a beautiful and functional piece of furniture that features a unique design with ample storage space. This L-shaped desk has a wooden frame with a distressed finish and a black metal base, giving it a rustic and industrial look. The desk is perfect for a home office or gaming setup and can be customized to suit your very own specific needs.

The instructions for this project are provided in a video tutorial. The video is well-produced and easy to follow, and it provides detailed diagrams and step-by-step instructions. The materials for this project will cost around $200, and it will take a few days to complete.

19- The mobile stand-up computer desk

This computer desk plan by jayscustomcreations is a perfect project for those who need a versatile workspace. This desk is designed to be both portable and adjustable, so it can be used in a variety of settings.

The materials for this diy computer desk are relatively simple, including hardwood, wheels, and basic tools. Build the desk on a sturdy wooden frame with casters attached to the bottom for easy movement. The top of the desk is also adjustable, and this allows the user to switch between sitting and standing positions.

The design includes multiple shelves for storage, a pull-out keyboard tray, and a monitor stand. The shelves are perfect for storing office supplies, books, or a CPU tower. The monitor stand is also adjustable, so it can be customized to fit any size monitor or laptop.

Jay Bates provides a detailed step-by-step guide on his website, along with helpful diagrams and photos. The project can be completed in just a few days, and this makes it a perfect weekend project.

This desk is ideal for those who work from home or need a portable workspace. Its mobility and adjustability make it an excellent option for those who like to switch up their work environment frequently. Don’t waste time and build your own computer desk now!

computer desk plan
The mobile stand-up computer desk, Image via: jayscustomcreations

20- The DIY Modern Wood Desk From House

This DIY project by houseonlongwoodlane is an excellent option for those who want to create a sleek and stylish workspace. The project requires some woodworking skills, but the end result is a beautiful and functional desk that will enhance any workspace.

The desk is made from hardwood and plywood, and the project can be completed on a weekend. The desk has a minimalist design with a wooden top and black metal legs. The dimensions of the desk are customizable, so it can be tailored to your specific needs and the size of your space. Don’t waste time and start building your own computer desk now!

DIY modern wood desk
DIY modern wood desk, Image via: houseonlongwoodlane

21- The Low Budget Computer Desk project

It is a simple yet functional DIY desk plan that is perfect for those who are on a tight budget. Get step-by-step instructions on how to build a computer desk by Instructables using only a few basic materials, including plywood, 2x4s, and screws.

The desk features a minimalist design with a spacious surface area that can accommodate a computer monitor, keyboard, and other accessories. It also has an open shelf underneath for storage and easy access to items. The materials needed for this project can be purchased for under $50, making it an affordable option for anyone looking to create a practical workspace without spending much money.

Low Cost Computer Desk
Low Cost Computer Desk, Image source: Instructables

22- The Woodworking Skill’s Desk

This is a modern and stylish computer desk on youtube that can be built from scratch using hardwood and steel pipes. The project is featured in a detailed video tutorial by the Woodworking Skill YouTube channel. This desk is a great option for those who want a custom-built workspace that is both functional and aesthetically pleasing.

The video tutorial introduces the materials needed for the project and provides a detailed cutting list to help with the material preparation.

23- The DIY computer desk plan

This DIY computer desk by Angela Marie Made is a simple and functional project that can be completed on a weekend. The desk is made from hardwood and features a sleek and modern design that can fit into any workspace.

The plan includes detailed instructions with helpful visuals and a cutting list, and this makes it easy for even beginners to follow along. This DIY computer desk project from Angela Marie Made is also a great option for those who want a simple and functional workspace that can be completed on a weekend with basic tools and materials.

DIY computer desk plan
The DIY computer desk plan, Image source: Angela Marie Made

24- Two Level Desk

You can increase the surface space of a gaming desk by building it with two levels like the one shown in these free plans by addicted2diy.

The bottom level is a large flat surface that can be used for the keyboard, game controllers, and mouse. The top level is the perfect size for holding the monitor at eye level so eye strain and body fatigue will be reduced.

On one end of the DIY computer desk is a three-drawer storage unit and the other end is supported with metal hair pin legs. The overall appearance is sleek and modern and the size is perfect for any room.

DIY computer desk
Two Level Desk, Image source: addicted2diy

25- Work Desk For Under $75

This wooden work desk on Youtube has a large top surface that can hold two computers and other equipment for work or play. Best of all, it can be built for under $75.

The wood top is supported by four round metal legs and gives this PC desk build a sleek industrial appearance. Watch this YouTube video for the detailed building instructions. You can customize the lenght and height so it will fit into your interior space. Use a wood stain or paint to finish the custom look of this desk that can be used for work or gaming.

Conclusion

So these are the diy computer desks you can make yourself using your diy skills, budget, and custom requirements such as space or shape. Hope this article has helped you in giving an idea to decide how your desk should be starting from simple, large, curved, having multiple drawers and shelves.

Frequently asked questions  

What is the best type of wood for desks?

Hardwood is the best material to use for desks. Natural wood is available in various forms in the market such as MDF, Bamboo, sustainable melamine and oak wood. You can select any of these woods for building a desk. They are all solid, appealing and durable as well.

Is it cheaper to build your own computer desk?

Building your own computer desk is always cheaper than the one you purchase from the market. You can have a custom design and add many options when building your own desk such as drawers, a keyboard tray, a cabinet and as many shelves as you need.

How to Choose the Best Gaming Desk?

The best gaming desk should have enough space to accommodate keyboard, mouse, monitors, audio system and any other necessities you need for your desk. Sitting on a table can consume a lot of time so it should have elements that make you more comfortable with your PC time. The keyboard should be at the right place, a sitting needs proper distance and adjustable height option and a proper space for your legs down the desk.

What is the cost of building a computer desk

It depends upon many factors such as your custom size, woodworking tools, material you choose, the design you like. It can be build from 50$ to 500$

References:

TheCB OERTX, “All you need to know about computers built Into desks”, https://oertx.highered.texas.gov/courseware/lesson/226/overview

Research Gate, Pub:October 2013, “Multifunctional Computer Table”, https://www.researchgate.net/publication/324586961_MULTIFUNCTIONAL_COMPUTER_TABLE

Chegg, “Question: Mini Design Case of Study – Computer Desk/Table Design Mini Project:”, https://www.chegg.com/homework-help/questions-and-answers/mini-design-case-study-computer-desk-table-design-mini-project-objective-allow-students-de-q99541448

23 DIY Air Conditioner-An Easy Way To Beat The Heat

Save yourself some money and beat the heat this summer with an easy DIY air conditioner build. By making your own air conditioner, you will be able to enjoy a portable cooling system that costs a fraction of what traditional air conditioning units cost and you’ll have on-the-spot cooling wherever you happen to be enjoying your summer day at.

Check out these 23 diy air conditioners and get busy building your own cooling system today.

1- Peltier and Fan DIY Air Conditioner

A Peltier uses electrical energy to cool down an object or area, so why not use Peltier modules to build an air conditioner like this one on youtube? For cooling, you’re going to use an aluminum heat sink and fan, and you may need to use more than one fan to create an effective cooling system. Just like with the air conditioner for your van, it never hurts to invest in an infrared thermometer so you can make sure it’s cooling to a reasonable temperature. It may seem like a small unit, but you can use it to stay cool at your desk in your home office, or you can place it in a small bedroom to avoid buying a second unit. If you’re only using it for yourself, this may be a good way to stay cool without breaking the bank.

2- DIY Air Conditioner With A Box Fan and Cooler

If you like the idea of building a portable air conditioner like this one by siamagazin, you may enjoy this homemade air conditioner project. For this project, you’re going to build a unit with a box fan and cooler. Who knew you could build an air conditioner using common items? Your homemade air conditioner pumps cold water into the cooler through the tubing, which allows the fan to blow cool air throughout the room. You can also build your box fan air conditioner for just $100 or less, making this a budget-friendly way to cool your space.

Air Conditioner With A Box Fan and Cooler
Image via: siamagazin

3- Build DIY Air Conditioner For Less Than 50$

When serious cooling is needed without spending serious cash, use this under $40 DIY plan like this one by businessinsider that creates an air conditioner that can chill a room down to 42 degrees Fahrenheit.

$40 DIY cooler plan
Image via: businessinsider

4- Spot Cooling

This is a great DIY air conditioner design by lifehacker to use when spot cooling is needed. A perfect unit to place beside a couch or chair for an extra bit of coolness.

DIY air conditioner
Image via: lifehacker

5- Portable Cardboard Air Conditioner

Another project for building a DIY air cooler like this one by homecrux with cardboard, you can actually create vents for blowing out air. It also includes holes so you can access the power button and temperature display. The best part is this DIY air conditioner is portable, allowing you to move it from room to room with ease. This is great if you’re only looking to cool down the room you’re currently using. The air conditioner is also a decent size, so you may decide to build a second one for your home, especially if you need a unit for another floor. Once again, you can find a way to dress up the box if you’re looking to add a little style to your unit, or you can leave it alone and focus on the cool air.

Portable Cardboard Air Conditioner
Image via: homecrux

6- Bucket DIY Air Conditioner

Use this budget-friendly building plan to create a stylish DIY bucket air conditioner at buzzfeed for under $60. The portability allows you to take it with you from room to room so you can keep cool anywhere in the house.

diy bucket air conditioner
Image via: buzzfeed

7- DIY Ice Cooler Air Conditioner

Transform an inexpensive Styrofoam cooler into a portable ice air conditioner like this one by theblaze that will lower the temperature in any room of your home.  Less than $20 will keep you cooler this summer.

Ice Cooler Air Conditioner
Image via: theblaze

8- Box Fan Cooling and Heating

Use these unique plans by instructables to build a unit that will cool the air and chill a beverage at the same time. This same DIY unit will heat the air and beverage during the winter months. All you need is a box fan, Styrofoam ice chest and some DIY ingenuity.

Box Fan Cooling and Heating
Image via: instructables

9- $20 Homemade Air Conditioner

Get cooler instantly when you create this simple and inexpensive homemade air conditioner at yahoo.com. An ice chest, bag of ice and small fan are the major components of this DIY build and the results are chilling.

$20 Air Conditioner
Image via: yahoo.com

10- Non-Electric DIY Air Cooler

No electricity needed for this diy swamp cooler collective-evolution. Great for off-grid camping or living, plus this plan recycles plastic bottles to create a homemade air conditioner without ice or the use of natural resources.

Non-Electric Air Cooler
Image via: collective-evolution

11- DIY Evaporative Cooler

Cool the air and your drinks with this unique evaporative cooling design like this one by instructables. Warm water is used to create an evaporation cooler that can chill you and three canned drinks at the same time.

unique evaporative cooling design
Image via: instructables

12- Homemade Solar Power Air Conditioner

Harness the power of the sun to cool down the inside temperature created by the sun with these easy plans. A solar powered bucket air conditioner like this one on youtube cost little to build and nothing to run.

diy bucket air conditioner
Image via: youtube

13- Cheap DIY Air Conditioner

Recycle an old five gallon bucket and small fan to create this efficient air conditioner bobvila that has the capacity to cool down an entire room.

Cheap Air Conditioner
Image via: bobvila

14- Simple Homemade Air Conditioner

This homemade air conditioner at wikihow is so simple, it boggles the mind. Three bottles of salted water and a fan are all that’s needed to keep you cool all day.

homemade air conditioner
Image via: wikihow

15- Effective and Inexpensive DIY Swap Cooler

Keep cool this summer without spending a lot of cash with these plans to create a ice chest air conditioner like this one by thrillist. It’s effective and portable so you can stay cooler inside or outside.

ice chest air conditioner
Image via: thrillist

16- Solar DIY Evaporative Cooler

Here are some DIY plans that will enable you to build a large air conditioner like this one by instructables that will cool your entire home with solar energy. Easy to build, cheap to operate.

Solar Evaporative Cooler
Image via: instructables

17- Well Water Cooler

Perfect DIY design for an air conditioning unit by instructables if you have well water at home. Well water is typically very cold and that coldness can easily be harnessed and used to cool your home with these step-by-step instructions.

DIY design for an air conditioning unit
Image via: instructables

18- DIY Swamp Cooler

Go anywhere cooling power is what this homemade swamp cooler by instructables will provide you with. Battery power runs this ice chest cooler and it provide enough cooling power for for an off-grid camping trip.

DIY Swamp Cooler
Image via: instructables

19- Cool Air From A Hot Water Heater

It may sound unbelievable, but you can actually build a DIY air conditioner like this one by hackaday from a hot water heater. There may be a broken water heater sitting in your house, ready to be taken to the junkyard. Donor parts such as a refrigerator compressor are also necessary for this project. You may be able to find these parts around the house or at your local junkyard, giving you the option to live a little greener by reusing old parts. Reusing older parts is also a great way to save money on your homemade air cooler, you just have to play around to see which parts work the best. When you’re finished, you have an alternative to central air conditioning, which is essential when the weather warms up.

Cool Air From A Hot Water Heater
Image via: hackaday

20- DIY Air Cooler From A Bucket

You can learn how to make air conditioner like this one by offgridsurvival with a bucket, which is the perfect DIY swamp cooler for your next camping trip. Of course, you need something to circulate the air, and this is where a computer case fan comes in. Use a high-speed fan to circulate a good amount of cool air. If you’re looking for another way to build a homemade air conditioner without ice, you can rest assured that 2 ½ gallons of cold water are enough to create cool air with this device.

DIY swamp cooler
Image via: offgridsurvival

21- Handheld DIY Air Conditioner

A handheld DIY air conditioner like this one by instructables is an eco-friendly, portable device that doesn’t cost a lot of money to build. In fact, you’re building this air conditioner with ice water, as well as a stainless steel thermos and fan. You don’t even need to worry about using a lot of parts because it runs on four AA batteries. This homemade air conditioner is similar to the box fan and cooler project, as it uses tubing to pump the ice water and circulate cool air. Whether you’re at home or the park, you can easily carry your handheld air conditioner with you.

 DIY air conditioner
Image via: instructables

22- DIY Air Conditioner For Your Van

Going on a drive in a hot van is never any fun, but you can solve this problem by building an air conditioner like this one on youtube for your van. It’s amazing what you can do with a cooler, fan motor and several bags of ice. You can power it up by plugging it into the USB port. One idea is to use an infrared thermometer to keep track of the temperature, since your unit may not include a thermostat or display. Whether you’re taking a road trip with friends or working as a delivery driver, an air conditioner for your van can keep you cool in the hot weather.

23- Cardboard Box Air Conditioner

That’s right, you’re building a homemade air conditioner like this one by blog.hackster.io with cardboard boxes. With three fans at two temperatures, you’re sure to keep a smaller space cool when the temperature rises. Now, you may not want to move three cardboard air conditioners, so it’s important to place them in a spot that cools your preferred area. If you’re worried about aesthetics, you can always find a way to decorate the cardboard boxes. One idea is to use cardboard boxes from store-bought items, as they won’t be as plain to look at. Living on a budget doesn’t mean you should suffer from the heat, so use this DIY air conditioner with fan to stay cool even when your funds are limited.

Cardboard Box Air Conditioner
Image via: blog.hackster.io

Conclusion

Remember, when using ice for your DIY air conditioner, you want to give it about 20 minutes for the ice to cool the interior of the device.

As you can see, there are several choices for building a homemade air conditioner. You can build a unit for your home or van, or you can build a handheld unit to carry with you. A DIY air conditioner is a great way to stay cool regardless of your budget.